

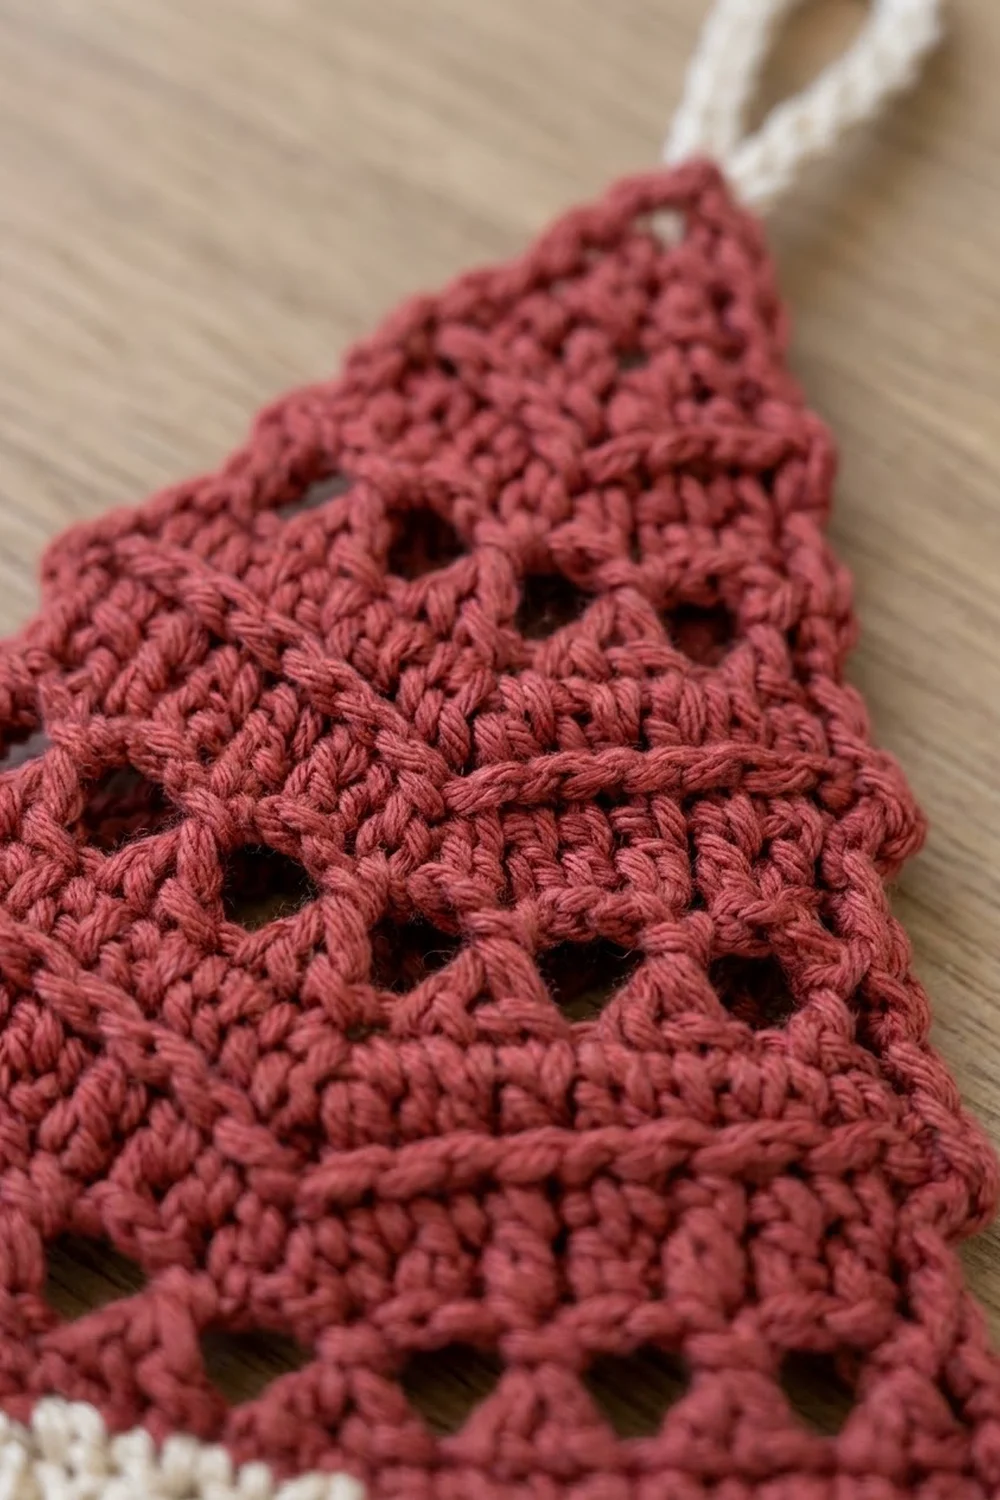
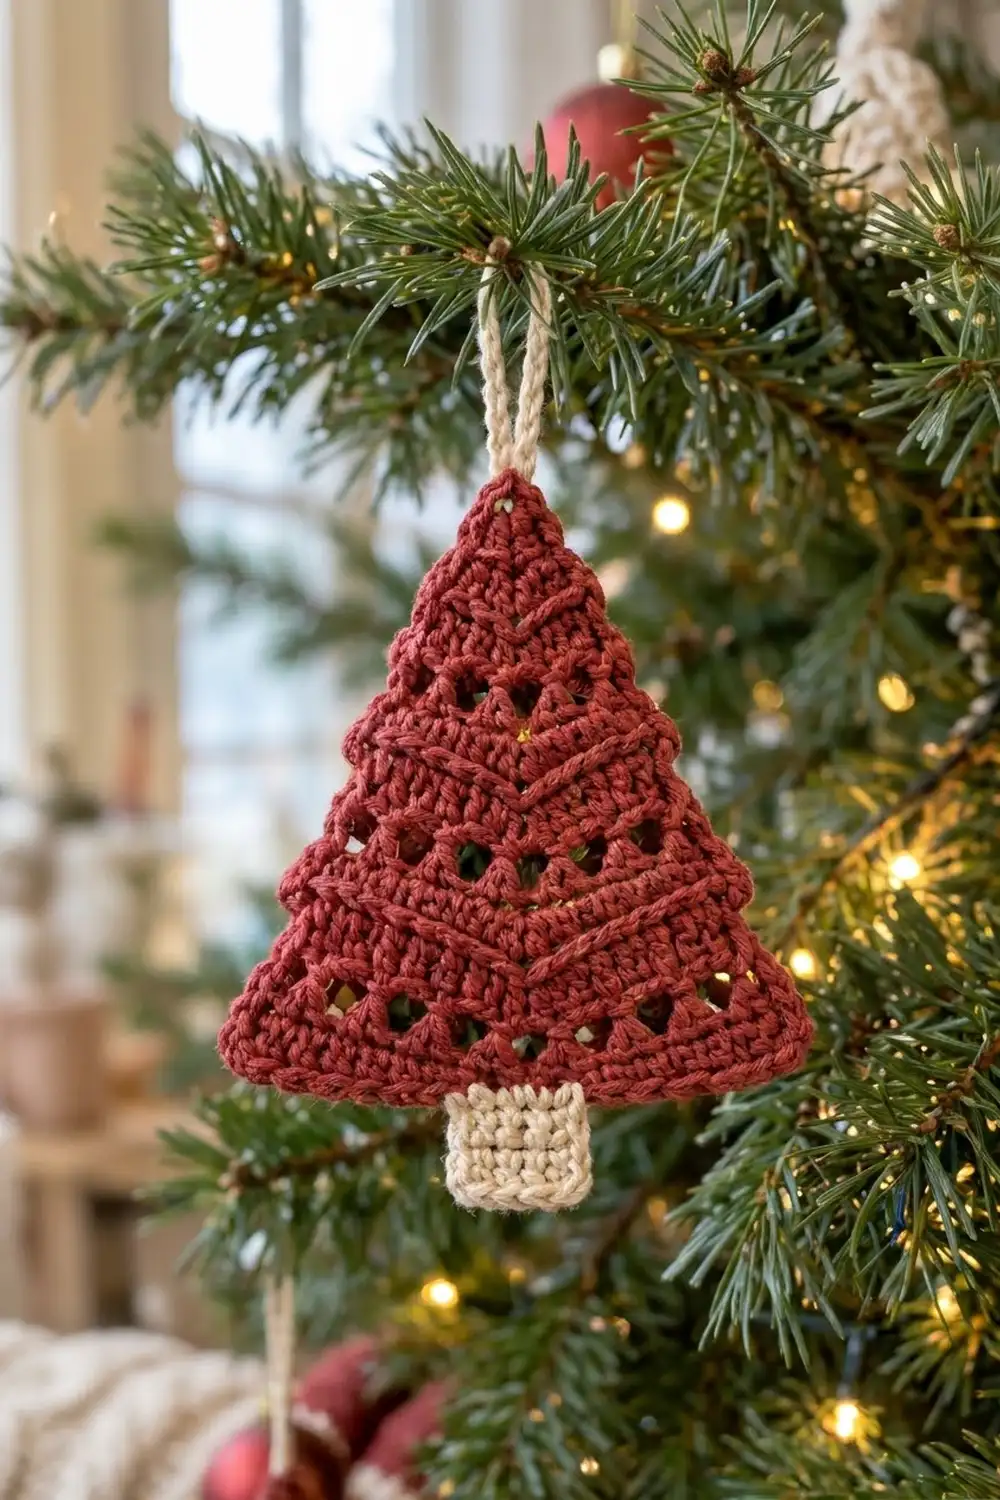
This little tree is a quick, satisfying ornament with a lot of texture for its size. Solid double crochet bands alternate with rows of small eyelets, and raised ridge lines divide the tiers. A crisp single crochet edge finishes it with a sharp point at the top.
The palette is classic and cozy: a deep cranberry red for the tree, with a cream trunk and a matching cream hanging loop. It looks rustic and Scandinavian on a real evergreen. It also works well as a gift topper or as a garland charm if you make several.
The pattern uses US crochet terms. The finished ornament measures about 4.25 in (10.8 cm) wide and 4.75 in (12.1 cm) tall for the tree. With the trunk, it is 5.75 in (14.6 cm) tall, not counting the loop.
You work the tree flat in rows from the tip down, adding stitches at both edges on every double crochet row. Then you add a single crochet border around the triangle and work the trunk in rows off the bottom edge. The hanging loop goes on last.
Finished Size and Construction
- Finished size (tree only): 4.25 in (10.8 cm) wide × 4.75 in (12.1 cm) tall
- Finished size with trunk: 4.25 in (10.8 cm) wide × 5.75 in (14.6 cm) tall
- Skill level: Easy / advanced beginner
- Terminology: US crochet terms
- Yarn weight: DK (light worsted, #3) cotton or cotton blend
- Hook: 3.5 mm (E-4)
- Number of pieces: 1 (the trunk and loop are worked directly onto the tree)
- Layout: single ornament, no joining
- Tree body before border: about 3.75 in (9.5 cm) wide × 4.25 in (10.8 cm) tall
- Border depth: 1 round of sc, about 0.25 in (0.6 cm)
- Trunk: 1.1 in (2.8 cm) wide × 1 in (2.5 cm) tall
Materials
Yarn: Choose a smooth DK cotton or cotton blend so the eyelets and ridges show clearly. Mercerized cotton gives the crispest edges. Matte cotton gives the soft, homespun look in the photos.
- Cranberry red (tree and border): 12 g, about 26 m
- Cream (trunk and loop): 4 g, about 9 m
These quantities include a margin for your gauge swatch-checks and yarn tails. One standard 50 g ball of each color makes several ornaments.
Tools:
- 3.5 mm (E-4) crochet hook
- Tapestry needle
- Scissors
- Stitch markers (2)
- Ruler or tape measure
- Blocking mat and rust-proof pins
- Spray bottle with water
Abbreviations (US Terms)
- ch – chain
- sl st – slip stitch
- sc – single crochet
- dc – double crochet
- st(s) – stitch(es)
- sp – space
- sk – skip
- BLO – back loop only
- FLO – front loop only
- RS / WS – right side / wrong side
Special technique – ridge row: You work the ridge rows in sc through one loop only, so the unused loop stays on the RS as a raised line. On RS rows, work in the BLO. On WS rows, work in the FLO. Either way, the free loop sits on the RS.
Stitch counting: In the eyelet rows, each ch-1 space counts as 1 stitch. The beginning ch 3 of a dc row counts as 1 dc. The ch 1 at the start of an sc row does not count.
Gauge and Checkpoints
Gauge:
- 18 dc and 8 dc rows = 4 in (10.2 cm)
- 18 sc and 16 sc rows = 4 in (10.2 cm)
That means each dc row is about 0.5 in (1.3 cm) tall and each sc row is about 0.25 in (0.6 cm) tall.
Test the ornament itself. Because the piece is small, the first few rows work as your gauge swatch. Measure at these checkpoints:
- After Row 4 (9 sts): about 2 in (5.1 cm) wide at the last row, and 1.5 in (3.8 cm) tall from the tip
- After Row 8 (13 sts): about 2.9 in (7.4 cm) wide, and 3 in (7.6 cm) tall
- After Row 11 (17 sts): about 3.75 in (9.5 cm) wide, and 4.25 in (10.8 cm) tall
If your tree is too big, go down to a 3.25 mm (D-3) hook. If it’s too small, go up to a 3.75 mm (F-5) hook. If the width is right but the tree is too tall, your dc stitches are loose. Pull the first wrap of each dc snug.
Tree Body
Use cranberry red and a 3.5 mm hook. You work in turned rows from the tip down. Mark Row 1 as the RS.
Row 1 (RS): Ch 2. Work 3 sc in the 2nd ch from the hook. Turn. (3 sts)
Row 2 (WS): Ch 1. Work 2 sc in the first st, sc in the next st, and 2 sc in the last st. Turn. (5 sts)
Row 3 (RS, eyelet row): Ch 3 (counts as dc). Dc in the first st. Ch 1, sk next st, dc in next st, ch 1, sk next st, 2 dc in last st. Turn. (7 sts: 5 dc + 2 ch-1 sps)
Row 4 (WS, solid row): Ch 3. Dc in the first st. Dc in each dc and in each ch-1 sp across to the last st. Work 2 dc in the top of the turning ch. Turn. (9 sts)
Checkpoint: about 2 in (5.1 cm) wide.
Row 5 (RS, ridge row): Ch 1. Sc in the BLO of each st across, including the top of the turning ch. Turn. (9 sts, no increase)
Row 6 (WS, eyelet row): Ch 3. Dc in the first st. Repeat [ch 1, sk next st, dc in next st] 3 times. Ch 1, sk next st, 2 dc in last st. Turn. (11 sts: 7 dc + 4 ch-1 sps)
Row 7 (RS, solid row): Ch 3. Dc in the first st. Dc in each st and ch-1 sp across to the last st. Work 2 dc in the top of the turning ch. Turn. (13 sts)
Row 8 (WS, ridge row): Ch 1. Sc in the FLO of each st across. Turn. (13 sts)
Checkpoint: about 2.9 in (7.4 cm) wide and 3 in (7.6 cm) tall.
Row 9 (RS, eyelet row): Ch 3. Dc in the first st. Repeat [ch 1, sk next st, dc in next st] 5 times. Ch 1, sk next st, 2 dc in last st. Turn. (15 sts: 9 dc + 6 ch-1 sps)
Row 10 (WS, solid row): Ch 3. Dc in the first st. Dc in each st and ch-1 sp across to the last st. Work 2 dc in the top of the turning ch. Turn. (17 sts)
Row 11 (RS, ridge row): Ch 1. Sc in the BLO of each st across. (17 sts) Do not turn and do not fasten off. Continue straight into the border.
Checkpoint: about 3.75 in (9.5 cm) wide and 4.25 in (10.8 cm) tall.
Why the shape works: Each dc row adds 1 st per side, which is about 0.22 in (0.6 cm) of width per side for every 0.5 in (1.3 cm) of height. The ridge rows add height without width, which keeps the tree slim and pointed instead of turning into a wide, flat triangle. The eyelets grow 2, 4, 6 down the tiers because each eyelet row is 4 sts wider than the one before.
Border
Border gauge: The border sc should match the body gauge of 18 sc = 4 in (10.2 cm). The edge should lie flat with no ruffling or cupping.
Row-end counts per slanted side:
| Row type | Rows | sc per row end | Total |
|---|---|---|---|
| Sc rows | 1, 2, 5, 8 | 1 | 4 |
| Eyelet dc rows | 3, 6, 9 | 3 | 9 |
| Solid dc rows | 4, 7, 10 | 2 | 6 |
| Side total | 19 sc |
In this pattern, the corner groups are counted separately from the side counts.
Border Round (RS): Continue from the end of Row 11 and turn the piece so you can work up the left slanted edge.
- Work 19 sc evenly along the row ends up to the tip, following the table above.
- At the tip, ch 2. This makes the point and the loop anchor.
- Work 19 sc down the right slanted edge in the same way.
- Work 3 sc in the first st of Row 11 (bottom-right corner).
- Sc in each of the next 15 sts.
- Work 3 sc in the last st of Row 11 (bottom-left corner). This is the same stitch the border started from.
- Sl st to the first sc and fasten off.
Border count: 19 + 19 + 3 + 15 + 3 = 59 sc, plus 1 ch-2 tip sp.
Why the math works:
- Bottom edge: The 15 straight sc plus the 2 corner stitches equal the 17 sts of Row 11, one stitch per stitch.
- Slanted sides: Each side is about 4.25 in (10.8 cm) along the stepped edge. 19 sc at 4.5 sc per inch is about 4.2 in (10.7 cm), so the edge lies flat.
- Eyelet rows get 3 sc per row end because their increase edge is the loosest.
- Solid rows get 2 sc per row end.
- Sc rows get 1 sc per row end.
The border adds about 0.25 in (0.6 cm) on every edge. That brings the tree to about 4.25 in (10.8 cm) wide and 4.75 in (12.1 cm) tall.
Trunk
Use cream. Work in rows directly off the bottom edge of the border.
The bottom edge has 21 sts: a 3-sc corner group, 15 straight sc, and another 3-sc corner group. The trunk sits on the center 5 sts, which are the 6th through 10th of the 15 straight sc.
Row 1 (RS): With the RS facing and the bottom edge at the top, count to the 6th of the 15 straight sc, starting from the right corner group. Join cream with a sl st there. Ch 1, then sc in the same st and in each of the next 4 sts. Turn. (5 sc)
Rows 2–4: Ch 1. Sc in each st across. Turn. (5 sc)
Fasten off after Row 4. The trunk measures about 1.1 in (2.8 cm) wide and 1 in (2.5 cm) tall.
There are 5 free sts on each side of the trunk: the 3 corner sc plus 2 straight sc. If the trunk is off-center, pull it out and recount.
Hanging Loop
- Join cream with a sl st in the tip ch-2 sp.
- Ch 18, then sl st in the same ch-2 sp to form the loop.
- Work 24 sc tightly over the ch-18 loop to make a firm, corded hanger.
- Sl st in the tip sp and fasten off.
The loop stands about 1.75 in (4.4 cm) tall.
Weave in all ends inside the solid dc rows, not through the eyelets.
Final Blocking
- Mist the ornament evenly with the spray bottle until it is damp but not soaked.
- Lay it RS up on the blocking mat.
- Pin the tip and both bottom corners first, making the base 4.25 in (10.8 cm) wide.
- Measure from the base to the tip and adjust the pin to 4.75 in (12.1 cm).
- Add 3 pins along each slanted edge so the sides are straight, not curved inward.
- Pin the trunk square at 1.1 in × 1 in (2.8 cm × 2.5 cm).
- Gently open each eyelet with a fingertip.
- Shape the hanging loop upright and let it dry fully, usually 4–6 hours.
- For a firmer ornament, mist lightly with fabric stiffener before drying.
Final Quality-Control Checklist
- Row stitch counts: 3, 5, 7, 9, 9, 11, 13, 13, 15, 17, 17
- Eyelet rows show 2, 4, and 6 holes, centered in each tier
- All three ridge lines appear on the RS
- The border has 59 sc plus the tip ch-2 sp
- Both slanted sides are the same length and lie flat
- The trunk is centered with 5 border sts free on each side
- Finished tree: 4.25 in (10.8 cm) × 4.75 in (12.1 cm)
- The loop is firm and sits straight at the tip
- All ends are woven in securely and invisibly
Troubleshooting
- Ridge on the wrong side: You used the wrong loop. Use the BLO on RS rows and the FLO on WS rows.
- Eyelets off-center: You miscounted the repeat. Rows 3, 6, and 9 should have 2, 4, and 6 ch-1 spaces.
- Tree too wide: Your increases may be doubled. Increase only on dc rows.
- Wavy sides: Too many border sc. Return to 19 per side.
- Sides pulling in: Too few border sc or tight tension. Add 1 sc per eyelet-row end only if needed.
- Floppy loop: Pack the sc more tightly over the chain.
- Trunk too narrow: Your gauge is tight. Go up a hook size for the trunk only.
Care
Hand wash in cool water with mild soap, press out the water in a towel, and lay flat to dry. Reshape and re-pin if needed. Store flat or hang by the loop.
Final Notes
The measurement chain is short and easy to check:
- Row 4 is 2 in (5.1 cm) wide.
- Row 8 is 2.9 in (7.4 cm) wide.
- Row 11 is 3.75 in (9.5 cm) wide and 4.25 in (10.8 cm) tall.
- The border brings the tree to 4.25 in × 4.75 in (10.8 cm × 12.1 cm).
- The trunk adds 1 in (2.5 cm), for a total height of 5.75 in (14.6 cm).
If each checkpoint matches, the finished ornament will too. Make one, then a whole forest for your tree.
Happy crocheting!