

The Sage Flutter curtain is a lacy panel made from crochet butterflies joined at their wing tips. Each butterfly has a plump, ridged body, two antennae with knobbed tips and four wings. Every wing is a band of radiating double crochet around a large open teardrop, so light passes through the wings as well as the gaps between motifs.
The sample uses one soft sage green cotton. The look is calm, botanical and a little vintage. It suits a sunny window where you want privacy without blocking the light.
This pattern uses US crochet terms. One finished panel measures 25 in (63.5 cm) wide by 51 in (129.5 cm) tall. With the hanging tabs, the total drop is 52.5 in (133.4 cm). Make two panels for a pair, as in the photo.
Each butterfly is made separately. You crochet the body first, then the antennae, then each wing back and forth over a chain loop anchored to the body. From the second motif on, you join each butterfly to its neighbors through picots on the last wing row (join-as-you-go). A three-round border straightens all four edges, and eight tabs along the top hold the rod.
Finished Size and Construction
- Finished panel size: 25 in x 51 in (63.5 cm x 129.5 cm), plus 1.5 in (3.8 cm) tab loops
- Skill level: Intermediate
- Terminology: US
- Yarn weight: DK (#3) cotton
- Hook: 4.0 mm (G-6)
- Number of pieces: 40 butterfly motifs per panel
- Layout: 4 motifs across x 10 motifs down
- Motif size: 6 in wide x 5 in tall (15.2 cm x 12.7 cm), measured from picot tip to picot tip
- Size before border: 24 in x 50 in (61.0 cm x 127.0 cm)
- Border depth: 0.5 in (1.3 cm) on each side
Materials
Choose a smooth mercerized or soft combed DK cotton of about 110 m per 50 g. Cotton holds its shape at a window and blocks crisply. Avoid fuzzy yarns, because they blur the open teardrops.
- Sage green: 300 g / 660 m per panel (600 g / 1,320 m for a pair)
These amounts include a margin of about 10% for swatching and joining.
Tools:
– 4.0 mm (G-6) crochet hook
– Tapestry needle
– 4 locking stitch markers
– Rust-proof pins and foam blocking mats
– A paper blocking template, 6 in x 5 in (15.2 cm x 12.7 cm)
– Measuring tape
Abbreviations (US Terms)
- ch: chain
- sl st: slip stitch
- sc: single crochet
- hdc: half double crochet
- dc: double crochet
- BLO: back loop only
- st(s): stitch(es)
- RS: right side
Special stitches:
- Join picot (jp): Ch 5, sl st in 5th ch from hook to form a small ring. Picots are not counted as stitches.
- Joined picot (jjp): Ch 2, sl st into the ring of the matching jp on the neighboring motif, ch 2, sl st in the base of this picot.
- Antenna: Ch 10, sl st in 4th ch from hook (this forms the knob), sl st in each of next 6 ch.
Gauge and Checkpoints
Border gauge: 13 sc = 3 in (7.6 cm), and 4 rows of sc = 1 in (2.5 cm).
Motif gauge: One blocked motif measures 6 in x 5 in (15.2 cm x 12.7 cm) between picot tips.
Make and block one test motif before you start the panel. Check it against these measurements:
- Body after Rnd 1: 2.5 in (6.4 cm) long.
- One side with both wings done: 3 in (7.6 cm) from the body centerline to the side picots.
- Finished motif: top picots 3 in (7.6 cm) apart, bottom picots 3 in (7.6 cm) apart, and side picots 2.5 in (6.4 cm) apart vertically.
If the motif is too big, go down 0.5 mm in hook size. If it is too small, go up 0.5 mm. An error of only 0.25 in (0.6 cm) per motif adds up to 2.5 in (6.4 cm) over 10 rows.
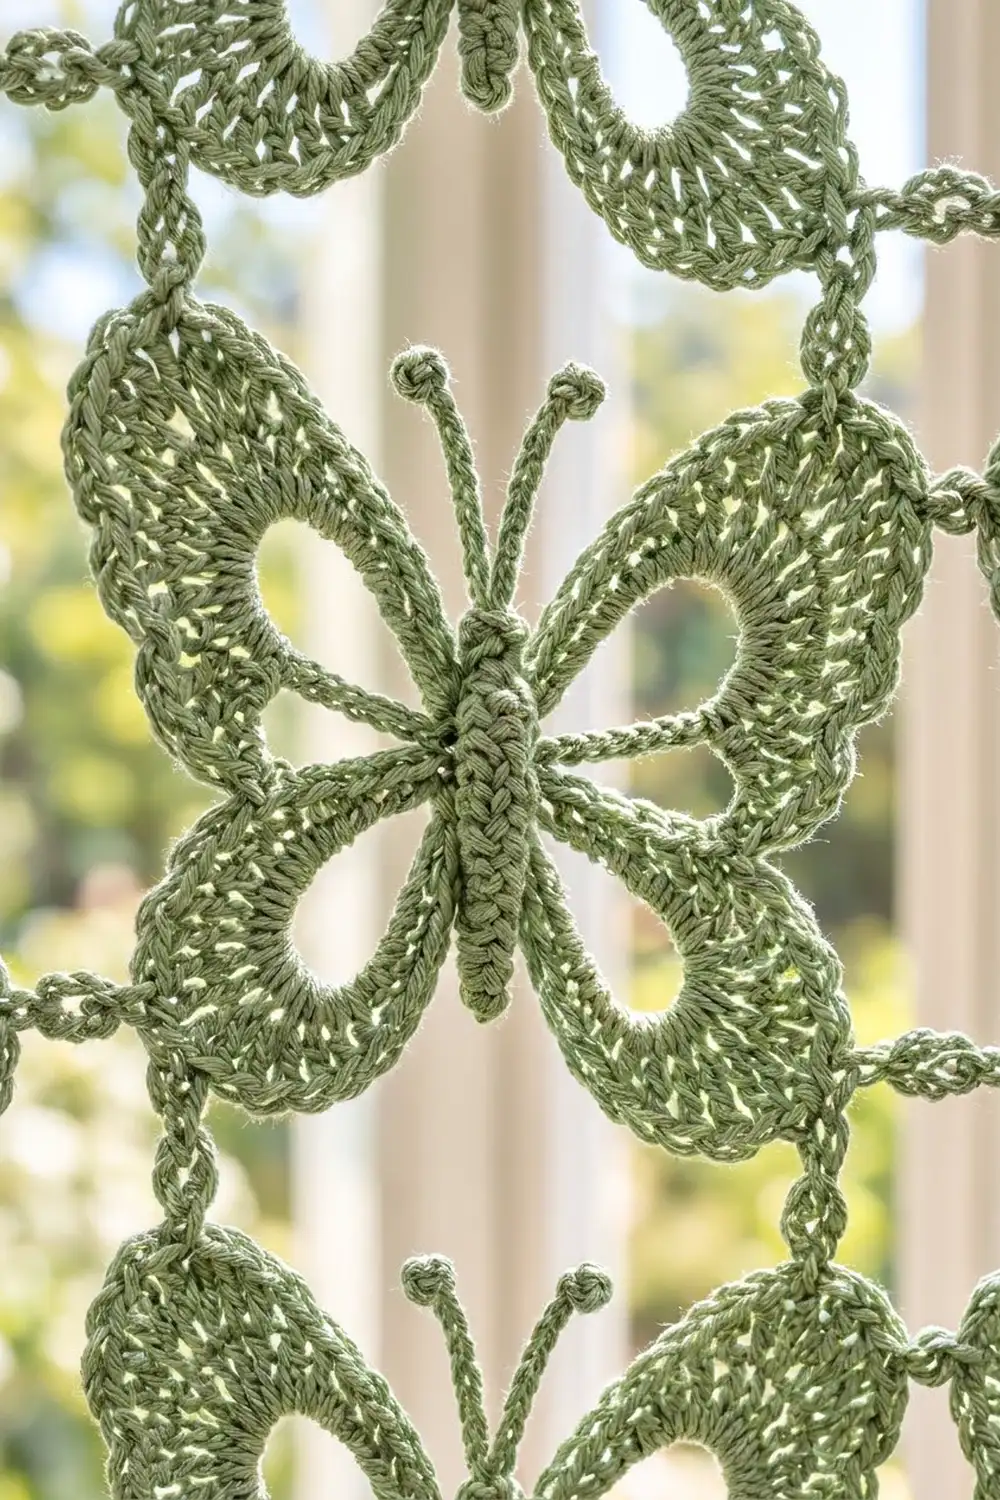
Butterfly Motif
Body
Ch 12.
Rnd 1: Sc in 2nd ch from hook and next 9 ch, 3 sc in last ch. Working along the other side of the foundation, sc in next 9 ch, then 2 sc in the last ch (the one that already holds a sc). Do not join. (24 sc)
The starting end is the tail and the 3-sc end is the head:
– Sts 1–10 run up side A.
– Sts 11–13 form the head.
– Sts 14–22 run down side B.
– Sts 23–24 form the tail.
Rnd 2: Sc in BLO of each st around, sl st to first sc. (24 sc)
The unused front loops make a raised ridge around the body. The stitch numbers stay the same as in Rnd 1. Fasten off.
Antennae
Join yarn with sl st in st 11. Make 1 antenna, then sl st in st 11, st 12 and st 13. Make 1 antenna, then sl st in st 13. Fasten off. (2 knobbed antennae)
Wing Rows
Each wing is worked back and forth over a chain loop. End every row with a sl st into the body stitch that anchors that end of the loop, then turn. The wing fabric looks the same on both sides.
Right Upper Wing (Side A)
Join yarn with sl st in st 9. Ch 20, sl st in st 6. This forms the teardrop loop.
Row 1: Turn, sc in each ch of loop. (20 sc)
Row 2: Sc in next 2 sts, hdc in next st, dc in next 2 sts, (2 dc in next st, dc in next st) 5 times, dc in next 2 sts, hdc in next st, sc in next 2 sts. (25 sts)
Row 3: Sc in next 2 sts, hdc in next st, dc in next 2 sts, (2 dc in next st, dc in next 2 sts) 5 times, dc in next 2 sts, hdc in next st, sc in next 2 sts. (30 sts)
Row 4: Sc in next 10 sts, jp, sc in next 10 sts, jp, sc in last 10 sts. (30 sc + 2 jp)
Row 4 runs from the head end toward the tail. The first jp is therefore the top picot and the second is the side picot.
Right Lower Wing (Side A)
Sl st in st 5. Ch 14, sl st in st 2.
Row 1: Turn, sc in each ch of loop. (14 sc)
Row 2: Sc in next 2 sts, hdc in next st, dc in next st, (2 dc in next st, dc in next st) 3 times, dc in next st, hdc in next st, sc in next 2 sts. (17 sts)
Row 3: Sc in next 2 sts, hdc in next st, dc in next st, (2 dc in next st, dc in next 2 sts) 3 times, dc in next st, hdc in next st, sc in next 2 sts. (20 sts)
Row 4: Sc in next 7 sts, jp, sc in next 6 sts, jp, sc in last 7 sts. (20 sc + 2 jp)
The first jp is the side picot and the second is the bottom picot. Fasten off.
Left Wings (Side B)
Upper wing: Join with sl st in st 15, ch 20, sl st in st 18. Work Rows 1–4 as for the right upper wing.
Lower wing: Sl st in st 19, ch 14, sl st in st 22. Work Rows 1–4 as for the right lower wing. Fasten off.
Each motif now has 8 picots: 2 top, 2 bottom and 4 side. Weave in the ends along the body.
Make All Pieces
Make 40 motifs per panel, all in sage green (80 for a pair). Only Motif 1 is made on its own. You join every later motif while you work its Row 4.
Layout (rows top to bottom, columns left to right):
Row 1:   B  B  B  B
Row 2:   B  B  B  B
Row 3:   B  B  B  B
 ...
Row 10:  B  B  B  B
Joining
Use join-as-you-go. On Row 4, wherever a picot meets a picot on a finished motif, work a jjp instead of a jp. The stitch counts do not change: each jjp simply takes the place of a jp.
Stitch-to-stitch logic:
– Side joins: Each left-wing side picot joins the matching right-wing side picot of the motif to its left, upper to upper and lower to lower.
– Vertical joins: Each top picot joins the bottom picot directly above it.
– Per panel: 60 side joins (3 seams x 2 picots x 10 rows) plus 72 vertical joins (9 seams x 2 picots x 4 columns), for 132 joins in total.
Tension: Make the 2-ch legs of each jjp at your normal chain tension. Tight legs pucker the grid, and loose legs let the motifs sag when the panel hangs.
Size checkpoint: Row 1 should measure 24 in (61.0 cm) across. Each new row adds 5 in (12.7 cm). The full grid measures 24 in x 50 in (61.0 cm x 127.0 cm).
Border
Border gauge: 13 sc = 3 in (7.6 cm). The 4 corner stitches are counted separately and are not included in the per-side numbers below.
Rnd 1 (chain frame): With RS facing, join with sc in the top picot of the upper-left wing of the top-left motif. Then work around the panel:
- Top edge: (Ch 12, sc in next top picot) 7 times, ch 6.
- Top-right corner: Ch 1 and mark it as the corner.
- Right edge: Ch 5, sc in first side picot, (ch 10, sc in next side picot) 19 times, ch 5.
- Bottom-right corner: Ch 1 and mark it.
- Bottom edge: Ch 6, sc in first bottom picot, (ch 12, sc in next bottom picot) 7 times, ch 6.
- Bottom-left corner: Ch 1 and mark it.
- Left edge: Ch 5, sc in first side picot, (ch 10, sc in next side picot) 19 times, ch 5.
- Top-left corner: Ch 1 and mark it, ch 6, sl st to first sc.
Rnd 1 counts:
– Top and bottom: 6 + 8 sc + 84 ch + 6 = 104 sts each (4 motifs x 26).
– Left and right: 5 + 20 sc + 190 ch + 5 = 220 sts each (10 motifs x 22).
– Total: 104 + 104 + 220 + 220 + 4 corners = 652 sts.
Rnd 2: Ch 1, sc in each sc and each ch around (insert the hook under 2 loops of each ch), 3 sc in each corner ch, sl st to first sc. (652 sts worked 1-per-stitch + 8 extra = 660 sts)
Rnd 3: Ch 1, sc in each st around, 3 sc in the center st of each corner group, sl st to first sc. (660 sts worked 1-per-stitch + 8 extra = 668 sts)
After Rnd 3, not counting the 4 corner centers, the top and bottom have 108 sts each and the sides have 224 sts each. Check: 108 + 108 + 224 + 224 + 4 = 668.
Hanging tabs:
1. Start after the top-left corner center and skip the first 6 of the 108 top sts.
2. Join with sc in next st, sc in next 4 sts. (5 sc)
3. Rows 2–12: Ch 1, turn, sc in each st. (5 sc) Fasten off, leaving a 10 in (25.4 cm) tail.
4. Skip 8 sts and repeat Steps 2–4 for 7 more tabs. This leaves 6 sts after the last tab. (6 + 8 tabs x 5 + 7 gaps x 8 + 6 = 108)
Fold each tab to the back and sew its last row to the back of Rnd 2. Each tab forms a 1.5 in (3.8 cm) loop that fits a rod up to 0.75 in (1.9 cm) across.
Why the math works:
– Along the top and bottom, the picots sit 3 in (7.6 cm) apart. The 13-st repeat (sc + ch 12) is exactly 3 in at border gauge.
– Down the sides, the picots sit 2.5 in (6.4 cm) apart. The 11-st repeat (sc + ch 10) is within 2% of that.
– The corner runs (ch 6 and ch 5) cover the 1.5 in (3.8 cm) and 1.25 in (3.2 cm) from the outer picots to the corners.
Because the chain lengths match the picot spacing, the frame lies flat without pulling the wing tips in or rippling. The tab centers also fall 13 sts apart, so each tab sits directly above a top picot.
Final Blocking
- Soak the panel in cool water for 15 minutes, then gently press out the water. Do not wring it.
- Roll the panel in towels to remove more water.
- Lay it on the mats in sections, starting with the top two rows of motifs.
- Pin every picot tip using the template. Keep picots 3 in (7.6 cm) apart across and 2.5 in (6.4 cm) apart vertically.
- Pin each teardrop open at its widest point, and shape the antennae into a soft V.
- Pin the border straight along a measuring tape at 25 in x 51 in (63.5 cm x 129.5 cm).
- Let each section dry completely before you move to the next one.
Final Quality-Control Checklist
- 40 motifs, each with 4 open teardrops and 2 knobbed antennae
- 132 joins, with no picots skipped or twisted
- Border Rnd 3 counts of 108 / 224 / 108 / 224, plus 4 corner sts
- 8 evenly spaced tabs, each securely sewn
- Panel measures 25 in x 51 in (63.5 cm x 129.5 cm)
- All ends woven in along the bodies or the border
Troubleshooting
- Wings cup: Loosen your tension on the dc in Rows 2–3.
- Wings ruffle: Recount Rows 2 and 3. They should have 25 and 30 sts on upper wings and 17 and 20 on lower wings.
- Teardrops close up: Work the loop chain more loosely, or use a hook one size larger for the chain.
- Panel leans: Check that each side picot is joined to its match, upper to upper and lower to lower.
- Border waves: Your Rnd 1 chains are too loose. Go down 0.5 mm.
- Border pulls in: Your chains are too tight. Chain more loosely, then re-block.
Care
Hand wash in cool water with mild soap and lay flat to dry, re-pinning the picots as needed. Don’t tumble dry the panel or hang it while it’s wet.
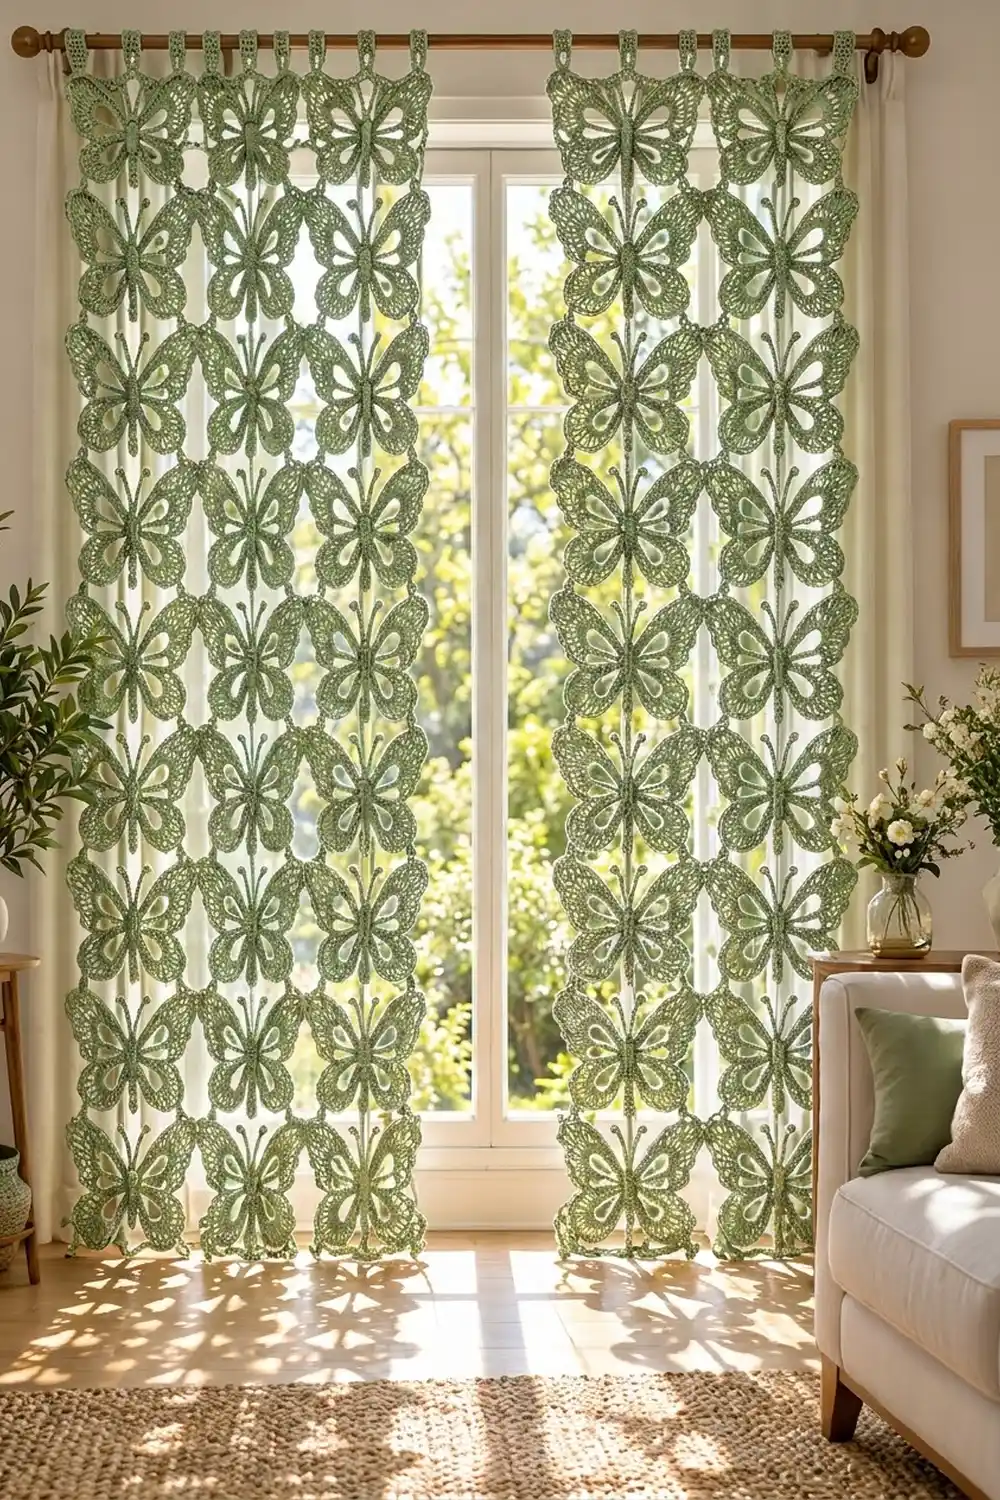
Final Notes
The measurements build on each other. Each motif is 6 in x 5 in (15.2 cm x 12.7 cm), so the 4 x 10 grid is 24 in x 50 in (61.0 cm x 127.0 cm). The border adds 0.5 in (1.3 cm) on every side, bringing the panel to 25 in x 51 in (63.5 cm x 129.5 cm). The tabs then bring the drop to 52.5 in (133.4 cm). If your first motif measures correctly, the rest of the panel will too. Happy crocheting!