

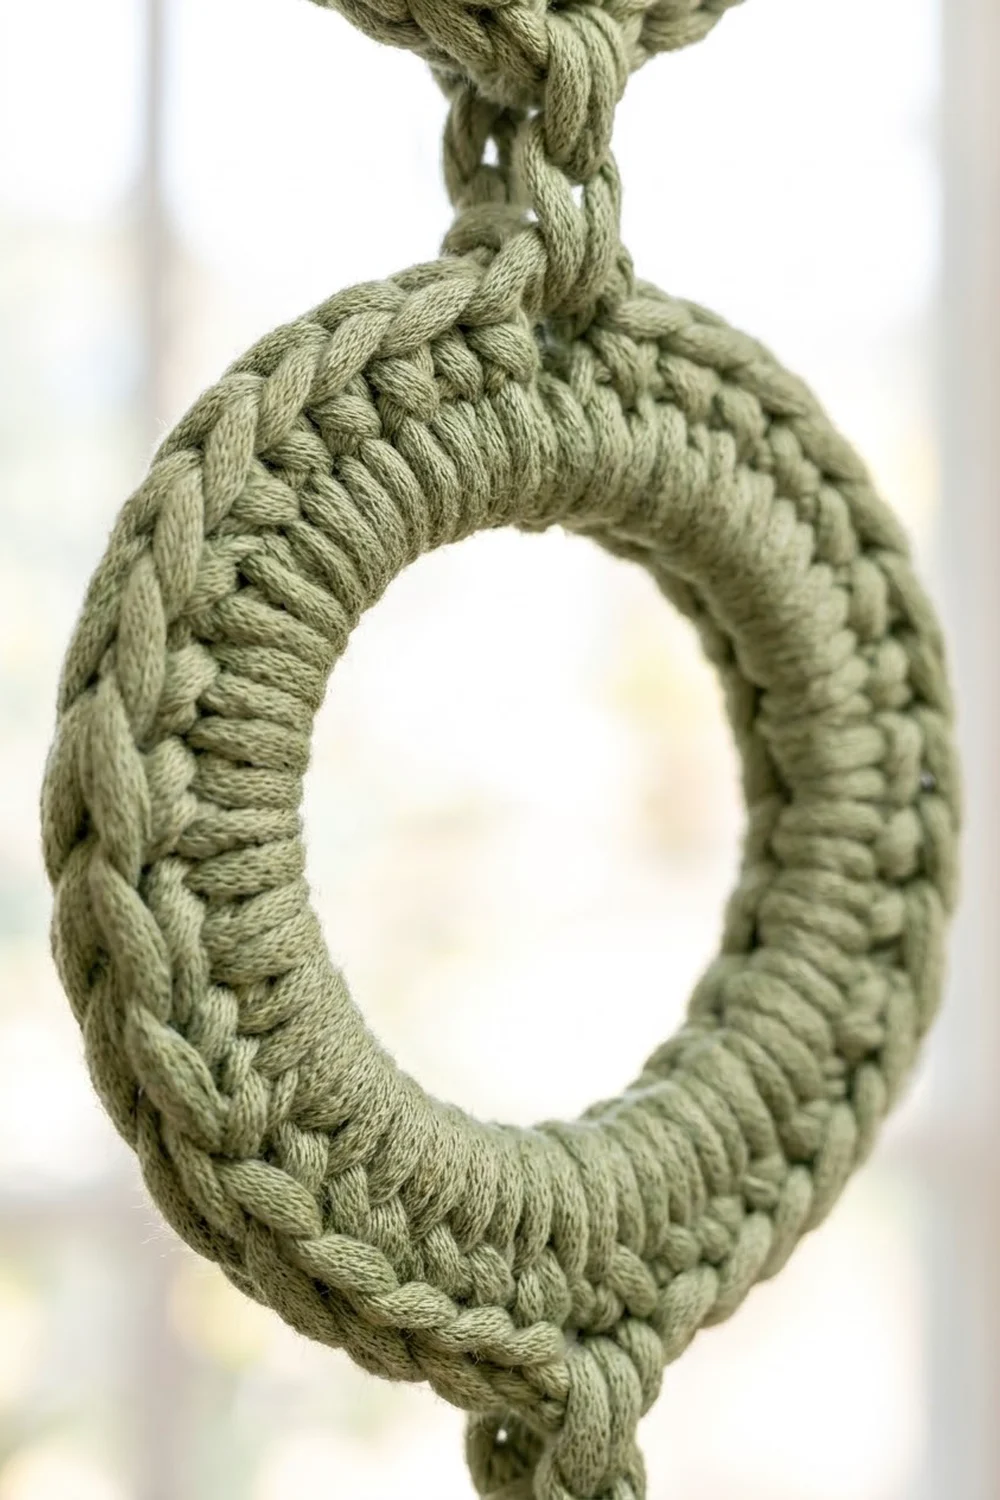
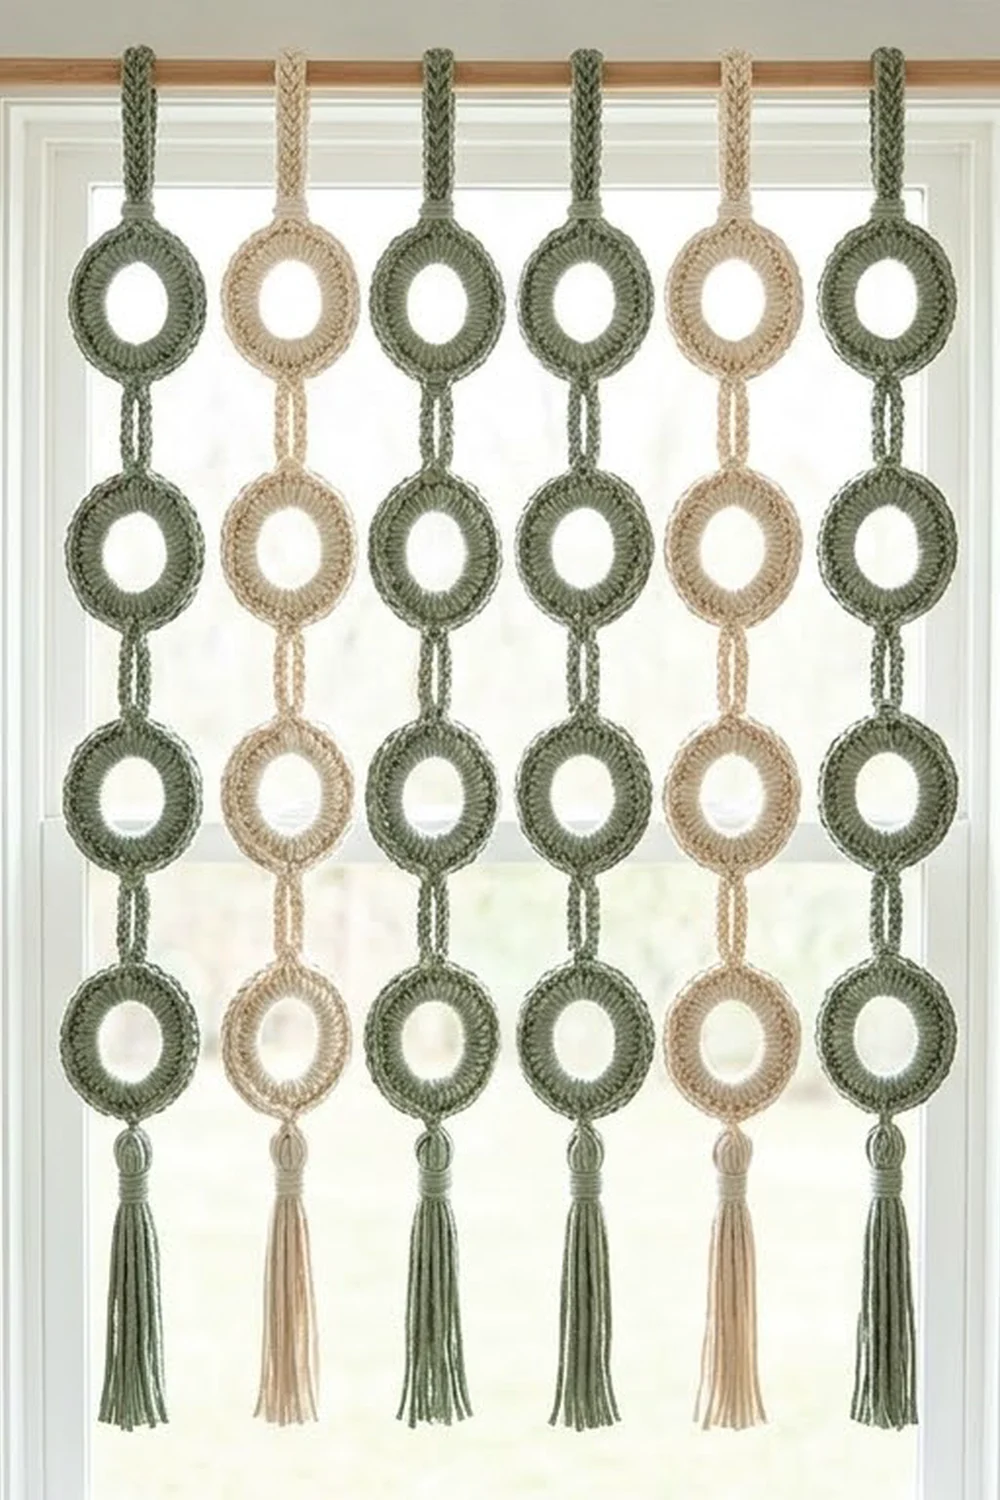
The Sage Hoop Cascade is a light, airy ring curtain built from small padded crochet rings. Each ring is a chunky little donut with a crisp, braided outer edge. Six rings hang in a column, joined by short chain links, and each column ends in a full tassel.
The palette is calm and natural: muted sage green and soft cream, alternating strand by strand across the rod. The look is modern boho. It works in a window, a doorway nook, a closet opening, or as a wall feature behind a bed or shelf.
This pattern uses US crochet terms. One ring measures 2.75 in (7.0 cm) across. One finished strand, from the top of the hanging loop to the end of the tassel, measures 26.5 in (67.3 cm). The full curtain of 8 strands spaced 3.5 in (8.9 cm) apart covers about 27.25 in (69.2 cm) of rod.
Construction is simple. You crochet each ring in the round from a short chain ring. A slip-stitch edge round gives it the braided rim. Then you link the rings into strands with doubled chains, add a hanging loop to the top ring, and tie a wrapped tassel to the bottom ring.
Finished Size and Construction
- Finished size (one strand): 26.5 in (67.3 cm) long, 2.75 in (7.0 cm) wide
- Finished size (full curtain): about 27.25 in (69.2 cm) wide x 26.5 in (67.3 cm) long
- Skill level: Easy
- Terminology: US crochet terms
- Yarn weight: Worsted (#4), cotton or cotton blend
- Hook: US 7 (4.5 mm)
- Number of pieces: 48 rings and 8 tassels, joined into 8 strands
- Layout: 8 strands across x 6 rings down
- Piece size (one ring): 2.75 in (7.0 cm) outer diameter, 1.25 in (3.2 cm) center opening
- Size before border: 2.5 in (6.4 cm) outer diameter
- Border depth: 0.125 in (0.3 cm) on each side (slip-stitch edge)
Materials
Pick a smooth, firm worsted-weight cotton or cotton blend. Cotton keeps the rings round and holds the stitch definition that gives the padded look. Avoid fuzzy or very stretchy acrylic, because the rings will droop over time.
- Sage green: 130 g / 220 m (4 strands: 24 rings + 4 tassels)
- Cream: 130 g / 220 m (4 strands: 24 rings + 4 tassels)
These quantities include about a 30% margin for swatching, tails, and a fuller tassel if you want one.
Tools:
- US 7 (4.5 mm) crochet hook
- Tapestry needle
- Stitch markers (2 or more)
- Stiff card 5 in (12.7 cm) tall, for tassels
- Sharp scissors
- Measuring tape
- Blocking mat and rustproof pins
- Spray bottle
- Wooden rod or tension rod, at least 30 in (76.2 cm) long
Abbreviations (US Terms)
- ch – chain
- sc – single crochet
- sl st – slip stitch
- st(s) – stitch(es)
- rnd – round
- rep – repeat
Special technique, doubled link: Slip stitch into a stitch on the upper ring, chain 2, slip stitch into a stitch on the lower ring, then slip stitch back along both chains and into the upper ring again. This doubles the link and gives it a firm, braid-like look.
Gauge and Checkpoints
Gauge: 18 sc and 13 rows = 4 in (10.2 cm) in sc, worked flat.
Make one complete ring before you start production. Ring gauge matters more than flat gauge, so measure the ring itself.
Checkpoints for one ring:
- After the foundation chain ring: The ring lies flat without twisting.
- After Rnd 1: Outer diameter is 1.875 in (4.8 cm), and the center opening is 1.25 in (3.2 cm).
- After Rnd 2: Outer diameter is 2.5 in (6.4 cm).
- After the border: Outer diameter is 2.75 in (7.0 cm).
If your ring is too big: Go down one hook size, to 4 mm (US G-6). Also check that you aren’t working the slip-stitch edge too loosely.
If your ring is too small or cups: Go up one hook size, to 5 mm (US H-8).
If your ring ruffles: Your Rnd 2 is too loose. Go down a hook size for Rnd 2 only.
Each ring is small, so a difference of 0.125 in (0.3 cm) per ring adds up to 0.75 in (1.9 cm) over a 6-ring strand. Fix gauge now.
Ring Pattern (Make 48)
Leave a 6 in (15.2 cm) starting tail and weave it in later.
Foundation: Ch 20, sl st in first ch to form a ring. Don’t twist the chain. (20 ch)
Rnd 1 (conversion round): Ch 1 (doesn’t count as a st). Sc in next ch, 2 sc in next ch; rep from * 10 times. Join with sl st in first sc.
Count: 20 sts worked 1 per ch + 10 extra sts = 30 sc.*
The stitches will feel crowded on the chain. That’s intentional: packing 30 sc onto a 20-ch ring is what makes the plump, padded inner edge. Push them together as you go.
Rnd 2 (growth round): Ch 1. 2 sc in next st, sc in next 2 sts; rep from * 10 times. Join with sl st in first sc.
Count: 40 sc.*
Place a marker in the first sc of Rnd 2. This is stitch 1, which becomes the top of the ring. Count around and place a second marker in stitch 21, which becomes the bottom of the ring. Stitches 2–20 (19 sts) form one side, and stitches 22–40 (19 sts) form the other. The ring is perfectly symmetrical: 1 + 19 + 1 + 19 = 40.
At this point the ring measures 2.5 in (6.4 cm) across. Don’t fasten off. Go straight on to the border below.
Border: Braided Slip-Stitch Edge (Each Ring)
On this design, the “border” is the slip-stitch round on each ring’s outer edge. There is no border around the curtain as a whole. Each ring is finished individually before joining.
Border gauge: 1 sl st per sc, worked loosely. That adds 0.125 in (0.3 cm) on each side.
Border Rnd (trim round): Ch 1. Sl st in each st around, working through both loops and keeping each loop loose enough for the hook to pass easily. Join with sl st in first sl st.
Count: 40 sts worked 1 per existing st + 0 extra = 40 sl st.
Per half: 20 sl st on the top half (sts 31–40 and 1–10) and 20 sl st on the bottom half (sts 11–30).
Fasten off, leaving a 6 in (15.2 cm) tail. Move the stitch 1 and stitch 21 markers up to the matching slip stitches.
Why the math works: Rnd 2 already has the right number of stitches to lie flat at 2.5 in (6.4 cm). Working exactly 1 slip stitch per stitch adds height without adding circumference, so the edge rolls slightly forward into a raised braid instead of ruffling. 2.5 in + 0.125 in + 0.125 in = 2.75 in (7.0 cm).
Weave in both tails along the inside of Rnd 1, where they are fully hidden.
Make All Pieces
- Sage green: 24 rings, 4 tassels
- Cream: 24 rings, 4 tassels
- Total: 48 rings, 8 tassels
Each strand is all one color. Strands alternate across the rod.
Layout grid (S = sage, C = cream; columns = strands, rows = rings from top):
         St1 St2 St3 St4 St5 St6 St7 St8
Loop      S   C   S   C   S   C   S   C
Ring 1    S   C   S   C   S   C   S   C
Ring 2    S   C   S   C   S   C   S   C
Ring 3    S   C   S   C   S   C   S   C
Ring 4    S   C   S   C   S   C   S   C
Ring 5    S   C   S   C   S   C   S   C
Ring 6    S   C   S   C   S   C   S   C
Tassel    S   C   S   C   S   C   S   C
Block all rings lightly before joining (see Final Blocking). Joining flat, uniform rings is much easier.
Joining
Method: doubled chain links, worked in the strand color.
Stitch-to-stitch logic: Every link connects stitch 21 (bottom) of the upper ring to stitch 1 (top) of the lower ring. Because each ring has 19 stitches on each side between these points, every link hangs exactly on the center line, and the strand drops straight.
To join two rings:
- Lay ring A above ring B, right sides up, with the marked stitches facing each other.
- Make a slip knot on the hook. Sl st in stitch 21 of ring A.
- Ch 2.
- Sl st in stitch 1 of ring B.
- Sl st in each of the 2 ch, working back toward ring A.
- Sl st in stitch 21 of ring A again. Fasten off.
The link measures 0.5 in (1.3 cm) between rings. Repeat to join all 6 rings in each strand, for 5 links per strand.
Tension advice: Work the links at the same tension as your border. If the chains are tight, the rings will tilt forward. If they’re loose, the link will stretch over time. Before fastening off, hold the strand up and check that the rings hang flat and face forward.
Hanging loop: Join yarn with sl st in stitch 1 of Ring 1. Ch 16, sl st in the same stitch 1. Sl st in each of the 16 ch around the loop, then sl st into stitch 1 once more. Fasten off. The doubled loop stands 2 in (5.1 cm) tall and fits over a rod up to 1 in (2.5 cm) thick.
Size checkpoint (one strand, before tassel): 6 rings x 2.75 in + 5 links x 0.5 in = 16.5 in + 2.5 in = 19 in (48.3 cm). Add the 2 in (5.1 cm) loop for 21 in (53.3 cm). If a strand is more than 0.25 in (0.6 cm) off, check the links before adding the tassel.
Tassels (Make 8)
- Wrap yarn 40 times around a 5 in (12.7 cm) card. That uses about 400 in (1,016 cm) of yarn.
- Slide a 12 in (30.5 cm) piece of yarn under the wraps at the top edge and tie it tightly. Leave both ends long.
- Cut through the wraps along the bottom edge. You now have 80 ends.
- Wrap a separate 18 in (45.7 cm) piece of yarn tightly around the bundle 0.75 in (1.9 cm) below the top, 6 to 8 times, to form the neck. Thread the tail onto a needle, push it down through the neck wraps into the skirt, and trim it to match.
- Join to the strand: sl st in stitch 21 of Ring 6, ch 2, fasten off. Thread the tassel’s top tie through the end of that chain, knot it securely, and hide the ends inside the tassel head.
- Steam the skirt lightly and trim it level at 5 in (12.7 cm).
Final strand length: 2 in loop + 19 in rings and links + 0.5 in tassel link + 5 in tassel = 26.5 in (67.3 cm).
Final Blocking
- Pin each ring flat on a mat. Use 4 pins on the outer edge and stretch it to exactly 2.75 in (7.0 cm).
- Push a round object, such as a marker cap or the hook handle, through the center to open the hole to 1.25 in (3.2 cm).
- Mist until damp, not soaked.
- Let dry completely, about 2 to 4 hours.
- After joining, hang each finished strand from a hanger and mist it lightly. The weight of the tassel straightens the links as it dries.
- Steam the tassels separately, holding the iron above the yarn without touching it. Comb the strands straight with your fingers.
- Hang all 8 strands on the rod 3.5 in (8.9 cm) apart, center to center, in the alternating color order.
Final Quality-Control Checklist
- Every ring measures 2.75 in (7.0 cm) across, with a 1.25 in (3.2 cm) opening.
- Every ring has 40 sl st on the border: 20 on the top half and 20 on the bottom half.
- Every link connects stitch 21 to stitch 1 and measures 0.5 in (1.3 cm).
- Each strand has 6 rings, 5 links, 1 loop, and 1 tassel.
- All strands measure 26.5 in (67.3 cm) within 0.25 in (0.6 cm).
- Colors alternate sage and cream across all 8 strands.
- All tails are woven in, and no ends show at the links.
- The tassels are trimmed level and the necks are tight.
Troubleshooting
Ring cups into a bowl: Rnd 2 is too tight. Go up a hook size for Rnd 2, or add 2 more increases spread evenly. If you do, recount stitches 1 and 21 so the halves stay equal.
Ring ruffles: Rnd 2 or the border is too loose. Go down a hook size, and keep the slip stitches even.
Inner edge looks gappy: Push the Rnd 1 stitches tighter along the chain, and pull the starting tail firmly before weaving it in.
Strand twists: One link went into the wrong stitch. Recount from the marker and redo that link.
Rings face sideways: The link chains are uneven. Rework the link, making both passes at the same tension.
Tassel looks thin: Wrap 50 times instead of 40. Your margin covers it.
Strands hang at different lengths: Measure each strand at its loop, and adjust the length by retrimming the tassels.
Care
Hand wash in cool water with mild soap, press out the water in a towel, and lay flat to dry, re-pinning the rings to 2.75 in (7.0 cm). Dust between washes with a soft brush or a cool hairdryer setting.
Final Notes
The whole design depends on one measurement chain. A 20-chain ring becomes 30 sc in Rnd 1 and 40 sc in Rnd 2, for a 2.5 in (6.4 cm) ring. The 40-stitch slip-stitch border brings it to 2.75 in (7.0 cm). Six rings with five 0.5 in (1.3 cm) links make 19 in (48.3 cm). With the 2 in (5.1 cm) loop, the tassel link, and the 5 in (12.7 cm) tassel, each strand reaches 26.5 in (67.3 cm). Eight strands spaced 3.5 in (8.9 cm) apart fill 27.25 in (69.2 cm) of rod. If the first ring matches its checkpoints, the rest of the curtain will too.
Happy crocheting!