

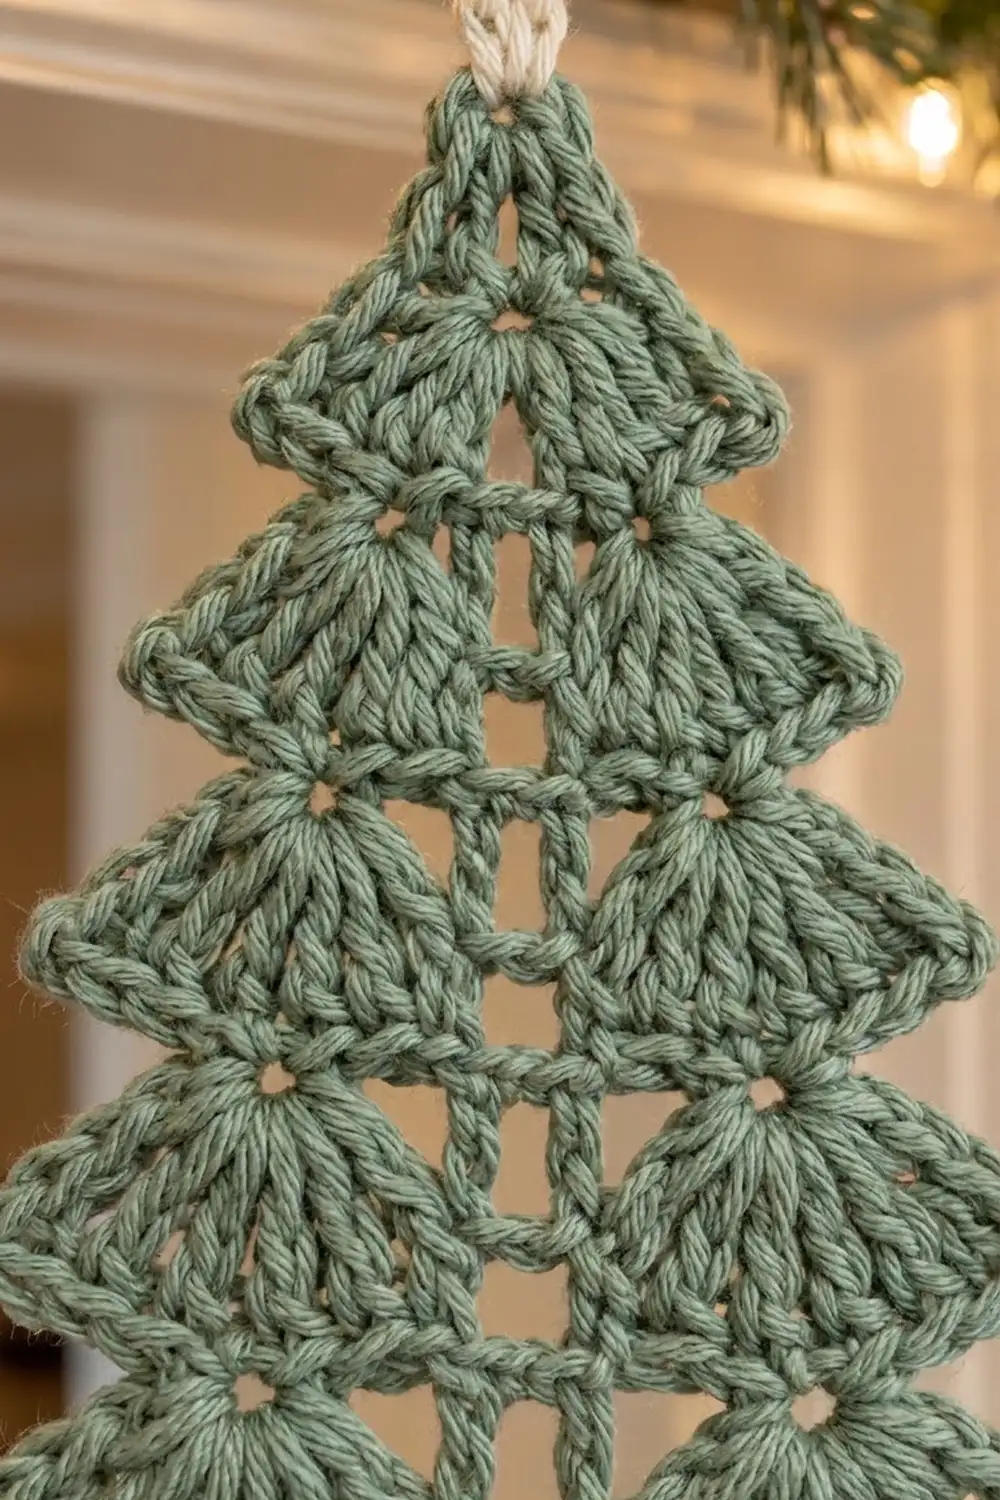
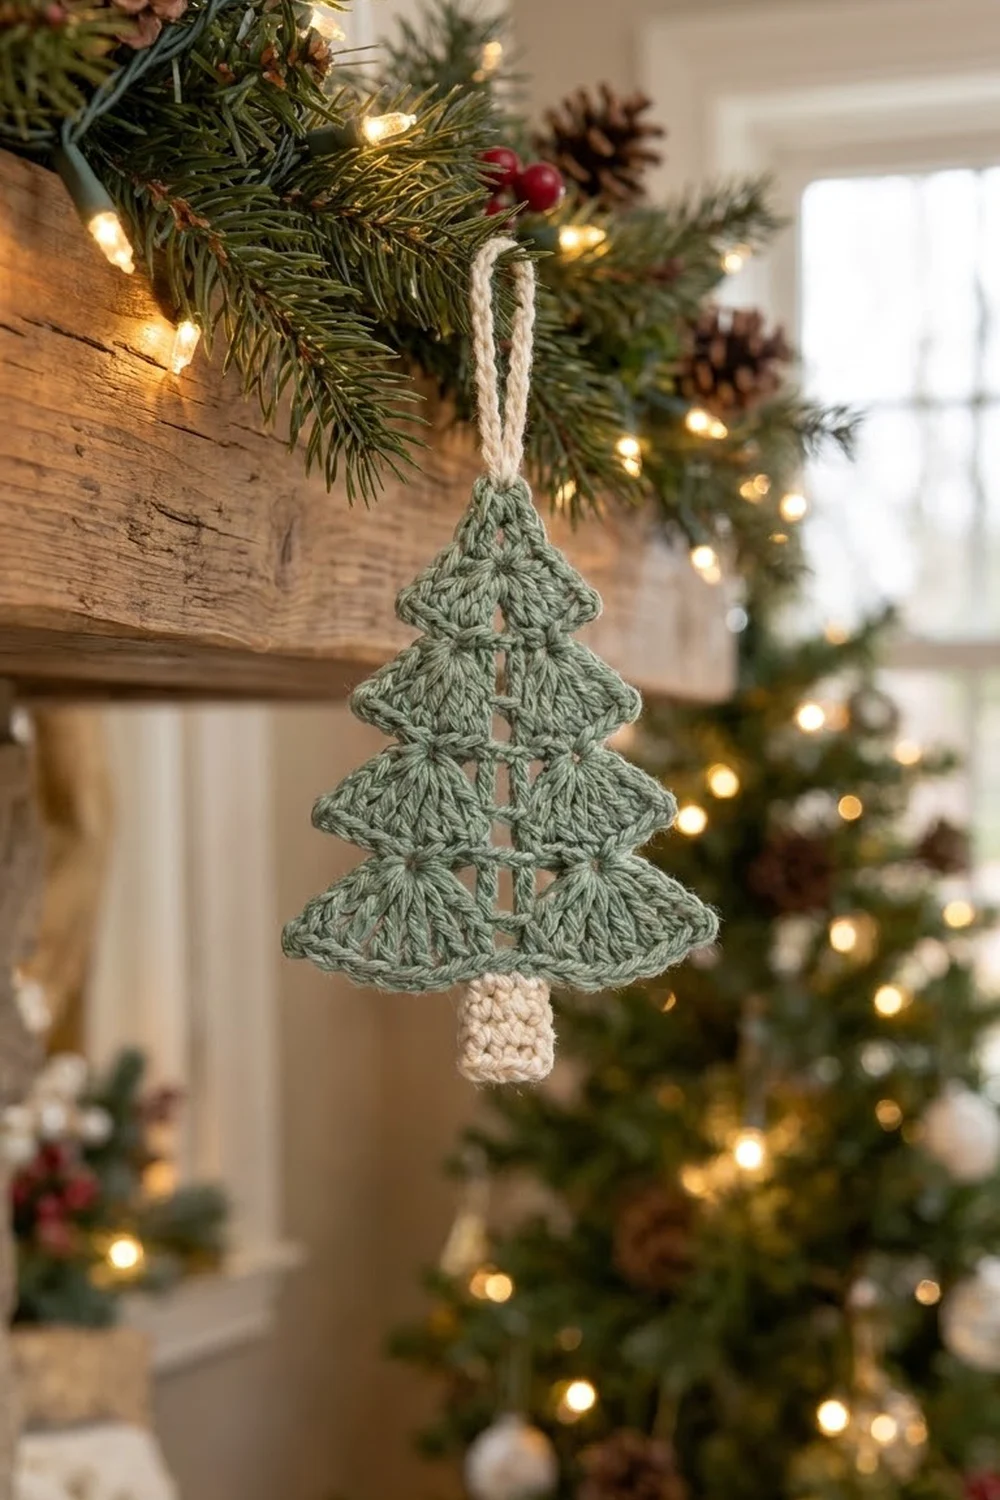
This little tree is one flat ornament in soft sage green. It has four stacked tiers of fan shells, an open ladder running down its center, a small cream trunk, and a cream hanging loop. Each tier has two fans that spread down and out from near the center, so the tree gets a stepped silhouette with a pointed tip at the end of every tier.
The palette is two colors: a muted sage for the tree and a warm cream for the trunk and loop. The look is calm and Scandinavian. It suits a natural garland, a gift tag, or a bare branch. It works up in well under an hour once you know the shells.
The pattern uses US crochet terms. The finished tree body measures 3.4 in wide x 3.4 in tall (8.6 cm x 8.6 cm). With the trunk, it is 4.2 in (10.7 cm) tall, and the loop adds about 1.25 in (3.2 cm) above the tip.
You work the tree from the top down in turned rows, starting with a small fan in a ring. Fan rows alternate with single crochet “bar” rows. Every fan row grows by 4 stitches, and the center ladder is kept open the whole way down. After that comes one round of single crochet border. You then sew on a separate cream trunk and work the loop onto the tip.
Finished Size and Construction
- Finished size: 3.4 in x 3.4 in (8.6 cm x 8.6 cm) for the bordered tree body; 4.2 in (10.7 cm) tall with the trunk
- Skill level: Easy-intermediate (shells with tall stitches, simple rows)
- Terminology: US
- Yarn weight: DK (#3)
- Hook: 3.5 mm (E/4)
- Number of pieces: 1 ornament (a tree body plus one small sewn-on trunk)
- Layout: single motif, 4 tiers stacked top to bottom
- Piece size: trunk 0.9 in wide x 1 in tall (2.3 cm x 2.5 cm)
- Size before border: 3 in wide x 3 in tall (7.6 cm x 7.6 cm)
- Border depth: 0.2 in (0.5 cm) on every edge
Materials
Pick a smooth DK yarn. Cotton or a cotton blend gives the crispest fans and keeps them flat. Avoid fuzzy yarns, because they hide the ladder. A slightly heathered sage still looks good and shows the stitch texture well.
- Sage green (tree and border): 6 g, about 14 m (15 yd)
- Cream (trunk and hanging loop): 2 g, about 5 m (5.5 yd)
The quantities include a margin of roughly 30% for your gauge check and tails. Leftovers from larger projects are usually enough.
Tools:
– 3.5 mm (E/4) crochet hook
– Tapestry needle
– Scissors
– Rust-proof pins and a foam blocking board
– Spray bottle with water
– Ruler or tape measure
Abbreviations (US Terms)
- ch – chain
- sl st – slip stitch
- sc – single crochet
- dc – double crochet
- tr – treble crochet
- dtr – double treble crochet (yarn over 3 times, insert hook, pull up a loop, [yarn over, pull through 2 loops] 4 times)
- sp – space
- st(s) – stitch(es)
- sk – skip
- tch – turning chain
Special stitches (shells): Each shell is worked entirely into one stitch. On side A (the start of a fan row), shells begin with the longest stitches, which become the outer tip, and end with the shortest. On side B they are mirrored.
- Sh2 (5 sts): Side A: (dtr, 2 tr, 2 dc). Side B: (2 dc, 2 tr, dtr).
- Sh3 (7 sts): Side A: (2 dtr, 2 tr, 3 dc). Side B: (3 dc, 2 tr, 2 dtr).
- Sh4 (9 sts): Side A: (3 dtr, 3 tr, 3 dc). Side B: (3 dc, 3 tr, 3 dtr).
Gauge and Checkpoints
Gauge: 22 sc and 24 sc rows = 4 in (10.2 cm) with a 3.5 mm hook.
Make the trunk first, because it doubles as your gauge test. A finished trunk of 5 sc x 6 rows should measure 0.9 in wide x 1 in tall (2.3 cm x 2.5 cm). Then work Rows 1–4 of the tree and check again before you continue.
Checkpoints (measured flat, unblocked, straight across from tip to tip):
– After Row 2: 1 in wide x 0.75 in tall (2.5 cm x 1.9 cm)
– After Row 4: 1.75 in wide x 1.5 in tall (4.4 cm x 3.8 cm)
– After Row 6: 2.4 in wide x 2.25 in tall (6.1 cm x 5.7 cm)
– After Row 8: 3 in wide x 3 in tall (7.6 cm x 7.6 cm)
– After the border: 3.4 in x 3.4 in (8.6 cm x 8.6 cm)
The bottom edge of Row 8 is scalloped. Measured along the curves it is about 3.75 in (9.5 cm). Measured straight across it is 3 in (7.6 cm).
Too big? Go down to a 3.25 mm hook, or tighten your tall stitches by pulling each yarn over snug before the next one.
Too small? Go up to a 3.75 mm hook. Tall stitches that are too tight make the fans cup instead of lying flat.
Trunk (Cream)
With cream, ch 6.
Row 1: Sc in 2nd ch from hook and in each ch across. Turn. (5 sc)
Rows 2–6: Ch 1 (does not count as a st), sc in each sc across. Turn. (5 sc)
Fasten off and leave a 10 in (25.4 cm) tail for sewing. The trunk measures 0.9 in x 1 in (2.3 cm x 2.5 cm).
Tree Body (Sage Green)
The ch-1 sp at the center of every row is the ladder. Never work a stitch into it except where the instructions say so. In the fan rows, the turning sl sts do not count as stitches.
Ring: Ch 4, sl st in first ch to form a ring.
Row 1 (Tier 1 fan): Ch 3 (counts as dc), dc in ring, tr in ring, ch 1, tr in ring, 2 dc in ring. Turn. (6 sts and 1 ch-1 sp)
The stitches spread around the lower half of the ring. The two tr point straight down and start the center ladder.
Row 2 (bar): Ch 1, sc in each of the first 3 sts, ch 1, sk ch-1 sp, sc in each of the next 2 sts, sc in top of tch. Turn. (6 sc and 1 ch-1 sp: 3 sc per half)
Row 3 (Tier 2 fan): Sl st in first 2 sc. Work Sh2 side A in the same sc as the last sl st. Tr in next sc, ch 1, sk ch-1 sp, tr in next sc, Sh2 side B in next sc. Leave the last sc unworked. Turn. (12 sts and 1 ch-1 sp: 5 shell sts + 1 tr per half)
Row 4 (bar): Ch 1, sc in each of the first 6 sts, ch 1, sk ch-1 sp, sc in each of the next 6 sts. Turn. (12 sc and 1 ch-1 sp: 6 sc per half)
Row 5 (Tier 3 fan): Sl st in first 3 sc. Work Sh3 side A in the same sc as the last sl st. Sk next 2 sc, tr in next sc, ch 1, sk ch-1 sp, tr in next sc, sk next 2 sc, Sh3 side B in next sc. Leave the last 2 sc unworked. Turn. (16 sts and 1 ch-1 sp: 7 shell sts + 1 tr per half)
Row 6 (bar): Ch 1, sc in each of the first 8 sts, ch 1, sk ch-1 sp, sc in each of the next 8 sts. Turn. (16 sc and 1 ch-1 sp: 8 sc per half)
Row 7 (Tier 4 fan): Sl st in first 4 sc. Work Sh4 side A in the same sc as the last sl st. Sk next 3 sc, tr in next sc, ch 1, sk ch-1 sp, tr in next sc, sk next 3 sc, Sh4 side B in next sc. Leave the last 3 sc unworked. Turn. (20 sts and 1 ch-1 sp: 9 shell sts + 1 tr per half)
Row 8 (bar): Ch 1, sc in each of the first 10 sts, ch 1, sk ch-1 sp, sc in each of the next 10 sts. Turn, but do not fasten off. (20 sc and 1 ch-1 sp: 10 sc per half)
How the shape forms: Each shell sits a few stitches in from the outer end of the bar row above it. Its dtr stitches swing outward past the end of that bar, so every tier ends in a point that sticks out wider than the tier above. The unworked bar stitches on each side become the underside of the tier above, which creates the step between tiers. The two tr per fan row, joined by the ch-1 bridges of the bar rows, form the open ladder down the center.
Border (Sage Green)
Border gauge: One sc for every sc-height of edge. A sc row end takes 1 sc, a dc post takes 2 sc, and a dtr post takes 3 sc. Bottom stitches are worked 1 sc per st.
Round 1: Ch 1.
- Bottom edge: 3 sc in first sc (corner), sc in each of the next 9 sc, sc in ch-1 sp, sc in each of the next 9 sc, 3 sc in last sc (corner). That is 19 sc between the corners.
- First side, working up: 3 sc along the outer dtr post of Tier 4, 1 sc in the end of Row 6, 3 sc along the outer dtr post of Tier 3, 1 sc in the end of Row 4, 3 sc along the outer dtr post of Tier 2, 1 sc in the end of Row 2, 2 sc along the outer dc post of Row 1. (14 sc)
- Tip: 3 sc around the bare top of the ring.
- Second side, working down: 2 sc along the dc post (the tch) of Row 1, 1 sc in the end of Row 2, 3 sc along the Tier 2 dtr post, 1 sc in the end of Row 4, 3 sc along the Tier 3 dtr post, 1 sc in the end of Row 6, 3 sc along the Tier 4 dtr post. (14 sc)
Sl st to the first sc. Fasten off and weave in the ends. (56 sc: 3 + 19 + 3 bottom, 14 per side, 3 at the tip)
Why the math works: Row 8 has 20 sc plus 1 ch-1 sp, which is 21 working points. The 2 end sc each become a 3-sc corner, so the bottom gets 19 + 6 = 25 sc. That is 1 sc per existing st plus 4 extra sts that turn the corners. Each side follows the edge height exactly: 2 + (1 + 3) x 3 = 14 sc. Because the border never puts more stitches on an edge than it can hold, it lies flat. It adds 0.2 in (0.5 cm) all around, so 3 in (7.6 cm) grows to 3.4 in (8.6 cm) in both directions.
Hanging Loop (Cream)
Join cream with a sl st in the center sc of the 3 tip sc. Ch 16, then sl st in the same sc to make a loop. Work 20 sc around the ch-16 loop, covering it completely, and sl st in the tip sc. Fasten off and weave in the ends. The loop stands about 1.25 in (3.2 cm) above the tip.
Attaching the Trunk
Center the trunk below the bottom edge. Line up its middle (3rd) stitch with the ch-1 sp of the ladder. Overlap the top 0.2 in (0.5 cm) of the trunk behind the bottom border. With the cream tail, whip stitch the trunk’s top edge to the back of Row 8, then tack both sides of the overlap. The visible trunk is 0.8 in (2.0 cm), which makes the total height 3.4 + 0.8 = 4.2 in (10.7 cm).
Final Blocking
- Lightly mist the ornament until it is damp but not wet.
- Lay it right side up on the blocking board.
- Pin the center of the ladder straight with one pin at the tip and one at the trunk.
- Pin each of the 8 tier tips outward. Check that each pair of tips sits level and the same distance from the ladder.
- Shape each fan with your fingers so its stitches radiate evenly.
- Measure the tree body: 3.4 in x 3.4 in (8.6 cm x 8.6 cm).
- Let it dry completely before unpinning, which takes about 2–4 hours.
Final Quality-Control Checklist
- 4 tiers, each with 2 fans that mirror each other
- Stitch counts of 6 / 12 / 16 / 20 in the bar rows, plus one ch-1 sp each
- The ladder stays open and straight from tip to trunk
- 56 border sc in total, with 3 sc at each bottom corner and at the tip
- Bordered body measures 3.4 in x 3.4 in (8.6 cm x 8.6 cm)
- Trunk centered and showing 0.8 in (2.0 cm)
- Loop firm, centered, and about 1.25 in (3.2 cm) tall
- All ends woven in on the back
Troubleshooting
- Fans cup or ruffle: The tall stitches are too tight or the bar row is too loose. Change hooks, or rework the bar with firmer sc.
- The tree leans to one side: You probably started side A in the wrong sc. Count the sl sts again: 2, 3, then 4.
- The ladder closes up: You worked into the ch-1 sp. Always skip it and make a fresh ch 1 over it.
- The border waves: There are too many sc along the dtr posts. Use exactly 3 per post.
- The border pulls in: Loosen your tension at the corners and the tip.
- Tips look blunt: Pin them harder while blocking, and check that the outer stitches are dtr, not tr.
Care
Hand wash in cool water, press out the water in a towel, and dry flat. Re-pin the tips if they lose their shape after washing.
Final Notes
The measurement chain is short. The trunk swatch confirms gauge at 0.9 in x 1 in (2.3 cm x 2.5 cm). The tree grows 1, 1.75, 2.4, then 3 in wide (2.5, 4.4, 6.1, 7.6 cm) through the bar rows. The 56-stitch border brings it to 3.4 in (8.6 cm) square. The trunk adds 0.8 in (2.0 cm) for a total of 4.2 in (10.7 cm). If each checkpoint matches, the finished tree will too.
Happy crocheting!