

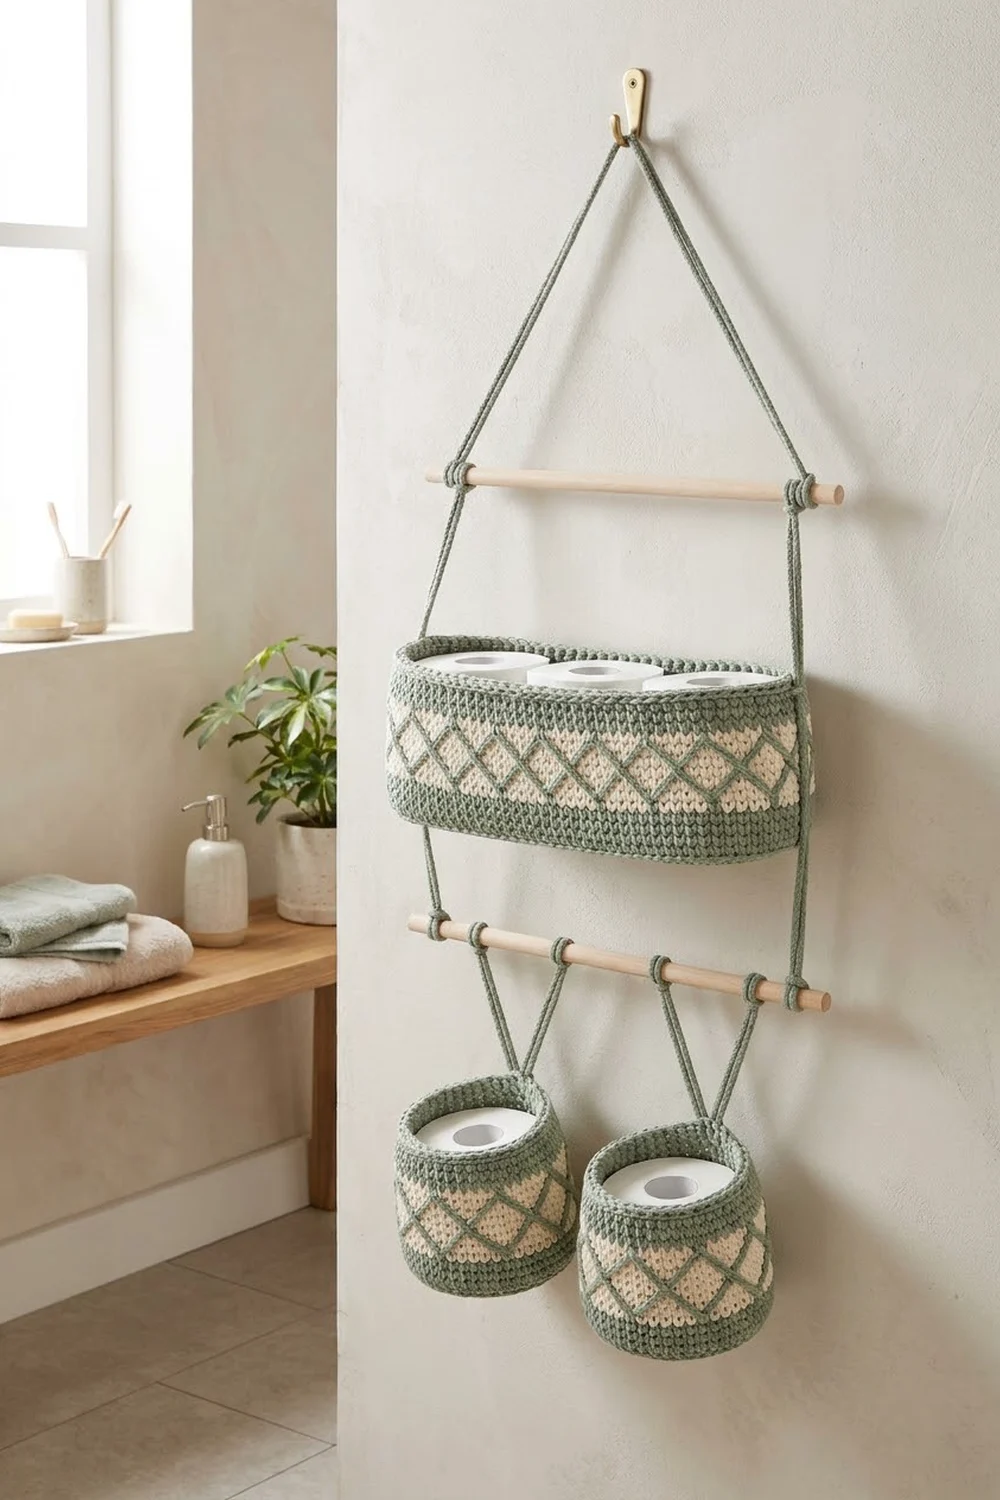
This hanging organizer has three tiers: a long oval basket on top and two small round baskets below. A crocheted cord runs through two wooden dowels to hold everything together. It’s built for a small bathroom, where it holds three spare rolls up top and one roll in each small basket. It works just as well for toiletries or washcloths.
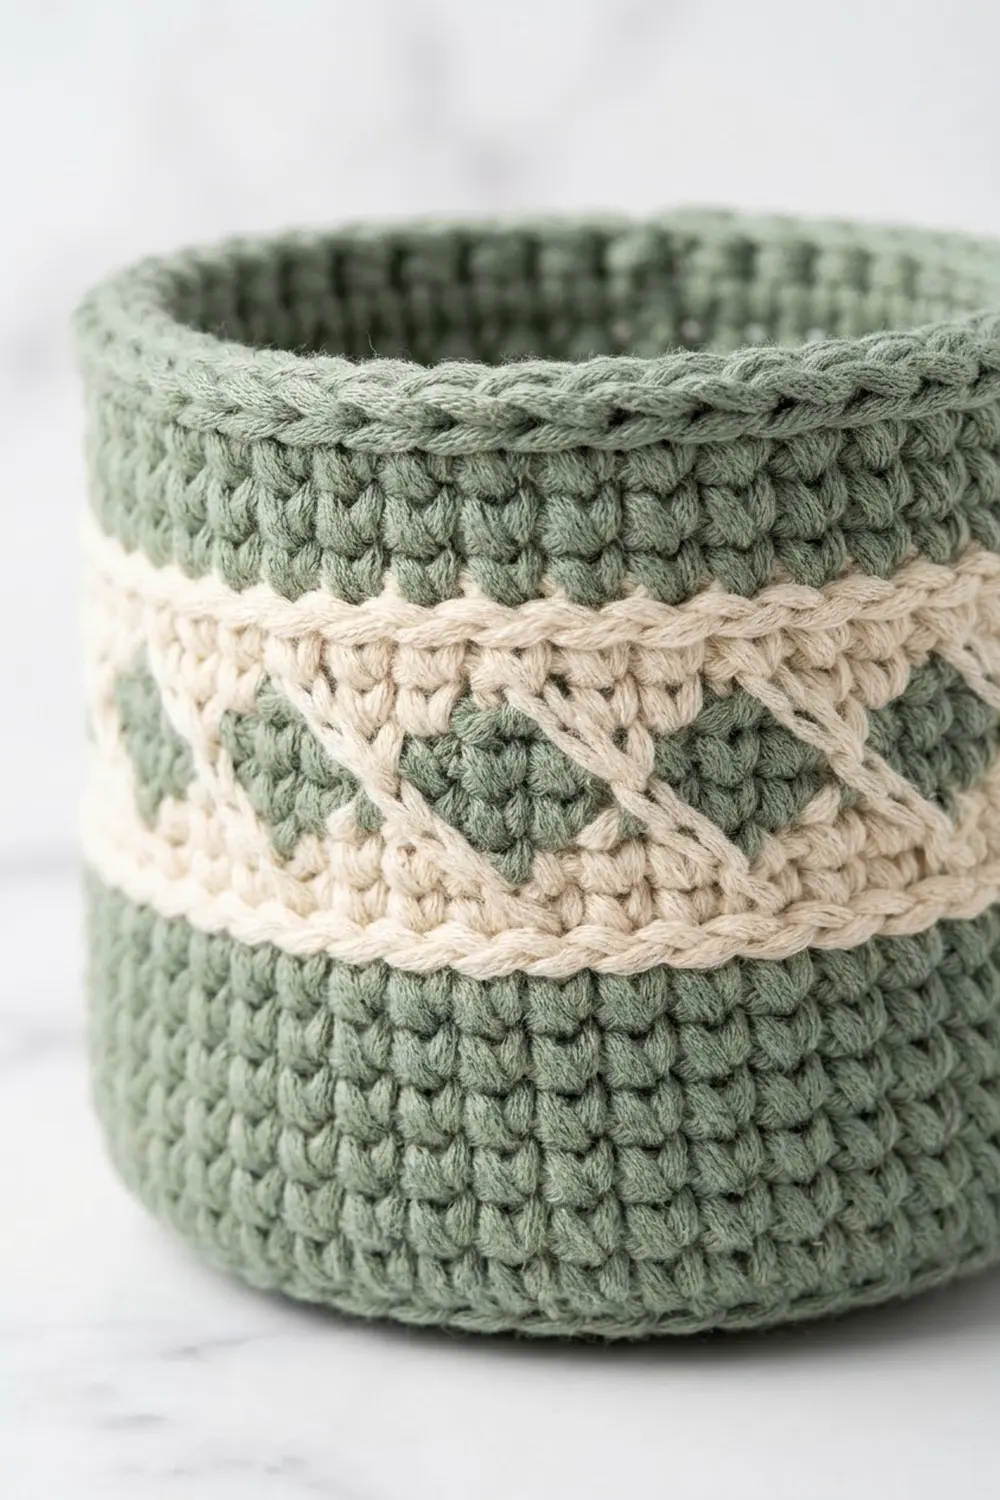
The palette is soft sage green with a cream accent. A cream diagonal lattice wraps around each basket and frames a row of sage diamonds, with half-diamonds along the top and bottom edges. Each basket finishes with a thick, rope-like crab-stitch rim.
The pattern uses US crochet terms. The oval basket measures 13.9 in x 4.9 in (35.3 cm x 12.4 cm) at the base and 4.6 in (11.7 cm) tall. Each small basket is 4.9 in (12.4 cm) across and 3.7 in (9.4 cm) tall. Hung up, the organizer is about 16 in (40.6 cm) wide and 30 in (76.2 cm) long.
You’ll work each base in joined rounds of single crochet, turn up the wall with a back-loop round, and work the lattice band in tapestry crochet. After a crab-stitch rim on each basket, you make three slip-stitch cords and assemble everything with two dowels.
Finished Size and Construction
- Oval basket: 13.9 in x 4.9 in (35.3 cm x 12.4 cm) base, 4.6 in (11.7 cm) tall
- Small basket (make 2): 4.9 in (12.4 cm) diameter, 3.7 in (9.4 cm) tall
- Assembled size: about 16 in (40.6 cm) wide x 30 in (76.2 cm) long
- Skill level: Intermediate (tapestry color changes)
- Terminology: US
- Yarn weight: Bulky (#5)
- Hook: 6 mm (J-10)
- Number of pieces: 6 crocheted (3 baskets, 3 cords) plus 2 wooden dowels
- Layout: 3 tiers: hook, top dowel, oval basket, lower dowel, then 2 small baskets side by side
- Size before border (rim): oval 4.3 in (10.9 cm) tall; small 3.4 in (8.6 cm) tall
- Border depth: 1 crab-stitch round, about 0.3 in (0.8 cm)
Materials
Pick a firm bulky yarn, like a cotton blend or a smooth acrylic, so the baskets can stand up on their own. Fluffy or very soft yarns will slump.
- Sage green (MC): 200 g, about 220 m (240 yd)
- Cream (CC): 65 g, about 70 m (77 yd)
These amounts include roughly a 25% margin for swatching, carried strands and tails.
Tools:
- 6 mm (J-10) crochet hook
- 2 wooden dowels, 16 in (40.6 cm) long, 0.75 in (1.9 cm) in diameter
- 1 sturdy wall hook with screws and anchors
- Tapestry needle
- 6 stitch markers
- Scissors and measuring tape
Abbreviations (US Terms)
- ch – chain
- sc – single crochet
- sl st – slip stitch
- st(s) – stitch(es)
- BLO – back loop only
- rnd(s) – round(s)
- MC / CC – main color (sage) / contrast color (cream)
- rev sc – reverse single crochet (crab stitch)
Reverse single crochet (rev sc): Work from left to right (right to left if you’re left-handed). Insert the hook into the next stitch to the right, yarn over and pull up a loop. Then yarn over and pull through both loops on the hook.
Tapestry color change: Work the last stitch in the old color until 2 loops remain on the hook. Yarn over with the new color and pull through. Lay the unused strand along the tops of the stitches and work over it so it stays hidden.
Gauge and Checkpoints
Gauge: 12 sc and 13 rnds = 4 in (10.2 cm) in joined rounds. That’s 3 sts and 3.25 rnds per inch.
Make one small basket first. It’s the quickest way to test your gauge, your colorwork tension and how stiff the walls turn out.
Checkpoints:
- Small base after Rnd 8: 4.9 in (12.4 cm) across, lying flat.
- Oval base after Rnd 8: 13.9 in x 4.9 in (35.3 cm x 12.4 cm).
- Lattice band (7 rnds): about 2.2 in (5.6 cm) tall.
- Walls before the rim: 3.4 in (8.6 cm) for a small basket, 4.3 in (10.9 cm) for the oval.
If your piece is too big: Use a hook 0.5 mm smaller. A ruffled base means your tension is loose, so change hooks rather than skipping increases.
If your piece is too small or cupping: Use a hook 0.5 mm larger. A cupping base usually means your increase stitches are too tight.
Small Round Basket (Make 2)
Join every round with a sl st to the first sc. Ch 1 at the start of each round; the ch 1 does not count as a stitch.
Base
With MC:
- Rnd 1: 6 sc in a magic ring. (6)
- Rnd 2: 2 sc in each st. (12)
- Rnd 3: [sc in next st, 2 sc in next st] 6 times. (18)
- Rnd 4: [sc in next 2 sts, 2 sc in next st] 6 times. (24)
- Rnd 5: [sc in next 3 sts, 2 sc in next st] 6 times. (30)
- Rnd 6: [sc in next 4 sts, 2 sc in next st] 6 times. (36)
- Rnd 7: [sc in next 5 sts, 2 sc in next st] 6 times. (42)
- Rnd 8: [sc in next 6 sts, 2 sc in next st] 6 times. (48)
Check: the base should measure 4.9 in (12.4 cm) across.
Wall
- Rnd 9: sc BLO in each st. (48) This makes the sharp fold where the wall turns up.
- Rnd 10: sc in each st. (48) Change to CC on the last yarn-over.
- Rnd 11: With CC, sc in each st, working over MC. (48)
Lattice Band
Carry both colors through Rnds 12–16. The 6-st repeat fits 8 times around (6 x 8 = 48).
- Rnd 12: [1 MC, 1 CC, 3 MC, 1 CC] 8 times. (48)
- Rnd 13: [2 MC, 1 CC, 1 MC, 1 CC, 1 MC] 8 times. (48)
- Rnd 14: [3 MC, 1 CC, 2 MC] 8 times. (48)
- Rnd 15: Repeat Rnd 13. (48)
- Rnd 16: Repeat Rnd 12. (48)
- Rnd 17: With CC, sc in each st, working over MC. (48)
In each repeat, the two cream lines move one stitch closer together per round until they cross at Rnd 14, then move apart again. This gives a full sage diamond centered on stitch 1 of each repeat, plus sage half-diamonds resting on Rnd 11 and hanging from Rnd 17.
- Rnd 18: Change to MC and cut CC, leaving a 6 in (15.2 cm) tail. Sc in each st. (48)
- Rnd 19: sc in each st. (48)
Check: the wall should measure 3.4 in (8.6 cm). The rim is in the Border section.
Oval Basket (Make 1)
Base
With MC, ch 30.
- Rnd 1: 3 sc in 2nd ch from hook, sc in next 27 ch, 3 sc in last ch. Working along the opposite side of the chain, sc in next 27 ch. (60: 3 per end, 27 per side)
- Rnd 2: [2 sc in each of next 3 sts, sc in next 27 sts] twice. (66: 6 per end)
- Rnd 3: [(sc in next st, 2 sc in next st) 3 times, sc in next 27 sts] twice. (72: 9 per end)
- Rnd 4: [(sc in next 2 sts, 2 sc in next st) 3 times, sc in next 27 sts] twice. (78: 12 per end)
- Rnd 5: [(sc in next 3 sts, 2 sc in next st) 3 times, sc in next 27 sts] twice. (84: 15 per end)
- Rnd 6: [(sc in next 4 sts, 2 sc in next st) 3 times, sc in next 27 sts] twice. (90: 18 per end)
- Rnd 7: [(sc in next 5 sts, 2 sc in next st) 3 times, sc in next 27 sts] twice. (96: 21 per end)
- Rnd 8: [(sc in next 6 sts, 2 sc in next st) 3 times, sc in next 27 sts] twice. (102: 24 per end, 27 per side)
Check: 27 sts at 3 per inch makes a 9 in (22.9 cm) straight section. The curved ends add 4.9 in (12.4 cm), so the base measures 13.9 in x 4.9 in (35.3 cm x 12.4 cm).
Wall
- Rnd 9: sc BLO in each st. (102)
- Rnds 10–11: sc in each st. (102)
- Rnd 12: With CC, sc in each st, working over MC. (102)
Lattice Band
The 6-st repeat fits 17 times around (6 x 17 = 102).
- Rnd 13: [1 MC, 1 CC, 3 MC, 1 CC] 17 times. (102)
- Rnd 14: [2 MC, 1 CC, 1 MC, 1 CC, 1 MC] 17 times. (102)
- Rnd 15: [3 MC, 1 CC, 2 MC] 17 times. (102)
- Rnd 16: Repeat Rnd 14. (102)
- Rnd 17: Repeat Rnd 13. (102)
- Rnd 18: With CC, sc in each st. (102)
- Rnd 19: Change to MC and cut CC. Sc in each st. (102)
- Rnds 20–22: sc in each st. (102)
Check: the wall should measure 4.3 in (10.9 cm) tall and 34 in (86.4 cm) around.
Border (Rim)
Border gauge: One rev sc round adds about 0.3 in (0.8 cm) of height and stays at 3 sts per inch.
Small basket, Rnd 20: With MC, ch 1, then rev sc in each st. Join and fasten off. (48)
Oval basket, Rnd 23: With MC, ch 1, then rev sc in each st. Join and fasten off. (102: 27 per long side and 24 per end, so 27 + 24 + 27 + 24 = 102)
Why the math works: The rim has exactly 1 rev sc per stitch, so the count doesn’t change and the edge neither flares nor pulls in. Each basket’s rim is worked separately because the baskets are never joined to each other. The finished heights are 3.4 + 0.3 = 3.7 in (9.4 cm) for the small baskets and 4.3 + 0.3 = 4.6 in (11.7 cm) for the oval.
Hanging Cords
To make each cord, chain to the stated length, then sl st into the back bump of each ch, working back to the start. The cord comes out at about 3 ch per inch, but measure it rather than counting.
- Cord A (make 1): 58 in (147.3 cm), about 174 ch.
- Cord B (make 2): 16 in (40.6 cm), about 48 ch.
Leave a 12 in (30.5 cm) tail at both ends of every cord for sewing.
Make All Pieces
Quantities:
- Oval basket: 1 (MC + CC)
- Small basket: 2 (MC + CC)
- Cord A: 1 (MC)
- Cord B: 2 (MC)
Layout grid:
              [ wall hook ]
               /         \
          Cord A         Cord A
 [=========== top dowel ============]
         |                   |
   [      oval basket          ]
         |                   |
 [========== lower dowel ===========]
      \  B  /           \  B  /
     [small]           [small]
Joining
Cord A to the top dowel: Fold Cord A in half; the fold hangs on the wall hook. Measure 12 in (30.5 cm) down each side. At that point, wrap the cord once around the top dowel, 2 in (5.1 cm) in from the dowel end, and tack it with 3 whipstitches.
Cord A to the oval basket: Fold the basket flat with the long sides together. The two fold points are the centers of the ends, 51 sts apart around the rim. Mark both. Let each side of Cord A drop 3 in (7.6 cm) below the top dowel, then lay it down the outside of the basket over one marked end. Sew one whipstitch per round from Rnd 22 down to Rnd 9, which is 14 stitches per side. Each stitch catches one sc of the marked center column and one ch of the cord.
Cord A to the lower dowel: Let each side of Cord A continue 3 in (7.6 cm) below the base. Wrap it once around the lower dowel, 2 in (5.1 cm) in from the end. Tack it with 3 whipstitches and weave the tail into the cord.
Cord B to the small baskets: On each small basket, mark st 1 and st 25 of the rim. They sit directly opposite each other, 24 sts apart. Lay one end of a Cord B down the outside of the basket over st 1’s column. Sew it with one whipstitch per round from Rnd 19 to Rnd 15, which is 5 stitches covering about 1.5 in (3.8 cm). Sew the other end the same way at st 25.
Cord B to the lower dowel: Center each Cord B loop 4 in (10.2 cm) in from a dowel end. Wrap it once around the dowel and tack it with 3 whipstitches.
Tension: Keep the whipstitches snug but not tight. If you pull them too hard, the wall puckers behind the cord.
Size checkpoint: Hang the empty organizer. It should measure about 16 in (40.6 cm) wide and 30 in (76.2 cm) long, with both dowels level.
Final Blocking
- Weave in all ends, hiding cream tails inside the cream rounds.
- Mist each basket until it’s damp but not soaked.
- Stuff the oval basket with a towel shaped to 13.9 in x 4.9 in (35.3 cm x 12.4 cm). Shape each small basket around a 4.9 in (12.4 cm) jar.
- Pinch the BLO fold at Rnd 9 to sharpen the base edge.
- Roll the crab-stitch rim slightly outward.
- Let everything dry completely before you assemble it.
Final Quality-Control Checklist
- Small bases measure 4.9 in (12.4 cm). The oval base measures 13.9 in x 4.9 in (35.3 cm x 12.4 cm).
- Each round has 48 sts on the small baskets and 102 on the oval.
- Each lattice round has complete repeats: 8 on a small basket, 17 on the oval.
- The diamonds stack straight up, with no drift around the basket.
- No carried strand shows through the stitches.
- Each rim has the same count as the round below it and lies flat.
- Every dowel wrap is tacked, and both dowels hang level.
Troubleshooting
Cream shows through the sage: Keep the carried strand snug along the tops of the stitches.
The lattice drifts: Count every repeat. One extra sc shifts every repeat after it.
The walls lean outward: Use a smaller hook, or work Rnd 9 more firmly.
The oval ends cup: Your increases are stacking. In alternate rounds, work the “2 sc” first in each group.
The basket tilts when hung: The cords are off-center. Re-mark the center stitches and sew the cords again.
The rim flares: Use a hook 0.5 mm smaller for the rim round only.
Care
Hand wash in cool water, roll the baskets in a towel to remove water and reshape them. Dry flat, then hang the organizer again.
Final Notes
Everything in this pattern comes from one gauge: 3 sts and 3.25 rnds per inch. After eight base rounds, each small basket has 48 sts and measures 4.9 in (12.4 cm) across. The oval has 102 sts and measures 13.9 in x 4.9 in (35.3 cm x 12.4 cm). The 6-st lattice repeat divides evenly into both counts. The walls reach 3.4 in (8.6 cm) and 4.3 in (10.9 cm) before the rim. The rim adds 0.3 in (0.8 cm), for finished heights of 3.7 in (9.4 cm) and 4.6 in (11.7 cm). The assembled organizer measures about 16 in (40.6 cm) x 30 in (76.2 cm).
Happy crocheting!