

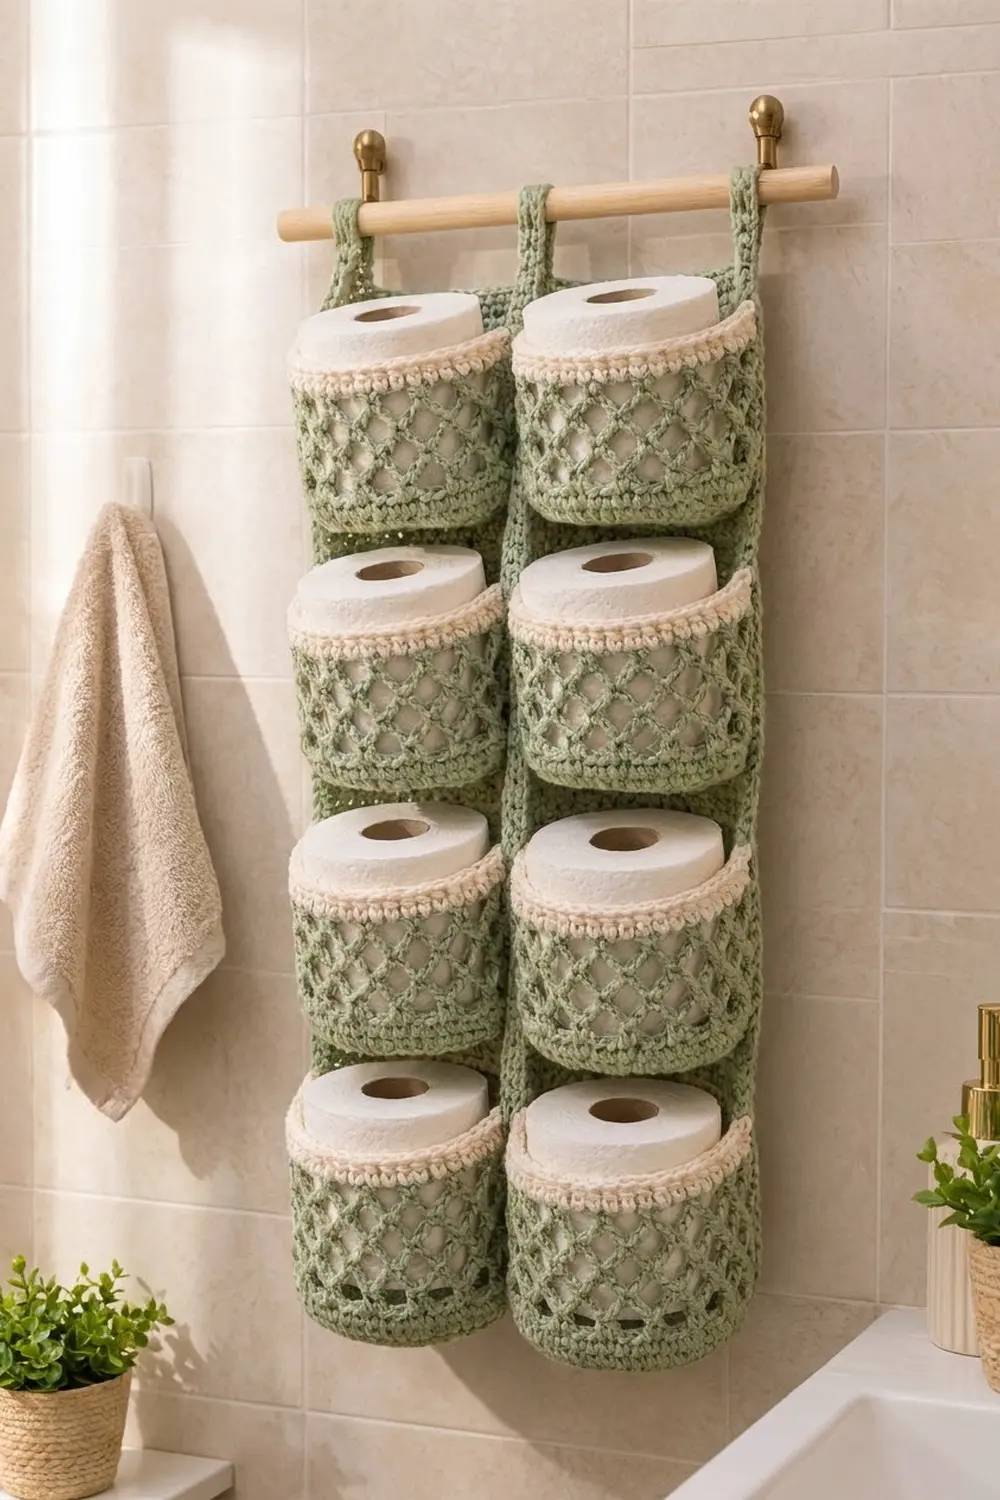
This hanging holder keeps six spare rolls within reach and off the floor. Six round, open-mesh pockets in soft sage green sit in two neat columns on a solid green backing panel. Each pocket is finished with a chunky cream rim. Three green loops slide over a wooden dowel, so the holder hangs flat against the wall.
The look is calm and a little boho. It has a diamond-lattice body, a dense cream band and a bumpy crab-stitch edge around each roll. Sage and cream suit almost any bathroom, and cotton yarn keeps its shape under the weight of the paper.
This pattern uses US crochet terms. The bordered backing panel measures 13 in wide x 15.4 in tall (33.0 x 39.1 cm). With the loops, the holder hangs about 17 in (43.2 cm) tall. Each pocket is 4.75 in (12.1 cm) across and 4 in (10.2 cm) tall.
Construction is simple. You make six pockets from the bottom up: a flat single crochet base, a mesh wall and a cream rim. Then you make one rectangular backing panel and sew the pockets onto it in a 2 x 3 grid. Last, you work a two-round border around the panel and add three hanging loops.
Finished Size and Construction
- Finished size: 13 x 15.4 in (33.0 x 39.1 cm) panel; about 17 in (43.2 cm) tall with loops
- Skill level: Easy-intermediate
- Terminology: US
- Yarn weight: Worsted (#4) cotton
- Hook: 5 mm (H-8)
- Number of pieces: 7 (6 pockets + 1 backing panel); the 3 loops are worked directly onto the panel
- Layout: 2 columns x 3 rows of pockets
- Pocket size: 4.75 in (12.1 cm) diameter x 4 in (10.2 cm) tall
- Panel size before border: 12 x 14.4 in (30.5 x 36.6 cm)
- Border depth: 0.5 in (1.3 cm) on each side
Materials
Choose a smooth worsted-weight cotton or cotton blend. Cotton is firm, stretches very little under weight and is easy to wash. A slightly heathered sage gives the lattice a soft, textured look.
- Sage green (MC): 200 g / 310 m
- Cream (CC): 40 g / 62 m
Tools:
- 5 mm (H-8) crochet hook
- Tapestry needle
- 8 locking stitch markers
- Straight pins
- Wooden dowel, 16 in (40.6 cm) long and 0.75 in (1.9 cm) in diameter
- Two wall hooks or knobs
- Tape measure and scissors
The yarn amounts include a margin of about 20 percent for your gauge pocket, sewing tails and differences in tension.
Abbreviations (US Terms)
- ch – chain
- sl st – slip stitch
- sc – single crochet
- dc – double crochet
- inc – 2 sc in the same stitch
- BLO – back loop only
- sp – space
- st(s) – stitch(es)
- MC / CC – main color / contrast color
- rev sc (crab stitch) – reverse single crochet. Work from left to right (if you crochet right-handed): insert the hook in the next stitch to the right, yarn over, pull up a loop, yarn over and pull through both loops. This makes the rope-like, bumpy edge on each rim.
Gauge and Checkpoints
Gauge: 16 sc x 18 rows = 4 in (10.2 cm) in sc with MC and a 5 mm hook.
Make one full pocket before anything else. It’s your real gauge test, and it shows whether a roll fits.
Checkpoints:
- After base Rnd 5 (30 sts): 2.4 in (6.1 cm) across
- After base Rnd 10 (60 sts): 4.75 in (12.1 cm) across, lying flat
- After Rnd 17 (last mesh round): the wall is about 2.75 in (7.0 cm) tall from the base edge
- Finished pocket: 4 in (10.2 cm) tall
- Panel after Row 65: 12 x 14.4 in (30.5 x 36.6 cm)
If the base is too big, go down half a hook size. If it’s too small, go up half a size. If the base cups, you’re working too tightly; if it ruffles, too loosely. Change hooks rather than stitch counts, because the mesh needs the 60-stitch base to make 15 even loops.
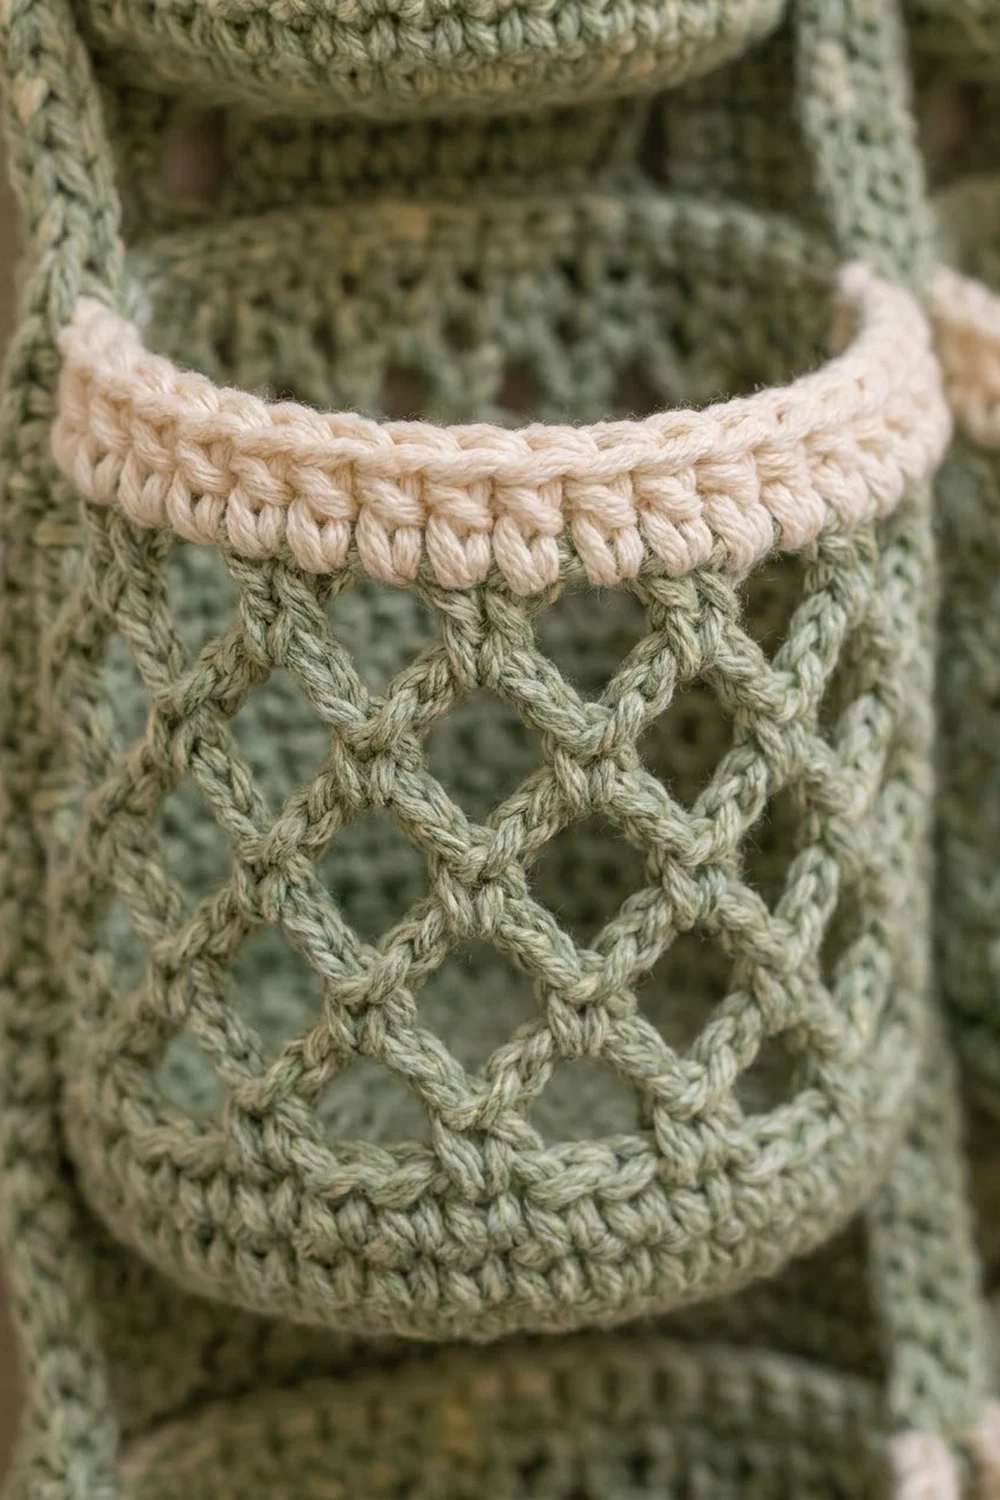
Pocket (make 6)
Work in joined rounds. The ch 1 at the start of a round doesn’t count as a stitch. Join each round with a sl st to the first sc unless the pattern says otherwise.
Base
With MC, make a magic ring.
- Rnd 1: Ch 1, 6 sc in ring, join. (6 sts)
- Rnd 2: Ch 1, inc in each st around, join. (12 sts)
- Rnd 3: Ch 1, sc 1, inc 6 times, join. (18 sts)
- Rnd 4: Ch 1, sc 2, inc 6 times, join. (24 sts)
- Rnd 5: Ch 1, sc 3, inc 6 times, join. (30 sts)
- Rnd 6: Ch 1, sc 4, inc 6 times, join. (36 sts)
- Rnd 7: Ch 1, sc 5, inc 6 times, join. (42 sts)
- Rnd 8: Ch 1, sc 6, inc 6 times, join. (48 sts)
- Rnd 9: Ch 1, sc 7, inc 6 times, join. (54 sts)
- Rnd 10: Ch 1, sc 8, inc 6 times, join. (60 sts)
Check the base: it should lie flat and measure 4.75 in (12.1 cm) across.
Wall
- Rnd 11: Ch 1, sc in BLO of each st around, join. (60 sts) This turns the wall upward and leaves a crisp ridge at the base edge.
- Rnd 12 (mesh setup): Ch 1, sc in first st, ch 5, skip 3 sts, sc in next st 14 times, ch 2, dc in first sc. (15 sc and 15 loops; the ch 2 + dc counts as the 15th loop)
Each repeat uses 4 stitches, and 15 x 4 = 60, so the loops sit evenly around the base. The closing dc leaves your hook in the middle of the last loop, ready for the next round.
- Rnds 13–17: Ch 1, sc around the post of the closing dc, ch 5, sc in next ch-5 sp 14 times, ch 2, dc in first sc. (15 loops)
That makes six mesh rounds in total. Each sc lands in the center of a loop from the round below, which forms the diamond lattice. Check that the wall is about 2.75 in (7.0 cm) tall.
- Rnd 18 (conversion): Ch 1, 2 sc around the post of the closing dc, 4 sc in next ch-5 sp 14 times, 2 sc in the first loop again (around the ch 2), join. (60 sts = 15 loops x 4 sc each, 0 extra)
The 60 stitches match the base, so the rim stands straight up without flaring or pulling in. Fasten off MC.
Rim
- Rnds 19–21: Join CC in any st at the back of the pocket. Ch 1, sc in each st around, join. (60 sts each round)
- Rnd 22: Ch 1, rev sc in each st around, join. (60 sts)
Fasten off and weave in the ends. The pocket now measures 4 in (10.2 cm) tall and 4.75 in (12.1 cm) across. Put a marker in the Rnd 21 stitch at the CC join. This is the center back.
Backing Panel (make 1)
With MC, ch 49.
- Row 1: Sc in 2nd ch from hook and in each ch across, turn. (48 sts)
- Rows 2–65: Ch 1, sc in each st across, turn. (48 sts)
Don’t fasten off. Put the working loop on a marker for the border. Checkpoint: the panel is 12 in (30.5 cm) wide (48 sts at 4 sts per inch) and 14.4 in (36.6 cm) tall (65 rows at 4.5 rows per inch).
Make All Pieces
- Pockets: 6, each using about 21 m of MC and 7 m of CC
- Backing panel: 1, MC only
- Hanging loops: 3, worked onto the panel after the border
Layout (front view, in panel stitches and rows):
| 3 sts | Pocket A (19) | 4 sts | Pocket B (19) | 3 sts |  Rows 45–62
| 3 sts | Pocket C (19) | 4 sts | Pocket D (19) | 3 sts |  Rows 24–41
| 3 sts | Pocket E (19) | 4 sts | Pocket F (19) | 3 sts |  Rows 3–20
Width check: 3 + 19 + 4 + 19 + 3 = 48 sts. Height check: 2 rows below + 18 + 3 + 18 + 3 + 18 + 3 rows above = 65 rows.
Joining
Whipstitch each pocket to the panel along two horizontal lines: the base edge and the rim. Use MC and a tapestry needle.
Stitch-to-stitch logic: Each pocket’s space on the panel is 19 stitches wide. That’s 4.75 in (12.1 cm), the same as the pocket’s diameter. On the pocket, count 9 stitches to each side of the center-back marker. That gives 19 back stitches (9 + 1 + 9) on Rnd 11 and 19 on Rnd 21. Sew one pocket stitch to one panel stitch. The other 41 stitches bulge forward to hold the roll.
- Pin the pocket so the base ridge (Rnd 11) sits on the bottom row of its space and the rim (Rnd 21) sits on the top row.
- Whipstitch the 19 back stitches of Rnd 11 to the 19 panel stitches on the bottom row.
- Whipstitch the 19 back stitches of Rnd 21 to the 19 panel stitches on the top row.
- Tack each side of the pocket to the panel at two mesh points so it can’t twist.
Tension: Pull each whipstitch snug but not tight. If the panel puckers between seams, you’re pulling too hard. The panel should stay flat, with no gathers.
Sew the bottom pockets (E, F) first, then the middle pair, then the top pair. Checkpoint: lay the panel flat. It should still measure 12 x 14.4 in (30.5 x 36.6 cm). You should see 1 in (2.5 cm) of panel between the columns and 0.75 in (1.9 cm) at each outer edge.
Border
Border gauge: the same as the panel, 16 sc = 4 in (10.2 cm). The row ends need a ratio, because there are 18 rows in 4 in. Working 8 sc over every 9 row ends turns the row gauge (4.5 per inch) into the stitch gauge (4 per inch).
The border goes around the backing panel only. Thanks to the 3-stitch margins, the pockets never touch it. So the starting counts come straight from the panel: 48 stitches along the top and bottom, and 63 row ends (Rows 2–64) down each side between the corner rows.
Rnd 1: With the MC loop from Row 65, ch 1. Top: 3 sc in the first st (corner), sc in the next 46 sts, 3 sc in the last st (corner). First side: work 8 sc over every 9 row ends, 7 times. (56 sc) Bottom: 3 sc in the first ch (corner), sc in the next 46 ch, 3 sc in the last ch (corner). Second side: 56 sc as before. Join.
Count: top 46 + bottom 46 + sides 56 + 56 + 4 corners x 3 = 216 sts.
Rnd 2: Ch 1, sc in each st around, working 3 sc in the center st of each corner group, join.
Count: 216 worked 1 per stitch + 8 extra (2 at each corner) = 224 sts. Between corner centers there are 48 sts on the top and bottom (1 + 46 + 1) and 58 sts on each side (1 + 56 + 1). Add the 4 corner centers of 3 sts: 96 + 116 + 12 = 224.
Why the math works: 56 sc at 4 per inch is 14 in, and 63 row ends at 4.5 per inch is also 14 in, so the sides lie flat. Each corner gets the extra stitches it needs to turn square. Two rounds add 0.5 in (1.3 cm) per side, bringing the panel to 13 x 15.4 in (33.0 x 39.1 cm).
Hanging Loops
Number the 48 top-edge stitches of Rnd 2 between the corner centers.
- Left, center and right loops: Join MC in st 1 (then st 22, then st 43). Row 1: ch 1, sc in this st and the next 5, turn. (6 sts) Rows 2–20: ch 1, sc 6, turn. (6 sts)
Each strap is 1.5 in (3.8 cm) wide and 4.4 in (11.2 cm) long. The center strap covers sts 22–27, leaving 21 stitches on each side, so it sits exactly in the middle. Fold each strap to the back and whipstitch Row 20 to the back of border Rnd 1, leaving room for the dowel.
Final Blocking
- Wash or spray the holder until it’s evenly damp.
- Lay it face up on a blocking mat.
- Pin the panel to 13 x 15.4 in (33.0 x 39.1 cm), with pins at each corner and every 2 in (5.1 cm).
- Put a roll wrapped in a plastic bag in each pocket so the pockets dry round.
- Straighten the mesh diamonds with your fingers so the lattice is even.
- Let it dry completely; cotton needs at least 24 hours.
- Remove the pins and rolls, then slide the dowel through the loops.
Final Quality-Control Checklist
- Every base is flat, has 60 sts and measures 4.75 in (12.1 cm)
- Every pocket has 15 mesh loops per round and 60 sts in each rim round
- Every crab-stitch edge is even, with no gap at the join
- Pockets line up across each row and down each column
- Gaps: 1 in (2.5 cm) between columns and 0.75 in (1.9 cm) at the outer edges
- Border: 216 sts in Rnd 1 and 224 in Rnd 2, with square corners
- Loops are evenly spaced and securely sewn
- All ends are woven in and trimmed
Troubleshooting
Base cups or ruffles: Recount, then change hook size. A cupping base is usually worked too tightly.
Mesh leans or spirals: Make sure each sc goes into the loop space, not into a chain. Close every round with the ch 2 + dc.
Rim flares: Work only 4 sc per loop in Rnd 18. Five per loop gives 75 stitches and a wavy edge.
Roll won’t fit: Go up a hook size for the whole pocket, or add one more mesh round for height.
Panel sides wave: You worked too many sc along the row ends. Keep to 8 sc per 9 row ends.
Pocket sags away from the panel: Add more tacking stitches through the mesh at the sides.
Care
Hand wash, or machine wash on a gentle cold cycle. Take out the dowel first, then reshape the holder and lay it flat to dry.
Final Notes
The whole project follows one measurement chain. A 60-stitch base measures 4.75 in (12.1 cm). Those 60 stitches split into 15 mesh loops, and 15 loops x 4 sc bring the rim back to 60. Each pocket fills a 19-stitch space on a 48-stitch x 65-row panel that measures 12 x 14.4 in (30.5 x 36.6 cm). Two border rounds of 216 and 224 stitches bring the panel to 13 x 15.4 in (33.0 x 39.1 cm). Check each link as you go, and the holder will hang straight and flat.
Happy crocheting!