

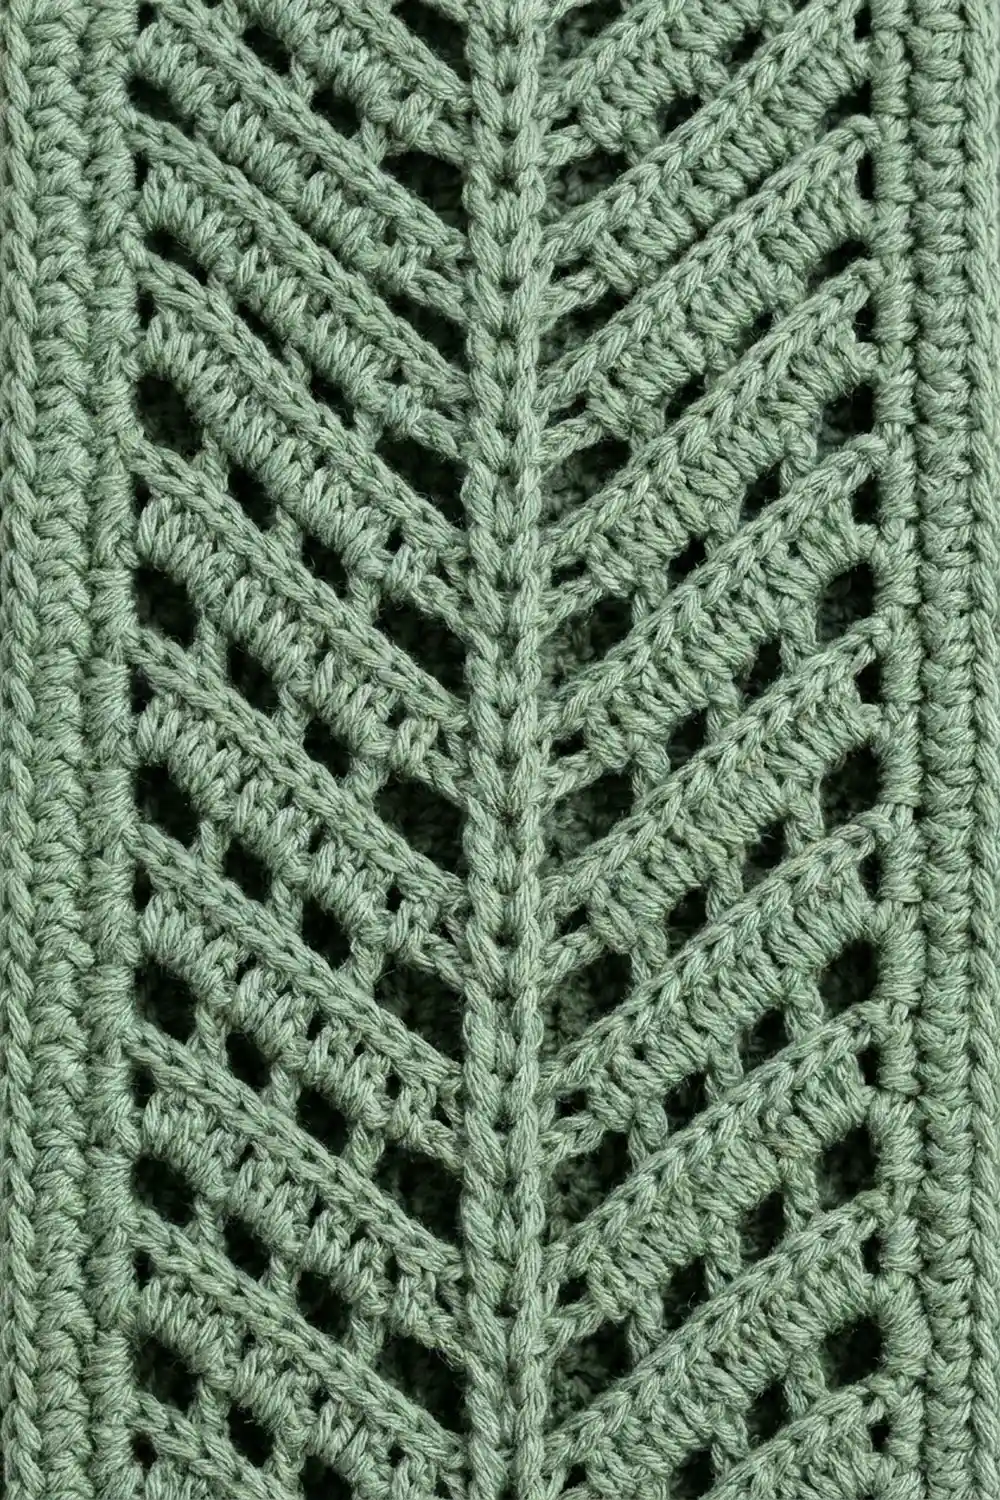
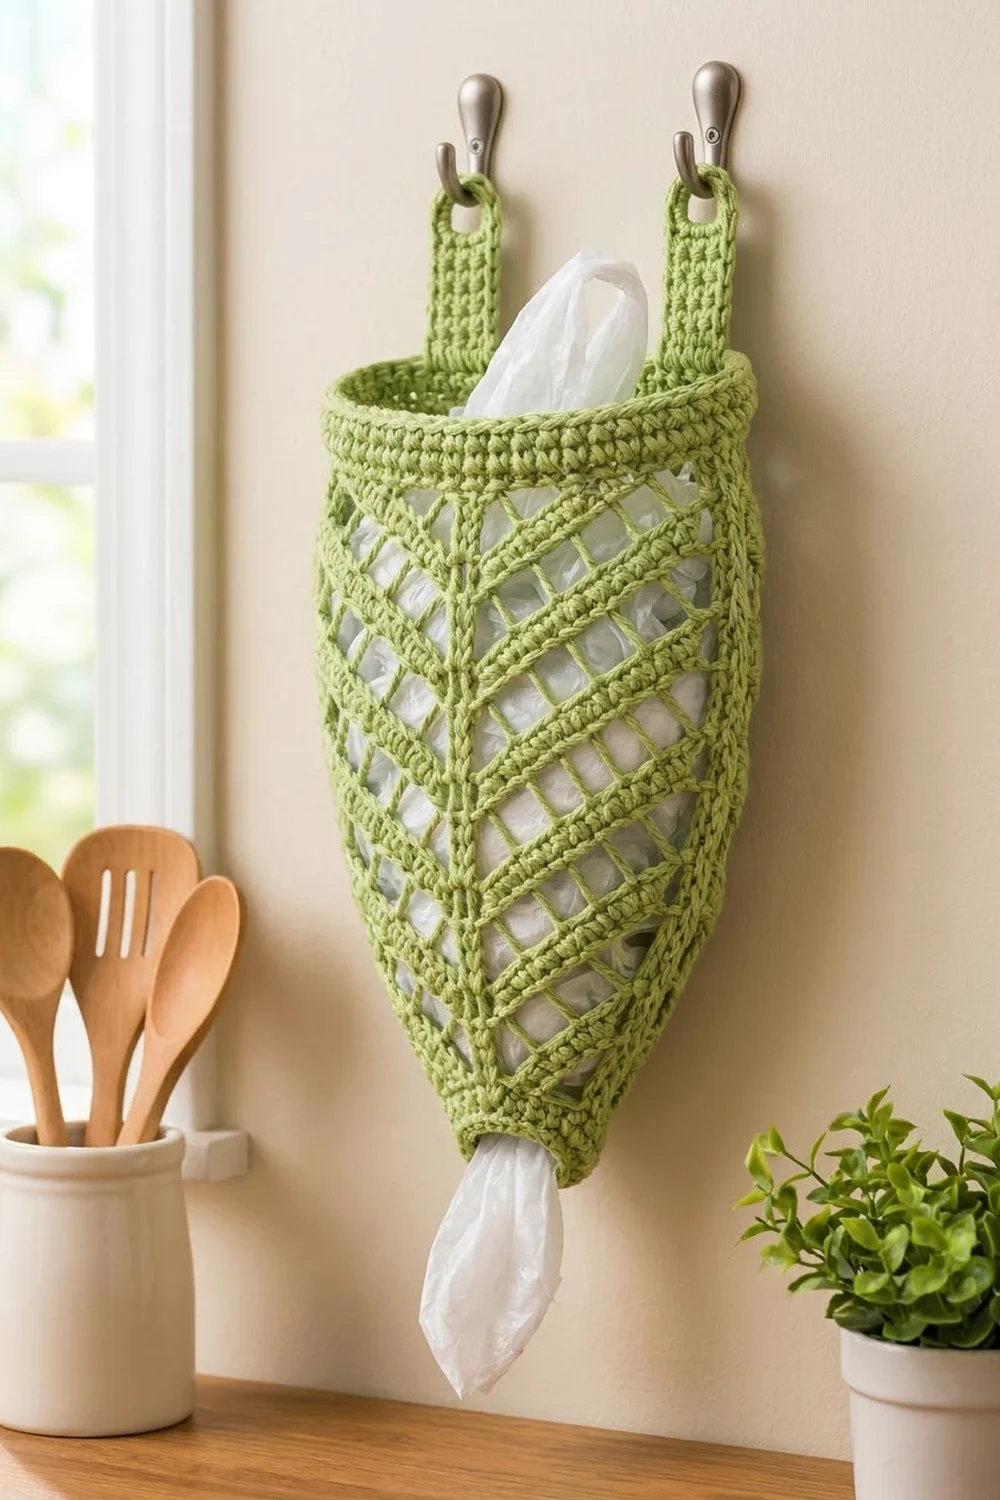
This sage green bag holder looks like a big leaf in mesh. A solid center vein runs down the front and the back. Angled bars branch off it in a chevron, with rows of open windows between them. The shape is narrow at the bottom and widens toward the top. It ends in a firm rolled rim with two hanging tabs. You stuff plastic grocery bags in from the top and pull them out one at a time through the small oval opening at the bottom.
Everything is worked in one color: a soft sage green in worsted weight cotton. The mesh lets you see how many bags are left, and the cotton holds its shape on a hook or door handle. It fits a farmhouse or plant-filled kitchen.
The pattern uses US crochet terms. The body measures about 7 in (17.8 cm) wide at the rim, 3 in (7.6 cm) wide at the bottom, and 11.75 in (29.8 cm) tall. With the tabs it hangs about 14.5 in (36.8 cm) tall.
The body is one seamless piece worked in the round from the bottom opening up. Each pair of rounds, a window round and then a solid bar round, uses ripple shaping: you decrease at the two center veins and increase at the two side edges. That is what slants the bars into chevrons. Extra increases at the sides widen the leaf on set rounds. A solid single crochet rim finishes the top, and two small tabs are sewn inside the back rim.
Finished Size and Construction
- Finished size: 7 in (17.8 cm) wide at rim x 11.75 in (29.8 cm) tall, flat; 14.5 in (36.8 cm) tall including tabs
- Skill level: Intermediate
- Terminology: US
- Yarn weight: Worsted (#4), cotton
- Hook: 5.0 mm (H-8)
- Number of pieces: 3 (1 body, 2 tabs)
- Layout: body worked in the round; tabs sewn inside the back rim
- Piece sizes: body as above; each tab 1 in (2.5 cm) wide x 3.75 in (9.5 cm) long
- Size before border (after Rnd 20): about 7.5 in (19.1 cm) wide x 10.75 in (27.3 cm) tall
- Border depth: top rim 1 in (2.5 cm); bottom trim is one round of single crochet
Materials
Use a smooth worsted weight cotton or cotton blend, about 170 m per 100 g. Cotton has the structure this piece needs. Acrylic works but sags more under a full load of bags.
- Sage Green: 115 g (about 196 m)
That is the whole project: body about 100 g, tabs about 6 g, plus a margin.
Tools:
– 5.0 mm (H-8) crochet hook
– 4 locking stitch markers (1 in a contrast color for S1)
– Tapestry needle
– Scissors
– Measuring tape
– Rust-proof pins and a blocking surface
All quantities include a margin of about 10% for your gauge swatch and small tension differences.
Abbreviations (US Terms)
- ch – chain
- sl st – slip stitch
- sc – single crochet
- dc – double crochet
- sc2tog – single crochet 2 together
- sk – skip
- st(s) – stitch(es)
- sp – space
- rnd(s) – round(s)
Special stitches and terms:
– dc3tog (spine decrease): [yarn over, insert hook in next st, pull up a loop, yarn over, pull through 2 loops] 3 times, yarn over, pull through all 4 loops. The top of this st is the new spine st. Move the spine marker into it.
– Side group: 3 dc (or 5 dc on growth rounds) in the marked side st. The center dc of the group is the new side st. Move the side marker into it.
– Ch-2 window: “ch 2, sk 1” makes one window. Each ch-2 sp counts as 1 st in the stitch counts and gets exactly 1 dc on the next round.
– Quarter (Q): the sts between a side st and a spine st, not counting either one. Every round has 2 side sts, 2 spine sts, and 4 quarters, so the total is 4Q + 4.
Gauge and Checkpoints
- Dc gauge: 14 dc and 7 rnds = 4 in (10.2 cm)
- Sc gauge: 16 sc and 18 rows = 4 in (10.2 cm)
Make one test tab first (it’s small and uses sc gauge). It should measure 1 in (2.5 cm) wide and 3.75 in (9.5 cm) long. Then work the body through Rnd 6 and check:
| Checkpoint | Width (flat) | Height from bottom edge |
|---|---|---|
| After Rnd 2 | 3 in (7.6 cm) | 0.5 in (1.3 cm) |
| After Rnd 6 | 5.25 in (13.3 cm) | 2.75 in (7.0 cm) |
| After Rnd 14 | 7.5 in (19.1 cm) | 7.25 in (18.4 cm) |
| After Rnd 20 | 7.5 in (19.1 cm) | 10.75 in (27.3 cm) |
| After rim | 7 in (17.8 cm) | 11.75 in (29.8 cm) |
If your pieces come out too big, go down half a hook size. If they’re too small, go up half a size. If the width is right but the height is off, check your dc height: pull each dc up to its full loop before you finish it, and don’t yank on the last loop.
Body
Work in joined rounds with the right side always facing you. Don’t turn.
Set-up
Rnd 1: Ch 24 and sl st to the first ch to make a ring, taking care not to twist it. Ch 1, sc in each ch around, then sl st to the first sc. (24 sts)
Place markers: S1 (contrast marker) in st 1, V1 in st 7, S2 in st 13, V2 in st 19. Each quarter has 5 sts (Q = 5).
Rnd 2: Ch 1, sc in each st around, then sl st to the first sc. (24 sts) Move each marker up into the st directly above it.
Round Formulas
Every round below starts at S1 and follows one of four formulas. R = the number of window repeats per quarter.
Window Growth (WG): Ch 3 (counts as dc), 4 dc in S1. [Ch 2, sk 1, dc in next] R times, dc3tog (V1). [Dc in next, ch 2, sk 1] R times, 5 dc in S2. Repeat from * to * once more for V2, then sl st to the top of the ch-3.
Window Even (WE): Same as WG, but start with ch 3 and 2 dc in S1, and work 3 dc in S2.
Bar Growth (BG): Ch 3 (counts as dc), 4 dc in S1. Dc in each st and ch-2 sp to 1 st before V1, dc3tog, dc in each st and ch-2 sp to S2, 5 dc in S2. Repeat from * to *, dc in each remaining st, then sl st to the top of the ch-3.
Bar Even (BE): Same as BG, but start with ch 3 and 2 dc in S1, and work 3 dc in S2.
Each quarter has Q − 1 sts left to work once the side group and the decrease have used their share, so you can always check by counting. Window rounds always begin with an odd Q, so the windows mirror perfectly on both sides of each vein.
Leaf Rounds
Rnd 3 (WG, R = 2): 28 sts (20 dc-type sts + 8 ch-2 sps). Q = 6.
Rnd 4 (BG, 5 dc between group and dc3tog): 32 sts. Q = 7.
Rnd 5 (WG, R = 3): 36 sts (24 dc-type sts + 12 ch-2 sps). Q = 8.
Rnd 6 (BG, 7 dc between group and dc3tog): 40 sts. Q = 9. Checkpoint: 5.25 in (13.3 cm) wide.
Rnd 7 (WE, R = 4): 40 sts (24 dc-type sts + 16 ch-2 sps). Q = 9.
Rnd 8 (BE, 8 dc between group and dc3tog): 40 sts. Q = 9.
Rnd 9 (WG, R = 4): 44 sts (28 dc-type sts + 16 ch-2 sps). Q = 10.
Rnd 10 (BG, 9 dc between group and dc3tog): 48 sts. Q = 11.
Rnd 11 (WE, R = 5): 48 sts (28 dc-type sts + 20 ch-2 sps). Q = 11.
Rnd 12 (BE, 10 dc between group and dc3tog): 48 sts. Q = 11.
Rnd 13 (WG, R = 5): 52 sts (32 dc-type sts + 20 ch-2 sps). Q = 12.
Rnd 14 (BG, 11 dc between group and dc3tog): 56 sts. Q = 13. Checkpoint: 7.5 in (19.1 cm) wide.
Rnd 15 (WE, R = 6): 56 sts (32 dc-type sts + 24 ch-2 sps). Q = 13.
Rnd 16 (BE, 12 dc between group and dc3tog): 56 sts. Q = 13.
Rnds 17–20: Repeat Rnds 15–16 twice. (56 sts each round)
That gives 9 window rounds and 9 bar rounds. The stacked dc3tog sts form the center vein on the front and the back. The side groups make a solid ridge down each edge, and the bars rise from each vein toward the sides in a V.
Make All Pieces
- Body: make 1 (Sage Green).
- Tabs: make 2 (Sage Green).
Tab: Ch 5.
Row 1: Sc in the 2nd ch from the hook and in each remaining ch. Turn. (4 sts)
Rows 2–14: Ch 1, sc in each st. Turn. (4 sts)
Row 15: Ch 1, sc 1, ch 2, sk 2, sc 1. Turn. (4 sts: 2 sc + 2 ch)
Row 16: Ch 1, sc 1, 2 sc in the ch-2 sp, sc 1. Turn. (4 sts)
Row 17: Ch 1, sc2tog twice. (2 sts) Fasten off and leave a 12 in (30.5 cm) tail for sewing.
The tab is 1 in (2.5 cm) wide and 3.75 in (9.5 cm) long. Row 17 rounds the top over the buttonhole.
Layout (back rim, 28 sts from fold to fold):
| 5 sts | TAB (4 sts) | 10 sts | TAB (4 sts) | 5 sts |
Joining
Work the top rim (see Border) before you join the tabs.
Lay the body flat with S1 and S2 at the folds. The back half has 28 rim sts. Pin each tab to the inside of the back rim. Line up the bottom edge of each tab with the bottom of the rim (Rnd 21) and match the tab’s 4 Row 1 sts to 4 rim sts, following the layout above.
Use the tail to whipstitch each tab’s side edges and bottom edge to the rim. Go through one tab st and the matching rim st every time, so you get 4 stitches along the bottom and one stitch per tab row up each side. Sew the bottom 1 in (2.5 cm) of the tab, which is the full depth of the rim. Pull each stitch snug but not tight, so the rim doesn’t pucker. Weave the tail back through the seam in a different direction before you trim it.
Checkpoint: each tab stands 2.75 in (7.0 cm) above the rim, and the overall height is 14.5 in (36.8 cm).
Border
The border has two parts, the top rim and the bottom trim, both worked in sc. Border gauge: 16 sc = 4 in (10.2 cm).
Top rim
Rnd 21 (conversion round): Ch 1, sc in each st around. Each dc3tog and the top of the ch-3 get 1 sc each. Sl st to the first sc. (56 + 0 = 56 sts: 56 worked one per existing st, 0 added; 28 front, 28 back)
Rnds 22–24: Ch 1, sc in each st, then sl st to the first sc. (56 sts: 28 front, 28 back) Fasten off with an invisible join.
The math works because 56 sc at 16 sc per 4 in comes to 14 in (35.6 cm) around, which is 7 in (17.8 cm) flat. The sc rim pulls the 7.5 in (19.1 cm) mesh in a little, which gives the leaf its rounded shoulders. The 4 rounds add 1 in (2.5 cm) of height.
Bottom trim
Rnd 1: With the bottom facing you, join yarn in the free loop of the foundation ch under S1. Ch 1, sc in each free loop around, then sl st to the first sc. (24 + 0 = 24 sts: 12 front, 12 back) Fasten off.
This round puts sc over sc at the same 4 sc per inch, so the opening stays 6 in (15.2 cm) around and 3 in (7.6 cm) flat. It’s firm, but it still stretches to let a bag through.
Final Blocking
- Weave in all ends along solid sc or dc sts, never across a window.
- Soak the holder in cool water for 10 minutes. Gently press the water out without wringing.
- Lay it flat with a vein centered on the front and the side ridges at the folds.
- Pin the rim to 7 in (17.8 cm) wide and the widest point to 7.5 in (19.1 cm).
- Pin the bottom to 3 in (7.6 cm) wide and the body height to 11.75 in (29.8 cm).
- Open each window with your fingers so the bars run in straight, even chevrons.
- Let it dry completely, then flip it and let the back dry too.
- Pin the tabs flat and straight while they dry.
Final Quality-Control Checklist
- Body is 7 in (17.8 cm) wide at the rim and 11.75 in (29.8 cm) tall
- Bottom opening is 3 in (7.6 cm) flat and smooth
- Final rim count is 56 sts, 28 per side
- The center veins run straight, with no drift to one side
- Window counts match on both sides of each vein
- Tabs are 2.75 in (7.0 cm) above the rim, level with each other, and 10 sts apart
- No ends show inside the mesh
Troubleshooting
- The vein spirals or drifts. You probably missed moving a marker. Always move V1 and V2 into the top of the new dc3tog.
- Windows don’t line up. Check Q before each window round. It must be odd, and R = (Q − 1) ÷ 2.
- The bottom flares. Your growth rounds are too loose. Go down a hook size for Rnds 3–6.
- The rim ruffles. Check that Rnd 21 is exactly 56 sts. If it is, use a hook half a size smaller for the rim.
- Tabs lean or stretch. Re-sew the tabs through the full 1 in (2.5 cm) depth of the rim.
- The holder sags when full. Your yarn is too soft or your gauge is too loose. Switch to 100% cotton or tighten your gauge.
Care
Hand wash or machine wash cold on a gentle cycle, then reshape and dry flat. Don’t put it in the dryer, because heat can shrink cotton unevenly.
Final Notes
The measurements build on each other. A 24-st ring makes a 3 in (7.6 cm) opening. Four growth pairs take it to 56 sts and a 7.5 in (19.1 cm) width by Rnd 14. Even rounds bring the body to 10.75 in (27.3 cm) tall. The 1 in (2.5 cm) rim draws the top to 7 in (17.8 cm) and finishes the body at 11.75 in (29.8 cm). The tabs add 2.75 in (7.0 cm), for a total hanging height of 14.5 in (36.8 cm). If you check each step on that list, the finished holder will match.
Happy crocheting!