

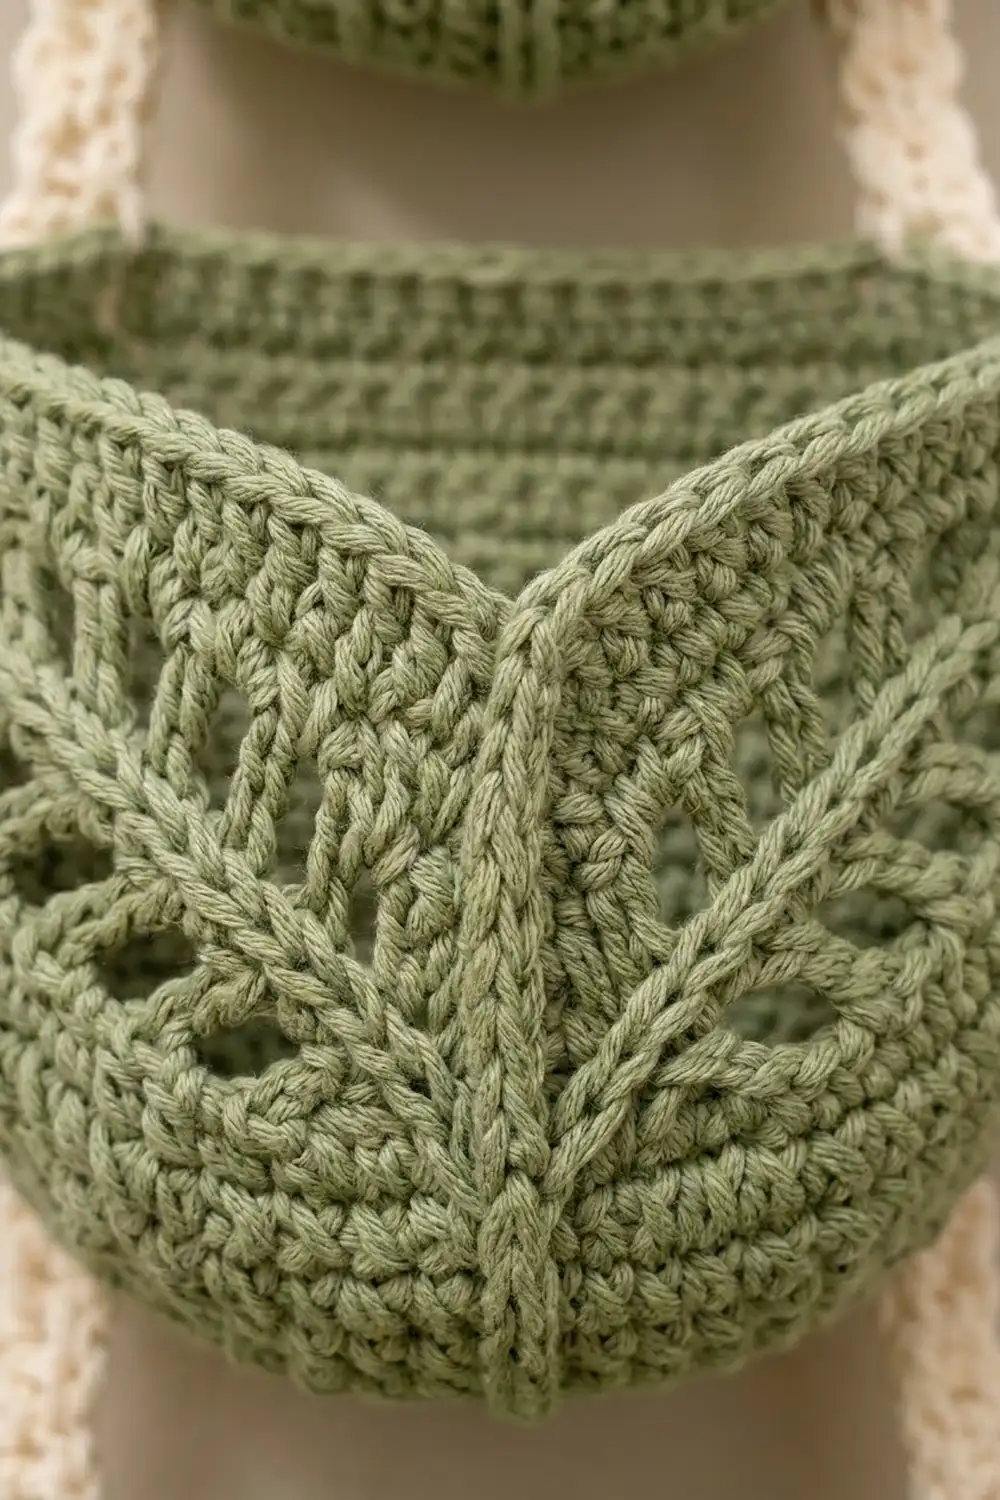
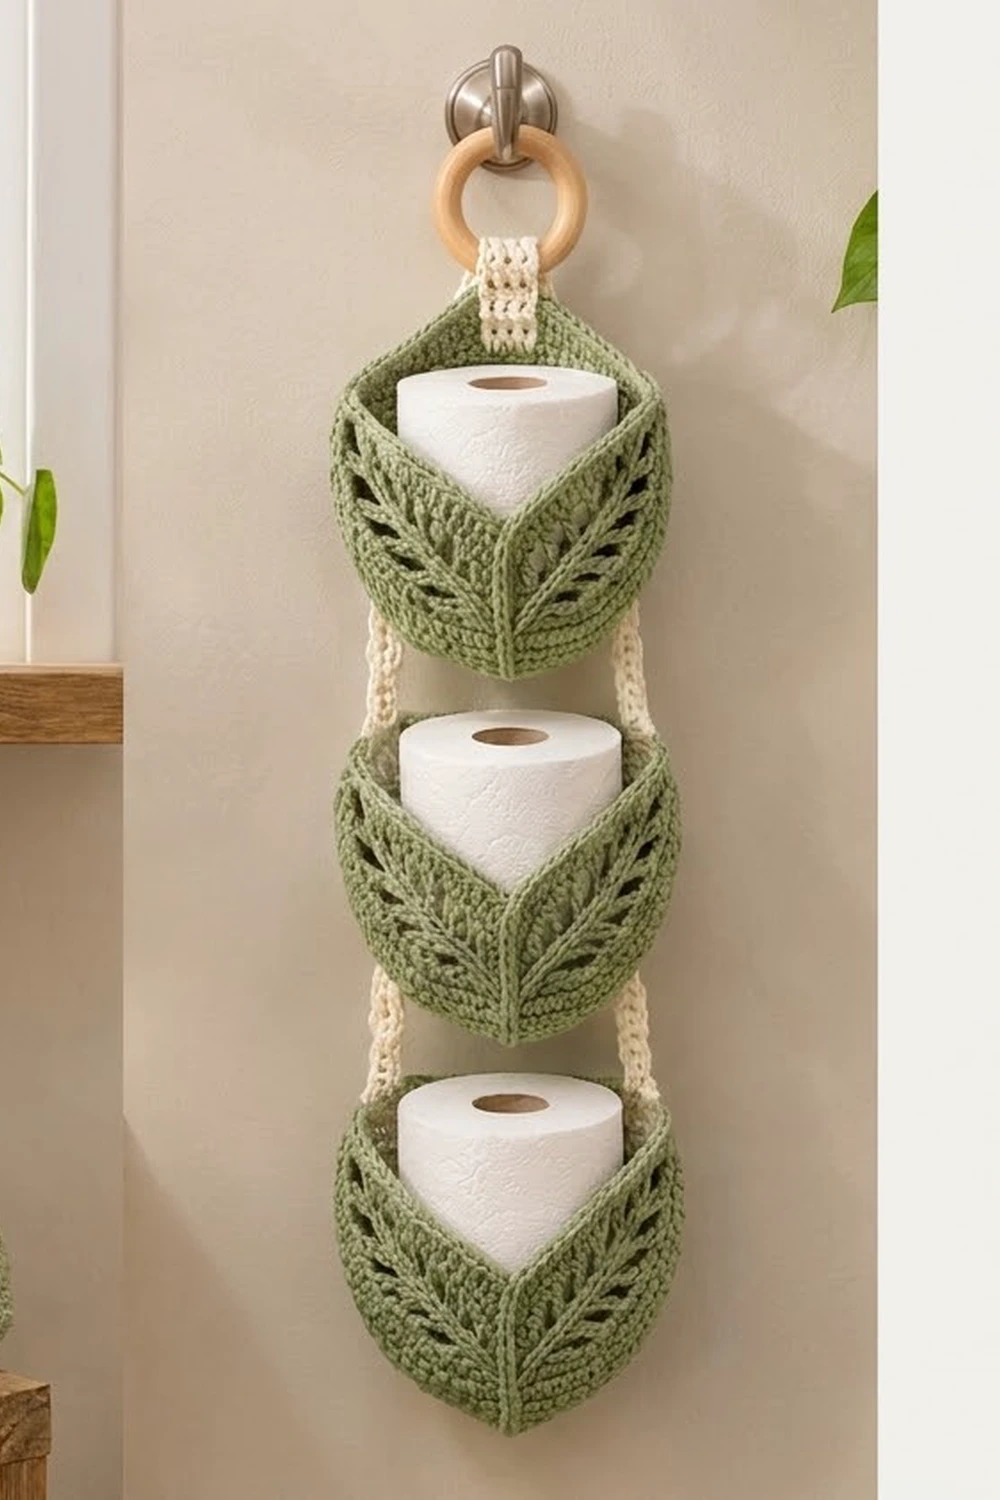
This hanging holder stores three spare rolls in three sage-green pockets, stacked one above the other. Each pocket is shaped like a leaf. It has a pointed tip, a raised center spine, and slanted eyelet veins that run out from the spine. Cream straps link the pockets, and a cream tab loops over a natural wooden ring so you can hang the holder from a robe hook or towel-ring post.
The palette is soft and calm: sage green for the pockets and warm cream for the straps and tab. The style sits somewhere between botanical and farmhouse, and it suits a bathroom with plants, light wood, and white towels.
The pattern uses US crochet terms. The finished holder hangs about 25.2 in (64.0 cm) from the bottom of the ring to the tip of the lowest pocket, or about 28 in (71.1 cm) with the ring. Each pocket is about 8.2 in (20.8 cm) wide and 6.9 in (17.5 cm) tall.
Each pocket starts as two flat shield-shaped panels worked in rows from the tip up. The front panel has the spine and the vein eyelets, and the back panel is plain double crochet. You join the two panels with a single crochet seam, add a three-round rim that dips at the center front, and then sew the pockets together with straps and a tab.
Finished Size and Construction
- Finished size: 8.2 in (20.8 cm) wide x 25.2 in (64.0 cm) long, plus a 2.75 in (7.0 cm) ring
- Skill level: Intermediate (front/back post stitches, shaping)
- Terminology: US crochet terms
- Yarn weight: Worsted (#4), cotton or cotton blend
- Hook: 5.0 mm (H-8)
- Number of pieces: 11 crocheted pieces (6 panels, 4 straps, 1 tab) plus 1 wooden ring
- Layout: 3 pockets in a single vertical column
- Panel size: 7.7 in (19.6 cm) wide x 6 in (15.2 cm) tall
- Pocket size before rim: 8.2 in (20.8 cm) x 6.2 in (15.7 cm)
- Rim (border) depth: 0.7 in (1.8 cm), 3 rounds of sc
Materials
Cotton or a cotton blend is the best choice here. It holds its shape, stands up to bathroom humidity, and shows the eyelets and post-stitch spine clearly. Pick a smooth yarn in a light color so the texture stays visible. These amounts assume a worsted cotton of about 190 m per 100 g.
- Sage green: 90 g (171 m) for the six panels, seams, and rims
- Cream: 20 g (38 m) for the four straps and the tab
- 5.0 mm (H-8) crochet hook
- Wooden ring, 2.75 in (7.0 cm) across
- Tapestry needle
- 4 stitch markers
- Scissors and a measuring tape
- Blocking mat and pins
Both quantities include a margin of about 15% for your gauge swatch and weaving in ends.
Abbreviations (US Terms)
- ch: chain
- sl st: slip stitch
- sc: single crochet
- dc: double crochet
- sk: skip
- st(s): stitch(es)
- sp: space
- tch: turning chain
- BLO: back loop only
- RS / WS: right side / wrong side
- FPdc (front post double crochet): Yarn over, insert the hook from front to back to front around the post of the stitch, and complete a dc. This raises the stitch on the side facing you.
- BPdc (back post double crochet): Yarn over, insert the hook from back to front to back around the post, and complete a dc. Working this on WS rows keeps the spine raised on the RS.
- sc3tog: (Insert hook in next st, yarn over, pull up a loop) 3 times, then yarn over and pull through all 4 loops on the hook.
- Eyelet: Ch 1, sk next st. Each eyelet counts as 1 stitch. On the next row, work 1 dc into the ch-1 sp.
Stitch notes: The ch 3 at the start of a row counts as 1 dc. The center stitch is the spine. Work it as an FPdc on RS rows and as a BPdc on WS rows.
Gauge and Checkpoints
- Double crochet: 14 dc x 8 rows = 4 in (10.2 cm)
- Single crochet: 16 sc x 18 rows = 4 in (10.2 cm)
Make one complete front panel before anything else. It works as your gauge swatch and shows you how the eyelets look.
- After Row 5: 19 sts, about 5.4 in (13.7 cm) across the top and 2.5 in (6.4 cm) tall
- After Row 9: 27 sts, about 7.7 in (19.6 cm) across and 4.5 in (11.4 cm) tall
- After Row 12: 7.7 in (19.6 cm) x 6 in (15.2 cm)
If your panel is too big, go down 0.5 mm in hook size. If it is too small, go up 0.5 mm. Height matters most, because a short pocket lets the roll tip forward. If only the height is off, adjust how far you pull up your dc loops before you change hooks.
Front Leaf Panel (make 3, sage)
Every increase happens at the two outer edges, so the spine stays exactly in the center. Each row lists its own complete stitch count.
Row 1 (RS): Ch 4, 2 dc in 4th ch from hook. (3 sts) The skipped ch counts as the first dc. The middle stitch is the spine. Place a marker in it and move the marker up as you go.
Row 2 (WS): Ch 3, turn, 2 dc in same st, BPdc around spine, 3 dc in top of tch. (7 sts: 3 each side + spine)
Row 3: Ch 3, turn, 2 dc in same st, eyelet, dc in next st, FPdc around spine, dc in next st, eyelet, 3 dc in top of tch. (11 sts)
Row 4: Ch 3, turn, 2 dc in same st, dc in next 4 sts (work into each ch-1 sp as a st), BPdc around spine, dc in next 4 sts, 3 dc in top of tch. (15 sts)
Row 5: Ch 3, turn, 2 dc in same st, dc in next 2 sts, eyelet, dc in next 3 sts, FPdc, dc in next 3 sts, eyelet, dc in next 2 sts, 3 dc in top of tch. (19 sts)
From here on, each edge increases by only 1 stitch per row. That turns the pointed tip into rounded leaf sides.
Row 6: Ch 3, turn, dc in same st, dc in next 8 sts, BPdc, dc in next 8 sts, 2 dc in top of tch. (21 sts)
Row 7: Ch 3, turn, dc in same st, dc in next 3 sts, eyelet, dc in next 3 sts, eyelet, dc in next st, FPdc, dc in next st, eyelet, dc in next 3 sts, eyelet, dc in next 3 sts, 2 dc in top of tch. (23 sts)
Row 8: Ch 3, turn, dc in same st, dc in next 10 sts, BPdc, dc in next 10 sts, 2 dc in top of tch. (25 sts)
Row 9: Ch 3, turn, dc in same st, (dc in next 3 sts, eyelet) twice, dc in next 3 sts, FPdc, (dc in next 3 sts, eyelet) twice, dc in next 3 sts, 2 dc in top of tch. (27 sts)
Row 10: Ch 3, turn, dc in next 12 sts, BPdc, dc in next 12 sts, dc in top of tch. (27 sts)
Row 11: Ch 3, turn, dc in next 2 sts, (eyelet, dc in next 3 sts) twice, eyelet, dc in next st, FPdc, dc in next st, (eyelet, dc in next 3 sts) twice, eyelet, dc in next 2 sts, dc in top of tch. (27 sts)
Row 12: Ch 3, turn, dc in next 12 sts, BPdc, dc in next 12 sts, dc in top of tch. (27 sts) Fasten off and leave a short tail.
Why the veins slant: Count each eyelet’s position outward from the spine, where position 1 is the stitch next to it. On RS rows the eyelets fall at position 2 (Row 3), 4 (Row 5), 2 and 6 (Row 7), 4 and 8 (Row 9), and 2, 6, and 10 (Row 11). Each vein moves 2 stitches outward every 2 rows, and a new vein starts beside the spine every 4 rows. That gives three diagonal veins on each side of the spine.
Back Panel (make 3, sage)
Work Rows 1–12 exactly like the Front Leaf Panel, with two changes. Replace every eyelet with 1 dc, and work the spine as a plain dc. The stitch counts stay the same: 3, 7, 11, 15, 19, 21, 23, 25, 27, 27, 27, 27. Fasten off.
Make All Pieces
- Sage: 3 Front Leaf Panels and 3 Back Panels
- Cream straps (make 4): Ch 28, sc in 2nd ch from hook and in each ch across. (27 sc) Work 2 more rows of ch 1, turn, sc in each st. (27 sc) Each strap measures 6.75 in (17.1 cm) x about 0.7 in (1.8 cm).
- Cream tab (make 1): Ch 7, sc in 2nd ch from hook and in each ch across. (6 sc) For Rows 2–22, ch 1, turn, and sc BLO in each st. (6 sc) The tab measures 1.5 in (3.8 cm) x 4.9 in (12.4 cm) and has a fine ribbed texture.
Layout (front view):
          ( RING )
           [TAB]
      [   POCKET 1   ]
       |            |   <- 2 straps
      [   POCKET 2   ]
       |            |   <- 2 straps
      [   POCKET 3   ]
Joining
Panel seam. Put one front panel and one back panel together with wrong sides facing, the front panel toward you, and the tips and top edges lined up. Join sage at the top right corner. Working through both layers, sc 2 into each row-end down the right side. (24 sc) Work 3 sc into the tip, then sc 2 into each row-end up the left side. (24 sc) That makes 51 sc in total. Do not fasten off.
Stitch logic: Each panel is 12 dc rows, or 6 in (15.2 cm), tall. Twenty-four sc at 4 sc per inch also measure 6 in (15.2 cm), so the seam lies flat and doesn’t ruffle or pucker. Work through both loops of both layers. Keep your tension relaxed enough to hold a roll, but not so loose that the seam gapes.
Checkpoint: The pocket should now measure about 8.2 in (20.8 cm) x 6.2 in (15.7 cm), with the top still open.
Straps. Join the straps after the rims are done. Lay Pockets 2 and 3 face down. Sew the top 0.75 in (1.9 cm) of a strap to the back of the pocket above, along the inside of each side seam, so it overlaps the rim. Whipstitch the bottom 0.75 in (1.9 cm) to the back of the pocket below, just inside the side seam, so that the sewn section ends 3.75 in (9.5 cm) above that pocket’s tip. That leaves 5.25 in (13.3 cm) of strap free, and the gap between each tip and the next rim works out to 1.5 in (3.8 cm). Sew through the back panel only, so no cream shows inside the pockets.
Tab. Fold the tab over the ring. Sew both ends, overlapping 0.5 in (1.3 cm), to the center back of Pocket 1 at the rim. The visible tab should measure 1.5 in (3.8 cm) between the rim and the ring.
Size checkpoint: The holder should measure 25.2 in (64.0 cm) from the bottom of the ring to the lowest tip.
Border (Pocket Rim)
Border gauge: 16 sc = 4 in (10.2 cm), so each sc is 0.25 in (0.6 cm) wide.
Keep going from the end of the seam, at the top left corner, and work in rounds around the opening.
Rnd 1: Ch 1. Work sc in each of the 27 sts across the top of the front panel, 1 sc in the top of the side seam, sc in each of the 27 sts across the back panel, and 1 sc in the top of the other seam. Join with a sl st. (56 sc: front 27, back 27, seams 1 + 1) This round is 1 sc per existing stitch with no extra stitches.
Rnd 2: Ch 1. Sc in each st to 1 st before the front center (the st above the spine), sc3tog, then sc in each st to the end. Join. (54 sc: front 25, back 27, seams 2)
Rnd 3: Ch 1. Sc in each st to 1 st before the center sc3tog, sc3tog centered over it, then sc to the end. Join. (52 sc: front 23, back 27, seams 2) Fasten off and weave in ends.
Why the math works: The 27 dc across the top of each panel measure 7.7 in (19.6 cm). The same 27 stitches in sc only cover 6.75 in (17.1 cm), so Round 1 gently gathers the opening into a firm cuff. That cuff holds the roll upright. The four stitches you remove at the front center pull that edge down into the shallow V of a leaf, while the back stays straight at 27 sts so it lies flat against the wall. Three sc rounds add 0.7 in (1.8 cm), which brings the pocket to 6.9 in (17.5 cm). Three pockets plus two 1.5 in (3.8 cm) gaps and a 1.5 in (3.8 cm) tab add up to 25.2 in (64.0 cm).
Final Blocking
- Before you add the straps, mist each finished pocket lightly with water.
- Stuff the pocket with a toilet roll wrapped in a plastic bag so it dries in its rounded shape.
- Pinch the spine into a ridge, and press the eyelets open with a fingertip.
- Pin the tip to a point and pin the rim’s V at the front center.
- Let it dry completely, then remove the roll.
- Assemble the straps and tab. Steam lightly from above, without touching the yarn with the iron.
Final Quality-Control Checklist
- Each panel has 27 sts in Row 12 and measures 7.7 in (19.6 cm) x 6 in (15.2 cm).
- The spine runs straight up the center of every front panel.
- Each side of the spine has three diagonal veins.
- Each seam has 24 sc per side plus 3 at the tip.
- Each rim ends with 52 sc and a centered V.
- The strap gaps are all 1.5 in (3.8 cm), and the pockets hang level.
- The tab is sewn securely and the ring sits centered.
- The total length is 25.2 in (64.0 cm), or 28 in (71.1 cm) with the ring.
Troubleshooting
- The spine wanders off center: You missed an increase on one edge. Count both sides of each row; they must match.
- The veins look vertical: Check the eyelet positions from the spine. Each vein should shift 2 sts outward every RS row it appears on.
- The pocket ruffles at the seam: You worked more than 2 sc per row-end. Take it out and redo the seam with exactly 24 per side.
- The rim flares: Your sc tension is too loose. Redo the rim with a hook 0.5 mm smaller.
- The pockets tilt: The straps are sewn at different heights. Measure each sewn section’s distance from the tip again.
- The roll falls through or sits too low: Your gauge is too loose. Remake the panels with a smaller hook.
Care
Hand wash in cool water with mild soap, press out the water in a towel, and lay flat to dry over a roll so the pockets keep their shape. Do not tumble dry.
Final Notes
The measurements build on each other. The 14 dc gauge gives a 27-stitch panel that is 7.7 in (19.6 cm) wide and 6 in (15.2 cm) tall. The 24-sc seams match the panel height, so each joined pocket measures 8.2 in (20.8 cm) x 6.2 in (15.7 cm). The 0.7 in (1.8 cm) rim takes each pocket to 6.9 in (17.5 cm). Three pockets, two strap gaps, and the tab come to 25.2 in (64.0 cm). Check your measurements at each step and the holder will hang straight.
Happy crocheting!