

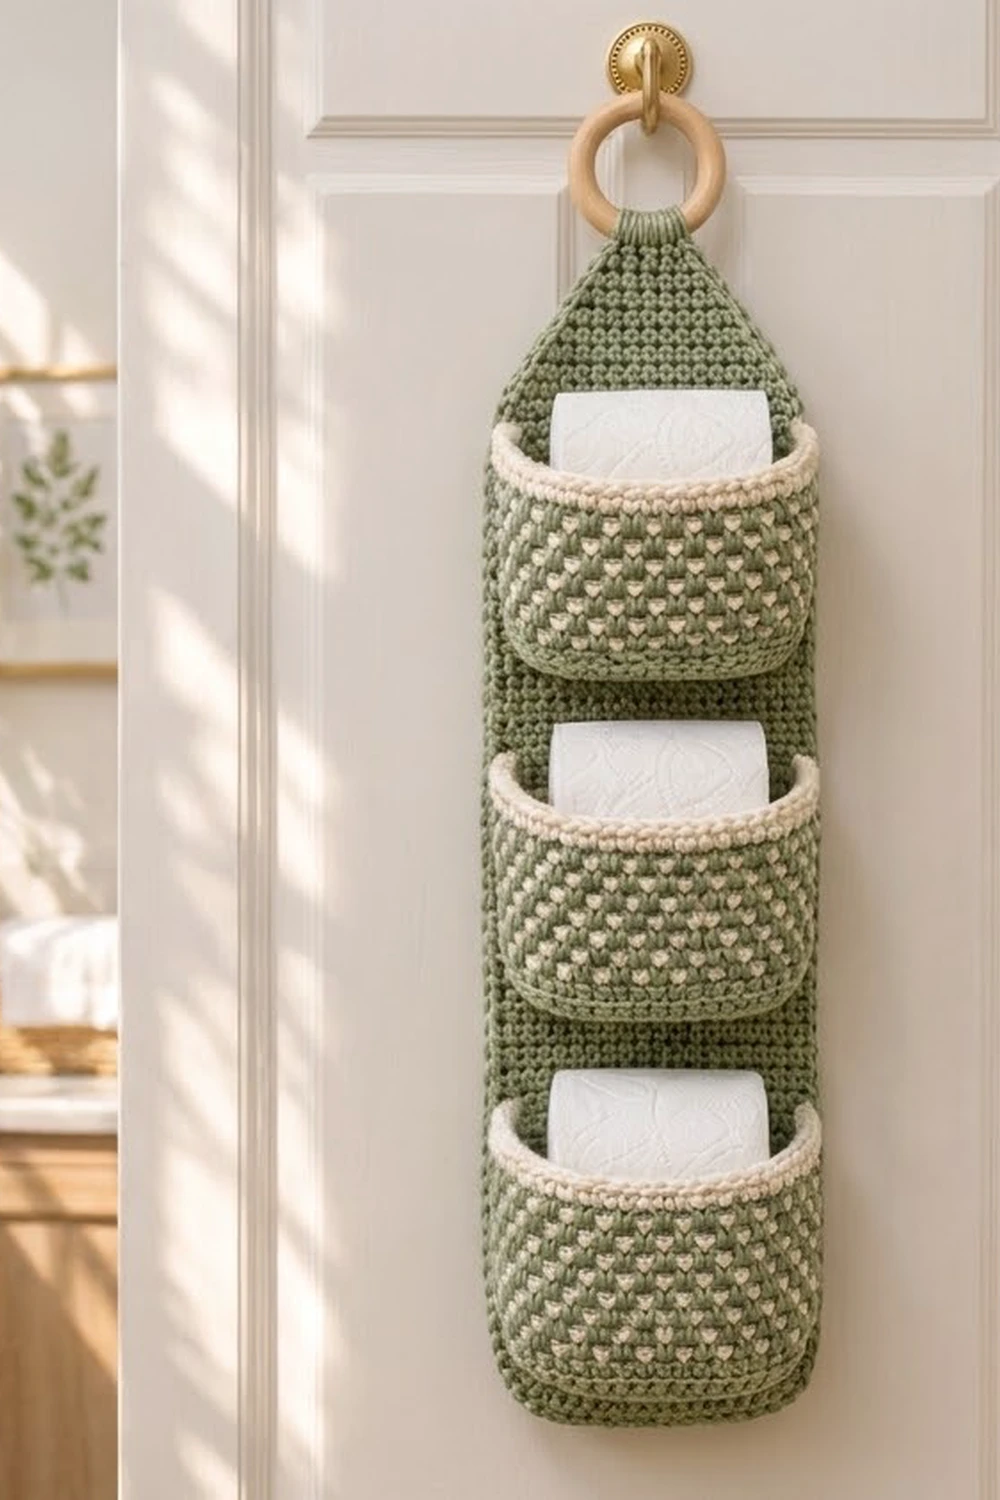
This hanging toilet paper holder stores three spare rolls in a narrow vertical strip that hangs from a door or wall hook. A solid sage green back panel holds three rounded pockets. The panel tapers to a point at the top and loops around a natural wooden ring.
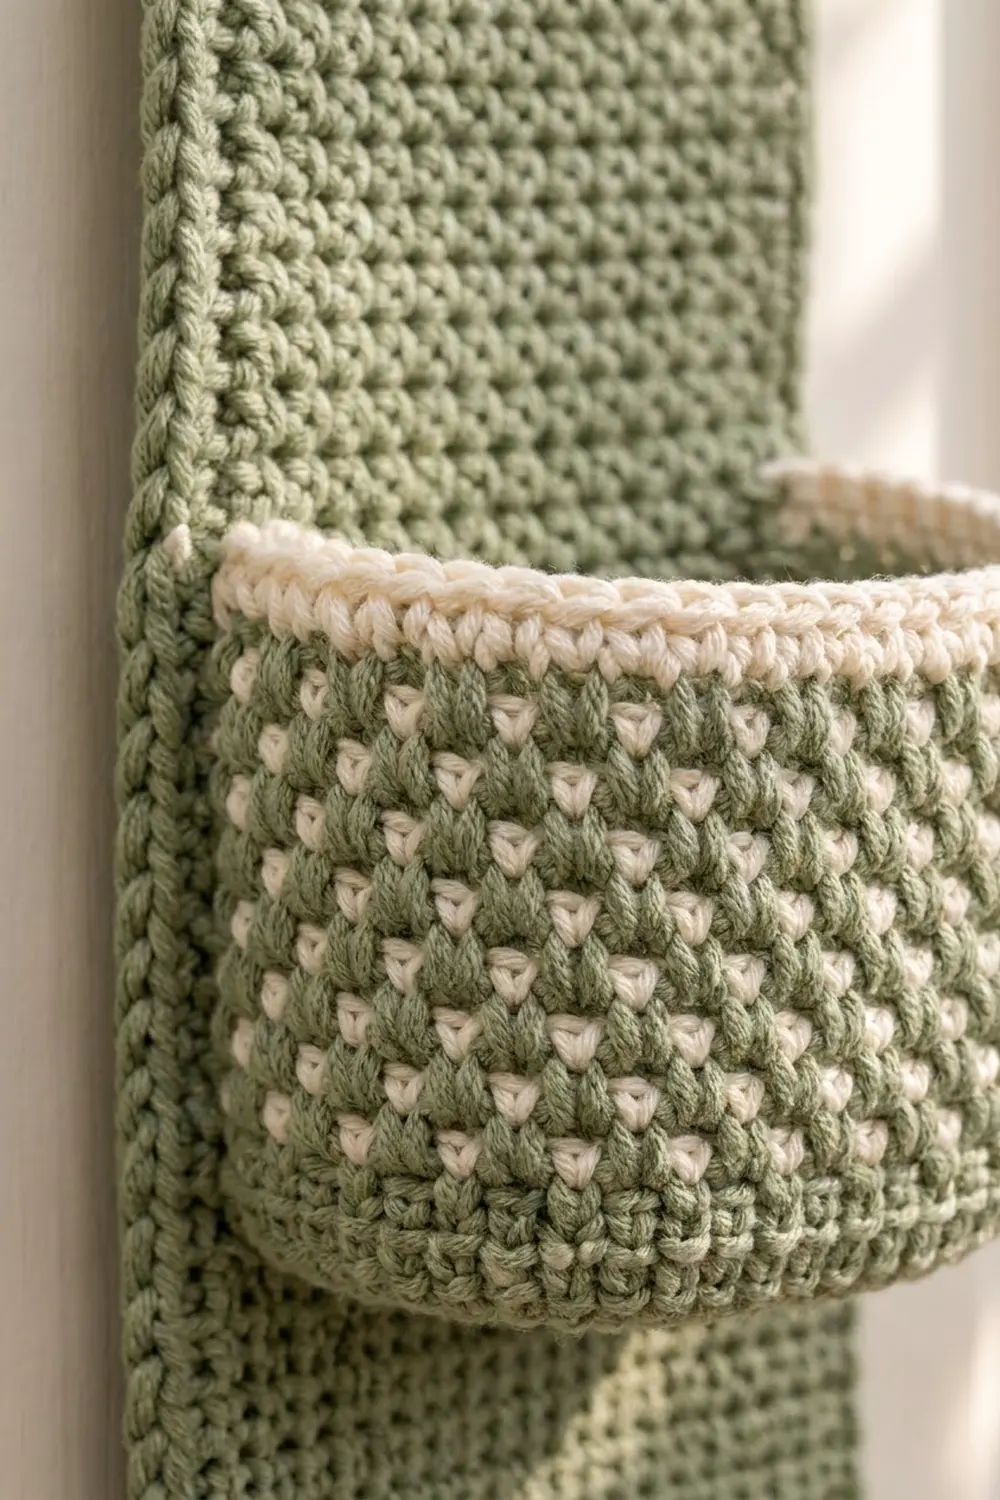
The pockets are where the texture is. Each one is worked in two-color moss stitch: sage green rounds with a cream round every third round, which gives small staggered cream dots across the green. A plain cream rim finishes each pocket. The style is soft and farmhouse, and it suits a light bathroom with brass or wood fittings.
The pattern uses US crochet terms. The finished panel measures 6 in (15.2 cm) wide and 20.25 in (51.4 cm) long to the point, not counting the tab and ring. Each pocket is 5.5 in (14.0 cm) wide, 3.5 in (8.9 cm) deep and 4.25 in (10.8 cm) tall.
Construction is simple. You make one back panel in single crochet rows. You make three pockets from the bottom up: a flat base in rows, then walls in rounds. Then you edge the panel, sew on the pockets and fold the tab over the ring.
Finished Size and Construction
- Finished size: about 23.5 in (59.7 cm) tall with the ring, 6 in (15.2 cm) wide
- Skill level: Intermediate (simple color changes, sewing)
- Terminology: US
- Yarn weight: Worsted (#4) cotton or cotton blend
- Hook: 5.0 mm (US H-8)
- Number of pieces: 4 (1 back panel, 3 pockets) plus 1 wooden ring
- Layout: 3 pockets stacked vertically on 1 panel
- Pocket size: 5.5 in (14.0 cm) wide x 3.5 in (8.9 cm) deep x 4.25 in (10.8 cm) tall
- Panel size before border: 5.5 in (14.0 cm) x 20 in (50.8 cm), tab not included
- Border depth: 0.25 in (0.6 cm), one round
Materials
Use a smooth worsted cotton or cotton blend. Cotton holds its shape, so the pockets stay open, and it copes with bathroom humidity. Don’t use fuzzy or very stretchy yarn: the dots get lost and the pockets sag.
- Sage Green (Color A): 260 g / 400 m
- Cream (Color B): 70 g / 110 m
- 5.0 mm (US H-8) crochet hook
- Wooden ring, 2.75 in (7.0 cm) outer diameter
- Tapestry needle
- 8 locking stitch markers
- Scissors and tape measure
- Rustproof pins for blocking
These quantities include a margin of about 10–15% to cover your swatch and small gauge differences.
Abbreviations (US Terms)
- ch – chain
- sc – single crochet
- sc2tog – single crochet 2 together (decrease)
- sl st – slip stitch
- BLO – back loop only
- sk – skip
- ch-sp – chain space
- st(s) – stitch(es)
- rnd – round
- A / B – Color A / Color B
Moss stitch in the round (special stitch): On an even number of stitches, work sc in next st, ch 1, sk next st around. On every later round, work each sc into a ch-sp and skip each sc from the round below. One “moss pair” is 1 sc plus 1 ch, and it counts as 2 stitches.
Color change: Work the joining sl st with the new color. Don’t cut the unused color. Carry it loosely up the inside of the pocket at the joins.
Gauge and Checkpoints
- Single crochet rows: 16 sts and 18 rows = 4 in (10.2 cm)
- Moss stitch rounds: 16 sts (8 moss pairs) and 20 rnds = 4 in (10.2 cm)
Make one complete pocket before you start the panel. It works as your gauge test, and the panel is matched to it stitch for stitch.
Checkpoints:
- Pocket base after Row 16: 5.5 in (14.0 cm) x 3.5 in (8.9 cm).
- Pocket after Rnd 19: walls about 3.6 in (9.1 cm) tall from the fold line.
- Finished pocket: 4.25 in (10.8 cm) tall.
- Panel at Row 72: 5.5 in (14.0 cm) x 16 in (40.6 cm).
If your piece comes out too big, go down 0.5 mm in hook size. If it’s too small, go up 0.5 mm. Don’t change any stitch counts. The panel and pockets are designed to match 22 stitches to 22 stitches.
Pocket (Make 3)
Base
With A, ch 23.
Row 1: Sc in 2nd ch from hook and in each ch across, turn. (22 sts)
Rows 2–16: Ch 1, sc in each st across, turn. (22 sts)
Don’t fasten off. The base should measure 5.5 in (14.0 cm) x 3.5 in (8.9 cm).
Walls
From here on, work in joined rounds without turning, with the right side facing out.
Rnd 1 (base edge): Ch 1. Sc in each of the 22 sts of Row 16 and mark the first st. Down the row ends, sc in next 7 row ends, sk 1 row end twice (14 sc). Sc in each of the 22 chains along the underside of the foundation chain. Up the other row ends, repeat the 7-and-skip pattern (14 sc). Join with sl st to the first sc. (72 sts: 22 + 14 + 22 + 14)
The first 22 stitches are the back wall. Keep every round join at this back corner so the carried yarn stays hidden against the panel.
Rnd 2 (fold): Ch 1, sc in BLO of each st around, join. (72 sts)
The unworked front loops make a crisp fold line, so the walls stand up from the base.
Rnd 3: With A, ch 1, sc in first st, ch 1, sk next st, sc in next st, ch 1, sk next st around, join. (36 sc + 36 ch-sps = 72 sts)
Rnd 4: With A, sl st into first ch-sp, ch 1, sc in same ch-sp, ch 1, sk next sc, sc in next ch-sp, ch 1, sk next sc around. Join with B. (72 sts)
Rnd 5: With B, work as Rnd 4. Join with A. (72 sts)
Rnds 6–19: Work as Rnd 4, using this color sequence:
| Rounds | Color |
|---|---|
| 6, 7 | A |
| 8 | B |
| 9, 10 | A |
| 11 | B |
| 12, 13 | A |
| 14 | B |
| 15, 16 | A |
| 17 | B |
| 18, 19 | A |
Every round stays at 72 sts (36 sc + 36 ch-sps). That’s 17 moss rounds, 5 of them cream. The cream rounds are three rounds apart, and each moss round shifts over by one stitch. So each cream round sits offset from the last one, and that gives the staggered dots. Fasten off A at the end of Rnd 19.
Cream Rim
Rnd 20 (conversion): With B, ch 1, sc in each sc and in each ch-sp around, join. (36 sc into sc + 36 sc into ch-sps = 72 sts)
Rnds 21–22: Ch 1, sc in each st around, join. (72 sts)
Fasten off, leaving a 24 in (61.0 cm) tail of B for sewing. The pocket should measure 4.25 in (10.8 cm) tall.
Back Panel
With A, ch 23.
Row 1: Sc in 2nd ch from hook and in each ch across, turn. (22 sts)
Rows 2–72: Ch 1, sc in each st across, turn. (22 sts)
Checkpoint: 5.5 in (14.0 cm) x 16 in (40.6 cm).
Taper
Row 73: Ch 1, sc2tog, sc in each st to last 2 sts, sc2tog, turn. (20 sts)
Row 74: Ch 1, sc in each st across, turn. (20 sts)
Rows 75–90: Repeat Rows 73–74 eight more times. After each pair of rows you’ll have 18, 16, 14, 12, 10, 8, 6, then 4 sts.
The taper is 18 rows, or 4 in (10.2 cm). The panel now measures 20 in (50.8 cm).
Tab
Rows 91–100: Ch 1, sc in each st across, turn. (4 sts)
The tab measures 1 in (2.5 cm) wide and 2.25 in (5.7 cm) long. Fasten off, leaving a 12 in (30.5 cm) tail.
Make All Pieces
| Piece | Qty | Colors |
|---|---|---|
| 3 | A (base, Rnds 1–4, green moss rounds), B (dot rounds, rim) | |
| Back panel | 1 | A only |
Layout, top to bottom (rows counted from the bottom of the panel):
      [ ring ]
       /    \     tab + taper, Rows 73–100
       |    |     Rows 68–72  free
     [POCKET 3]   Rows 49–67
       |    |     Rows 45–48  gap
     [POCKET 2]   Rows 26–44
       |    |     Rows 22–25  gap
     [POCKET 1]   Rows 3–21
       |____|     Rows 1–2    bottom margin
Each pocket covers 19 panel rows. That’s 4.22 in (10.7 cm), which matches the 4.25 in (10.8 cm) pocket height. Row check: 2 + 19 + 4 + 19 + 4 + 19 + 5 = 72.
Joining
Work the border first (see the next section), then sew on the pockets.
Method: Whipstitch, going through both the pocket and the panel.
Stitch-to-stitch logic: Each pocket’s back wall is its first 22 stitches, and the panel is 22 stitches wide. Line up the pocket’s back corners with the panel’s side stitches. Pin the back loops of the 22 back-wall rim stitches to the 22 stitches of the pocket’s top row (Row 21, 44 or 67), one to one. Sew this edge with the cream tail. Then, with A, sew the fold line of the back wall (Rnd 2) to the pocket’s bottom row (Row 3, 26 or 49), again 22 to 22. Last, tack down both short side edges of the back wall.
Tension: Keep the stitches snug but not tight. If the panel puckers, you’re pulling too hard. Never sew through the front wall of the pocket.
Size checkpoint: Lay the holder flat. The pockets should be level, with 0.9 in (2.3 cm) gaps between them, and the panel should still be 6 in (15.2 cm) wide.
Ring: Fold the tab over the ring toward the back. Sew the end of the tab firmly to the back of the taper, just below the ring.
Border
The border is one round of sc in A around the panel. The tab stays unbordered.
Border gauge: 4 sc per inch, the same as the stitch gauge.
Border round: With the right side facing, join A at the right-hand base of the tab.
- Right taper edge: 18 sc, 1 per row end
- Right straight edge: sc in next 8 row ends, sk 1 row end 8 times (64 sc)
- Bottom right corner: 3 sc in corner st
- Bottom edge: sc in next 20 sts
- Bottom left corner: 3 sc in corner st
- Left straight edge: 64 sc, same 8-and-skip pattern
- Left taper edge: 18 sc
Fasten off at the left base of the tab. Total: 18 + 64 + 3 + 20 + 3 + 64 + 18 = 190 sts.
Why the math works: Each straight edge is 72 rows. At 4.5 rows per inch, that’s 16 in (40.6 cm), and at 4 sc per inch it needs 64 sc. Skipping 1 row end in every 9 gives exactly 64. Each taper edge is a diagonal 4 in (10.2 cm) high and 2.25 in (5.7 cm) across, so it’s about 4.6 in (11.7 cm) long. That length needs about 18 sc, so 1 sc per row end lies flat. On the bottom edge, 20 of the 22 stitches get plain sc, and the 2 end stitches become the 3-sc corners. The border adds 0.25 in (0.6 cm) all around, so the panel finishes at 6 in (15.2 cm) x 20.25 in (51.4 cm).
Final Blocking
- Weave in all ends. Hide B ends in the cream rims and A ends in the green areas.
- Mist the whole piece until it’s evenly damp.
- Pin the panel flat at 6 in (15.2 cm) x 20.25 in (51.4 cm), with the edges straight and the taper symmetrical.
- Fill each pocket with a toilet paper roll in a plastic bag so the walls dry rounded.
- Let it dry flat for a full 24 hours.
- Unpin it and hang it to check that it hangs straight.
Final Quality-Control Checklist
- Every pocket wall round has 72 sts
- Each pocket has 5 cream rounds, and the dots are evenly staggered
- The round joins are at the back corners and can’t be seen from the front
- The panel is 22 sts wide, and the taper ends at 4 sts
- The border lies flat, with no ruffling or cupping
- The pockets are level, centered and sewn 22 to 22
- The tab is securely sewn and the ring doesn’t slip
- No ends show on the front
Troubleshooting
- The dots line up in columns instead of staggering: You worked into the sc instead of the ch-sp. Every round has to go into the ch-sps.
- The pocket flares at the top: The rim is too loose. Rework Rnds 21–22 with a 4.5 mm hook.
- The pocket is too snug for the roll: Block the pocket over a roll, or work the walls one hook size larger.
- The border ruffles: Skip one more row end on each long side, keeping both sides equal.
- The carried strand shows: Carry it more loosely, and twist the colors once at each join.
- The panel twists when hanging: Re-block it flat and check that the pockets are centered.
Care
Hand wash in cool water with mild soap, roll it in a towel to remove the water, and dry it flat. Reshape the pockets while they’re damp.
Final Notes
All the measurements in this pattern link together. The 22-stitch pocket base becomes a 72-stitch wall round. The pocket’s 22-stitch back wall is sewn stitch for stitch onto the 22-stitch panel. Each pocket covers 19 rows, and the three pockets plus their gaps fill exactly 72 panel rows. The 190-stitch border brings the panel to 6 in (15.2 cm) wide. If your first pocket meets gauge, everything else will fit.
Happy crocheting!