

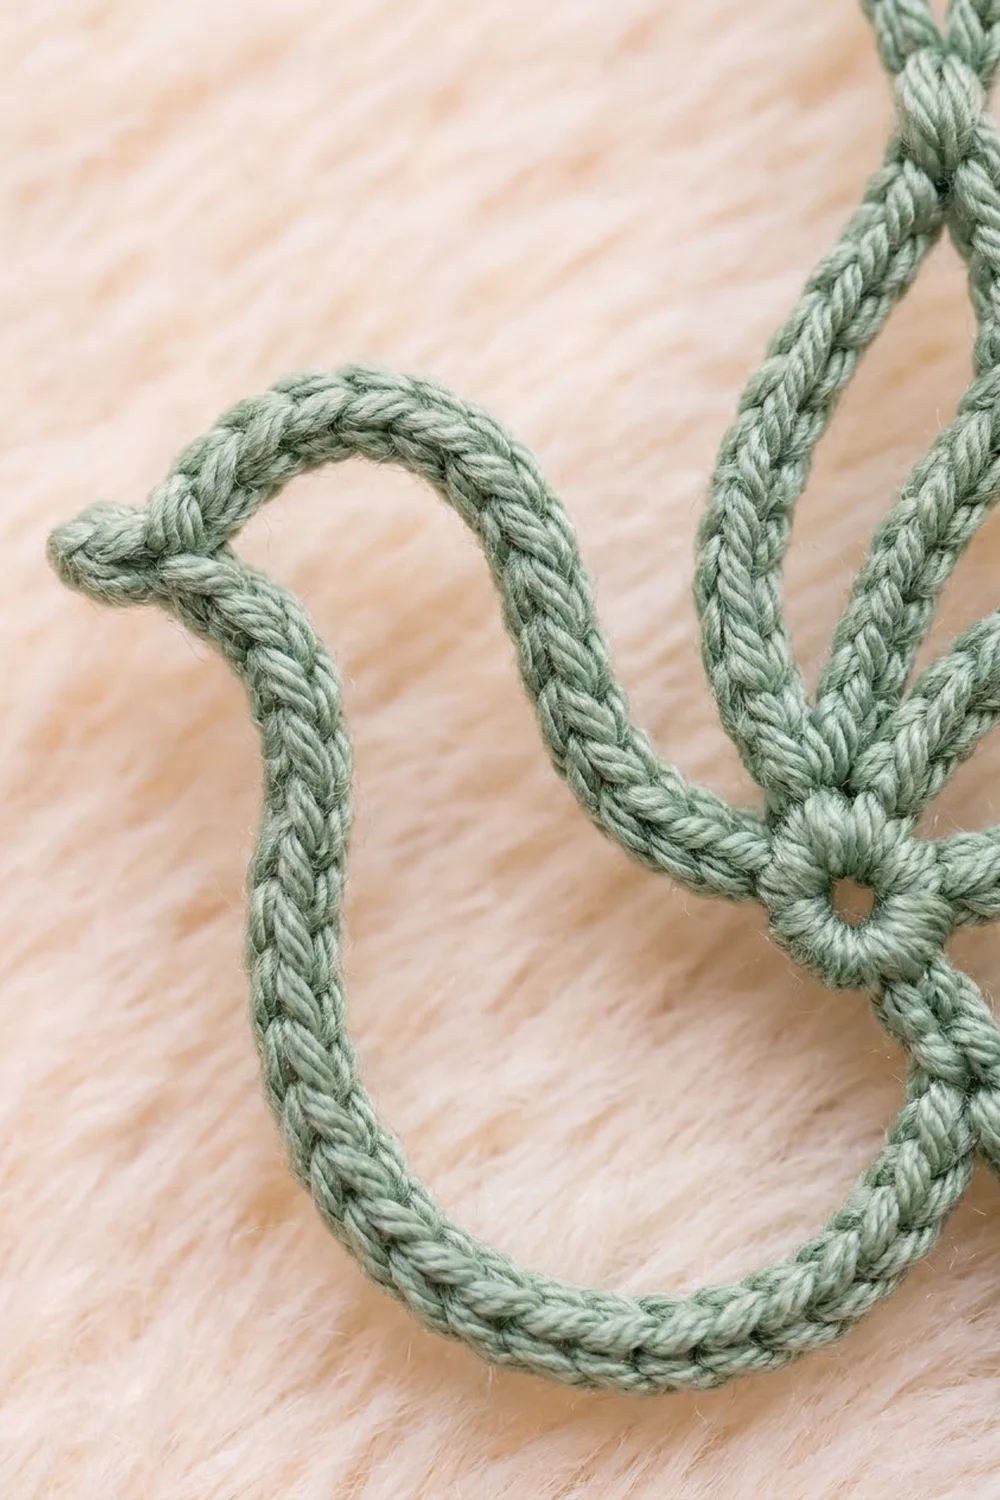
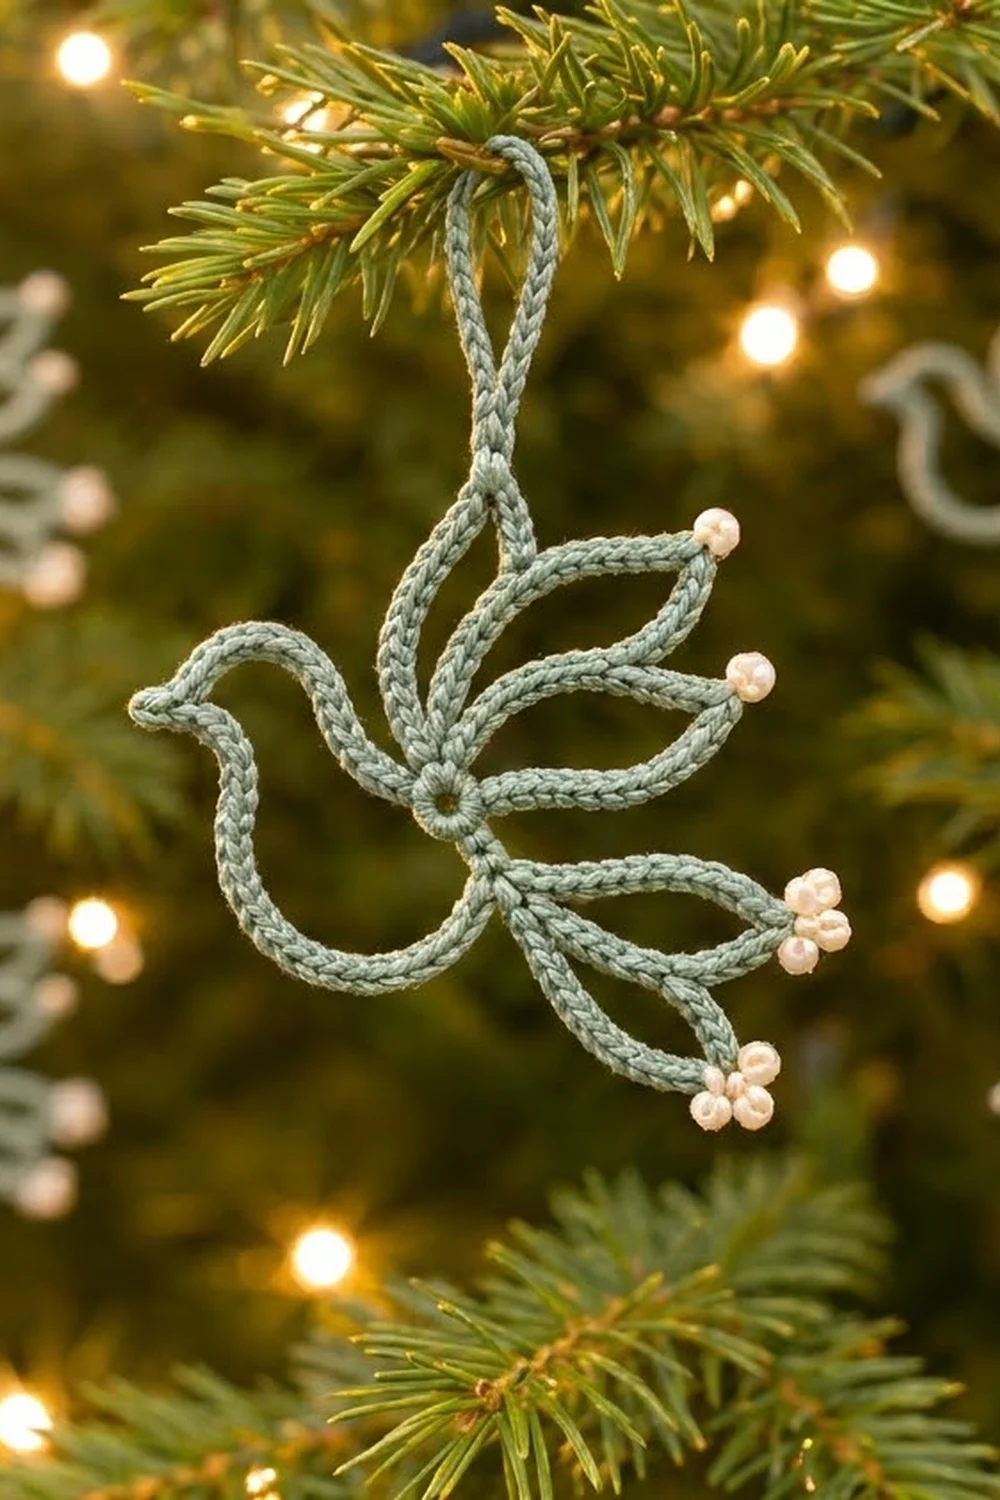
This dove ornament is made as one continuous outline, like a line drawing in yarn. A sage green cord traces the head, beak, breast and belly. A fan of pointed petals forms the wing and tail, and each petal tip has a small cluster of cream pearl bobbles.
The palette is quiet and wintry: soft sage green with cream. The style is minimal and airy. It looks good on a tree, tied to a gift, or hung in a window by itself.
This pattern uses US crochet terms. The finished ornament is about 4.5 in (11.4 cm) wide and 5 in (12.7 cm) tall, including the hanging loop.
Construction is simple. You start with a small ring of 12 single crochet. Each part of the dove is a chain loop anchored to that ring and then covered with single crochet, which gives the braided cord look. The cream pearl tips go on last, and blocking sets the final dove shape.
Finished Size and Construction
- Finished size: 4.5 in (11.4 cm) wide × 5 in (12.7 cm) tall
- Skill level: Easy to intermediate
- Terminology: US
- Yarn weight: Sport (#2) cotton
- Hook: 3.0 mm (C/2–D/3)
- Number of pieces: 1
- Layout: Single motif; all loops radiate from one center ring
- Piece size before pearl trim: 4.25 in (10.8 cm) wide × 4.75 in (12.1 cm) tall
- Pearl trim depth: about 0.25 in (0.6 cm) beyond each petal tip
- Cord width: about 0.2 in (0.5 cm)
Materials
Use a smooth, mercerized cotton or cotton blend in sport weight. Mercerized cotton shows stitch definition clearly, holds a crisp shape after blocking, and doesn’t fuzz on a tree. Avoid fluffy or very soft acrylics, because the petals will droop.
- Sage green (main color): 5 g, about 15 m
- Cream (pearl tips): 2 g, about 6 m
These quantities include a margin for a gauge swatch and tails. One 50 g ball of sage makes about ten doves.
Tools:
– 3.0 mm crochet hook
– Tapestry needle
– Stitch markers (2–3)
– Scissors
– Blocking board or foam mat with a printed grid
– Rustproof pins
– Spray bottle, or diluted fabric stiffener (optional)
Abbreviations (US Terms)
- ch – chain
- sl st – slip stitch
- sc – single crochet
- st(s) – stitch(es)
- rnd – round
- picot – ch 3, sl st in 3rd ch from hook
Special stitch – Pearl (pl): Ch 2, [yarn over, insert hook in 2nd ch from hook, yarn over, pull up a loop] 3 times (7 loops on hook), yarn over, pull through all 7 loops, ch 1 to close. This makes a tiny, round puff bead.
Covered loop (the core technique): Sl st in the given ring st, chain the stated number, then sl st in the same ring st to close a chain loop. Work 1 sc in each ch of the loop, going back the way you came. Sl st in the same ring st again to finish. The sc row wraps the chain and gives the doubled, braided cord.
Gauge and Checkpoints
Gauge: 6 sc worked over chain = 1 in (2.5 cm) along the cord.
Gauge matters more than you might expect, because every loop’s length comes straight from its chain count. Make a test strip first: ch 18, sc in 2nd ch from hook and in each ch across (17 sc). It should measure about 2.75 in (7.0 cm). Then use the checkpoints below while working the real dove.
Checkpoints:
– Center ring: 0.5 in (1.3 cm) across, with an open hole about 0.25 in (0.6 cm) wide
– Hanging loop (after stitching the stem): 0.75 in (1.9 cm) stem plus a 1.5 in (3.8 cm) teardrop
– Wing petal: 2 in (5.1 cm) long from ring to tip
– Tail petal: 1.75 in (4.4 cm) long from ring to tip
– Body loop: 2.25 in (5.7 cm) from ring to beak tip
If your loops come out too big: Go down to a 2.75 mm hook, or tighten your chains. Loose chains are the most common cause.
If your loops come out too small: Go up to a 3.25 mm hook. Don’t add chains. Changing the counts changes the proportions and the stitch counts below.
Center Ring
With sage green:
Foundation: Ch 6, sl st in first ch to form a ring.
Rnd 1: Ch 1, work 12 sc into the ring. Sl st in first sc to join. (12 sc)
Don’t turn. Number the ring sts clockwise as you look at the right side, starting with the joining st as st 1 (top). Put a marker in st 1 and another in st 8.
Ring map:
– St 1: hanging loop
– Sts 2–3: wing petals
– St 4: spacer
– Sts 5–7: tail petals
– St 8: body loop starts
– Sts 9–10: spacers (bottom of the ring, inside the body loop)
– St 11: body loop ends
– St 12: spacer
Hanging Loop
You are at st 1.
Loop: Ch 30, sl st in st 1 to close the chain loop.
Cover: Sc in each of the 30 ch around the loop. Sl st in st 1. (30 sc)
You will shape the stem during finishing: pinch the two legs together for the bottom 0.75 in (1.9 cm) and stitch them closed.
Checkpoint: Laid flat and unpinched, the loop is about 2.5 in (6.4 cm) tall.
Wing Petals (Make 2)
Wing Petal 1: Sl st in st 2. Ch 26, sl st in st 2. Sc in each of the 26 ch. Sl st in st 2. (26 sc)
Wing Petal 2: Sl st in st 3. Ch 26, sl st in st 3. Sc in each of the 26 ch. Sl st in st 3. (26 sc)
On each wing petal, the 13th sc is the tip st. Mark both tips now; this saves time when you add the pearl trim.
Checkpoint: Pinch the petal flat into a pointed teardrop. It should be 2 in (5.1 cm) from ring to tip.
Tail Petals (Make 3)
Sl st in st 4 (spacer), then sl st in st 5.
Tail Petal 1: Ch 22, sl st in st 5. Sc in each of the 22 ch. Sl st in st 5. (22 sc)
Tail Petal 2: Sl st in st 6. Ch 22, sl st in st 6. Sc in each of the 22 ch. Sl st in st 6. (22 sc)
Tail Petal 3: Sl st in st 7. Ch 22, sl st in st 7. Sc in each of the 22 ch. Sl st in st 7. (22 sc)
On each tail petal, the 11th sc is the tip st. Mark all three.
Checkpoint: Each tail petal is 1.75 in (4.4 cm) from ring to tip. The tails are shorter than the wings on purpose. That difference gives the dove its lifted-wing silhouette.
Body Loop with Beak
Sl st in st 8.
Chain: Ch 56. Skip sts 9 and 10, then sl st in st 11. This makes one large loop that runs from the bottom of the ring around to its left side.
Cover: Work back along the chain toward st 8:
– Sc in each of the next 19 ch (the neck).
– In the next ch, work (sc, picot, sc). This is the beak.
– Sc in each of the remaining 36 ch (head, breast and belly).
Sl st in st 8. (57 sc + 1 picot)
Count check: 19 + 1 + 36 = 56 ch covered. The beak ch takes 2 sc, so 19 + 2 + 36 = 57 sc.
Sl st in st 9, then sl st in st 10 to tidy the bottom of the ring. Fasten off and leave a 10 in (25.4 cm) tail for stitching the hanging stem.
Checkpoint: Shape the loop by hand: neck up and to the left, a rounded head, the beak picot pointing left, then a deep curve down and back to the ring. The beak tip should sit about 2.25 in (5.7 cm) from the ring.
Border: Cream Pearl Tip Trim
On this single motif, the “border” is the cream trim on the five petal tips. The cord outline itself needs no further edging.
Border gauge: One pearl is about 0.2 in (0.5 cm) across. Three pearls fanned on one tip st make a cluster about 0.4 in (1.0 cm) wide and 0.25 in (0.6 cm) deep.
Each tip (worked 5 times): With cream, join with a sl st in the marked tip st. Pearl, sl st in the same tip st; repeat from * 2 more times. Fasten off and leave a 4 in (10.2 cm) tail. (3 pearls + 4 sl st per tip)
Tip counts:
– Wing Petal 1, sc 13: 3 pearls
– Wing Petal 2, sc 13: 3 pearls
– Tail Petal 1, sc 11: 3 pearls
– Tail Petal 2, sc 11: 3 pearls
– Tail Petal 3, sc 11: 3 pearls
– Total: 15 pearls
Why the math works: Each wing petal has 26 sc, an even count, so sc 13 sits exactly at the fold of the loop. Each tail petal has 22 sc, so sc 11 is its fold point. Working all three pearls into that single st fans them around the point instead of along one side. That keeps every petal symmetrical. The trim adds 0.25 in (0.6 cm) at the right and bottom tips, which takes the piece from 4.25 × 4.75 in (10.8 × 12.1 cm) to 4.5 × 5 in (11.4 × 12.7 cm).
Weave each cream tail into the back of 4–5 green sc on the same petal.
Final Blocking
- Stitch the stem. Thread the long green tail onto the tapestry needle and bring it up to the base of the hanging loop. Pinch the two legs of the loop together and whipstitch them for 0.75 in (1.9 cm). Weave in the tail. The teardrop above should be 1.5 in (3.8 cm) tall.
- Dampen. Mist the ornament until it is evenly damp, or dip it in diluted stiffener and blot it with a towel.
- Pin the ring. Center the ring on the grid and pin it through the open hole.
- Pin the hanging loop. Pull it straight up and pin the top of the teardrop 2.25 in (5.7 cm) above the ring.
- Pin the wings. Pin each wing tip 2 in (5.1 cm) from the ring, fanned up and to the right, with about 0.5 in (1.3 cm) between the tips.
- Pin the tails. Pin each tail tip 1.75 in (4.4 cm) from the ring, fanned down and to the right.
- Shape the dove. Pin the beak 2.25 in (5.7 cm) left of the ring. Pin the crown of the head, then curve the breast and belly down and back toward the ring. Pin about every 0.5 in (1.3 cm).
- Check the size. The total should be 4.5 in (11.4 cm) wide and 5 in (12.7 cm) tall.
- Dry. Leave it pinned until completely dry, usually 6–12 hours.
Final Quality-Control Checklist
- Ring has 12 sc and an open center hole.
- Hanging loop: 30 sc, with a 0.75 in (1.9 cm) stitched stem.
- Two wing petals with 26 sc each.
- Three tail petals with 22 sc each.
- Body loop: 57 sc plus 1 beak picot.
- 15 cream pearls, three on each of the five tips.
- All tails woven in, with none showing on the front.
- Finished size: 4.5 × 5 in (11.4 × 12.7 cm).
- The ornament hangs level and doesn’t tilt forward.
Troubleshooting
Petals twist into a figure-eight. The chain twisted before you closed it. Before the closing sl st, check that the chain’s front bars all face you.
Cord curls or ripples. Your sc are tighter than your chains. Chain slightly tighter, or relax your sc tension.
Beak doesn’t point. Pin the picot hard into a point while it’s damp. A drop of stiffener on the beak helps.
Pearls look flat. Pull each puff loop up to the full height of the ch-2 before closing.
Ornament tilts on the tree. The stem is off-center. Unpick it and stitch the legs together again, evenly.
Head looks too small. Check gauge. If you’re on gauge, ease more of the body loop toward the head while blocking.
Care
Hand wash in cool water with mild soap, press out water in a towel, and re-pin to dry. Store flat or hanging, away from heavy ornaments.
Final Notes
The measurement chain is short and easy to follow. At 6 sc per 1 in (2.5 cm), a 12 sc ring measures 0.5 in (1.3 cm). The 26-ch wing loops become 2 in (5.1 cm) petals, and the 22-ch tail loops become 1.75 in (4.4 cm) petals. The 56-ch body loop reaches 2.25 in (5.7 cm) to the beak. The pearl trim then takes the dove from 4.25 × 4.75 in (10.8 × 12.1 cm) to 4.5 × 5 in (11.4 × 12.7 cm). Check gauge once and confirm each checkpoint, and every dove you make will match.
Happy crocheting!