

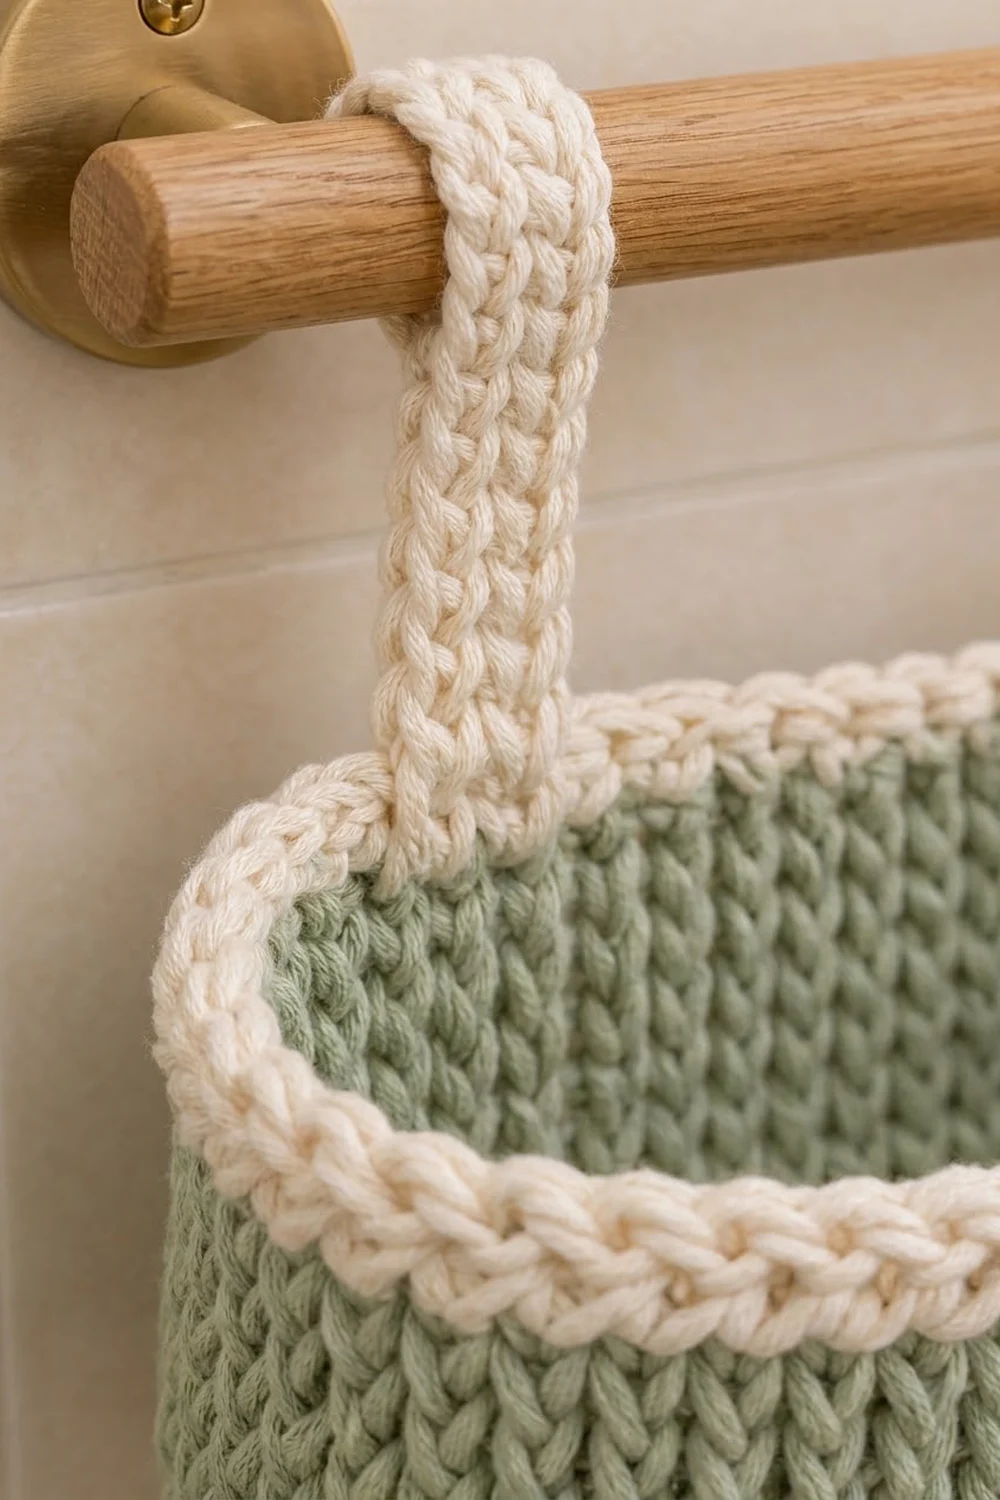
This oval basket hangs from a towel rod by two cream straps and holds two spare toilet rolls within easy reach. The sage green body is worked in waistcoat stitch, which gives a fabric that looks knitted, with tidy vertical columns of V’s. The fabric is dense enough that the basket keeps its shape without stiffener.
The colors are soft sage green for the base and walls, with warm cream for the rim and straps. The rim ends with a round of crab stitch (reverse single crochet), which gives a twisted, rope-like edge.
All instructions use US crochet terms. The finished basket measures 10.75 in (27.3 cm) long, 5 in (12.7 cm) deep and 3.75 in (9.5 cm) tall. Each strap is 9 in (22.9 cm) long and 1.25 in (3.2 cm) wide when flattened.
Construction is simple. You crochet an oval base in a spiral, turn the walls up with one back-loop round, and work the walls straight. Then you make two tubular straps, sew them to the back wall and finish with the cream rim.
Finished Size and Construction
- Finished size: 10.75 in (27.3 cm) long × 5 in (12.7 cm) deep × 3.75 in (9.5 cm) tall
- Skill level: Intermediate (waistcoat stitch, spiral rounds, crab stitch)
- Terminology: US
- Yarn weight: Worsted (medium #4), cotton or cotton blend
- Hook: 5 mm (H-8)
- Number of pieces: 3 (1 basket body, 2 straps)
- Layout: Straps sewn to the straight back wall, centers 4 in (10.2 cm) apart
- Piece sizes: Body 10.75 × 5 × 3.75 in (27.3 × 12.7 × 9.5 cm); straps 9 × 1.25 in (22.9 × 3.2 cm)
- Size before border: 10.75 × 5 in (27.3 × 12.7 cm) base, 3 in (7.6 cm) wall height
- Border depth: 0.75 in (1.9 cm)
Materials
Use a smooth worsted-weight cotton or cotton blend of about 190 m per 100 g. Cotton holds the basket’s shape and stands up to bathroom humidity. Avoid fuzzy or very stretchy acrylics, because they hide the V columns and let the basket sag under weight.
- Sage green (A): 110 g, about 210 m (230 yd)
- Cream (B): 55 g, about 105 m (115 yd)
These quantities include a margin of about 20% for gauge differences and a swatch.
Tools:
– 5 mm (H-8) crochet hook
– 1 locking stitch marker for the spiral, plus 4 extra markers for the strap positions
– Tapestry needle
– Scissors
– Measuring tape
– Pins and a spray bottle for blocking
– A towel rod at least 8 in (20.3 cm) long
Abbreviations (US Terms)
- ch – chain
- sc – single crochet
- sl st – slip stitch
- blo – back loop only
- st(s) – stitch(es)
- ws – waistcoat stitch
- rev sc – reverse single crochet (crab stitch)
- Rnd – round
Waistcoat stitch (ws): Look at the stitch below and find its V, made of two front legs. Insert the hook from front to back through the center of the V, between those legs and below the top loops. Yarn over and pull up a loop, then yarn over and pull through both loops on the hook. Rnd 1 is ordinary sc, and every waistcoat round stacks its V’s directly on the V’s below it, which creates the vertical columns.
Waistcoat increase: Work 2 ws into the same stitch.
Reverse sc (rev sc): Work from left to right (right-handed). Insert the hook into the next stitch to the right, yarn over, pull up a loop, then yarn over and pull through both loops.
Gauge and Checkpoints
Gauge: 16 sts and 16 rnds = 4 in (10.2 cm) in waistcoat stitch worked in rounds. That means 4 sts and 4 rnds per 1 in (2.5 cm).
Waistcoat stitch is tight by nature. Keep your loops pulled up a little looser than for normal sc, or you won’t be able to get the hook into the V’s. Test with one piece first: work the base through Rnd 6, then check it against the measurements below before you continue.
Checkpoints:
– After Rnd 1: 6.25 in (15.9 cm) long
– After Rnd 6: 8.75 in (22.2 cm) long × 3 in (7.6 cm) wide
– After Rnd 10: 10.75 in (27.3 cm) long × 5 in (12.7 cm) wide, and the base lies flat
– After Rnd 16: wall height 1.5 in (3.8 cm)
– After Rnd 22: wall height 3 in (7.6 cm)
– After the rim: total height 3.75 in (9.5 cm)
If the piece is too big, go down 0.5 mm in hook size. If it is too small, go up 0.5 mm. A base that ruffles means you are working loosely or have added stitches. A base that cups means you are working tightly or have missed increases. Recount before you change hooks.
Basket Body
The base is worked in a continuous spiral without joining. Place the marker in the first stitch of each round and move it up as you go. Each round has four sections: End A, Side 1, End B and Side 2. Side 2 becomes the back wall.
Base (Color A)
Ch 26.
Rnd 1: Work 3 sc in the 2nd ch from the hook (End A). Sc in each of the next 23 ch (Side 1). Work 3 sc in the last ch (End B). Rotate the work and sc in the underside of each of the next 23 ch (Side 2). Do not join. (52 sts: 3 + 23 + 3 + 23)
Rnd 2: For End A, work 2 ws in each of the next 3 sts. For Side 1, ws in the next 23 sts. For End B, work 2 ws in each of the next 3 sts. For Side 2, ws in the next 23 sts. (58 sts: 6 + 23 + 6 + 23)
Rnd 3: Over each end, work ws in 1 st, 2 ws in the next st 3 times. Work ws in each of the 23 side sts. (64 sts: 9 per end)
Rnd 4: Over each end, work ws in 2 sts, 2 ws in the next st 3 times. Work 23 ws per side. (70 sts: 12 per end)
Rnd 5: Over each end, work ws in 3 sts, 2 ws in the next st 3 times. Work 23 ws per side. (76 sts: 15 per end)
Rnd 6: Over each end, work ws in 4 sts, 2 ws in the next st 3 times. Work 23 ws per side. (82 sts: 18 per end)
Rnd 7: Over each end, work ws in 5 sts, 2 ws in the next st 3 times. Work 23 ws per side. (88 sts: 21 per end)
Rnd 8: Over each end, work ws in 6 sts, 2 ws in the next st 3 times. Work 23 ws per side. (94 sts: 24 per end)
Rnd 9: Over each end, work ws in 7 sts, 2 ws in the next st 3 times. Work 23 ws per side. (100 sts: 27 per end)
Rnd 10: Over each end, work ws in 8 sts, 2 ws in the next st 3 times. Work 23 ws per side. (106 sts: 30 + 23 + 30 + 23)
Each round adds exactly 3 stitches per end, which is 6 per round. That matches the increase rate of a flat sc circle split into two half-circles, so the base stays flat.
Walls (Color A)
Rnd 11 (turning round): Sc blo in each st around. (106 sts) The unused front loops make a crisp ridge, and the wall rises up from it.
Rnds 12–22: Ws in each st around. (106 sts in each round)
At the end of Rnd 22, sl st into the next st to smooth out the spiral step. Fasten off Color A and weave in the end. The walls go straight up because the count stays at 106.
Place markers on Side 2 (the back) as follows, counting from the End A side: one each in back-wall sts 2 and 6, and one each in sts 18 and 22. These mark the strap edges.
Straps (make 2, Color B)
Each strap is a small tube of waistcoat stitch that you flatten. You get V columns on both faces, and the strap is thick enough to carry the weight.
Ch 10 and join with a sl st to form a ring, taking care not to twist the chain.
Rnd 1: Sc in each ch around. (10 sts)
Rnds 2–36: Ws in each st around, working in a spiral. (10 sts in each round)
Sl st into the next st and fasten off, leaving a 12 in (30.5 cm) tail for sewing.
Flatten the tube so that 5 sts lie on each face. Each strap should measure 9 in (22.9 cm) long and 1.25 in (3.2 cm) wide.
Make All Pieces
- Color A: 1 basket body (Rnds 1–22)
- Color B: 2 straps, with the rim worked later on the body
Layout (back wall, Side 2, seen from outside):
End A |st1|[st2 st3 st4 st5 st6]|st7 ... st17|[st18 st19 st20 st21 st22]|st23| End B
            STRAP 1 (5 sts)                     STRAP 2 (5 sts)
Each strap covers 5 sts, matching its flattened width of 5 sts. One plain stitch is left between each strap and the curve. The strap centers are 16 sts apart, which is 4 in (10.2 cm).
Joining the Straps
Method: Whipstitch with the cream tail through both layers of the flattened strap.
- Lay one end of Strap 1 against the outside of the back wall. Line its 5-st width up with back sts 2–6, with the strap end sitting 4 rounds below the top edge (over Rnds 19–22). This gives a 1 in (2.5 cm) overlap.
- Whipstitch the strap’s bottom edge to the wall one strap stitch to one wall column, so 5 strap sts meet 5 wall columns. Then sew both long edges up the overlap, one stitch for each wall round, which is 4 per edge.
- Bring the strap up and over the rod. Lay the other end against the inside of the back wall directly behind the first end, again over Rnds 19–22, and sew it the same way.
- Repeat for Strap 2 over sts 18–22.
If your rod lifts out of its brackets, you can attach both ends first and slide the rod through afterward.
Tension: Keep your sewing stitches snug but not tight. If you pull too hard, the wall puckers above the base.
Checkpoint: The free loop of each strap should be 7 in (17.8 cm) long, which is 9 in minus two 1 in overlaps. Both loops must be the same length so that the basket hangs level.
Border (Rim, Color B)
Border gauge: 4 sc per 1 in (2.5 cm), with each round about 0.25 in (0.6 cm) tall.
Join Color B with a sl st into the first st of End A on the top edge of Rnd 22. Work into the top loops of the wall. The straps lie flat against the wall faces, so they don’t get in the way.
Rnd 23: Sc in each st around. (106 sts: End A 30, Side 1 23, End B 30, Side 2 23) Join with a sl st to the first sc.
Rnd 24: Ch 1, then sc in each st around. (106 sts, same split per section) Join.
Rnd 25: Ch 1, then rev sc in each st around. (106 sts: 30 + 23 + 30 + 23) Join, fasten off and weave in the end.
Why the math works: The rim starts on exactly the 106 wall stitches and works 1 into each one, with no increases or decreases. The rim’s circumference therefore matches the wall’s 26.5 in (67.3 cm) exactly. The 30-st curved ends and 23-st straight sides carry straight up, so the rim follows the oval without flaring or pulling in. Three rounds at 0.25 in each give the 0.75 in (1.9 cm) border depth.
Final Blocking
- Weave in all remaining ends on the inside, following the stitch columns.
- Mist the basket evenly with water until it is damp but not soaked.
- Fill it with two toilet rolls or a rolled towel so that the walls stand straight.
- Shape the base into a smooth oval by hand, pressing the Rnd 11 ridge into a sharp fold.
- Pin the rim if it rolls outward, then let it dry completely on a flat surface.
- Lightly steam the straps flat, keeping the 5 V columns centered on each face.
Final Quality-Control Checklist
- The base lies flat and measures 10.75 × 5 in (27.3 × 12.7 cm).
- Every round from Rnd 10 to Rnd 25 has 106 sts.
- The V columns run straight up the walls without drifting.
- The wall is 3 in (7.6 cm) tall before the rim and 3.75 in (9.5 cm) after.
- Both straps are 9 in (22.9 cm) long and 1.25 in (3.2 cm) wide.
- The strap ends are sewn over Rnds 19–22 at back sts 2–6 and 18–22.
- The basket hangs level from the rod.
- The crab stitch rim is even all the way around.
Troubleshooting
The base ruffles: You have extra stitches or loose tension. Recount the end sections against the per-end totals given in the base rounds.
The base cups: You have missed increases or tight tension. Check that each end gained exactly 3 sts in every round.
The V columns slant: This is normal in a spiral. Block the basket while it is filled, and keep the ws insertion exactly in the center of each V.
The hook won’t go into the V’s: Your stitches are too tight. Pull up a slightly taller loop, or go up 0.5 mm for the walls only.
The basket tilts forward: The straps are uneven. Undo one inside end and re-sew it so that both loops measure 7 in (17.8 cm).
The rim flares: You worked more than 1 sc per stitch somewhere. Recount to 106.
The crab stitch looks flat: Work it slightly looser so that each stitch twists.
Care
Hand wash cool and reshape while damp. Dry flat with the basket filled so that it keeps its oval shape.

Final Notes
The measurement chain is short and checkable. Gauge of 4 sts and 4 rnds per inch gives a 10-round base of 106 sts, which measures 10.75 × 5 in (27.3 × 12.7 cm). Twelve straight wall rounds add 3 in (7.6 cm). The 3-round, 106-st rim adds 0.75 in (1.9 cm) for a finished height of 3.75 in (9.5 cm). Two 36-round straps of 9 in (22.9 cm) each hang the basket from a 7 in (17.8 cm) loop. If each checkpoint matches, the finished basket will too.
Happy crocheting!