
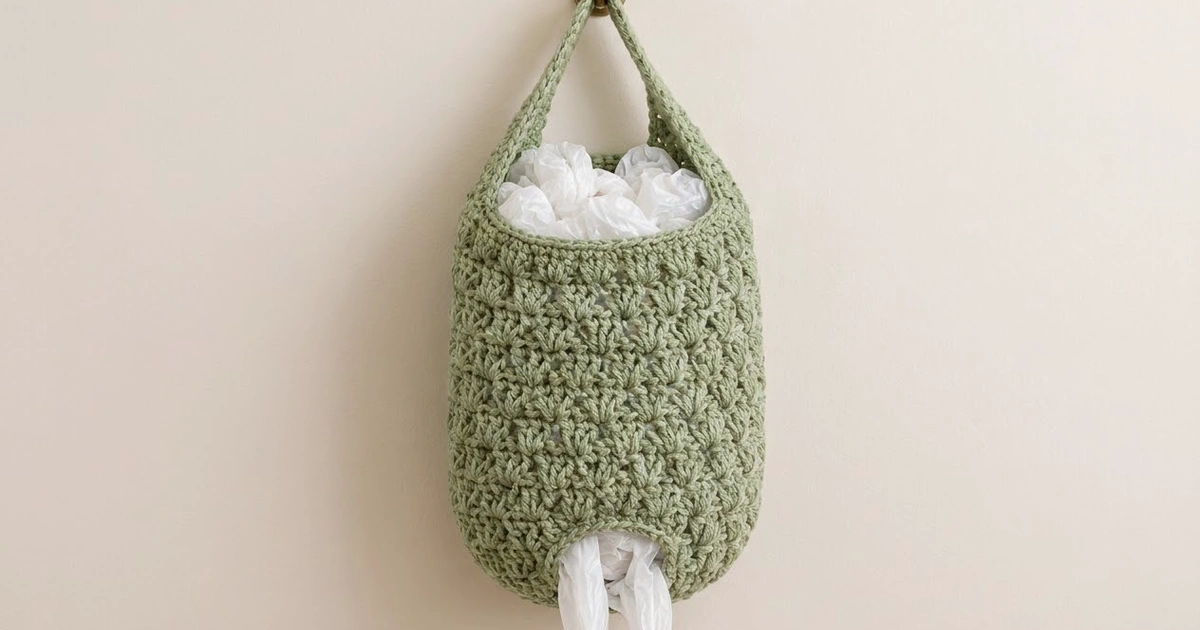
The Sage Shell Bag Holder is a practical kitchen piece that looks good on the wall. It is a soft, pod-shaped dispenser in sage green. You stuff plastic bags in through the top and pull them out one at a time through a round opening at the bottom.
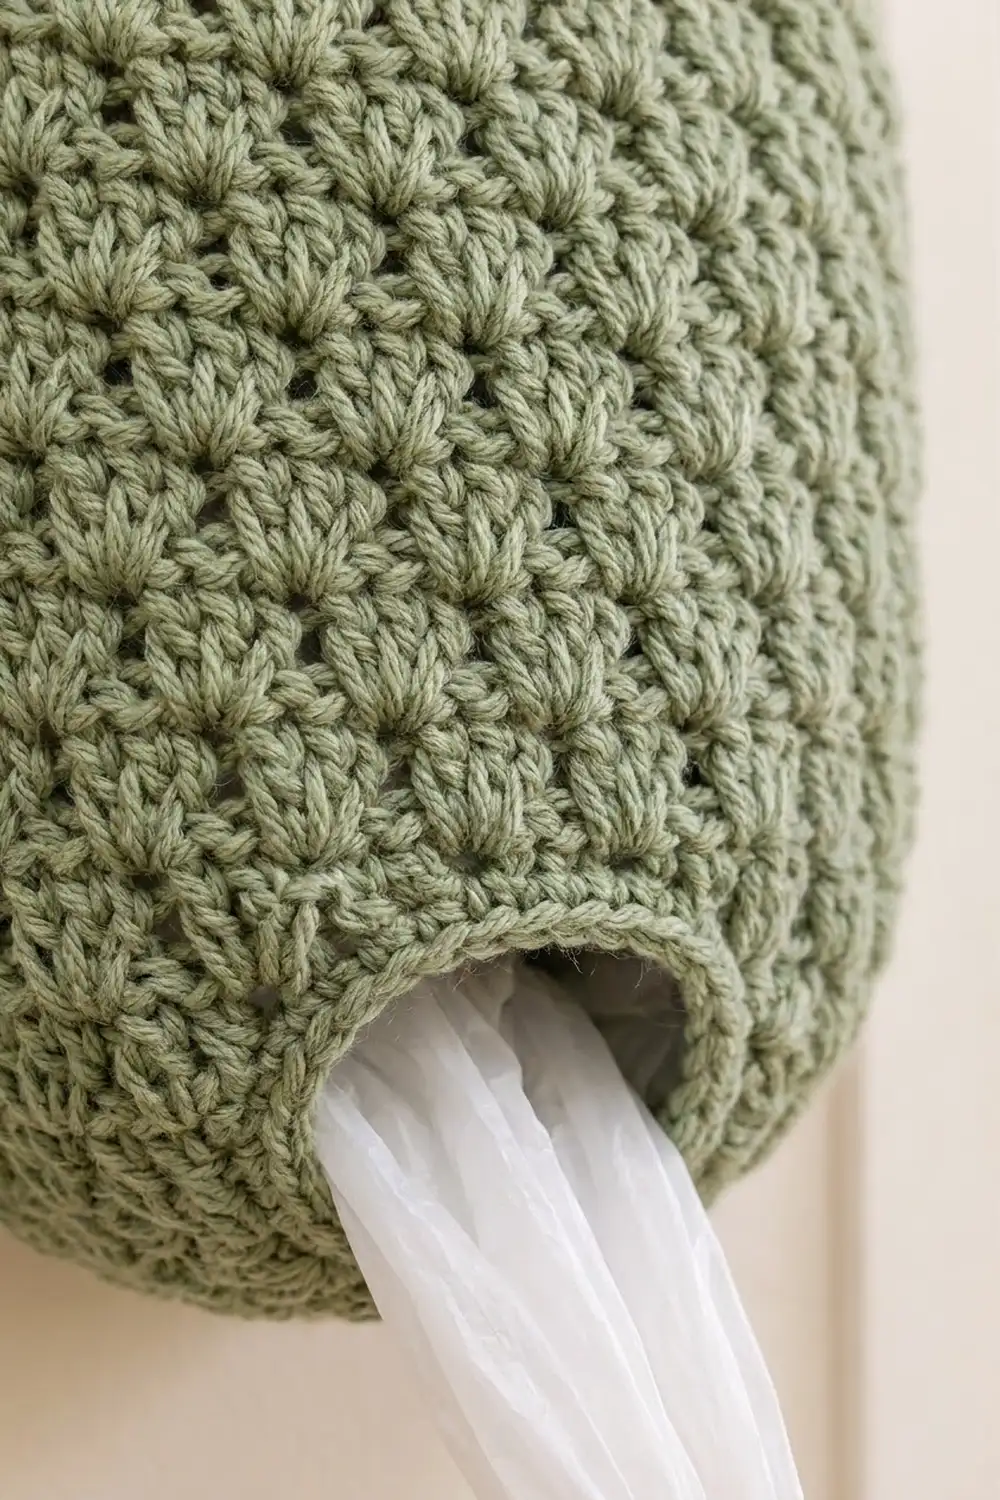
The texture comes from staggered rounds of small three-double-crochet shells. Together they make a dense, bumpy surface that holds its shape and hides what is inside. The top has a smooth band of single crochet, and two narrow straps rise from the sides of the rim to meet in one hanging loop.
This pattern uses US crochet terms. The finished body is 8 in (20.3 cm) wide when flattened and 12.7 in (32.3 cm) tall. The total height, including the straps and loop, is about 19 in (48.3 cm).
Construction is simple. You start at the bottom with a chain ring, which becomes the dispensing opening. You then increase outward to form a rounded base, and work the shell pattern even in joined rounds. After a single crochet rim, you add two straps in rows and join them at the top into a loop.
Finished Size and Construction
- Finished size: 8 in (20.3 cm) wide when flattened × 12.7 in (32.3 cm) body height; about 19 in (48.3 cm) to the top of the loop
- Skill level: Easy / advanced beginner
- Terminology: US crochet terms
- Yarn weight: Worsted (#4), cotton or cotton blend
- Hook: 5.0 mm (H-8)
- Number of pieces: 1 (seamless tube with attached straps)
- Layout: Single vertical pod, hung from one loop
- Piece size: 16 in (40.6 cm) around, 8 in (20.3 cm) wide when flat
- Size before rim: 11.8 in (30.0 cm) tall
- Rim (border) depth: 0.9 in (2.3 cm), 4 rounds of sc
- Dispensing opening: 8 in (20.3 cm) around, about 2.5 in (6.4 cm) across
Materials
Yarn: Choose a smooth worsted-weight cotton or cotton blend. Cotton holds its shape when the holder is fully stuffed and doesn’t stretch out over time. Avoid very fuzzy yarns, because they blur the shell texture.
- Sage green: 200 g / about 380 m (416 yd), based on a typical cotton of 100 g = 190 m (208 yd)
These quantities include a margin of about 10–15% for your gauge swatch and small differences in tension.
Tools:
- 5.0 mm (H-8) crochet hook
- 4 locking stitch markers
- Tapestry needle
- Scissors
- Measuring tape
- Rust-proof pins and a rolled towel for blocking
Abbreviations (US Terms)
- ch – chain
- sl st – slip stitch
- sc – single crochet
- dc – double crochet
- sc2tog – single crochet 2 together: (insert hook in next st, yo, pull up a loop) twice, yo, pull through all 3 loops
- st(s) – stitch(es)
- rnd(s) – round(s)
- RS – right side
- rep – repeat
Special stitch – Shell: Work 3 dc in the same stitch.
Pattern repeat: Every shell round is made of repeats of 4 sts (1 sc + one 3-dc shell). With 16 repeats you get 64 sts.
Gauge and Checkpoints
Single crochet gauge: 16 sts × 18 rnds = 4 in (10.2 cm).
Shell pattern gauge: 16 sts (4 repeats) × 9 rnds = 4 in (10.2 cm).
Each shell round is about 0.44 in (1.1 cm) tall, and each sc round is about 0.22 in (0.6 cm) tall.
Test first: Work Rnds 1–9 below (the base plus 4 shell rounds) as your swatch, then check it:
- After Rnd 1: The ring lies flat and measures 8 in (20.3 cm) around.
- After Rnd 5: The outer edge measures 16 in (40.6 cm) around. When you pinch it flat, it is 8 in (20.3 cm) wide.
- After Rnd 14: The 9 shell rounds measure 4 in (10.2 cm) tall.
- After Rnd 29: The body measures 11.8 in (30.0 cm) tall when flattened.
- After Rnd 33: The body measures 12.7 in (32.3 cm) tall.
Too big? If the piece is wider than 8 in (20.3 cm) flat, go down to a 4.5 mm hook.
Too small? If it is narrower than 8 in (20.3 cm) flat, go up to a 5.5 mm hook.
A change of 0.25 in (0.6 cm) in flat width adds up to 0.5 in (1.3 cm) around the tube, so fix the gauge before you continue.
Base and Dispensing Opening
The base begins as a chain ring, which stays open as the dispensing hole. The increase rounds make a flat ring that cups gently into the rounded bottom.
Foundation: Ch 32, then sl st to the first ch to form a ring. Don’t twist the chain.
Rnd 1: Ch 1, sc in the same ch as the join and in each ch around, then sl st to the first sc. (32 sts)
Rnd 2: Ch 1, sc in next 3 sts, 2 sc in next st; rep from * 8 times, then sl st to the first sc. (40 sts)*
Rnd 3: Ch 1, sc in next 4 sts, 2 sc in next st; rep from * 8 times, then sl st to the first sc. (48 sts)*
Rnd 4: Ch 1, sc in next 5 sts, 2 sc in next st; rep from * 8 times, then sl st to the first sc. (56 sts)*
Rnd 5: Ch 1, sc in next 6 sts, 2 sc in next st; rep from * 8 times, then sl st to the first sc. (64 sts)*
Checkpoint: The outer edge measures 16 in (40.6 cm) around. The base is about 1.1 in (2.8 cm) deep from the opening to the outer edge. It will curl slightly upward, and that curl forms the rounded bottom.
Place a marker in the joining stitch. This marks the seam line, which you will later place at one side fold.
Body (Staggered Shell Pattern)
The shell rounds alternate between two versions, Round A and Round B. Each sc sits over the center of a shell below, and each shell sits over an sc below, which staggers the texture. The join stays in the same column, so the rounds don’t drift.
Rnd 6 (Round A): Ch 1, sc in the same st as the join, skip next st, Shell in next st, skip next st. Sc in next st, skip next st, Shell in next st, skip next st; rep from * 15 more times. Sl st to the first sc. (64 sts: 16 sc + 16 shells of 3 dc)*
Rnd 7 (Round B): Ch 3 (counts as dc), dc in the same st as the join. Skip next dc, sc in the center dc of the next shell, skip next dc. Shell in next sc, skip next dc, sc in the center dc of the next shell, skip next dc; rep from * 15 more times. Finish with dc in the same st as the beginning ch-3 to complete the split first shell, then sl st to the top of the ch-3. (64 sts: 16 sc + 16 shells)*
Rnd 8 (Round A): Ch 1, sc in the top of the ch-3 (this is the center of the split shell). Skip next dc, Shell in next sc, skip next dc. Sc in the center dc of the next shell, skip next dc, Shell in next sc, skip next dc; rep from * 15 more times. Sl st to the first sc. (64 sts)*
Rnds 9–29: Keep alternating. Odd rounds repeat Rnd 7 and even rounds repeat Rnd 8, ending with an odd round (Round B) on Rnd 29. That gives 24 shell rounds in total. (64 sts every round)
Checkpoint after Rnd 14: The 9 shell rounds measure 4 in (10.2 cm) tall.
Checkpoint after Rnd 29: The 24 shell rounds measure 10.7 in (27.2 cm). Added to the 1.1 in (2.8 cm) base, the body is 11.8 in (30.0 cm) tall.
Top Rim
The plain rim makes a firm, smooth edge so the opening doesn’t sag when you stuff bags in.
Rnd 30 (conversion round): Ch 1, sc in each st around, then sl st to the first sc. Count the ch-3 from Rnd 29 as a stitch. (64 sts = 64 worked 1-per-existing-stitch + 0 added)
Rnds 31–33: Ch 1, sc in each st around, then sl st to the first sc. (64 sts)
Fasten off and weave in the end.
Checkpoint: The rim is 0.9 in (2.3 cm) deep, and the body is 12.7 in (32.3 cm) tall. When flattened, the rim lies at exactly 8 in (20.3 cm) with no ruffling.
Straps and Hanging Loop
Flatten the body with the seam marker at the left side fold. The folds now fall between st 64 and st 1, and between st 32 and st 33. Each strap is centered on one fold.
Strap 1
Row 1: With RS facing, join yarn in st 62 of Rnd 33. Ch 1, sc in the same st and in the next 5 sts (sts 62, 63, 64, 1, 2, 3). Turn. (6 sts)
Rows 2–4: Ch 1, sc in each st. Turn. (6 sts)
Row 5: Ch 1, sc2tog, sc in next 2 sts, sc2tog. Turn. (4 sts)
Rows 6–24: Ch 1, sc in each st. Turn. (4 sts)
Fasten off.
Strap 2
Rows 1–24: With RS facing, join yarn in st 30 and work over sts 30–35 exactly as for Strap 1. Don’t fasten off.
Checkpoint: Each strap is 5.3 in (13.5 cm) long. It is 1.5 in (3.8 cm) wide at the base and 1 in (2.5 cm) wide at the top.
Join the straps: Bring the top of Strap 1 up to meet Strap 2 without twisting either one. Hold the last rows together. Ch 1, then sl st through both layers across all 4 sts. Turn. (4 sts)
Neck row: Ch 1, sc in each of the 4 sl sts. (4 sts)
Loop: Ch 12, then sl st to the first sc of the neck row. Ch 1 and work 18 sc into the ch-12 space, then sl st to the first sc. Fasten off.
The loop is about 3 in (7.6 cm) around and hangs about 1.5 in (3.8 cm) above the neck. Because the straps angle inward, they form an open arch above the rim.
Border (Rim and Opening Edges)
This piece has no added outer border. Its edge finishing is the top rim (Rnds 30–33) plus one round around the dispensing opening.
Border gauge: 16 sc = 4 in (10.2 cm), the same as the body.
Top rim, per side when flattened:
- Front: 32 sts. At 4 sts per inch, that is 8 in (20.3 cm).
- Back: 32 sts, also 8 in (20.3 cm).
- Total: 64 sts.
The fold stitches are part of those 32 per side, so nothing is counted twice.
Opening Edge Rnd: With RS facing, join yarn in any free loop of the foundation chain. Ch 1, sc in each free loop around, then sl st to the first sc. (32 sts = 32 worked 1-per-loop + 0 added)
When flattened, that is 16 sts per side, or 4 in (10.2 cm) across. Fasten off and weave in the end.
Why the math works: The shell repeat is 4 sts, and 64 sts make exactly 16 repeats. At 16 sts per 4 in (10.2 cm), 64 sts make 16 in (40.6 cm) around, or 8 in (20.3 cm) flat. The rim converts the 64 shell-round sts 1-to-1, so its width matches the body exactly. The opening edge matches the 32-ch ring, so the hole stays at 8 in (20.3 cm) around and doesn’t tighten.
Final Blocking
- Weave in all ends along the wrong side, following stitch columns.
- Soak the holder in cool water for 10 minutes. Gently press out the water without wringing.
- Roll it in a dry towel to remove extra moisture.
- Stuff the body with a rolled towel or a plastic bag filled with bags so it forms a smooth pod shape.
- Flatten slightly and check that the width is 8 in (20.3 cm) and the body height is 12.7 in (32.3 cm).
- Lay the straps flat, pin them at 1 in (2.5 cm) wide, and shape the loop into a round.
- Let everything dry completely before you hang it.
Final Quality-Control Checklist
- [ ] The opening edge has 32 sc and measures 8 in (20.3 cm) around.
- [ ] Every shell round has 64 sts (16 repeats).
- [ ] The join seam runs straight up one side fold.
- [ ] The rim has 64 sc, and both sides measure 8 in (20.3 cm) when flattened.
- [ ] The straps are equal: 24 rows each, 6 sts tapering to 4 sts.
- [ ] Neither strap is twisted, and the join sits centered above the opening.
- [ ] The loop is firm and fits your hook.
- [ ] All ends are secured.
Troubleshooting
The base ruffles a lot: Your tension is loose. Go down a hook size for Rnds 2–5 only.
The base cups too sharply: Work loosely, or try Rnd 5 with a 5.5 mm hook.
Shells lean or the join drifts: Make sure each Round B begins and ends its split shell in the same st, and each Round A starts in the top of the ch-3.
Stitch count off by 4: You missed or added a repeat. Count the shells: there should be 16.
Rim flares: Use a hook 0.5 mm smaller for Rnds 30–33.
Bags come out too fast: Work a second Opening Edge round of sc2tog every 8th st (28 sts).
Straps differ in length: Count the rows. Both straps need exactly 24.
Care
Hand wash in cool water and lay flat to dry, reshaping it while damp. Cotton can be machine washed on a gentle cycle inside a mesh bag.

Final Notes
The measurement chain is short and reliable:
- 32-ch ring = 8 in (20.3 cm) opening
- 64-st base = 16 in (40.6 cm) around, 8 in (20.3 cm) flat
- 24 shell rounds = 10.7 in (27.2 cm), bringing the body to 11.8 in (30.0 cm)
- 4 rim rounds = 0.9 in (2.3 cm), for a 12.7 in (32.3 cm) body
- Straps = 5.3 in (13.5 cm) each, plus the loop, for about 19 in (48.3 cm) overall
Check your gauge at the base and again after 9 shell rounds, and everything after that should fall into place.
Happy crocheting!