

This hanging holder stores three spare rolls in a narrow strip of wall. It has a long cream back panel, three round pockets, and a wooden ring at the top for a hook.
The palette is soft and fresh. Cream is the main color, lavender trims the rims and edges, a slightly deeper purple makes the grapes, and sage green makes the leaves and vines. Each pocket has an open net-mesh band between two solid bands and a scalloped lavender top.
The pattern uses US crochet terms. The finished holder is 5.9 in (15.0 cm) wide and about 22 in (55.9 cm) tall from the bottom edge to the top of the folded tab. Each pocket is 4.75 in (12.1 cm) across and 3.5 in (8.9 cm) tall.
You work the panel flat in rows and the pockets in the round from the base up. Add the appliqués, sew the pockets to the panel, add the border, and wrap the tab around the ring.
Finished Size and Construction
- Finished size: 5.9 in × 22 in (15.0 cm × 55.9 cm), ring not included
- Skill level: Intermediate
- Terminology: US crochet terms
- Yarn weight: Worsted (#4) cotton
- Hook: 4.5 mm (US 7)
- Number of pieces: 1 back panel, 3 pockets, 3 grape appliqués
- Layout: 3 pockets stacked in 1 column
- Pocket size: 4.75 in (12.1 cm) diameter, 3.5 in (8.9 cm) tall
- Panel size before border: 5 in × 18 in (12.7 cm × 45.7 cm) body, plus 1.33 in (3.4 cm) shoulders and a 4 in (10.2 cm) tab
- Border depth: 0.45 in (1.1 cm), 2 rounds
Materials
Use a smooth, firm worsted-weight cotton of about 175 m per 100 g. Cotton holds the pocket shape and stands up to bathroom humidity. Very soft yarn will make the mesh sag.
- Cream (main): 130 g, 230 m
- Lavender (rims and border): 30 g, 55 m
- Purple (grapes): 20 g, 35 m
- Sage green (leaves, tendrils, vines): 15 g, 25 m
Tools:
– 4.5 mm (US 7) crochet hook
– Wooden ring, 3 in (7.6 cm) diameter
– Tapestry needle
– 6 locking stitch markers
– Rust-proof pins and a blocking mat
– Measuring tape and scissors
The quantities include a margin of about 15% for your gauge test and weaving in ends.
Abbreviations (US Terms)
- ch – chain
- sl st – slip stitch
- sc – single crochet
- hdc – half double crochet
- dc – double crochet
- sc2tog – single crochet 2 together
- BLO – back loop only
- sk – skip
- st(s) – stitch(es)
- MR – magic ring
Popcorn (pc): Work 5 dc in the same place. Take the hook out of the loop and insert it from front to back into the first dc of the group. Pick up the dropped loop and pull it through.
Gauge and Checkpoints
Gauge: 16 sc and 18 rows = 4 in (10.2 cm) in sc worked flat. That is 4 sts and 4.5 rows per inch.
Make one pocket base first to check your gauge, since every pocket depends on it.
- Base after Rnd 10: 4.75 in (12.1 cm) across, lying flat
- Pocket after Rnd 21: 3.5 in (8.9 cm) tall
- Panel after Row 18: 5 in (12.7 cm) wide and 4 in (10.2 cm) tall
- Panel after Row 81: 5 in × 18 in (12.7 cm × 45.7 cm)
If your base measures more than 4.75 in (12.1 cm), go down half a hook size. If it measures less than 4.6 in (11.7 cm), go up half a size. A standard roll is about 4.5 in (11.4 cm) across and needs this small amount of ease.
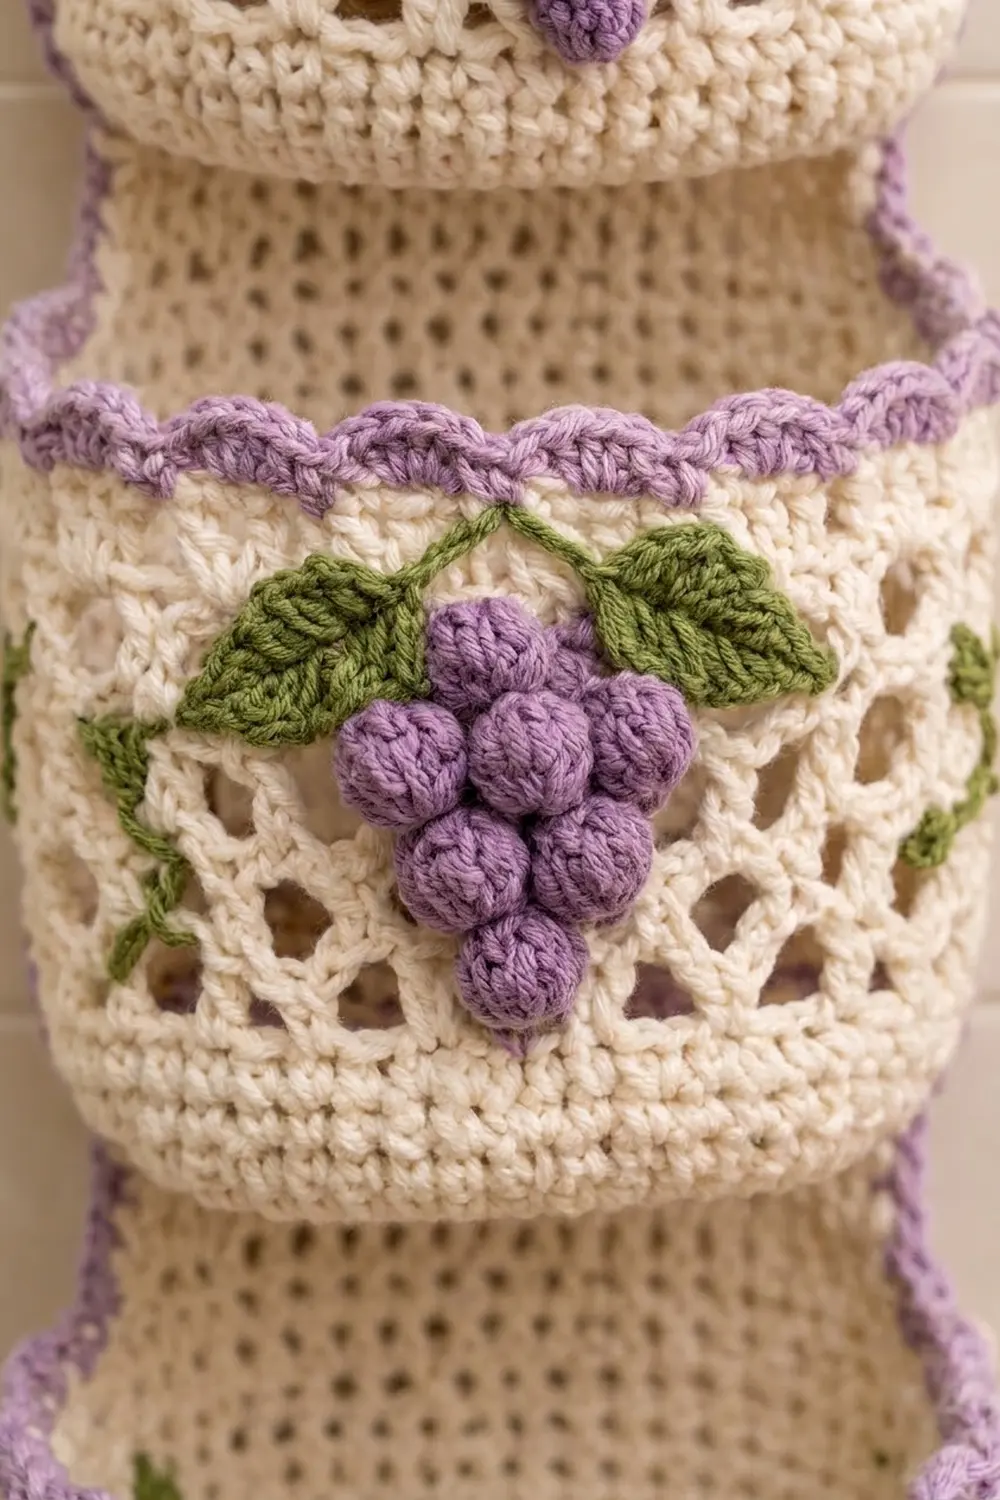
Pocket (Make 3)
Use cream unless the pattern says otherwise. Work the base in continuous rounds. From Rnd 11 on, join each round with a sl st.
Base
Rnd 1: MR, 6 sc in the ring. (6)
Rnd 2: 2 sc in each st. (12)
Rnd 3: Sc in next st, 2 sc in next st 6 times. (18)
Rnd 4: Sc in next 2 sts, 2 sc in next st 6 times. (24)
Rnds 5–10: Continue increasing 6 sts evenly in each round, working 1 more sc between increases each time. The counts are 30, 36, 42, 48, 54, and 60.
Count after Rnd 10: 60 sts. The base measures 4.75 in (12.1 cm) across.
Sides
Rnd 11 (turning round): Ch 1, sc in BLO of each st, sl st to join. Count: 60 worked 1 per st + 0 added = 60. This round turns the edge up to start the wall.
Rnds 12–13: Ch 1, sc in each st, sl st to join. (60)
Rnd 14 (mesh setup): Ch 1, sc in first st, ch 5, sk 2, sc in next st 19 times, ch 5, sk 2, sl st to first sc. (20 ch-5 loops)
Rnd 15: Sl st in the first 3 ch to reach the center of the first loop. Ch 1, sc in the same loop, ch 5, sc in next loop 19 times, ch 5, sl st to first sc. (20 loops)
Rnd 16: Repeat Rnd 15. (20 loops)
These three rounds make the diamond-shaped net holes. Together they measure about 1.65 in (4.2 cm) tall.
Rnd 17 (conversion round): Sl st into the first loop. Ch 1, work 3 sc in each loop around, then sl st to join. Count: (20 loops × 1 sc) + (20 loops × 2 extra sc) = 60.
Rnds 18–19: Ch 1, sc in each st, sl st to join. (60) Fasten off cream.
Rnd 20: Join lavender. Ch 1, sc in each st, sl st to join. (60)
Rnd 21 (scallop): Ch 1, sc in next st, sk 1, 3 hdc in next st, sk 1 15 times, sl st to first sc. Each scallop uses 4 sts, so 15 × 4 = 60. (15 scallops) Fasten off.
Checkpoint: The pocket is 3.5 in (8.9 cm) tall. A roll should slide in easily, with about 0.6 in (1.5 cm) showing above the rim.
Grape Appliqué (Make 3 Sets)
Grapes (10 per set)
With purple, make a MR. Ch 3 (this counts as the first dc) and work 1 popcorn into the ring. Ch 1, pull the ring tight, and fasten off. Leave an 8 in (20.3 cm) tail for sewing. Each grape is about 0.5 in (1.3 cm) across.
Leaves (2 per set)
With green, ch 8. Starting in the 2nd ch from the hook, work sl st, sc, hdc, dc, dc, hdc, sc. (7 sts) Ch 1. Turn the piece and work along the other side of the chain: sc, hdc, dc, dc, hdc, sc, sl st. (7 sts) Sl st to the first sl st and fasten off. The leaf is pointed at both ends and about 1.75 in (4.4 cm) long.
Tendril (1 per set)
With green, ch 12. Work 2 sc in the 2nd ch from the hook and in each ch across. (22 sc) The strip twists into a curl. Fasten off.
Assemble
Arrange the grapes in an inverted triangle with rows of 4, 3, 2, and 1. Nest each row between the grapes above it. Sew each grape down through its center with its own tail. The cluster measures about 2 in (5.1 cm) wide and 1.75 in (4.4 cm) tall.
Center the cluster on the pocket front, opposite the round joins, so it covers Rnds 14–18. Sew the two leaves above the top row, angled out to each side. Tack the straight end of the tendril between the leaves and let the curl rest on the solid band.
Side Vines
With green and a tapestry needle, surface-chain a wavy line around each side of the pocket along Rnds 17–18. Add a lazy-daisy leaf about every 1.5 in (3.8 cm). Stop 2 in (5.1 cm) before the center back on each side, because that part lies against the panel.
Back Panel
With cream, ch 21.
Row 1: Sc in the 2nd ch from the hook and in each ch across. (20)
Rows 2–81: Ch 1, turn, sc in each st. (20)
Checkpoint: 5 in × 18 in (12.7 cm × 45.7 cm).
Row 82 (shoulders): Ch 1, turn, sc2tog, sc in next 16 sts, sc2tog. (18)
Rows 83–87: Decrease at both ends of each row the same way. The counts are 16, 14, 12, 10, and 8.
Rows 88–105 (tab): Ch 1, turn, sc in each st. (8) Fasten off.
The tab is 2 in (5.1 cm) wide and 4 in (10.2 cm) long.
Make All Pieces
- Cream: 1 panel, plus Rnds 1–19 of 3 pockets
- Lavender: Rnds 20–21 of 3 pockets, plus the border
- Purple: 30 grapes
- Green: 6 leaves, 3 tendrils, and the vine embroidery
Layout, front view (row numbers count up from the bottom):
      [ ring ]
      [ tab  ]          rows 88–105
     /shoulder\         rows 82–87
    |  space   |        rows 70–81
    | POCKET 3 |        rows 54–69
    |   gap    |        rows 45–53
    | POCKET 2 |        rows 29–44
    |   gap    |        rows 20–28
    | POCKET 1 |        rows 4–19
    |__________|        rows 1–3
Joining
Mark panel Rows 4, 29, and 54. On each pocket, find the 16 sts of Rnd 11 directly opposite the grapes. These are the back sts.
Stitch-to-stitch logic: The 16 back sts of the pocket lie on panel sts 3–18, which leaves 2 free panel sts on each side. Both stretches measure 4 in (10.2 cm), so you join them one stitch to one stitch.
- With cream, whipstitch Rnd 11 back sts 1–16 to panel sts 3–18 along the marked row.
- Flatten the back wall against the panel. Whipstitch Rnd 19 back sts 1–16 to panel sts 3–18, 13 rows higher. For the three pockets, that is Rows 17, 42, and 67.
- Close each end of the flattened section with a short vertical seam.
Tension: Pull each stitch just snug. If the stitches are too tight, the panel puckers below 5 in (12.7 cm). If they are too loose, a full pocket tips forward.
Checkpoint: Lay the holder flat. The panel should measure 5 in (12.7 cm) wide under every pocket, with 2 in (5.1 cm) gaps between pockets.
Border
The border goes around the panel only. The pockets leave the outer 2 sts on each side free, so the edge stays clear.
Border gauge: Work 8 sc for every 9 row-ends. This matches the 16:18 gauge ratio, so the edge neither ripples nor pulls in.
Rnd 1: Join lavender at the bottom right corner.
– Bottom: 3 sc in the first st, sc in next 18 sts, 3 sc in the last st. (24)
– Long side: 72 sc along Rows 1–81 (81 ÷ 9 × 8). Then 6 sc along the shoulder, 1 per row. Then 16 sc along the tab, Rows 88–105 (18 ÷ 9 × 8). (94)
– Tab top: 3 sc in the first st, sc in next 6 sts, 3 sc in the last st. (12)
– Second long side: Work as for the first long side. (94)
Sl st to the first sc. Total: 24 + 94 + 12 + 94 = 224. Do not increase at the inner corners where the shoulders meet the tab.
Rnd 2: Ch 1, sc in each st, working 3 sc in the center st of each of the 4 corner groups. Sl st to join and fasten off. Each corner adds 2 sts to its short side:
– Bottom: 28
– Long sides: 94 each
– Tab top: 16
Total: 28 + 94 + 94 + 16 = 232 (224 + 8).
Why the math works: The corner groups count only on the short sides, so no stitch is counted twice. The 8-in-9 ratio keeps each long side exactly 18 in (45.7 cm) along the body. The finished width is 5 + 0.45 + 0.45 = 5.9 in (15.0 cm).
Final Blocking
- Weave in all ends except the tab tail.
- Mist the whole holder lightly with water.
- Pin the panel flat at 5.9 in (15.0 cm) wide, keeping the edges straight.
- Fill each pocket with a rolled towel about 4.5 in (11.4 cm) across so the round shape sets.
- Shape each scallop into an even point, then let the holder dry completely.
- Fold the tab over the ring toward the back. Use the tab tail to sew Row 105 to Row 88.
Final Quality-Control Checklist
- Every pocket base has 60 sts and measures 4.75 in (12.1 cm).
- Every pocket has 20 net loops and 15 scallops.
- Every grape cluster has the 4-3-2-1 layout, 2 leaves, and 1 tendril.
- The pockets sit on Rows 4, 29, and 54, centered on the panel.
- Border Rnd 2 has 232 sts and square corners.
- The holder hangs straight when all three rolls are in place.
Troubleshooting
- Base cups or ruffles: Your gauge is off. Check Rnd 10 again and change hook size.
- Mesh sags: Your chains are loose. Work ch 4 loops instead, or crochet more tightly.
- Scallops lean: You missed a skip. Make sure each repeat uses exactly 4 sts.
- Border ripples: You worked too many stitches. Keep to 8 sc per 9 rows.
- Pockets tip forward: Add a second line of whipstitch at the Rnd 19 attachment row.
Care
Hand wash in cool water and press out the water in a towel. Reshape the pockets and dry flat. Do not tumble dry.

Final Notes
All the measurements come from one gauge: 16 sc × 18 rows = 4 in (10.2 cm). At that gauge, each pocket has a 4.75 in (12.1 cm) base and a 3.5 in (8.9 cm) wall. The panel measures 5 in × 18 in (12.7 cm × 45.7 cm). The 0.45 in (1.1 cm) border brings the finished holder to 5.9 in × 22 in (15.0 cm × 55.9 cm). Check your measurements at each checkpoint and the holder will hang straight and hold three rolls.
Happy crocheting!