

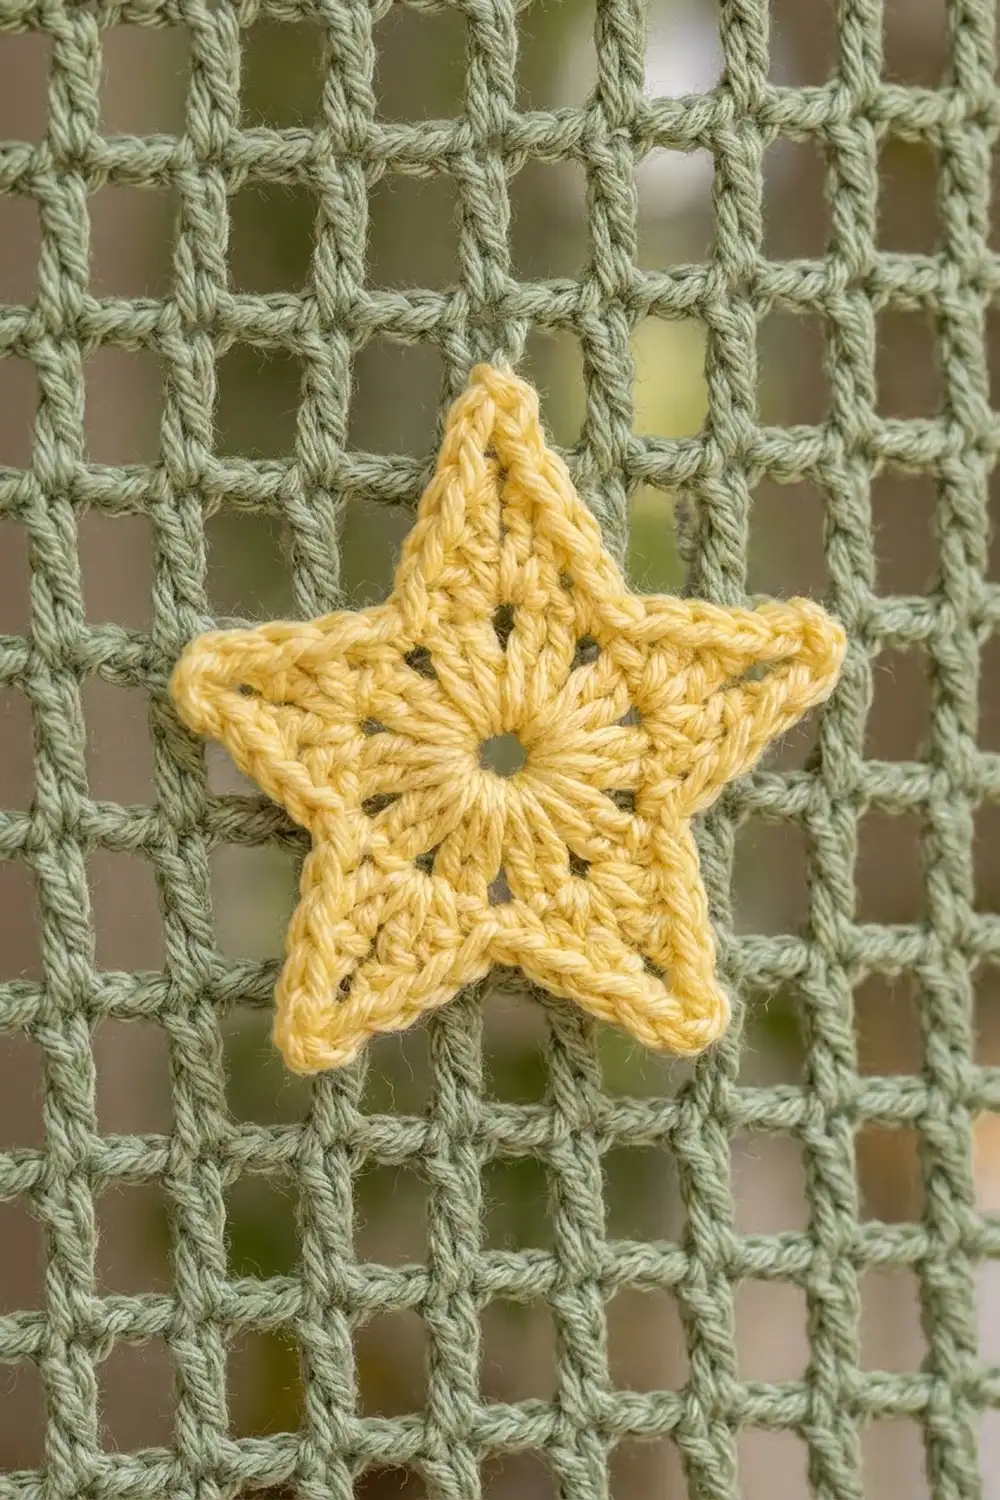
This café valance is made from eleven slim filet-mesh panels in soft sage green, joined side by side and finished with pointed hems. Each panel has a small butter-yellow star sewn on just below the middle, so a quiet row of stars runs across the window.
The look is cottage-simple: open grid mesh that lets light through, a raised seam ridge between panels, a solid band across the top, one tab per panel, and a tiny picot edge on every point. The pattern uses US crochet terms throughout.
The finished valance measures 55 in (139.7 cm) wide and 17.75 in (45.1 cm) long from the top band to the picot tips. The tab loops sit above that.
You crochet each panel from the top down in filet mesh, shape the point with stepped decreases, and edge it with a round of single crochet. Then you sew a star onto each panel, join the panels with a single crochet seam, and finish with a top band, tabs, and a picot trim along the bottom.
Finished Size and Construction
- Finished size: 55 in x 17.75 in (139.7 cm x 45.1 cm), plus tabs
- Skill level: Easy intermediate
- Terminology: US
- Yarn weight: Worsted (#4) cotton or cotton blend
- Hook: US H-8 (5.0 mm)
- Number of pieces: 11 mesh panels and 11 star appliqués; the tabs are worked in place
- Layout: 11 panels in a single row, 1 panel high
- Piece size (after panel edging): 5 in x 17 in (12.7 cm x 43.2 cm)
- Size before border: 55 in x 17 in (139.7 cm x 43.2 cm)
- Border depth: top band 0.5 in (1.3 cm); bottom picot trim 0.25 in (0.6 cm); tab strips 4.5 in (11.4 cm) long before folding
Materials
Use a smooth worsted-weight cotton or cotton blend. Cotton keeps the open mesh crisp and blocks well. Fuzzy or very stretchy yarns will let the mesh sag over the 17 in (43.2 cm) drop.
- Sage green (Color A): 250 g / 425 m (465 yd)
- Butter yellow (Color B): 30 g / 51 m (56 yd)
These quantities include a margin of about 20 percent for swatching and seaming.
Tools:
- US H-8 (5.0 mm) crochet hook
- Tapestry needle
- Locking stitch markers
- Measuring tape
- Blocking mats, rust-proof pins, and a spray bottle
- Curtain rod up to 1.25 in (3.2 cm) in diameter
Abbreviations (US Terms)
- ch – chain
- sl st – slip stitch
- sc – single crochet
- hdc – half double crochet
- dc – double crochet
- sk – skip
- sp – space
- st(s) – stitch(es)
- tch – turning chain
- RS / WS – right side / wrong side
Mesh square: one dc plus the ch-1 beside it, sitting over one ch-1 sp (or one skipped st) of the row below.
Picot: ch 3, sl st in 3rd ch from hook.
Gauge and Checkpoints
- Mesh gauge: 8 squares and 8 rows = 4 in (10.2 cm), or 2 squares and 2 rows per 1 in (2.5 cm).
- Single crochet gauge: 21 sc = 5 in (12.7 cm), which is 4.2 sc per inch. About 22 sc rows = 5 in (12.7 cm).
Make one complete panel first. It is your real gauge swatch, and every later number depends on it.
Checkpoints:
- After Row 1: 4.5 in (11.4 cm) wide
- After Row 9: 4.5 in (11.4 cm) long
- After Row 29: 14.5 in (36.8 cm) long
- After Row 33: 16.5 in (41.9 cm) long at the tip
- After panel edging: 5 in x 17 in (12.7 cm x 43.2 cm)
- Star: 2 in (5.1 cm) from point to point
If the panel is too big, go down a hook size. If it is too small, go up one. If the width is right but the panel is too long, your dc are too tall, so pull up a shorter first loop.
Panel (Make 11)
With Color A.
Foundation: Ch 21.
Row 1 (RS, solid top row): Dc in 4th ch from hook and in each ch across; turn. (18 dc + tch = 19 sts)
Row 2 (mesh set-up): Ch 4 (counts as dc + ch 1), sk next st, dc in next st, ch 1, sk next st, dc in next st 8 times, with the last dc going into the top of the tch; turn. (10 dc, 9 ch-1 sps = 9 squares, 19 sts)
Row 3: Ch 4 (counts as dc + ch 1), sk next ch-1 sp, dc in next dc, ch 1, sk next ch-1 sp, dc in next dc 7 times, ch 1, sk next ch-1 sp, dc in 3rd ch of tch; turn. (9 squares, 19 sts)
Rows 4–29: Repeat Row 3. (9 squares, 19 sts each row)
The panel should now measure 14.5 in (36.8 cm) from the foundation edge.
Shaping the Point
Each shaping row leaves one square unworked at each end.
Row 30: Do not ch. Sl st in next ch-1 sp, sl st in next dc, ch 4 (counts as dc + ch 1), sk next ch-1 sp, dc in next dc, ch 1, sk next ch-1 sp, dc in next dc 6 times; leave the last square unworked; turn. (7 squares, 8 dc)
Row 31: Do not ch. Sl st in next ch-1 sp, sl st in next dc, ch 4, sk next ch-1 sp, dc in next dc, ch 1, sk next ch-1 sp, dc in next dc 4 times; leave the last square unworked; turn. (5 squares, 6 dc)
Row 32: Do not ch. Sl st in next ch-1 sp, sl st in next dc, ch 4, sk next ch-1 sp, dc in next dc, ch 1, sk next ch-1 sp, dc in next dc 2 times; leave the last square unworked; turn. (3 squares, 4 dc)
Row 33: Do not ch. Sl st in next ch-1 sp, sl st in next dc, ch 4, sk next ch-1 sp, dc in next dc; leave the last square unworked. (1 square, 2 dc)
The panel now measures 16.5 in (41.9 cm) at the tip.
Panel Edging
Do not fasten off. Work one round of sc all the way around the panel.
Edging Rnd: Ch 1, turn.
- Tip: Sc in first dc, 3 sc in ch-1 sp, sc in 3rd ch of ch-4. (5 sts)
- First diagonal: 2 sc around the Row 33 row end. Then 2 sc in the exposed ch-1 sp of the row above, 2 sc around that row’s end for Rows 32, 31, and 30. Finish with 2 sc in the exposed ch-1 sp of Row 29. (16 sts)
- First long side: 2 sc in each row end of Rows 29 through 1. (58 sts)
- Top: Working into the foundation ch, 3 sc in first ch, sc in next 17 ch, 3 sc in last ch. (23 sts)
- Second long side: 2 sc in each row end of Rows 1 through 29. (58 sts)
- Second diagonal: Work it as a mirror of the first diagonal. (16 sts)
Sl st to first sc. Fasten off and weave in ends.
Round total: 5 + 16 + 58 + 23 + 58 + 16 = 176 sts.
Per-side counts (each count includes its own corner sc):
- Top edge: corner sc + 1 + 17 + 1 + corner sc = 21 sts
- Each long side: corner sc + 1 + 58 = 60 sts
- Bottom point: 16 + 5 + 16 = 37 sts
Check: 21 + 60 + 60 + 37 − 2 shared corner sts = 176.
Star Appliqué (Make 11)
With Color B.
Rnd 1: Make a magic ring, ch 2 (does not count as a st), 10 hdc in ring, sl st to first hdc. Pull the ring snug but leave a small center hole. (10 hdc)
Rnd 2 (points): Ch 4, sc in 2nd ch from hook, hdc in next ch, dc in next ch, sk next hdc, sl st in next hdc 5 times. The last sl st lands in the joining st. (5 points)
Fasten off, leaving a 12 in (30.5 cm) tail. The star measures about 2 in (5.1 cm) from point to point.
Attaching the Stars
Lay a panel RS up with the point at the bottom. Center the star on the middle (5th) column of squares, with the star’s center at the bottom of Row 20. That is 10 in (25.4 cm) below the foundation edge. Point one tip straight up. Use the yellow tail to whipstitch around each point, catching the dc bars behind it, and fasten off on the WS.
Make All Pieces
- Color A: 11 panels, each edged to 176 sts
- Color B: 11 stars, one sewn onto each panel
Layout (RS facing, top edge up):
 T    T    T    T    T    T    T    T    T    T    T
[P1][P2][P3][P4][P5][P6][P7][P8][P9][P10][P11]
 \/   \/   \/   \/   \/   \/   \/   \/   \/   \/   \/
P = panel with star, T = tab (added in the border), \/ = pointed hem
Joining
Use a single crochet seam worked on the RS. It makes the raised green ridge between panels.
- Hold P1 and P2 WS together, with the RS of P1 facing you and the top edges level.
- Leave the top corner sc of each panel free. It belongs to the top edge.
- Join Color A in the next st below the corner on both panels. Working through both loops of both layers, sc in each of the 59 remaining long-side sts. (59 sc)
- Stop at the last row-end sc of Row 29. The diagonals stay unjoined, so each panel keeps its own point.
- Fasten off. Join P3 to P2 the same way and continue until all 10 seams are done.
Each panel has 60 sts on each long side, so neighboring panels match stitch for stitch. Keep your seam tension the same as the edging: a tight seam puckers the mesh, and a loose one shows gaps.
Checkpoint: The joined piece measures 55 in x 17 in (139.7 cm x 43.2 cm).
Border
Border gauge: 4.2 sc per inch, the same as the panel edging. Each panel’s top edge has 21 sts, and 21 ÷ 4.2 = 5 in (12.7 cm).
Top Band Row 1 (RS): Join Color A in the top corner sc at the right-hand end. Ch 1, then sc in each of the 21 top-edge sts of every panel across. (11 x 21 = 231 sc)
The seams start below the corner sts, so nothing extra is added at the seams. Every corner sc is already counted in its own panel’s 21.
Top Band Row 2 (WS): Ch 1, turn, sc in each st across. (231 sc)
Fasten off. The band is 0.5 in (1.3 cm) deep.
Tabs (Make 11)
Each panel’s section of Row 2 has 21 sts. The tab goes on the center 5 sts (sts 9–13), leaving 8 free sts on each side.
Tab Row 1: Join Color A in st 9 of a panel section, ch 1, sc in same st and in next 4 sts; turn. (5 sc)
Tab Rows 2–20: Ch 1, sc in each st across; turn. (5 sc)
Fasten off, leaving a 12 in (30.5 cm) tail. The tab is about 1.25 in (3.2 cm) wide and 4.5 in (11.4 cm) long. Fold it to the WS and whipstitch the last row along the base of Top Band Row 1. The loop fits rods up to 1.25 in (3.2 cm) across.
Bottom Picot Trim
Trim Row (RS): Join Color A in the first diagonal st of the panel at one outer end.
For each panel: sc in first st, picot, sc in next 2 sts 18 times. (37 sc, 18 picots)
Go straight into the next panel’s first diagonal st, with no extra sts in the V between points. Repeat across all 11 panels and fasten off.
Total: 11 x 37 = 407 sc and 11 x 18 = 198 picots.
Why the math works: The 37 bottom sts are an odd number, and the tip’s center is st 19. Picots follow sts 1, 3, 5, and so on, so one picot always sits right on the point and the two diagonals mirror each other. The top band uses exactly 21 sts per panel, so it stays 55 in (139.7 cm) wide without flaring. The outer side edges keep their 60-st edging. The trim adds 0.25 in (0.6 cm), bringing the length to 17.75 in (45.1 cm).
Final Blocking
- Weave in the remaining ends along the seams or inside the solid band.
- Soak the valance in cool water, press the water out gently, and roll it in a towel.
- Lay it RS up on blocking mats.
- Pin the top band straight to 55 in (139.7 cm).
- Pin each panel to 5 in (12.7 cm) wide, with its tip 17 in (43.2 cm) from the base of the band, then pin out each picot.
- Straighten the mesh by sighting along the dc columns with a ruler.
- Let it dry completely before you unpin it.
Final Quality-Control Checklist
- 11 panels, each 5 in x 17 in (12.7 cm x 43.2 cm)
- 176 sts in every panel edging
- 10 seams of 59 sc each, ending at Row 29
- Stars at the same height on every panel
- 231 sc in both rows of the top band
- 11 tabs, each centered on sts 9–13
- 407 sc and 198 picots in the trim, with a picot on every tip
- Final size 55 in x 17.75 in (139.7 cm x 45.1 cm)
Troubleshooting
- Squares look tall: Pull up a shorter loop on each dc, or use a smaller hook.
- Panel edges wave: There are too many sc in the row ends. Keep it to exactly 2 per row.
- Lopsided points: Recount both diagonals; each should have 16 sts.
- Seam puckers: Rework the seam more loosely or with a hook one size larger.
- Top band flares: Stitches were added at the seams. Recount to 21 per panel.
- Star curls: Steam it flat before sewing, and stitch down every point.
Care
Hand wash in cool water with a mild detergent, then reshape it and dry it flat. Don’t hang it while wet, because the weight will stretch the mesh.

Final Notes
Here is the measurement chain. Two squares per inch gives a 4.5 in (11.4 cm) panel, and the edging brings it to 5 in x 17 in (12.7 cm x 43.2 cm). Eleven panels make 55 in (139.7 cm), and the border finishes the valance at 55 in x 17.75 in (139.7 cm x 45.1 cm). If you check each stage as you go, the stars will line up and the points will hang evenly.
Happy crocheting!