

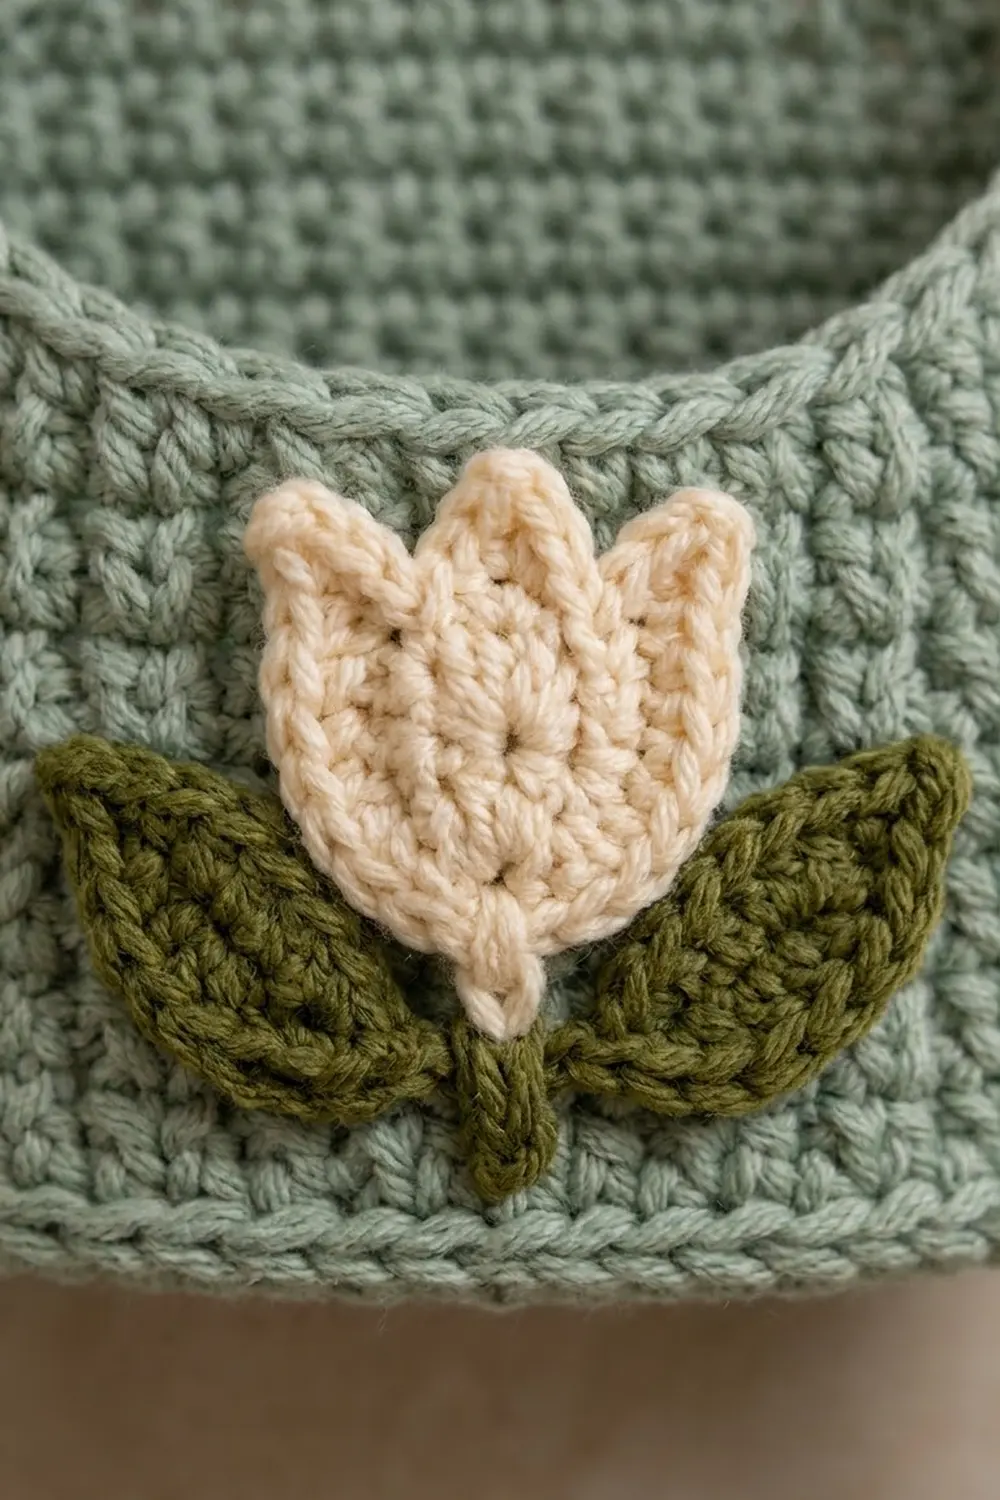
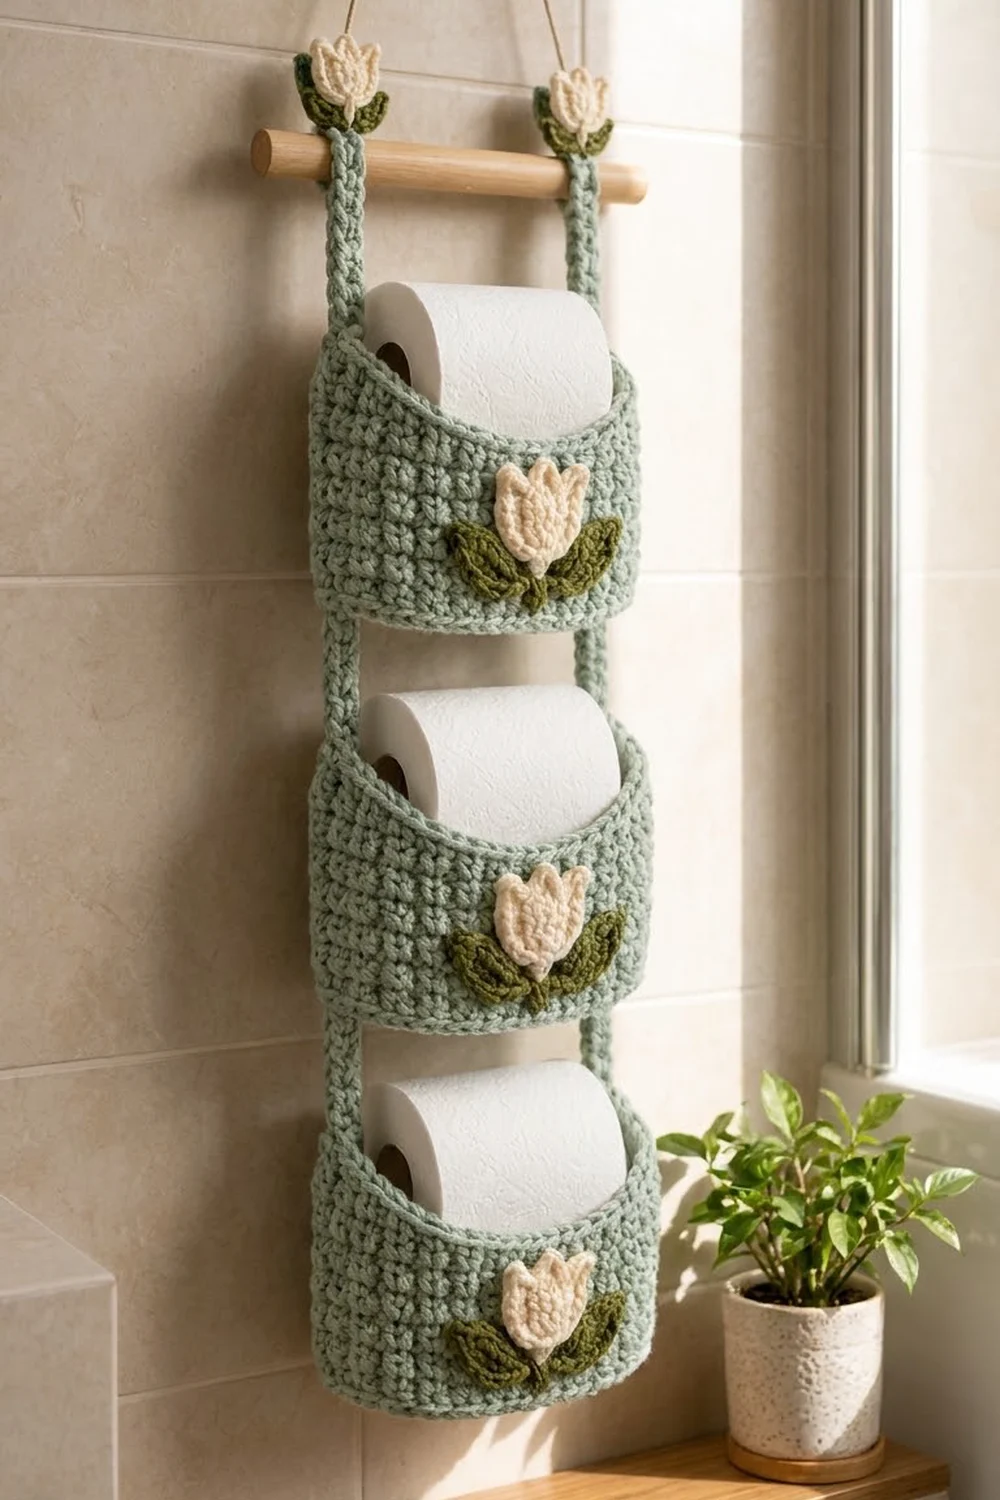
This hanging holder keeps three spare rolls in sight and within easy reach. It has three soft sage-green pockets stacked on two long straps, with a wooden dowel at the top. Each pocket has a cream tulip on two olive leaves on the front, and a smaller tulip sits at the top of each strap.
The look is calm and slightly cottage-style, and the three muted colors suit a neutral bathroom. The dense single crochet fabric holds its shape and doesn’t stretch out under the weight of a roll.
The pattern uses US crochet terms. The finished holder is about 6.25 in (15.9 cm) wide at the pockets and about 21 in (53.3 cm) long from the dowel to the bottom of the lowest pocket. It hangs from a 12 in (30.5 cm) dowel.
Here is how it’s built. Each pocket starts with an oval base worked in rounds, then the walls go straight up, and two rim rounds finish the top. You crochet two straps in rows and sew them to the curved sides of the pockets. The straps then fold over the dowel. Last, you sew the tulips and leaves on.
Finished Size and Construction
- Finished size: about 6.25 in (15.9 cm) wide x 21 in (53.3 cm) long, not counting the dowel loop or hanging cord
- Skill level: Easy / Advanced Beginner
- Terminology: US
- Yarn weight: #5 bulky, cotton or cotton blend
- Hook: 6.0 mm for the pockets and straps; 5.0 mm and 4.0 mm for the appliqués
- Number of pieces: 3 pockets, 2 straps, 5 tulips, 10 leaves
- Layout: 3 pockets stacked in one vertical column, joined by 2 side straps
- Piece size (one pocket): base 6.25 x 5 in (15.9 x 12.7 cm); height 4.25 in (10.8 cm)
- Size before border: wall height 3.75 in (9.5 cm) above the base
- Border (rim) depth: 2 rounds, about 0.5 in (1.3 cm)
Materials
Choose a firm cotton or cotton-acrylic bulky yarn. A bathroom is humid, and cotton holds its shape better than soft acrylic. The quantities below assume about 120 m per 100 g.
- Sage green (MC): 150 g / 180 m, for the pockets and straps
- Cream (CC1): 25 g / 30 m, for the tulips and hanging cord
- Olive green (CC2): 20 g / 24 m, for the leaves and stems
All quantities include a margin of about 20 percent.
Tools:
– 6.0 mm, 5.0 mm and 4.0 mm crochet hooks
– Wooden dowel, 12 in (30.5 cm) long and 0.75 in (1.9 cm) across
– Tapestry needle
– 6 stitch markers
– Scissors and a tape measure
– Pins for placing the appliqués
Abbreviations (US Terms)
- ch – chain
- sl st – slip stitch
- sc – single crochet
- hdc – half double crochet
- dc – double crochet
- tr – treble crochet
- BLO – back loop only
- st(s) – stitch(es)
- rnd – round
- rev sc – reverse single crochet
Special stitch: reverse single crochet (crab stitch). Work from left to right (right-handers). Insert the hook into the next stitch to the right, yarn over, pull up a loop, yarn over, and draw through both loops on the hook. It makes a rolled, rope-like edge.
Gauge and Checkpoints
Gauge: 12 sc x 13 rnds = 4 in (10.2 cm) in sc, using the 6.0 mm hook.
Make one full pocket before anything else. It works as your gauge swatch, and it’s the piece every other measurement depends on.
- After Rnd 8 (base): about 6.25 x 5 in (15.9 x 12.7 cm), with 52 sts around (about 17.3 in / 43.9 cm)
- After Rnd 20 (walls): the walls stand 3.75 in (9.5 cm) above the base edge
- After Rnd 22 (rim): the full pocket is 4.25 in (10.8 cm) tall
- Fit test: a standard roll is about 4.5 in (11.4 cm) across, so it should drop in with a little room to spare
If the pocket is too small, the roll won’t go in. Go up half a hook size and start again. If it’s too big, the walls will sag. Go down half a hook size. Don’t change the stitch counts, because the strap layout depends on them.
Pocket (Make 3)
Use MC and the 6.0 mm hook. Work in continuous spiral rounds and mark the first stitch of each round.
Base
Rnd 1: Ch 5. Sc in 2nd ch from hook, sc in next 2 ch, 3 sc in last ch. Turn the work so you’re crocheting along the other side of the chain: sc in next 2 ch, 2 sc in the last ch (the one already holding the first sc). (10 sts)
Rnd 2: 2 sc in first st, sc in next 2, 2 sc in each of next 3, sc in next 2, 2 sc in each of next 2. (16 sts)
The 16 sts are now 2 straight sts on each long side and 6 curved sts at each end. For Rnds 3–8, you work the straight sts as plain sc and spread 3 increases across each curved end.
Rnd 3: Sc in next 2, [sc in next, 2 sc in next] 3 times; repeat from * once more. (22 sts)*
Rnd 4: Sc in next 2, [sc in next 2, 2 sc in next] 3 times; repeat from * once more. (28 sts)*
Rnd 5: Sc in next 2, [sc in next 3, 2 sc in next] 3 times; repeat from * once more. (34 sts)*
Rnd 6: Sc in next 2, [sc in next 4, 2 sc in next] 3 times; repeat from * once more. (40 sts)*
Rnd 7: Sc in next 2, [sc in next 5, 2 sc in next] 3 times; repeat from * once more. (46 sts)*
Rnd 8: Sc in next 2, [sc in next 6, 2 sc in next] 3 times; repeat from * once more. (52 sts)*
Check the base: it should be about 6.25 x 5 in (15.9 x 12.7 cm). Each long side has 2 straight sts and each curved end has 24 sts, so 2 + 24 + 2 + 24 = 52.
Walls
Rnd 9: Sc BLO in each st around. (52 sts) This makes a crisp edge where the base turns up into the wall.
Rnds 10–20: Sc in each st around. (52 sts each round)
The walls are now 12 rounds (Rnds 9–20), about 3.75 in (9.5 cm) above the base edge. Keep the yarn attached and go straight to the rim in the Border section. Every pocket gets its rim before you sew on the straps.
Tulips (Make 5)
Use CC1. Make 3 large tulips with the 5.0 mm hook (about 2 in / 5.1 cm wide). Make 2 small tulips with the 4.0 mm hook (about 1.6 in / 4.1 cm wide) for the strap tops. The instructions are the same for both sizes.
Row 1: Ch 2, 3 sc in 2nd ch from hook. (3 sts)
Row 2: Ch 1, turn. 2 sc in first st, sc in next, 2 sc in last st. (5 sts)
Row 3: Ch 1, turn. 2 sc in first st, sc in next 3, 2 sc in last st. (7 sts)
Rows 4–5: Ch 1, turn. Sc in each st across. (7 sts each row)
Row 6 (petals): Ch 1, turn. Sl st in 1st st; (hdc, dc, hdc) in 2nd st; sl st in 3rd st; (dc, tr, dc) in 4th st; sl st in 5th st; (hdc, dc, hdc) in 6th st; sl st in 7th st. (13 sts)
This gives three petal points, with a taller center petal. Fasten off and leave a 12 in (30.5 cm) tail for sewing.
Leaves (Make 10)
Use CC2. Make 6 leaves with the 5.0 mm hook and 4 leaves with the 4.0 mm hook.
Ch 7. Working into the chain, counting from the 2nd ch from the hook: sl st, sc, hdc, dc, hdc. In the last ch work (sc, ch 2, sc) to form the tip. Now work back along the other side of the chain: hdc, dc, hdc, sc, sl st. (12 sts plus the ch-2 tip)
Fasten off and leave a 10 in (25.4 cm) tail. The leaves come out pointed at both ends and about 2 in (5.1 cm) long for the large size.
Border (Pocket Rim)
Work this on each pocket right after Rnd 20, with MC and the 6.0 mm hook.
Border gauge: 2 rounds = about 0.5 in (1.3 cm).
Rnd 21: Sc in each st around. (52 sts: 26 across the front half, 26 across the back half)
Rnd 22: Rev sc in each st around. (52 sts: 26 front, 26 back) Sl st to the first st and fasten off. Weave in the end.
Why the math works: The rim has the same 52 sts as the walls, with no increases or decreases. That keeps the rolled edge from flaring out or pulling in, and it matches the 17.3 in (43.9 cm) wall circumference. The finished pocket is 14 rounds tall above the base (Rnds 9–22), about 4.25 in (10.8 cm). That number sets the strap layout.
Straps (Make 2)
Use MC and the 6.0 mm hook.
Row 1: Ch 4, sc in 2nd ch from hook and in next 2 ch. (3 sts)
Rows 2–78: Ch 1, turn, sc in each st across. (3 sts each row)
The strap is 78 rows, about 24 in (61.0 cm) long and 1 in (2.5 cm) wide. Fasten off and leave a 20 in (50.8 cm) tail.
Place stitch markers to map out each strap, counting from Row 1 at the bottom:
- Rows 1–14: bottom pocket (14 rows)
- Rows 15–22: gap (8 rows, about 2.5 in / 6.4 cm)
- Rows 23–36: middle pocket (14 rows)
- Rows 37–44: gap (8 rows)
- Rows 45–58: top pocket (14 rows)
- Rows 59–68: hanging section (10 rows, about 3.1 in / 7.9 cm)
- Rows 69–78: dowel loop (10 rows)
Check: 14 + 8 + 14 + 8 + 14 + 10 + 10 = 78.
Make All Pieces
| Piece | Qty | Color | Hook |
|---|---|---|---|
| 3 | MC | 6.0 mm | |
| Strap | 2 | MC | 6.0 mm |
| Large tulip | 3 | CC1 | 5.0 mm |
| Small tulip | 2 | CC1 | 4.0 mm |
| Large leaf | 6 | CC2 | 5.0 mm |
| Small leaf | 4 | CC2 | 4.0 mm |
Layout, top to bottom:
 [tulip]==========dowel==========[tulip]
   |S|                              |S|
   |T|   [ Pocket 3 + tulip ]       |T|
   |R|                              |R|
   |A|   [ Pocket 2 + tulip ]       |A|
   |P|                              |P|
   | |   [ Pocket 1 + tulip ]       | |
Appliqué the Tulips
Do this before joining, while each pocket is still easy to handle.
- Flatten a pocket with one straight side facing you. That side is the front.
- Pin 2 large leaves in a shallow V, with their inner tips meeting about 1.25 in (3.2 cm) above the base edge on the center front.
- Pin 1 large tulip above them so the Row 1 point overlaps where the leaves meet. The petal tips should sit about 0.5 in (1.3 cm) below the rim.
- With CC2, embroider a short stem of 2–3 backstitches, 0.25 in (0.6 cm) long, below the tulip point.
- Whipstitch around each piece through the outer loops only, and keep your hand inside the pocket so you don’t sew it shut. Use matching tails for each color.
Joining
Method: whipstitch the straps to the side walls with MC.
- Find the center of each curved end on Rnd 21: it’s the 12th–13th sts of each 24-st end. Mark the 3 sts there on both ends, through Rnds 9–22.
- Lay strap Rows 1–14 against the left end of the bottom pocket, with Row 1 at the base edge (Rnd 9) and Row 14 at the rim (Rnd 22).
- Stitch-to-stitch logic: one strap row matches one pocket round. There are 14 rows and 14 rounds. Whipstitch up both long edges of the strap, catching one edge stitch of the strap and the matching marked stitch of the wall with each pass.
- Repeat on the right end with the second strap.
- Attach the middle pocket at Rows 23–36 and the top pocket at Rows 45–58 the same way.
Tension: pull each stitch snug but not tight. If you pull too hard, the wall puckers and the pocket tips forward.
Size checkpoint: lay the piece flat. From the top of Row 58 to the base of the bottom pocket should be about 17.75 in (45.1 cm), and the pockets should hang level.
Dowel loop: slide the dowel under Rows 59–68. Fold Rows 69–78 over the dowel toward the back, and sew Row 78 across the back of Row 59. Sew 1 small tulip and 2 small leaves over the front of each fold. Make a 20 in (50.8 cm) cord by chaining with CC1, then tie it to both ends of the dowel for hanging.
Final Blocking
- Spray each pocket lightly with water.
- Stuff each pocket with a roll wrapped in a towel to round out the walls.
- Pinch the rev sc rim so it sits even all the way around.
- Lay the straps flat and smooth them to 1 in (2.5 cm) wide.
- Pat the tulip petals flat and set the leaves at matching angles.
- Leave it to dry completely, about 24 hours, before hanging.
Final Quality-Control Checklist
- Each pocket has 52 sts in every round from Rnd 8 to Rnd 22
- Each pocket is 4.25 in (10.8 cm) tall with an even rolled rim
- Both straps are 78 rows, about 24 in (61.0 cm)
- The gaps between pockets are the same on both straps
- The tulips are centered and the petal tips sit below the rim
- All ends are woven in and the inside seams are neat
- The dowel loops are sewn securely and the cord is tied tight
Troubleshooting
- The base curls up into a bowl: the increases are too tight. Go up a hook size for Rnds 1–8 only.
- The base ripples: check that you have 52 sts at Rnd 8.
- The walls lean outward: an extra stitch has crept in. Count and fix any rounds that aren’t 52.
- The pockets tilt: one strap was sewn a row higher or lower than the other. Re-check your row markers.
- The rim flares: the rev sc is too loose. Redo Rnd 22 with the 5.0 mm hook.
- The petals curl: steam them gently and pin them flat while they dry.
Care
Hand wash in cool water, press out the water gently, and dry flat with the rolls removed. Take the dowel out before washing.
Final Notes
The measurements build on each other:
- Gauge is 12 sc per 4 in (10.2 cm).
- The 52-st base measures 6.25 x 5 in (15.9 x 12.7 cm).
- 14 rounds of wall and rim make a 4.25 in (10.8 cm) pocket.
- Each pocket matches 14 strap rows, and 78 strap rows give a 24 in (61.0 cm) strap.
- The finished holder is about 21 in (53.3 cm) long.
Check every step against the one before it and the holder will hang straight and look tidy. Happy crocheting!