

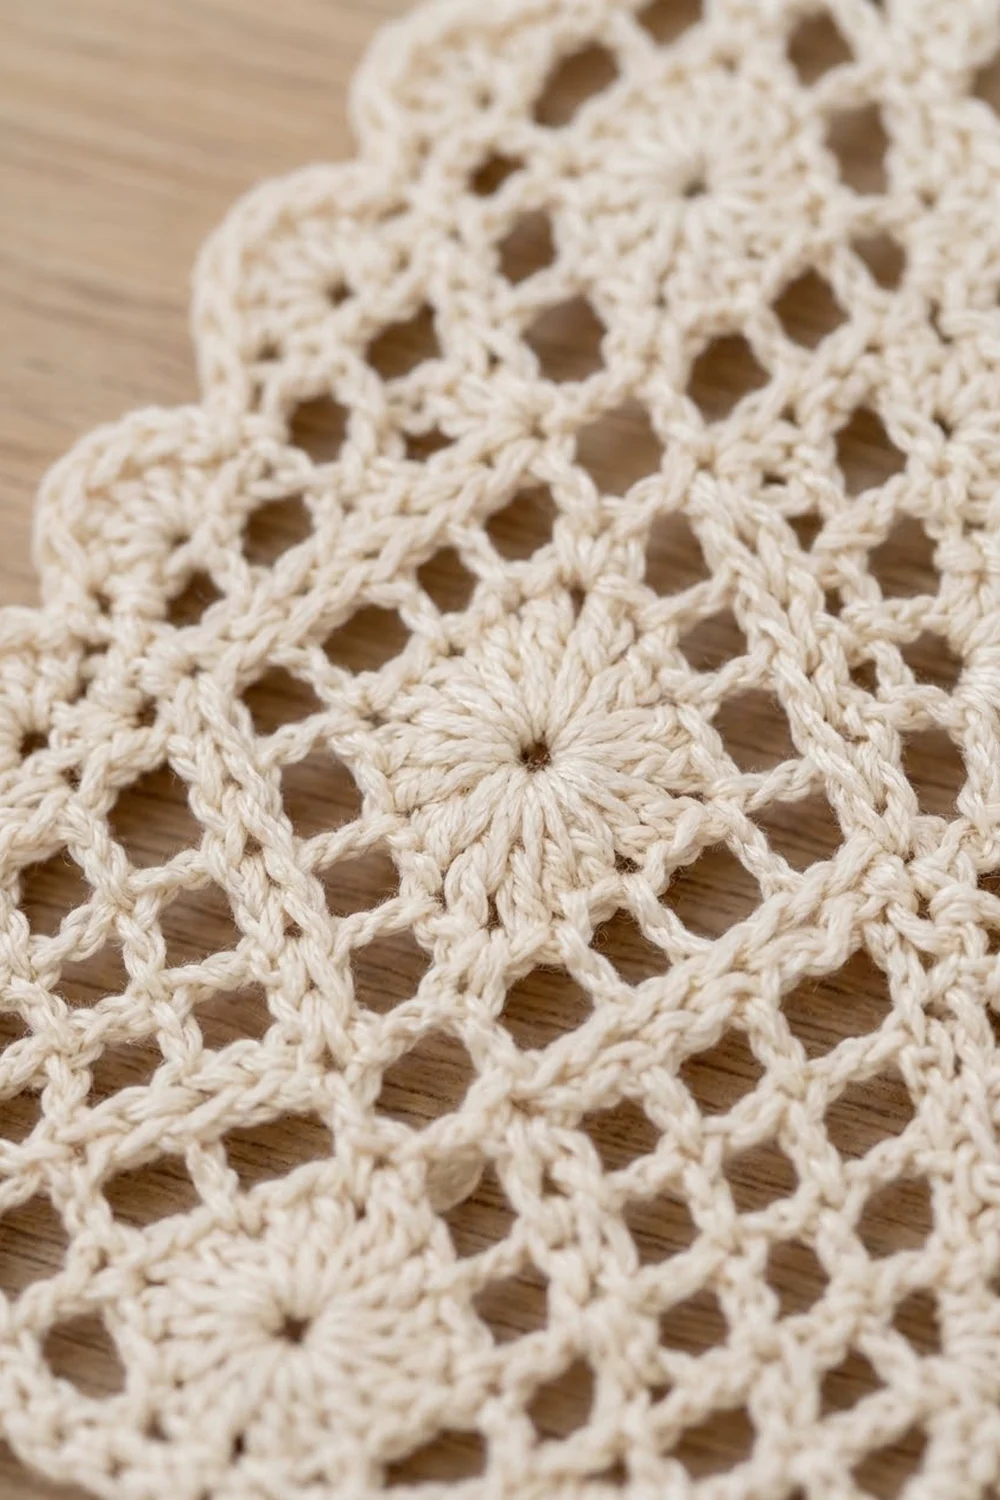
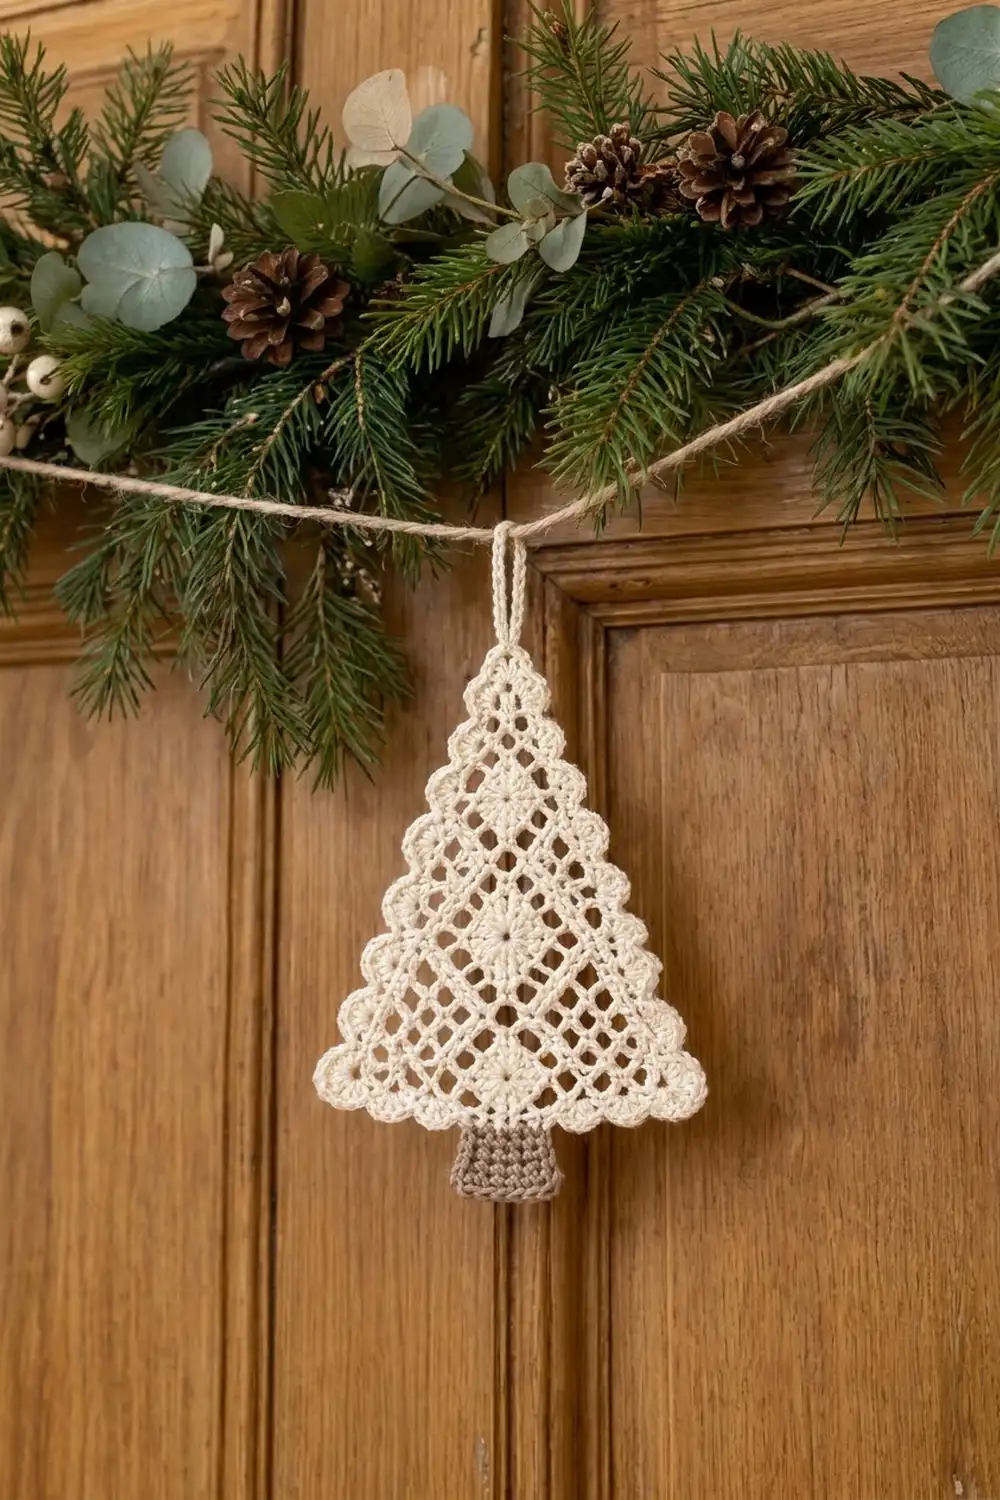
The Frosted Lattice Tree is a small lace ornament that looks like a frosty window decoration. It is an open diamond lattice in creamy cotton, dotted with tiny raised clusters and finished with soft scallops along all three edges. A short taupe trunk and a sturdy hanging loop finish the piece.
The palette is simple: cream for the tree, and a warm taupe for the trunk. The style is Scandinavian and natural. It looks best on a pine bough, a wooden door, or a plain gift box.
The pattern uses US crochet terms. The finished tree measures about 5.2 in (13.2 cm) wide and 6.3 in (16.0 cm) tall. Including the trunk it is about 7 in (17.8 cm) tall, and about 8.25 in (21.0 cm) with the hanging loop.
You start at the tip with a magic ring. Then you work rows of offset treble mesh that widen by one space each row, so the triangle shapes itself. Next comes a two-round scalloped border, followed by a single-crochet trunk that you sew on and a covered hanging loop.
Finished Size and Construction
- Finished size: 5.2 in (13.2 cm) wide x 6.3 in (16.0 cm) tall, tree only
- Overall length: about 7 in (17.8 cm) with trunk; 8.25 in (21.0 cm) with loop
- Skill level: Intermediate (simple stitches, careful counting)
- Terminology: US
- Yarn weight: Super fine (#1) / fingering cotton
- Hook: 2.5 mm
- Number of pieces: 1 tree body + 1 small trunk, assembled into one ornament
- Layout: Single triangle, worked from the tip down
- Body size before border: 4.4 in (11.2 cm) wide x 5.5 in (14.0 cm) tall
- Border depth: about 0.4 in (1.0 cm) on each edge
Materials
Use a smooth, firmly twisted cotton in fingering weight (about 170 m per 50 g). Mercerized cotton shows the lattice and clusters most clearly. Avoid fuzzy or very soft yarns, because they blur the diamonds.
- Color A – Cream: 10 g / 34 m (tree, border, loop)
- Color B – Taupe: 3 g / 10 m (trunk)
All quantities include a margin for a gauge swatch and weaving in ends.
Tools:
– 2.5 mm crochet hook
– Tapestry needle
– Scissors
– Rustproof pins and a blocking mat
– Spray bottle; light spray starch (optional)
– Ruler or tape measure
Abbreviations (US Terms)
- ch – chain
- sl st – slip stitch
- sc – single crochet
- dc – double crochet
- tr – treble crochet
- sp – space
- sk – skip
- st(s) – stitch(es)
- tch – turning chain
- RS / WS – right side / wrong side
Special stitch – 3-tr cluster (3trCL): *Yarn over twice, insert hook in the indicated space, yarn over and pull up a loop, [yarn over and pull through 2 loops] twice; repeat from * 2 more times in the same space (4 loops on hook). Yarn over and pull through all 4 loops. A cluster counts as one post.
Post: In this pattern, a “post” is any vertical stitch in the mesh: a tr, a 3trCL, or a ch-6 turning chain (which counts as tr + ch 2).
Gauge and Checkpoints
Mesh gauge: 5 mesh spaces = 2 in (5.1 cm) wide, and 4 tr rows = 2 in (5.1 cm) tall. So each mesh is 0.4 in (1.0 cm) wide and each row is 0.5 in (1.3 cm) tall.
Trunk gauge: 7 sc and 8 rows = 1 in (2.5 cm).
Make one full tree body (Rows 1–11) before you do the border, and treat it as your swatch. Measure flat without stretching.
- After Row 4: 1.6 in (4.1 cm) wide across the last row, 2 in (5.1 cm) tall.
- After Row 8: 3.2 in (8.1 cm) wide, 4.0 in (10.2 cm) tall.
- After Row 11: 4.4 in (11.2 cm) wide, 5.5 in (14.0 cm) tall.
- After the border: 5.2 in (13.2 cm) wide, 6.3 in (16.0 cm) tall.
Too big? Go down 0.25 mm in hook size, or keep the ch-2 spaces snug. Too small? Go up 0.25 mm in hook size. If the width matches but the height is short, your tr are too tight. Pull up the first loop of each tr a little taller.
Tree Body
The body is worked in turned rows, starting at the tip. Each row places one post in every ch-2 space of the row before, plus one post at each edge. This offsets the mesh by half a space every row, which makes the diagonal diamond lattice. It also adds exactly one space per row.
Rule for every row after Row 1: Row n has n + 1 posts and n ch-2 spaces.
With Color A:
Row 1: Make a magic ring. Ch 6 (counts as tr + ch 2), tr into ring. Pull the ring closed tightly. (2 posts, 1 ch-2 sp)
Row 2: Turn, ch 6 (counts as tr + ch 2 here and throughout), 3trCL in ch-2 sp, ch 2, tr in 4th ch of tch. (3 posts, 2 ch-2 sps)
Row 3: Turn, ch 6, [tr in next ch-2 sp, ch 2] twice, tr in 4th ch of tch. (4 posts, 3 ch-2 sps)
Row 4: Turn, ch 6, 3trCL in 1st ch-2 sp, ch 2, tr in 2nd sp, ch 2, 3trCL in 3rd sp, ch 2, tr in 4th ch of tch. (5 posts, 4 ch-2 sps)
Row 5: Turn, ch 6, [tr in next ch-2 sp, ch 2] 4 times, tr in 4th ch of tch. (6 posts, 5 ch-2 sps)
Row 6: Turn, ch 6. Working into the 5 spaces in order, work 3trCL, tr, 3trCL, tr, 3trCL, with ch 2 after each. Tr in 4th ch of tch. (7 posts, 6 ch-2 sps)
Row 7: Turn, ch 6, [tr in next ch-2 sp, ch 2] 6 times, tr in 4th ch of tch. (8 posts, 7 ch-2 sps)
Row 8: Turn, ch 6. Working into the 7 spaces in order, work tr, 3trCL, tr, 3trCL, tr, 3trCL, tr, with ch 2 after each. Tr in 4th ch of tch. (9 posts, 8 ch-2 sps)
Row 9: Turn, ch 6, [tr in next ch-2 sp, ch 2] 8 times, tr in 4th ch of tch. (10 posts, 9 ch-2 sps)
Row 10: Turn, ch 6. Working into the 9 spaces, work 3trCL in the 1st, 5th and 9th spaces and tr in all the others, with ch 2 after each. Tr in 4th ch of tch. (11 posts, 10 ch-2 sps)
Row 11: Turn, ch 6, [tr in next ch-2 sp, ch 2] 10 times, tr in 4th ch of tch. (12 posts, 11 ch-2 sps)
Do not fasten off. You are now at a bottom corner, which we call Corner B. The opposite bottom corner, at the ch-6 that started Row 11, is Corner A.
Body check: 11 rows, 77 posts in total, last row 4.4 in (11.2 cm) wide and body 5.5 in (14.0 cm) tall. Each slanted side is about 5.9 in (15.0 cm) long. The clusters sit on even rows only, so they appear as raised dots in the centers of diamonds, spread through the tree.
Border
Border gauge: Round 1 sc are spaced about 7 per inch (2.5 cm) along every edge. That matches the trunk gauge, so the edges stay flat.
Every edge has one corner sc (one at the tip and one at each bottom corner). Below, the “inner” count is the number of sts between two corner sc. A side’s total count includes its 2 corner sc, and each corner sc is shared by the two sides it joins.
Round 1 (sc base): Continuing with Color A at Corner B:
- Ch 1, sc in top of the last tr made (corner sc B).
- Side 1: working along the row ends toward the tip, work 4 sc around the post of each of Rows 11 through 2 (40 sc), then 3 sc around the Row 1 post (43 inner sc).
- Tip: sc into the center of the magic ring (corner sc T).
- Side 2: 3 sc around the Row 1 post on this side, then 4 sc around the post of each of Rows 2 through 11 (43 inner sc).
- Corner A: sc in 4th ch of the Row 11 tch (corner sc A).
- Bottom: working across the top of Row 11, work 2 sc in the 1st ch-2 sp, 3 sc in each of the next 9 sps, and 2 sc in the last sp (31 inner sc).
- Sl st to the first sc.
Count: 43 + 43 + 31 inner sc + 3 corner sc = 120 sc. With corners included, that is 45 sc per slanted side and 33 sc along the bottom (45 + 45 + 33 − 3 shared corners = 120).
Round 2 (scallops): Ch 1, sc in the same st (corner sc B). Sk 1 sc, 5 dc in next sc, sk 1 sc, sc in next sc. Repeat from * 28 more times (29 scallops). Then sk 1 sc, 5 dc in next sc, sk 1 sc, and sl st to the first sc. Fasten off.
Count: 30 scallops (150 dc) and 30 sc: 11 scallops on Side 1, 11 on Side 2 and 8 on the bottom.
Why the math works: Each scallop uses 4 sts and ends with a sc. Counting from corner sc B as position 0, the corner sc sit at positions 44, 88 and 120 (back to the start). All three are multiples of 4, so a scallop sc lands on every corner. The slanted sides have 43 + 1 = 44 sts (11 repeats) and the bottom has 31 + 1 = 32 sts (8 repeats). No corner needs fudging, and the scallops stay even right into each point.
Border check: about 5.2 in (13.2 cm) wide x 6.3 in (16.0 cm) tall.
Trunk
With Color B, ch 8.
Row 1: Sc in 2nd ch from hook and in each ch across. (7 sc)
Rows 2–10: Ch 1, turn, sc in each st across. (7 sc each row)
Fasten off, leaving a 12 in (30.5 cm) tail for sewing.
Trunk check: 1.0 in (2.5 cm) wide x 1.25 in (3.2 cm) tall.
Assembly and Hanging Loop
Attach the trunk: With the tree WS facing you, find the center 7 sc of the bottom’s 31 inner sc in Round 1 (sts 13 through 19, counting from corner A). Place the top 2 trunk rows, 0.25 in (0.6 cm), behind those sts. Whipstitch along the top edge and both short sides of the overlap, sewing only through the back of the Round 1 sc so nothing shows on the RS. About 0.75 in (1.9 cm) of trunk will show below the scallop tips.
Hanging loop: With the RS facing you, join Color A with a sl st in the tip corner sc of Round 2. Ch 20 and sl st in the same st to form a loop. Work 24 sc into the loop, then sl st into the tip sc. Fasten off. The finished loop stands about 1.25 in (3.2 cm) tall.
Weave in all ends along the posts, never across an open space.
Final Blocking
- Wet the ornament fully in cool water, then press it gently in a towel. Do not wring.
- Lay it RS up on a blocking mat. Pin the tip and both bottom corners first, making the base 5.2 in (13.2 cm) wide and the height 6.3 in (16.0 cm).
- Pin each slanted side straight between its corners, then pin into the center dc of each scallop so the curves open evenly.
- Use a pin to nudge each diamond open so the lattice is even and the clusters sit centered.
- Straighten the trunk to 1.0 in (2.5 cm) wide and square its bottom corners.
- Mist with light spray starch if you want a crisp ornament. Lay the loop flat in a neat oval.
- Let it dry completely before you unpin it.
Final Quality-Control Checklist
- Body has 11 rows; Row 11 has 12 posts and 11 ch-2 spaces.
- Clusters are on Rows 2, 4, 6, 8 and 10 only, in the stated spaces.
- Round 1 has 120 sc: 43 inner per slanted side, 31 inner on the bottom, plus 3 corners.
- Round 2 has 30 scallops: 11, 11 and 8.
- A scallop sc sits on each of the three corners.
- The trunk is centered under the middle 7 bottom sc and shows 0.75 in (1.9 cm) below the scallops.
- The loop is firmly anchored at the tip.
- Blocked size is 5.2 in x 6.3 in (13.2 cm x 16.0 cm).
Troubleshooting
Sides look wavy: Too many sc in Round 1. Check that you have exactly 4 sc per row end (3 on Row 1).
Sides pull in or pucker: Your sc are too tight around the posts. Loosen your tension or go up 0.25 mm for Round 1 only.
Triangle is lopsided: You probably missed the edge tr in the tch at the end of a row. Count the posts: Row n needs n + 1.
Diamonds look square, not diagonal: Make sure each tr goes into the ch-2 space, not into the post below.
Clusters disappear: Pull each cluster’s final loop snugly, and use a crisp mercerized cotton.
Scallops do not meet the corners: Recount Round 1. Each side needs 43 inner sc and the bottom needs 31.
Trunk shows stitching on the front: Sew only through the back of the Round 1 sts.
Care
Hand wash in cool water with mild soap, press out the water in a towel, and reshape flat to dry. Re-starch lightly after washing if you want it stiff again.
Final Notes
The measurement chain is short and easy to check. Each mesh is 0.4 in (1.0 cm) wide and each row is 0.5 in (1.3 cm) tall. After 11 rows that gives a body of 4.4 in x 5.5 in (11.2 cm x 14.0 cm). The 0.4 in (1.0 cm) border brings the tree to 5.2 in x 6.3 in (13.2 cm x 16.0 cm). The trunk and loop bring the ornament to about 8.25 in (21.0 cm) in total. If each checkpoint matches, the border counts and scallops will fall into place. Make one for a gift tag, or a few to hang on a twine strand among the greenery.
Happy crocheting!