

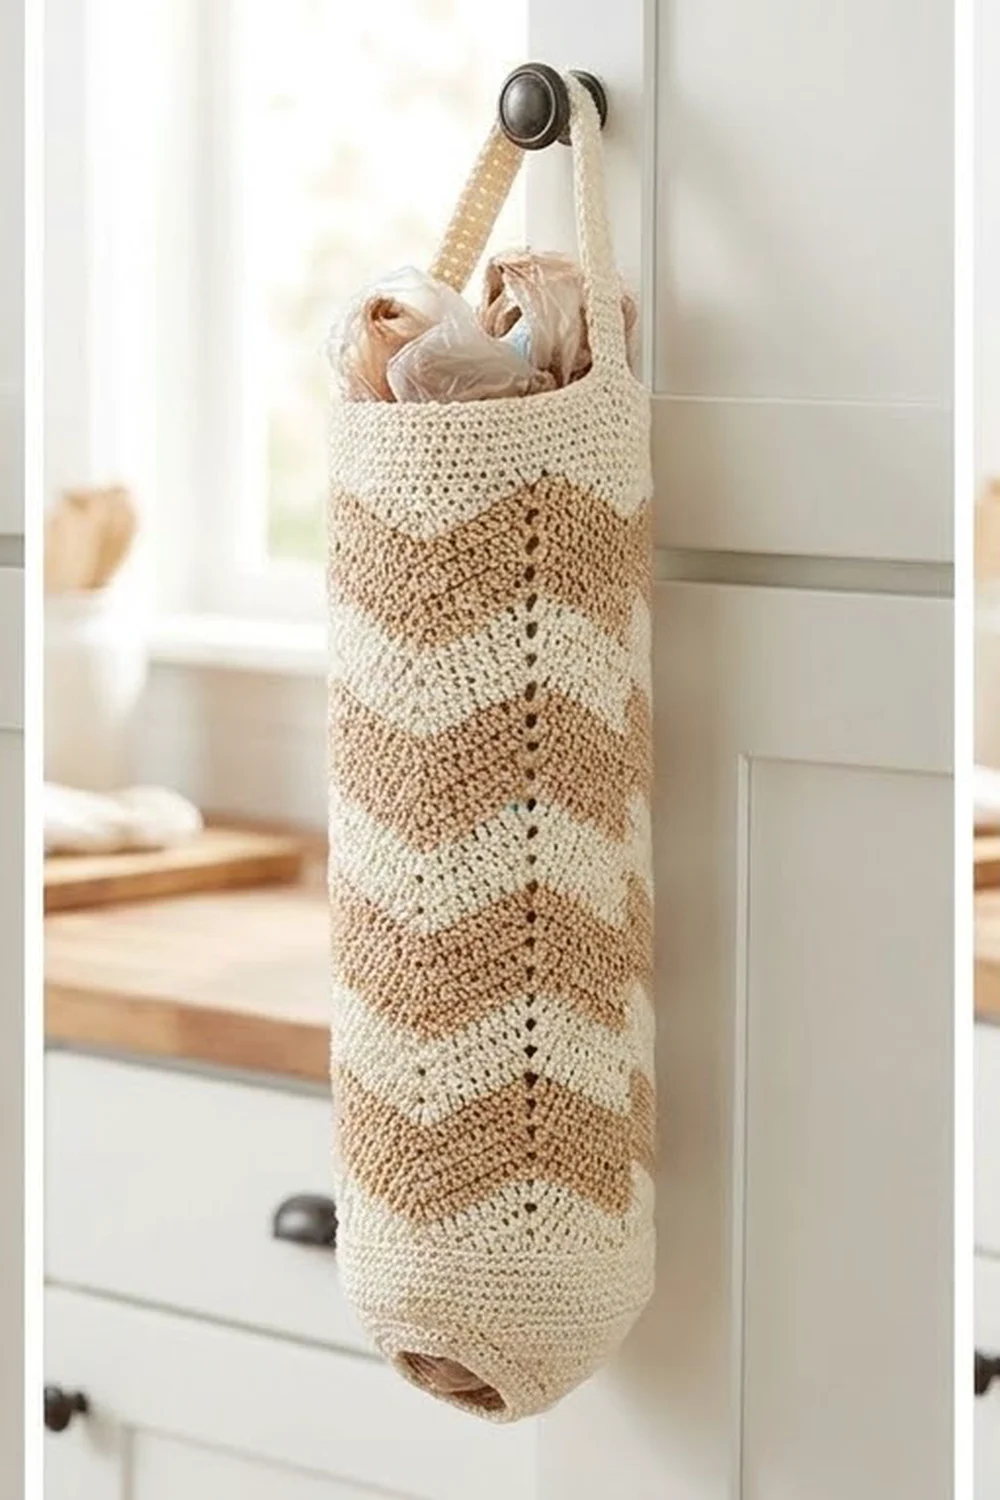
This plastic bag holder brings calm, warm stripes to the kitchen and keeps loose grocery bags in one place. Cream and soft tan zigzags run around a tall tube. The cream stripes have small open eyelets that make the fabric look lighter without making it weak.
The style is cottage farmhouse: neutral colors, cotton yarn, and a texture that looks good on a cabinet knob or the back of a pantry door. You fill it from the top and pull bags out through the narrower bottom opening.
This pattern uses US crochet terms. The finished holder is about 20 in (50.8 cm) tall and 15.25 in (38.7 cm) around, so it is just under 5 in (12.4 cm) across. The hanging strap is 8 in (20.3 cm) long.
Construction is simple. You crochet one flat chevron panel in rows, starting and ending with a shaping row so both edges are straight. Then you seam it into a tube, add single-crochet bands to the top and bottom edges, and work the strap directly off the top band.
Finished Size and Construction
- Finished size: about 20 in (50.8 cm) tall × 15.25 in (38.7 cm) around
- Flattened width: about 7.5 in (19.1 cm)
- Skill level: Intermediate (you should be comfortable with ripple stitches)
- Terminology: US
- Yarn weight: Worsted (#4), cotton or cotton blend
- Hook: 5.0 mm (H-8)
- Number of pieces: 1 (the strap is worked onto the body, not made separately)
- Layout: a single flat panel seamed into a tube
- Panel size before bands: 15.25 in wide × 17 in tall (38.7 × 43.2 cm)
- Top band depth: about 1.3 in (3.3 cm)
- Bottom band depth: about 1.75 in (4.4 cm), curving inward
Materials
Use a smooth worsted-weight cotton or cotton blend. Cotton holds its shape, doesn’t stretch much when the holder is full, and shows the eyelets clearly. Avoid fuzzy or very splitty yarns, because they hide the chevron lines.
- Color A, Cream: about 140 g / 250 m (273 yd)
- Color B, Light Tan: about 60 g / 110 m (120 yd)
These quantities include a margin of about 10–15% for your gauge swatch and seaming.
Tools:
– 5.0 mm (H-8) crochet hook
– Tapestry needle
– Scissors
– 6 stitch markers
– Measuring tape
– Rust-proof pins and a blocking mat
Abbreviations (US Terms)
- ch – chain
- sl st – slip stitch
- sc – single crochet
- hdc – half double crochet
- dc – double crochet
- tr – treble crochet
- sc2tog – single crochet 2 together
- dc2tog – double crochet 2 together
- dc3tog – double crochet 3 together
- sk – skip
- st(s) – stitch(es)
- sp – space
- rnd – round
Special stitches:
– Peak: 3 dc in the same st.
– Valley: dc3tog over the next 3 sts, with the middle one of those 3 being the valley stitch from the row below.
Gauge and Checkpoints
- Double crochet: 16 dc and 8 rows = 4 in (10.2 cm) square, measured flat in plain dc.
- Single crochet: 16 sc and 18 rnds = 4 in (10.2 cm) square.
Before you start, crochet a 20-stitch swatch about 4 in (10.2 cm) tall and block it. The whole design depends on having 4 dc per inch. That gives a 61-stitch panel 15.25 in (38.7 cm) wide.
Checkpoints:
– After Row 1: the panel is 15.25 in (38.7 cm) wide.
– After Row 10: the panel is about 5 in (12.7 cm) tall.
– After Row 34: the panel is 17 in (43.2 cm) tall, and its top and bottom edges are straight.
– After the bands: the holder is about 20 in (50.8 cm) tall.
If your swatch is too big, go down a hook size (4.5 mm). If it is too small, go up one size (5.5 mm). A difference of only 0.25 in (0.6 cm) on a 4 in (10.2 cm) swatch adds up to about 1 in (2.5 cm) around the finished tube.
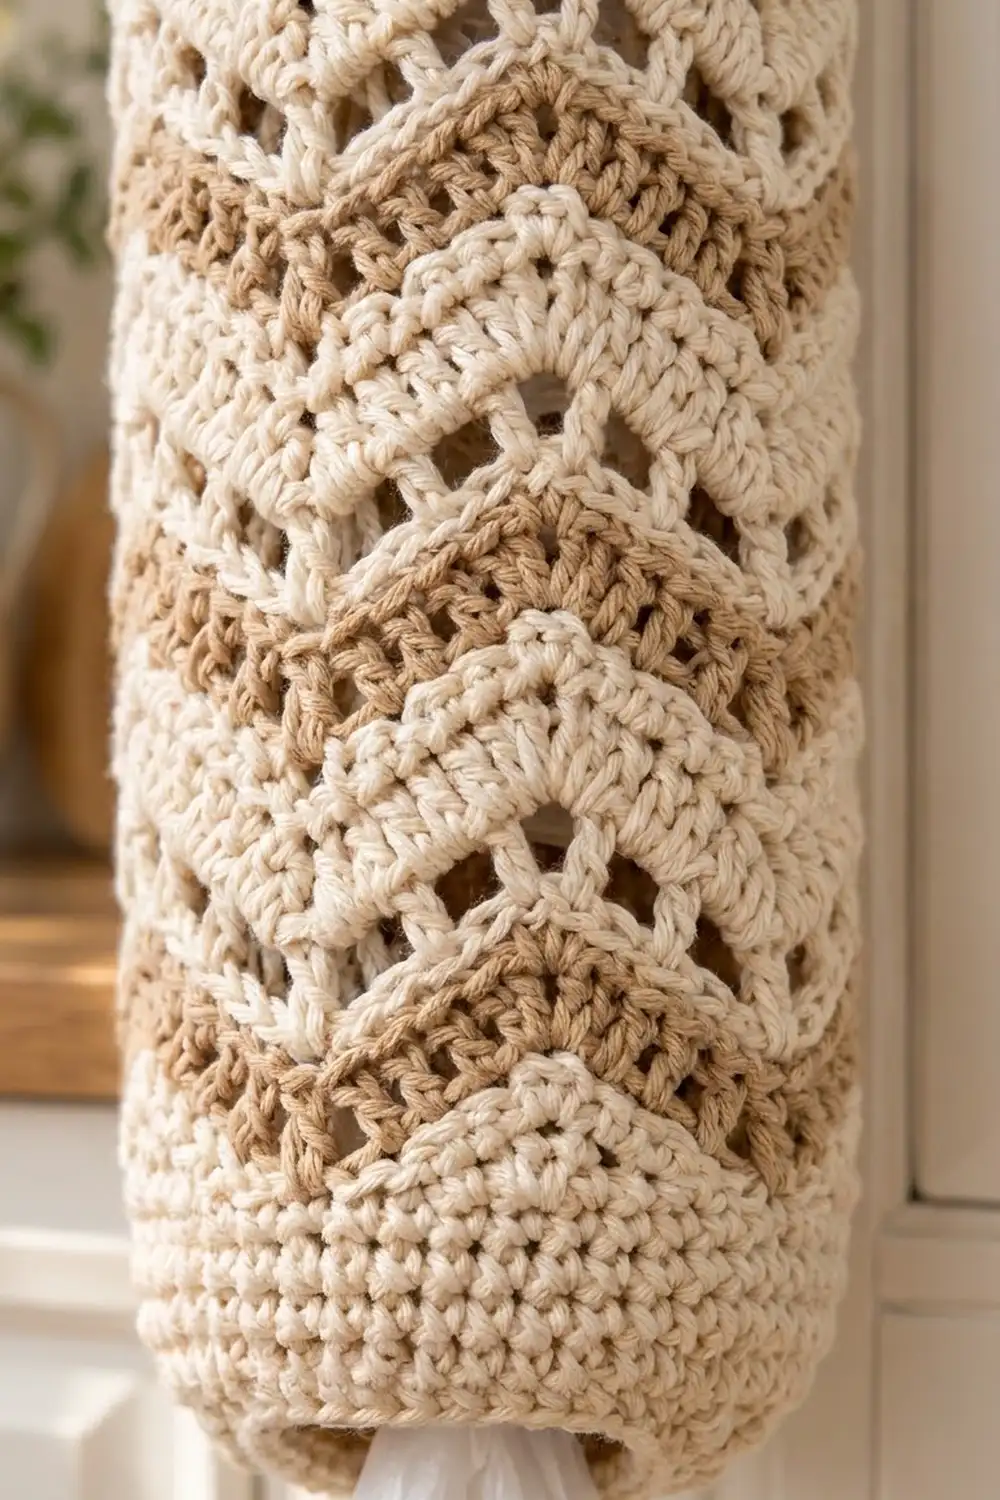
Stitch Repeat Logic
The panel is 61 stitches wide: 5 chevron repeats of 12 stitches, plus 1 balancing stitch (12 × 5 + 1 = 61).
If you number the stitches from 1 to 61:
– The valleys fall on stitches 1, 13, 25, 37, 49, and 61. The two edge valleys are half valleys.
– The peaks are centered on stitches 7, 19, 31, 43, and 55.
In every row, the stitches you use up and the stitches you make balance out. Each repeat makes 12 stitches, so the count stays at 61.
Panel (worked flat)
Row 1 – Wedge Row (Color A)
This row turns the straight foundation edge into the zigzag shape. It uses tall stitches under the peaks and short stitches under the valleys.
With Color A, ch 62.
Sc in the 2nd ch from the hook. Then repeat the following 5 times: hdc in the next 2 ch, dc in the next 2 ch, tr in the next 3 ch, dc in the next 2 ch, hdc in the next 2 ch, sc in the next ch. Turn.
(61 sts)
Row 2 – Solid Ripple Row (Color A)
Ch 2 (does not count as a st). Dc2tog over the first 2 sts, then dc in the next 4 sts. Work a peak in the next st, then dc in the next 4 sts.
Repeat the following 4 times: valley, dc in the next 4 sts, peak, dc in the next 4 sts.
Finish with dc2tog over the last 2 sts. Turn.
(61 sts)
We call this the Solid Row from here on.
Row 3 – Lace Ripple Row
Ch 2 (does not count). Dc2tog over the first 2 sts, then (ch 1, sk next st, dc in next st) twice. Work a peak, then (dc in next st, ch 1, sk next st) twice.
Repeat the following 4 times: valley, (ch 1, sk next st, dc in next st) twice, peak, (dc in next st, ch 1, sk next st) twice.
Finish with dc2tog over the last 2 sts. Turn.
(61 sts: 41 stitches + 20 ch-1 sps)
We call this the Lace Row from here on. Each straight section still uses up 4 sts and makes 4 (2 dc + 2 ch), so the chevrons stay lined up. In the next row, work 1 st into each ch-1 sp, the same as into a stitch.
Stripe Sequence
Change colors on the last yarn-over of the final st of the row before. Carry the unused color up the side edge; it will be hidden in the seam.
The 4-row stripe repeat is:
– Repeat row 1: Color B, Solid Row
– Repeat row 2: Color B, Solid Row
– Repeat row 3: Color A, Lace Row
– Repeat row 4: Color A, Solid Row
Each 4-row repeat is 2 in (5.1 cm) tall.
Note: Row 3 above was the first Lace Row and established the stitch. Work it again in Color A only where the sequence calls for it. For a clean count, the chart below starts the full repeat at Row 3.
- Rows 3–30: work the 4-row repeat 7 times. (61 sts in every row)
- Rows 31–32: Color B, Solid Row twice.
- Row 33: Color A, Lace Row.
Checkpoint: the panel now measures about 16.5 in (41.9 cm) at the peaks.
Row 34 – Leveling Row (Color A)
This row fills in the valleys so the top edge is straight.
Ch 4 (counts as the first tr), then repeat the following 5 times: dc in the next 2 sts, hdc in the next 2 sts, sc in the next 3 sts, hdc in the next 2 sts, dc in the next 2 sts, tr in the next st.
(61 sts: 1 + 5 × 12)
The tr stitches land on the valleys (1, 13, 25, 37, 49, 61) and the sc stitches land on the peaks. Fasten off.
The panel should now measure 15.25 in × 17 in (38.7 × 43.2 cm).
Seaming the Tube
- Lightly steam or spray-block the panel flat first. This straightens the side edges.
- Fold the panel with the right side facing in, so the two short row-end edges line up.
- With Color A and the tapestry needle, whipstitch the edges together. Match row to row (34 rows to 34 rows), so the stripes meet exactly.
- Keep the tension even. If you pull too tight, the seam puckers; too loose and it gapes.
- Turn the tube right side out.
The circumference stays at 61 stitches, or 15.25 in (38.7 cm).
Border: Top and Bottom Bands
Band gauge: 16 sc = 4 in (10.2 cm), the same as the dc gauge. That’s why 61 sc fit 61 dc exactly, with no rippling or pulling in.
Both bands are worked in continuous rounds with the right side facing. Mark the first st of each round.
Top Band (Color A)
Join Color A at the seam, working into the top loops of Row 34.
- Rnd 1: Ch 1, sc in each st around. (61 sts)
- Rnds 2–6: Sc in each st around. (61 sts each rnd)
Do not fasten off; continue straight into the strap.
The top band is 6 rnds, about 1.3 in (3.3 cm) deep, and stays at the full 15.25 in (38.7 cm) circumference so it’s easy to stuff bags in.
Hanging Strap
The strap starts at the seam, and its other end is sewn exactly opposite. Round 6 has 61 sts. Starting at the seam:
– The strap is worked on sts 1–5.
– The other end is sewn to sts 31–35.
The centers of those two groups (st 3 and st 33) are 30 sts apart, which is half the round.
- Row 1: Ch 1, sc in the next 5 sts. Turn. (5 sts)
- Rows 2–36: Ch 1, sc in each st across. Turn. (5 sts)
The strap is now 8 in (20.3 cm) long and 1.25 in (3.2 cm) wide.
Leave a 12 in (30.5 cm) tail. Whipstitch the end of the strap to sts 31–35 of Round 6. Finish by working sl st along both long edges of the strap for a firm, neat edge.
Bottom Band (Color A)
Turn the tube upside down. Join Color A at the seam and work into the free loops of the foundation chain.
- Rnd 1: Ch 1, sc in each ch around. (61 sts)
- Rnd 2: Sc in each st around. (61 sts)
- Rnd 3: Sc in the next 4 sts, sc2tog 10 times, then sc in the last st. (51 sts: 10 × 5 + 1)
- Rnd 4: Sc in each st around. (51 sts)
- Rnd 5: Sc in the next 3 sts, sc2tog 10 times, then sc in the last st. (41 sts: 10 × 4 + 1)
- Rnd 6: Sc in each st around. (41 sts)
- Rnd 7: Sc in the next 2 sts, sc2tog 10 times, then sc in the last st. (31 sts: 10 × 3 + 1)
- Rnd 8: Sc in each st around. (31 sts)
- Rnd 9: Sl st in each st around. (31 sl sts) Fasten off.
Why the math works: each decrease round removes exactly 10 stitches, spread evenly as 10 groups. The extra single stitch carries through every round, so the seam stays at the start.
The finished opening is 31 sts, or 7.75 in (19.7 cm) around and about 2.5 in (6.4 cm) across. That’s wide enough to pull a bag through but tight enough to hold the rest in. The slip-stitch round stops the edge from stretching out.
Final Blocking
- Weave in all ends along the seam or inside the bands.
- Wet the holder thoroughly in cool water, then press it gently in a towel. Don’t wring it.
- Slide a rolled towel inside so the tube holds about 4.9 in (12.4 cm) across.
- Pin the zigzags so the peaks and valleys are crisp and evenly spaced. There should be 5 peaks around.
- Check that the height is about 20 in (50.8 cm), with the panel section at 17 in (43.2 cm).
- Let it dry completely standing upright. Then hang it by the strap for a day to settle.
Final Quality-Control Checklist
- [ ] Every panel row has 61 sts, with 5 peaks and 6 valleys (2 of them at the edges).
- [ ] The stripes line up across the seam.
- [ ] The top and bottom panel edges are straight.
- [ ] The top band is 61 sts; the bottom band has 61 → 51 → 41 → 31 sts.
- [ ] The strap is centered opposite its start and securely sewn.
- [ ] The tube measures 15.25 in (38.7 cm) around and 20 in (50.8 cm) tall.
- [ ] All ends are woven in securely.
Troubleshooting
- The zigzags drift sideways: you have lost or gained a stitch. Count each row and check that the peaks still sit on sts 7, 19, 31, 43, and 55.
- The edges slant: make sure every row starts and ends with a dc2tog.
- The eyelets close up: work into the ch-1 sp, not into the chain itself.
- The top band ruffles: your sc tension is looser than your dc tension. Use a 4.5 mm hook for the bands.
- The bottom opening is too loose: add a second sl st round, or work Round 8 as sc 4, sc2tog to reduce it further.
- The strap stretches: stop at 34 rows instead of 36, and keep the sl st edging firm.
Care
Hand wash or machine wash gently in cool water, then reshape and dry flat or hanging. Don’t tumble dry, as it can shrink the cotton and distort the chevrons.
Final Notes
Here is the measurement chain:
- Your gauge of 16 dc per 4 in (10.2 cm) gives a 61-stitch panel 15.25 in (38.7 cm) wide.
- The 34 rows add up to 17 in (43.2 cm) of height.
- Seaming turns the panel into a tube 15.25 in (38.7 cm) around.
- The matching 61-stitch sc bands add about 1.3 in (3.3 cm) at the top and 1.75 in (4.4 cm) at the bottom, for about 20 in (50.8 cm) in total.
If your gauge is right, every later stage will fit without any guesswork.
Happy crocheting!