

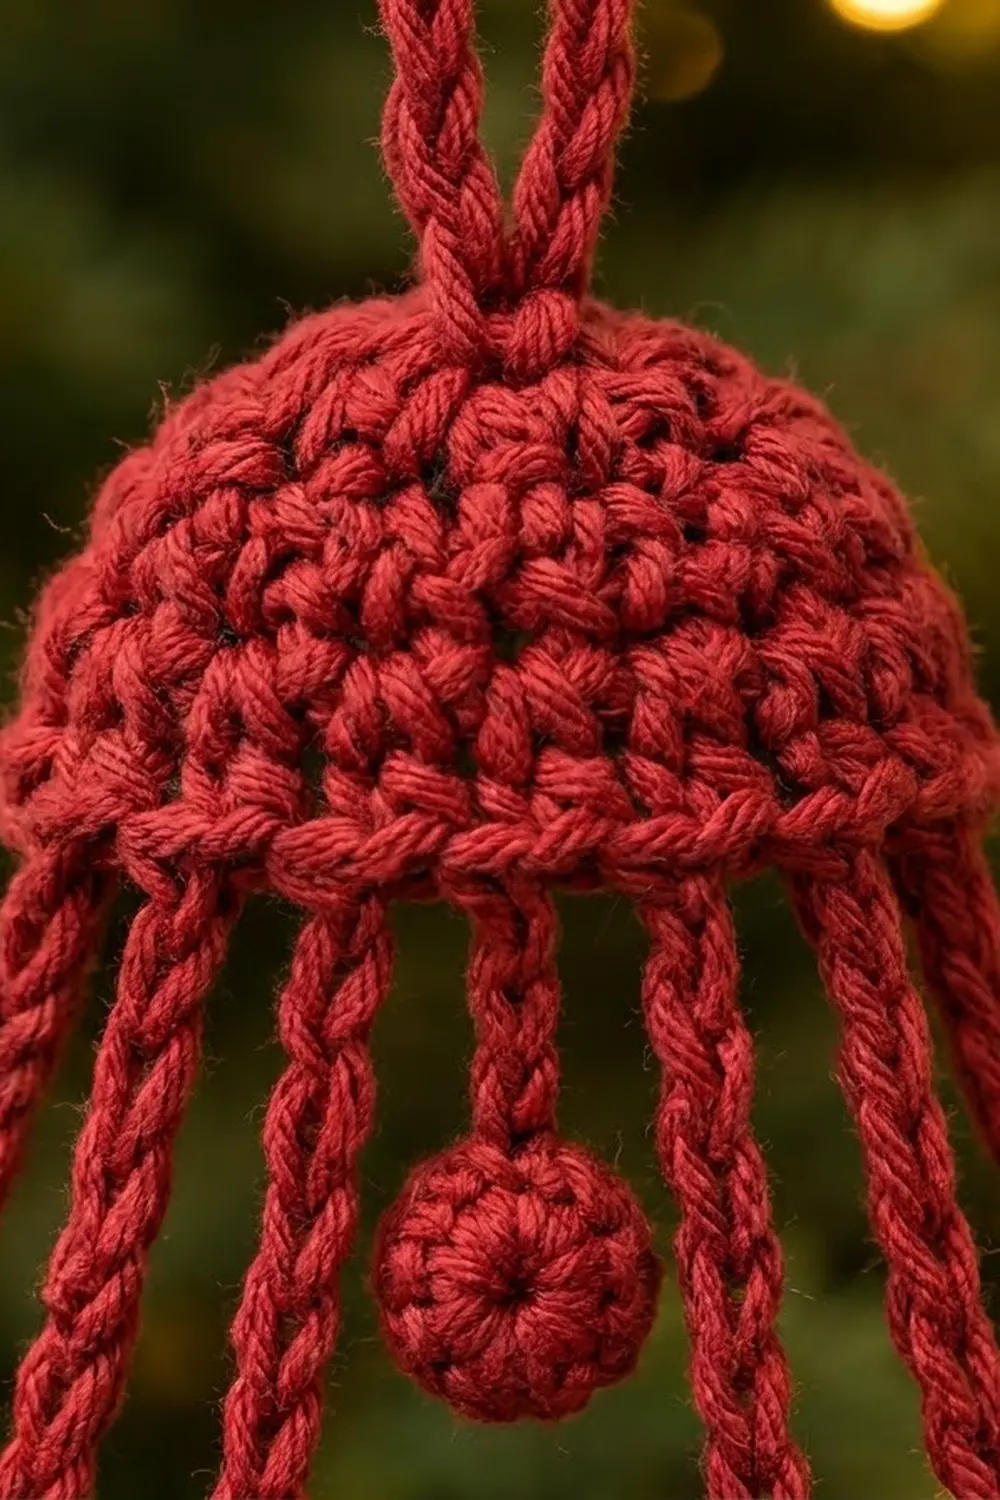
This little bell has an airy, see-through look. A solid red dome sits at the top. Five slim cords hang from it: four ribs that form the outline of the bell and one center cord with a small round clapper at the end. A solid curved rim closes the bottom, so the bell keeps its shape when it hangs. The tree shows through the open spaces.
The ornament uses one color, a classic Christmas red. Most of the work is single crochet. Simple cords and a slight flare in the rim give it a clean, graphic shape that looks good on a tree, on a gift tag, or hanging in a window.
This pattern uses US crochet terms. The finished bell is about 4.5 in (11.4 cm) wide at the rim and about 4.4 in (11.2 cm) tall from the top of the dome to the bottom of the rim. With the hanging loop, it is about 5.9 in (15.0 cm) tall.
Construction is straightforward. You crochet the dome flat as a half circle and add a base row along its straight edge. Then you add a cord loop on top, make a separate rim strip and a tiny ball, and connect everything with crocheted ribs. A short edging round on the rim adds the flare. The result is one finished, flat ornament.
Finished Size and Construction
- Finished size: about 4.5 in (11.4 cm) wide × 4.4 in (11.2 cm) tall without the loop, or 5.9 in (15.0 cm) tall with the loop
- Skill level: Easy / advanced beginner
- Terminology: US crochet terms
- Yarn weight: DK (light, #3)
- Hook: 3.5 mm (E-4)
- Number of pieces: 1 finished ornament, made from 3 crocheted parts (dome, rim, ball) and joined with crocheted ribs
- Layout: single standalone bell, flat
- Dome size: 1.8 in (4.6 cm) wide × 1.1 in (2.8 cm) tall
- Rim size before border: 4 in (10.2 cm) long × 0.4 in (1.0 cm) deep
- Border depth: one row of single crochet, which brings the rim to about 0.55 in (1.4 cm) deep
Materials
Yarn: Use a smooth DK-weight yarn. Mercerized cotton or a cotton blend gives the crispest stitches and the straightest ribs. Acrylic also works but is softer, so you may want to stiffen the finished bell. Avoid fuzzy or textured yarn, which hides the open structure.
- Red: 15 g (about 38 m / 42 yd)
The quantity includes a generous margin. The bell itself uses about 8 g, and the extra covers your gauge swatch and a few rib adjustments.
Tools:
- 3.5 mm (E-4) crochet hook
- Tapestry needle
- 4 to 6 stitch markers
- Rust-proof pins and a foam blocking mat
- Ruler or tape measure
- Spray bottle with water
- Optional: fabric stiffener or diluted white glue (1 part glue to 1 part water)
Abbreviations (US Terms)
- ch – chain
- sl st – slip stitch
- sc – single crochet
- sc2tog – single crochet 2 together
- st(s) – stitch(es)
- MR – magic ring
- ( ) × n – repeat the bracketed steps n times
Special technique: rib cord. Work a chain, sl st into the target stitch, then turn and work 1 sc into each chain back toward the start. This makes a firm cord with a finished edge on both sides and fastens both ends in place.
Gauge and Checkpoints
Gauge: 20 sc × 22 rows = 4 in (10.2 cm) in sc worked flat. That works out to 5 sc per inch and 5.5 rows per inch.
Before you start, make the dome as a test piece. It is small and quick, and it tells you right away whether your gauge is on track.
Checkpoints:
- Dome after Row 5: straight edge 1.8 in (4.6 cm), height 0.9 in (2.3 cm)
- Dome after the base row: 1.8 in (4.6 cm) wide, 1.1 in (2.8 cm) tall
- Loop cord: 3.0 in (7.6 cm) long before folding, 1.5 in (3.8 cm) tall once folded
- Rim after Row 2: 4 in (10.2 cm) × 0.4 in (1.0 cm)
- Clapper cord: 1.6 in (4.1 cm)
- Ball: about 0.6 in (1.5 cm) across
- Outer ribs: 3.0 in (7.6 cm). Inner ribs: 2.8 in (7.1 cm).
If your dome is too big (wider than 2 in / 5.1 cm), go down to a 3.25 mm hook. If it is too small (narrower than 1.6 in / 4.1 cm), go up to a 3.75 mm hook. The rib lengths match the rim width, so if you change hooks, re-check the rim before you add the ribs.
Part 1: Dome
The dome is worked flat in rows as a half circle. Each row adds 3 stitches. Turn at the end of every row. The ch 1 at the start of a row does not count as a stitch.
Row 1: MR, ch 1, 3 sc into ring. Do not join. Turn. (3 sts)
Row 2: Ch 1, 2 sc in each st. Turn. (6 sts)
Row 3: Ch 1, (sc in next st, 2 sc in next st) × 3. Turn. (9 sts)
Row 4: Ch 1, (sc in next 2 sts, 2 sc in next st) × 3. Turn. (12 sts)
Row 5: Ch 1, (sc in next 3 sts, 2 sc in next st) × 3. Do not turn. (15 sts)
Pull the magic ring tight. The piece is now a half circle with a curved top and a straight bottom edge made of row ends. Check it: 1.8 in (4.6 cm) across the straight edge and 0.9 in (2.3 cm) tall.
Base row: Ch 1 and rotate the piece so you are working along the straight edge. Work 1 sc into each of the row ends of Rows 5, 4, 3 and 2 (4 sts). Skip the Row 1 row end and work 1 sc into the center of the magic ring (1 st). Skip the Row 1 row end on the other side, then work 1 sc into each of the row ends of Rows 2, 3, 4 and 5 (4 sts). (9 sts)
This row makes the horizontal band at the base of the dome. Fasten off and weave in the ends.
With the right side facing you, number the base-row stitches 1 to 9 from left to right. Put markers in sts 1, 3, 5, 7 and 9. These are where the ribs and the clapper attach. The dome should now measure 1.8 in (4.6 cm) wide × 1.1 in (2.8 cm) tall.
Part 2: Hanging Loop
Find the center stitch of Row 5 (st 8 of 15) and mark it.
Loop: Join yarn with a sl st in the marked st 8. Ch 16, sc in the 2nd ch from the hook and in each ch across. (15 sc)
Fold the cord into a loop and sl st into the same st 8 to close it. Fasten off. The loop should stand about 1.5 in (3.8 cm) tall. Weave the tails into the dome so the loop sits straight up.
Part 3: Rim Strip
Foundation: Ch 21.
Row 1: Sc in the 2nd ch from the hook and in each ch across. Turn. (20 sts)
Row 2: Ch 1, sc in each st across. Do not fasten off yet; keep the loop on a marker. (20 sts)
Check: 4 in (10.2 cm) long × 0.4 in (1.0 cm) deep.
Row 2 is the top edge, where the ribs attach. The free loops of the foundation chain form the bottom edge, where the border goes. Mark rim sts 1, 7, 14 and 20 on Row 2, counting from left to right with the right side facing you. Sts 1 and 20 are the corner stitches. Sts 7 and 14 sit symmetrically, since 7 + 14 = 1 + 20.
Part 4: Clapper Cord and Ball
Clapper cord: Join yarn with a sl st in dome base st 5 (the center). Ch 9, sc in the 2nd ch from the hook and in each ch back toward the dome. Sl st again in base st 5 and fasten off. (8 sc)
The cord should be 1.6 in (4.1 cm) long, hanging straight down from the center of the dome.
Ball: Worked in continuous rounds.
Rnd 1: MR, 6 sc into ring. (6 sts)
Rnd 2: 2 sc in each st. (12 sts)
Rnd 3: Sc in each st. (12 sts)
Push the starting tail and a small wad of scrap red yarn inside the ball.
Rnd 4: (Sc2tog) × 6. (6 sts)
Fasten off, leaving a 6 in (15.2 cm) tail. Thread the tail through the front loops of the last 6 sts and pull them closed. Sew the ball to the free end of the clapper cord with the spiral center of Rnd 1 facing forward, as shown in the photo. The finished ball is about 0.6 in (1.5 cm) across.
Part 5: Ribs (Assembling the Bell)
Lay the dome and rim on your blocking mat, both with the right side up. Center the rim under the dome, with the bottom of the dome’s base row 2.75 in (7.0 cm) above the top edge of the rim. Pin both pieces in place.
The rib lengths come from this layout. Each outer rib moves out 1.1 in (2.8 cm) while dropping 2.75 in (7.0 cm), so it needs about 3.0 in (7.6 cm), which is 15 sc. Each inner rib moves out only 0.3 in (0.8 cm), so it needs about 2.8 in (7.1 cm), which is 14 sc.
Left outer rib: Join with a sl st in dome base st 1. Ch 15, sl st in rim st 1. Turn and sc in each ch back toward the dome (15 sc). Sl st in dome base st 1. Fasten off.
Left inner rib: Join with a sl st in dome base st 3. Ch 14, sl st in rim st 7. Turn and sc in each ch back (14 sc). Sl st in dome base st 3. Fasten off.
Right inner rib: Join with a sl st in dome base st 7. Ch 14, sl st in rim st 14. Turn and sc in each ch back (14 sc). Sl st in dome base st 7. Fasten off.
Right outer rib: Join with a sl st in dome base st 9. Ch 15, sl st in rim st 20. Turn and sc in each ch back (15 sc). Sl st in dome base st 9. Fasten off.
The clapper hangs between the inner ribs and should not touch the rim. The cord plus the ball measures about 2.2 in (5.6 cm), which leaves a gap of about 0.5 in (1.3 cm) above the rim.
Border: Rim Edging
The border goes around three sides of the rim: down one short end, along the bottom edge, and up the other short end. The top edge already holds the ribs and is not worked. Work the border at the same gauge of 5 sc per inch.
Go back to the live loop you left at the end of rim Row 2.
Border row:
- Short end 1: Work 1 sc into each of the 2 row ends. (2 sts)
- Bottom edge: Work into the free loops of the foundation chain: sc in next 2, (2 sc in next, sc in next 4) × 3, 2 sc in next, sc in last 2. That is 20 sts worked one per loop, plus 4 increases. (20 + 4 = 24 sts)
- Short end 2: Work 1 sc into each of the 2 row ends. (2 sts)
Total: 2 + 24 + 2 = 28 sts. Fasten off.
Per-side summary:
- Top edge: 20 sts (from Row 2, not worked in the border)
- Short ends: 2 sts each
- Bottom edge: 24 sts
The corner stitches are the first and last of the 24 bottom-edge stitches. No extra stitches are added at the corners.
Why the math works: The top edge has 20 sc, which is 4 in (10.2 cm). The bottom edge now has 24 sc, which is 4.8 in (12.2 cm) measured along the edge. The extra 0.8 in (2.0 cm) on the lower edge of a narrow band pushes the rim into a gentle downward curve, the same flare a real bell has. Measured straight across, the curved bottom edge is about 4.5 in (11.4 cm) wide. The increases fall on loops 3, 8, 13 and 18, which are symmetrical around the center, so the curve is even on both sides. The rim is now about 0.55 in (1.4 cm) deep.
Final Blocking
- Weave in all remaining ends along the cords and the dome, not across the open spaces.
- Lay the bell right side up on the blocking mat.
- Pin the dome as a neat half circle 1.8 in (4.6 cm) wide.
- Pin the rim so its curve is even and its bottom edge is 4.5 in (11.4 cm) wide.
- Check that the gap between dome and rim is 2.75 in (7.0 cm) at the center.
- Pin each rib straight along its full length, using 2 or 3 pins per rib.
- Let the clapper hang straight down the center and pin the ball in place.
- Mist the bell evenly with water. If you want a stiff ornament, brush on fabric stiffener instead.
- Pin the hanging loop straight up so it stands 1.5 in (3.8 cm) tall.
- Let it dry completely, about 6 to 12 hours, before you unpin it.
Final Quality-Control Checklist
- Dome is a smooth half circle with 15 sts in Row 5 and 9 sts in the base row
- Loop is centered at Row 5 st 8 and stands 1.5 in (3.8 cm) tall
- Outer ribs have 15 sc and inner ribs have 14 sc, with no twists
- Ribs attach at dome sts 1, 3, 7 and 9 and at rim sts 1, 7, 14 and 20
- Clapper is attached at dome st 5, is 1.6 in (4.1 cm) long, and has the ball secured
- Rim border has 28 sts in total and 24 along the bottom edge
- Bell measures about 4.5 in (11.4 cm) wide × 4.4 in (11.2 cm) tall
- No loose tails in the open spaces
Troubleshooting
The dome ruffles. Your tension is loose or you added too many stitches. Recount each row: 3, 6, 9, 12 and 15 sts. Then try a smaller hook.
The dome cups. Your tension is tight. Go up a hook size or relax your grip.
The ribs sag or bow. The rib is too long for your layout. Remove the sc row, take out 1 ch, and work the rib again.
The ribs pull the rim up. The rib is too short. Add 1 ch and rework it.
The rim curls instead of curving flat. Block it firmly. If it still curls, check that you worked exactly 4 increases.
The ball is lopsided. Add a little more stuffing before Rnd 4, then roll the ball between your palms.
The bell hangs crooked. The loop is off-center. Move it to st 8.
Care
Hand wash in cool water and lay flat to dry, pinning the bell back into shape. If you used stiffener, spot clean only and store the bell flat.

Final Notes
The measurements build on each other:
- Gauge: 20 sc = 4 in (10.2 cm)
- Dome: 1.8 in (4.6 cm) wide and 1.1 in (2.8 cm) tall
- Rim: a 20-sc top edge of 4 in (10.2 cm), flaring to a 24-sc bottom edge with a 4.5 in (11.4 cm) chord
- Ribs: 15 sc on the outside and 14 sc on the inside, spanning 2.75 in (7.0 cm)
- Body total: 1.1 + 2.75 + 0.55 = 4.4 in (11.2 cm), or 5.9 in (15.0 cm) with the loop
If you check each stage against these numbers, the bell will come out even and hang straight every time.
Happy crocheting!