

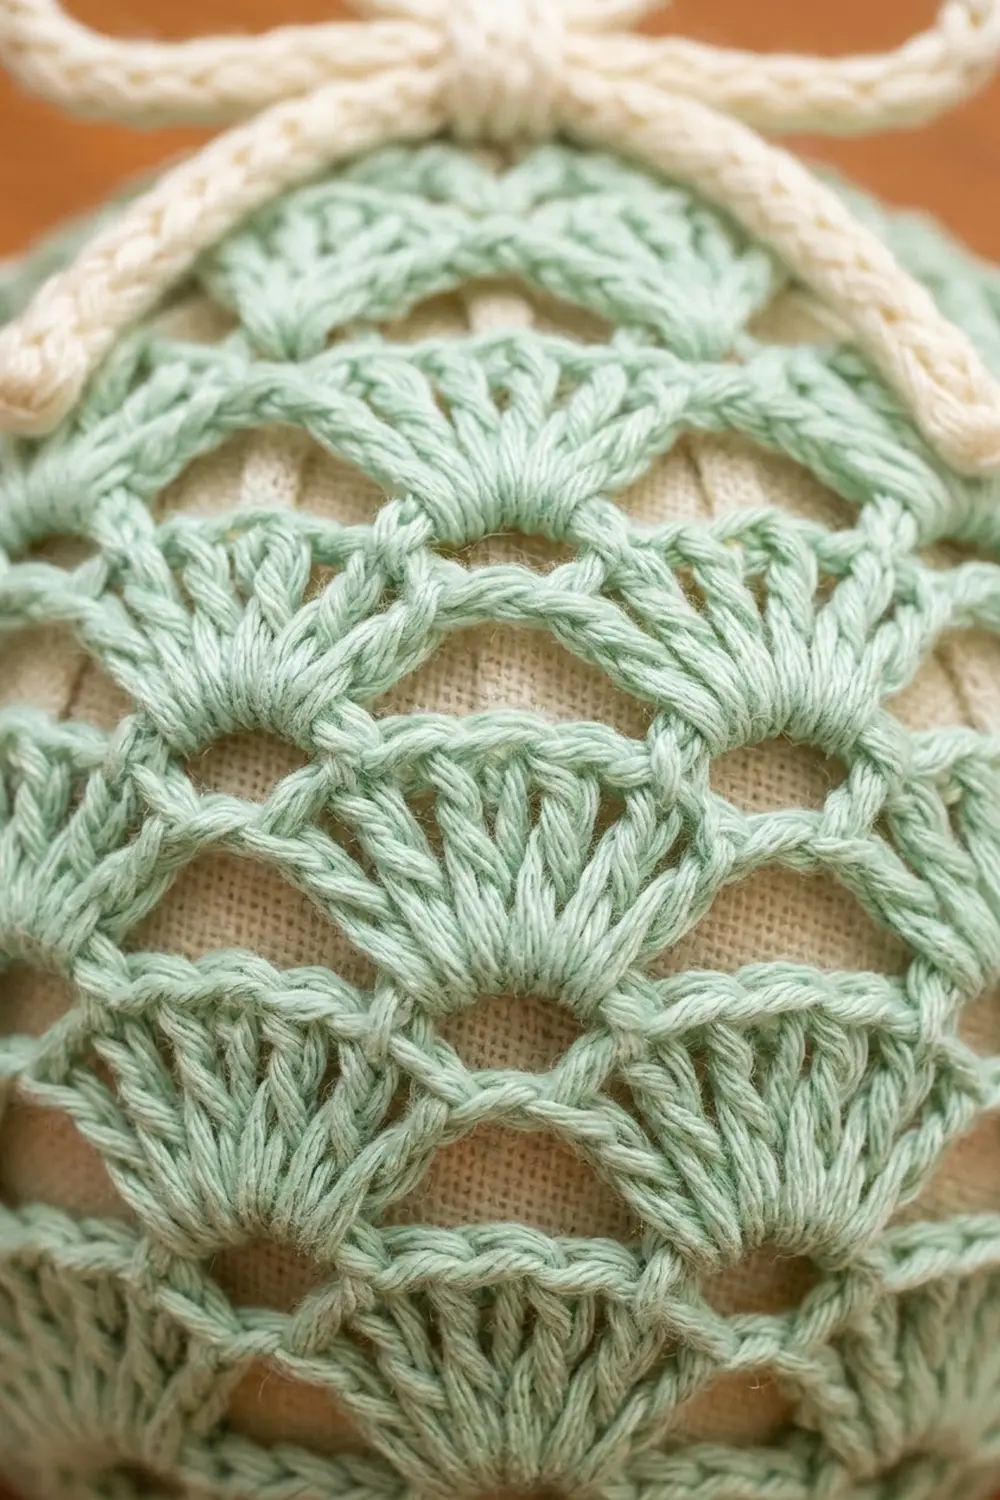
This ornament is a fabric ball covered in an open shell-stitch lace. The fans stack in neat columns, and the cream lining shows through every arch, so the ornament looks light and old-fashioned without being fussy. A cream cord loop and a small bow finish the top.
The sample uses soft mint green cotton for the lace and cream for the lining, loop, and bow. Blush pink, cream, and butter yellow covers also look good on the same lining, so one lining color works for a whole set of ornaments. All instructions are in US crochet terms.
The finished ornament is about 3.5 in (8.9 cm) in diameter, not counting the loop. Before it is shaped, the lace panel measures 9.5 x 4 in (24.1 x 10.2 cm) including its edging.
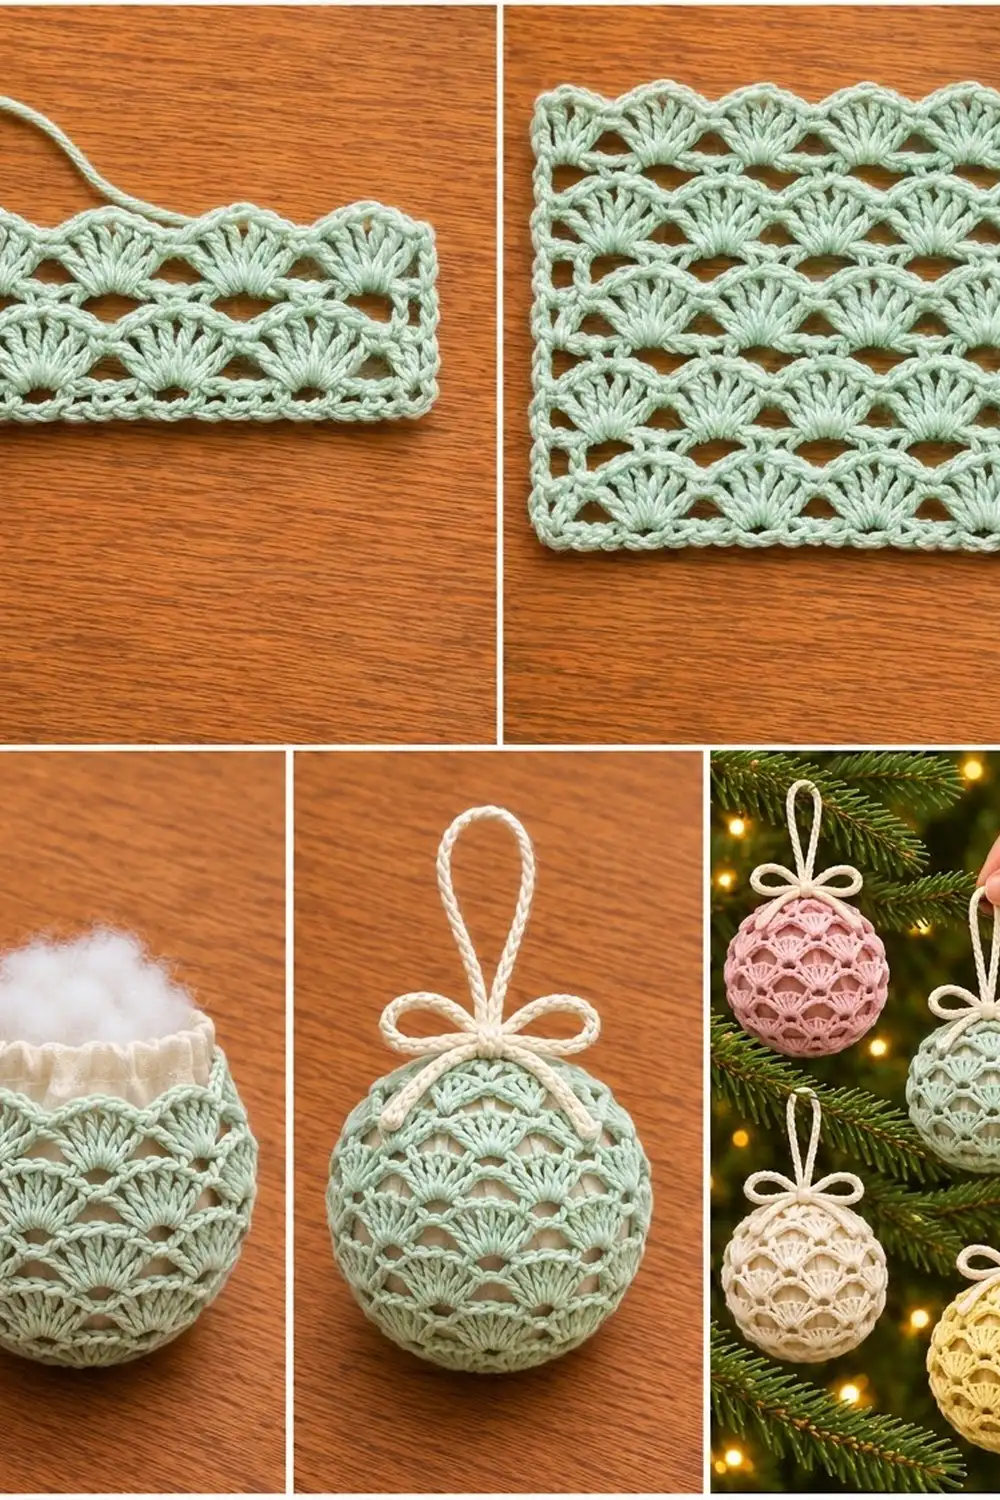
Construction is simple. First you sew a stuffed fabric ball. Then you crochet one flat shell-lace rectangle in rows, edge it with single crochet, and block it. Finally you seam it into a tube, slip it over the ball, cinch the top and bottom closed, and add the cord loop and bow.
Finished Size and Construction
- Finished size: about 3.5 in (8.9 cm) diameter; loop adds about 3 in (7.6 cm)
- Skill level: Easy-intermediate
- Terminology: US crochet terms
- Yarn weight: DK (#3) cotton
- Hook: 3.5 mm (E-4)
- Number of pieces: 1 lace panel, plus a fabric inner ball and a cord
- Layout: one rectangle seamed into a tube, then gathered at both ends
- Panel size before border: 9 x 3.5 in (22.9 x 8.9 cm)
- Panel size after border: 9.5 x 4 in (24.1 x 10.2 cm)
- Border depth: 0.25 in (0.6 cm) on every side
- Inner ball: 3.25 in (8.3 cm) diameter, about 10.2 in (25.9 cm) around
Materials
Choose a smooth, mercerized or combed DK cotton. Cotton shows the shells clearly and keeps its shape when it is stretched over the ball. Fuzzy or very stretchy yarns blur the arches and make the lace hard to see.
- Color A, Mint Green: 12 g, about 28 m (lace panel and gathering)
- Color B, Cream: 6 g, about 14 m (hanging loop and bow)
Both amounts include a margin for your gauge swatch and weaving in ends.
Tools and notions:
- 3.5 mm (E-4) crochet hook
- Cream cotton fabric, one 9 in (22.9 cm) circle (cut from a 10 x 10 in / 25.4 x 25.4 cm square)
- About 10 g polyester fiberfill
- Cream sewing thread and a hand-sewing needle
- Tapestry needle
- 2 locking stitch markers
- Rust-proof pins, a foam blocking mat, and a spray bottle or steamer
- Scissors and a flexible tape measure
Abbreviations (US Terms)
- ch – chain
- sl st – slip stitch
- sc – single crochet
- dc – double crochet
- sk – skip
- st(s) – stitch(es)
- sp – space
- rep – repeat
- RS / WS – right side / wrong side
Special stitch – Shell: work 7 dc in the same stitch. The 4th dc is the center of the shell.
Turning chains: On shell rows, ch 3 counts as the first dc. On mesh rows, ch 5 counts as 1 dc plus ch 2. Chains are counted as stitches in all totals below.
Gauge and Checkpoints
Gauge: one 6-chain pattern repeat (one shell plus its neighboring sc) = 1.5 in (3.8 cm) wide. Nine rows = 3.5 in (8.9 cm) tall. One shell row is about 0.5 in (1.3 cm) tall and one mesh row is about 0.25 in (0.6 cm).
Your panel is your gauge swatch. It only takes a few minutes to work, so work Rows 1–3 and then check it before you continue.
Checkpoints:
- After Row 1: 9 in (22.9 cm) wide, slightly relaxed
- After Row 3: 1.25 in (3.2 cm) tall
- After Row 9: 9 x 3.5 in (22.9 x 8.9 cm)
- After the border: 9.5 x 4 in (24.1 x 10.2 cm)
- Seamed tube: 9.5 in (24.1 cm) around. That is 0.7 in (1.8 cm) smaller than the ball, so the lace hugs the lining.
Too big? If Row 1 is wider than 9.5 in (24.1 cm), go down to a 3.25 mm hook. A loose cover sags and shows gaps at the seam.
Too small? If Row 1 is narrower than 8.5 in (21.6 cm), go up to a 3.75 mm hook. A tight cover distorts the shells into ovals.
Inner Ball
- Cut a 9 in (22.9 cm) circle from the cream fabric.
- With doubled sewing thread, sew a running stitch all the way around, 0.5 in (1.3 cm) in from the edge. Leave both thread tails long.
- Pull the tails gently to form a cup. Fill it firmly with fiberfill.
- Pull the tails tight so the edge gathers into a small ruffle. Knot securely and tuck the ruffle in.
- Shape the ball with your hands until it is round and about 3.25 in (8.3 cm) across, or 10.2 in (25.9 cm) around. Add or remove fiberfill as needed.
Lace Panel
With Color A, ch 39.
Row 1 (RS, shell row): 7 dc in 6th ch from hook. The skipped chains count as the first dc. Sk 2 ch, sc in next ch, sk 2 ch, 7 dc in next ch; rep from * 4 more times. Sk 2 ch, dc in last ch, turn.
(6 shells, 5 sc, 2 edge dc = 49 sts.)
Row 2 (WS, mesh row): Ch 5 (counts as dc and ch 2), sc in center dc of first shell. Ch 2, dc in next sc, ch 2, sc in center dc of next shell; rep from * 4 more times. Ch 2, dc in top of turning ch, turn.
(7 dc, 6 sc, 12 ch-2 sps = 37 sts.)
Row 3 (RS, shell row): Ch 3 (counts as dc). Sk ch-2 sp, 7 dc in next sc, sk ch-2 sp, sc in next dc; rep from * 4 more times. Sk ch-2 sp, 7 dc in last sc, sk ch-2 sp, dc in 3rd ch of turning ch-5, turn.
(6 shells, 5 sc, 2 edge dc = 49 sts.)
Each new shell sits right on top of the shell below, because it is worked into the sc that was placed at that shell’s center. This is what makes the vertical columns of fans.
Rows 4–9: Rep Rows 2–3 three more times. You will end with a shell row, Row 9.
(Rows 4, 6, 8: 37 sts each. Rows 5, 7, 9: 49 sts each.)
The panel now has 5 shell rows and 4 mesh rows. It should measure 9 x 3.5 in (22.9 x 8.9 cm). Do not fasten off.
Every row starts and ends with a dc-height stitch, so both side edges are straight and even. This matters for the border and the seam.
Border
Border gauge: about 5 sc per 1 in (2.5 cm) along the sides. Along the top and bottom, work 1 sc into every existing stitch.
The corners are ch-1 spaces. They are not counted in the side totals below, so each side total is exactly the number of sc on that side.
Border Round (RS): Ch 1, turn to work along the last row.
- Top edge: sc in each of the 49 sts of Row 9. (49 sc) Ch 1 for the corner.
- Left side: work 2 sc around the edge stitch of each of the 9 row ends. (18 sc) Ch 1 for the corner.
- Bottom edge: working into the opposite side of the foundation chain, sc in each of the 37 chains. (37 sc) Ch 1 for the corner.
- Right side: work 2 sc around the edge stitch of each of the 9 row ends. (18 sc) Ch 1 for the corner.
- Join with a sl st to the first sc.
Total: 49 + 18 + 37 + 18 = 122 sc, plus 4 corner ch-1 sps.
Fasten off, leaving a 12 in (30.5 cm) tail for seaming.
Why the math works: The top and bottom get exactly 1 sc per existing stitch, so the width stays 9 in (22.9 cm). Every row end is the height of a dc, and a dc is about as tall as 2 sc, so 2 sc per row end (9 x 2 = 18) lies flat without pulling or rippling. The round adds 0.25 in (0.6 cm) on every side: 9 + 0.5 = 9.5 in (24.1 cm) wide and 3.5 + 0.5 = 4 in (10.2 cm) tall.
Both sides have the same count (18 sc), so they match stitch for stitch when you seam them.
Final Blocking
Block the panel while it is still flat, before seaming:
- Lay the panel RS up on a foam mat.
- Pin it to 9.5 x 4 in (24.1 x 10.2 cm). Put a pin in each corner first, then one at every sc between shells along the top and bottom.
- Open each ch-2 arch slightly with your fingertip so the mesh rows look even.
- Mist the panel until it is damp, or hold a steamer 1 in (2.5 cm) above it. Never press the iron onto the lace.
- Let it dry completely, at least 2 hours, then unpin.
Shape the ornament:
- Fold the panel RS out so the two 18-sc side edges meet. Whipstitch them together with the long tail, matching sc to sc, 18 stitches in all. The tube should measure 9.5 in (24.1 cm) around.
- Slide the tube over the fabric ball, with the gathered ruffle at the top. Center the lace so equal bands of lining show at the top and bottom.
- Gather the top: thread a 12 in (30.5 cm) strand of Color A on the tapestry needle. Weave it in and out through all 49 top-edge sc. Pull it tight until the opening closes to about 0.5 in (1.3 cm), then knot it and bury the ends.
- Gather the bottom: repeat Step 3 through all 37 bottom-edge sc, pulling until the opening closes completely.
- Hanging loop: with Color B, ch 41. Sl st in the back bump of the 2nd ch from hook and in each ch across. (40 sl sts, about 8 in / 20.3 cm.) Fold the cord in half and sew both ends to the top center to make a 3 in (7.6 cm) loop.
- Bow: with Color B, ch 61. Sl st in the back bump of the 2nd ch from hook and in each ch across. (60 sl sts, about 12 in / 30.5 cm.) Tie it in a bow with 1 in (2.5 cm) loops. Sew the bow to the base of the hanging loop, and let the tails rest over the top shells.
Final Quality-Control Checklist
- [ ] Shell rows have 49 sts and mesh rows have 37 sts
- [ ] Panel has 5 shell rows and 4 mesh rows, with shells in straight vertical columns
- [ ] Border round has 49 / 18 / 37 / 18 sc plus 4 corner ch-1 sps
- [ ] Blocked panel measures 9.5 x 4 in (24.1 x 10.2 cm)
- [ ] Seam is flat and matched 18 to 18
- [ ] Inner ball is about 3.25 in (8.3 cm) across and firm
- [ ] Top and bottom gathers are centered and secure
- [ ] Loop is about 3 in (7.6 cm) tall and the bow is sewn on firmly
- [ ] All ends are woven in and hidden behind shells
Troubleshooting
Shells drift diagonally instead of stacking. In mesh rows, the sc must go into the 4th (center) dc of each shell. Count 1-2-3-4 every time.
Too few shells in a row. You probably worked into a ch-2 sp instead of skipping it. Shells go only into sc, and the sc between shells go only into dc.
Side edges look ragged. Check that each shell row starts with ch 3 and ends with a dc into the turning chain.
Border ripples along the sides. Your dc rows may be short. Work 2 sc into the shell row ends and 1 sc into the mesh row ends for a total of 14 per side, using the same count on both sides.
The cover slides around. The ball is too small. Add fiberfill until the ball measures 10.2 in (25.9 cm) around.
The top won’t close. Pull the gathering strand in small steps, easing the lace along it as you go.
Care
Spot clean with a damp cloth and mild soap, then reshape the ornament by hand and let it air dry. Store it wrapped in tissue so the cord loop and bow don’t get crushed.
Final Notes
The size of this ornament depends on a short chain of measurements. A 1.5 in (3.8 cm) repeat gives a 9 in (22.9 cm) row. Nine rows make a 9 x 3.5 in (22.9 x 8.9 cm) panel. The edging round brings it to 9.5 x 4 in (24.1 x 10.2 cm). Seamed, that is a 9.5 in (24.1 cm) tube that fits snugly over a 3.25 in (8.3 cm) ball, for a finished ornament about 3.5 in (8.9 cm) across. If you check each link as you go, the ornament will come out right.
Happy crocheting!