

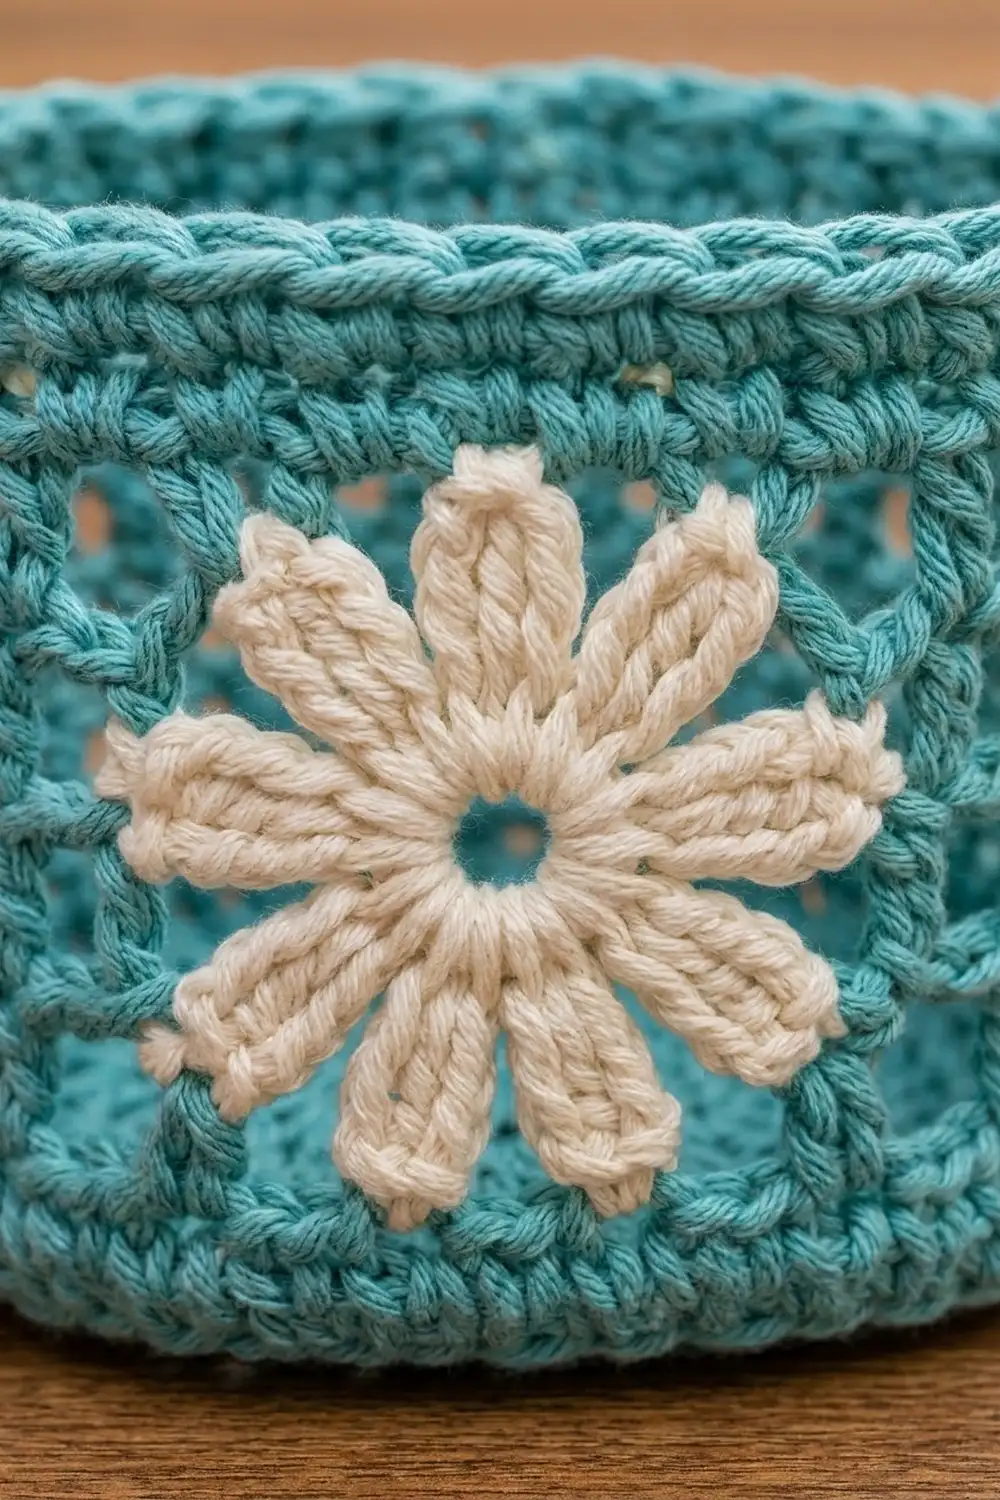
The Seaglass Daisy basket is a small, round holder for a single toilet roll. It has a solid base, an open mesh wall that lets the roll show through, and a firm rim that keeps its shape. A cream 10-petal flower sits on the front of each basket.
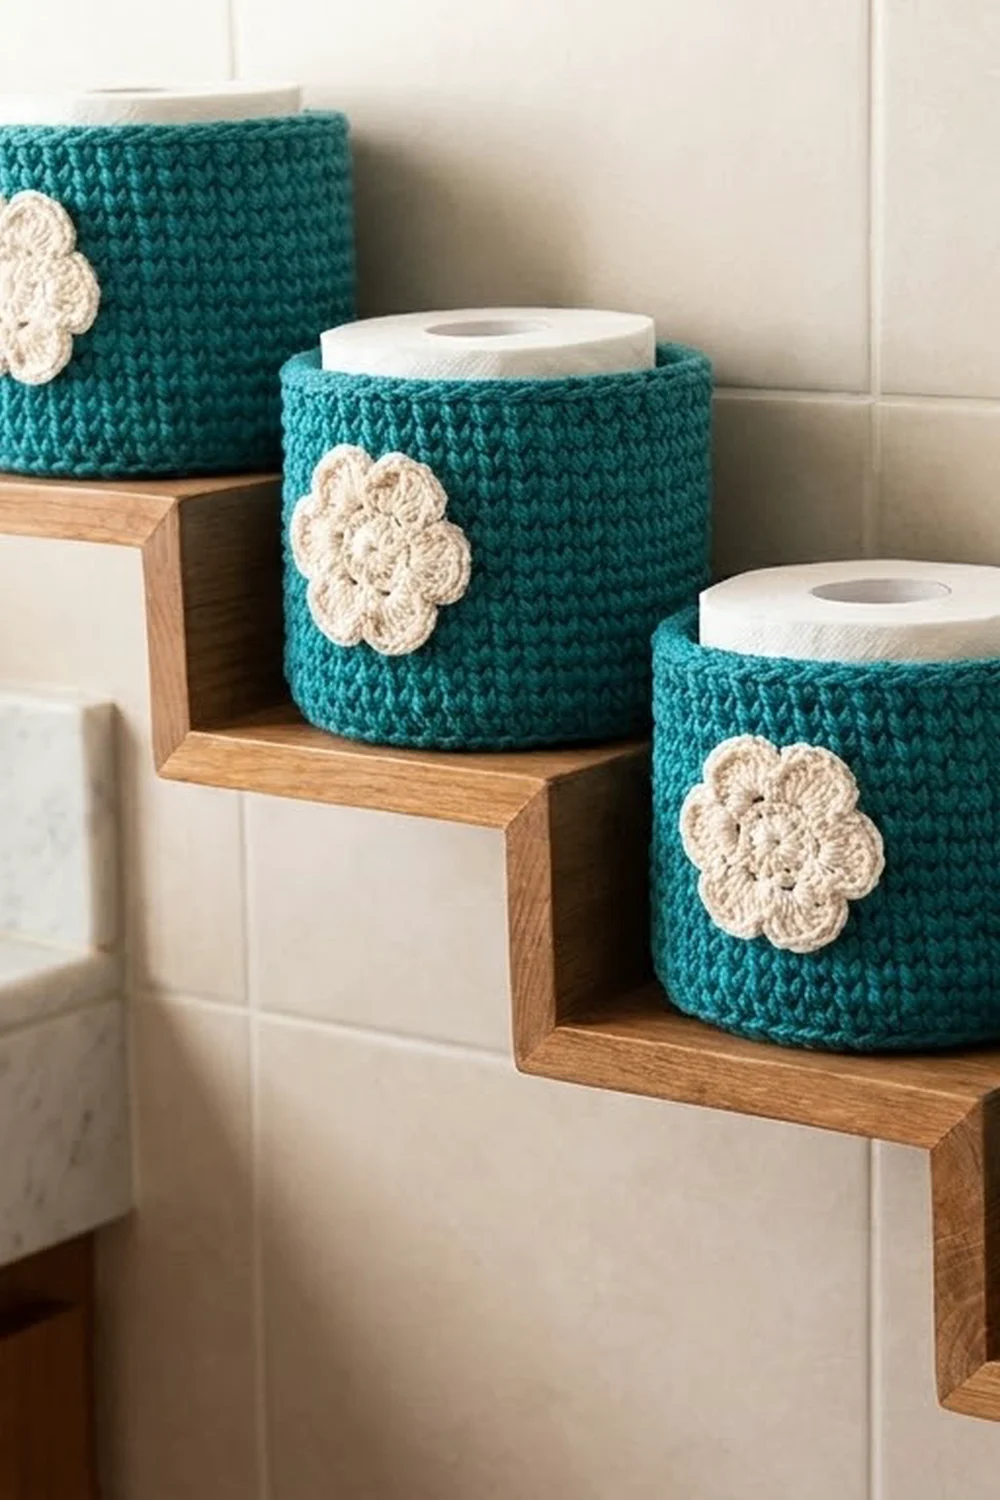
This pattern makes a set of five identical baskets. In the photos they are arranged on a stepped wooden wall rack, one roll per step. The baskets are not joined to each other. Each is a stand-alone piece, so you can make one or as many as your rack has steps.
The colors are a soft teal for the basket and cream for the flower. Cotton gives a matte, crisp finish that suits a bathroom. All instructions use US crochet terms. Each finished basket measures 5.25 in (13.3 cm) across and 3.5 in (8.9 cm) tall. Each flower measures 2.5 in (6.4 cm) across.
Construction is simple. You work a flat single crochet circle for the base and turn up the wall with a back-loop round. Then come 2 solid rounds, 3 mesh rounds, and a solid rim, which counts as the border. You make the flower separately and sew it on.
Finished Size and Construction
- Finished size (one basket): 5.25 in (13.3 cm) diameter × 3.5 in (8.9 cm) tall
- Skill level: Easy+
- Terminology: US
- Yarn weight: Worsted (#4) cotton
- Hook: 4.5 mm (US 7)
- Number of pieces: 10 in total: 5 baskets and 5 flowers (1 flower per basket)
- Layout: baskets are separate, one per rack step, descending diagonally
- Piece size: base 5.25 in (13.3 cm) across; flower 2.5 in (6.4 cm) across
- Size before border: wall height 2.25 in (5.7 cm)
- Border depth: 1.25 in (3.2 cm), for a total wall height of 3.5 in (8.9 cm)
Materials
Use a smooth, mercerized or combed worsted-weight cotton. Cotton holds the basket upright and doesn’t stretch out under the weight of a roll. Acrylic works too, but the walls will be softer. The amounts below assume a yarn of about 170 m per 100 g.
- Teal (main color): 150 g / 255 m (about 25 g / 43 m per basket)
- Cream (flower color): 30 g / 51 m (about 4 g / 7 m per flower)
These quantities include a margin of about 20% for swatching and tension differences.
Tools:
– 4.5 mm (US 7) crochet hook
– Locking stitch markers (at least 2)
– Tapestry needle
– Scissors
– Measuring tape
– Rust-proof pins and a spray bottle for blocking
– A toilet roll and a small towel, used as a blocking form
Abbreviations (US Terms)
- ch – chain
- sl st – slip stitch
- sc – single crochet
- hdc – half double crochet
- dc – double crochet
- sk – skip
- sp – space
- BLO – back loop only
- st(s) – stitch(es)
- rnd – round
- rev sc – reverse single crochet (crab stitch)
Special stitch: reverse single crochet (rev sc). Work from left to right (right to left if you crochet left-handed). Insert the hook into the next stitch to the right, yarn over, and pull up a loop. Yarn over and pull through both loops. This makes a firm, rope-like edge.
Gauge and Checkpoints
Gauge: 16 sc and 16 rnds = 4 in (10.2 cm) in sc worked in joined rounds. In mesh, 4 mesh rnds = 2 in (5.1 cm) tall.
Make one complete basket before starting the set. That is your real gauge test. Check it against these points:
- After Rnd 6 (36 sts): base about 3 in (7.6 cm) across.
- After Rnd 8 (48 sts): base about 3.75 in (9.5 cm) across.
- After Rnd 11 (66 sts): base 5.25 in (13.3 cm) across and 16.5 in (41.9 cm) around.
- After Rnd 17 (end of mesh): wall 2.25 in (5.7 cm) tall, measured from the fold ridge.
- After the border: wall 3.5 in (8.9 cm) tall.
If your basket is too big, go down to a 4 mm (US 6) hook. If it is too small or a roll won’t slide in, go up to a 5 mm (US H-8) hook. Don’t add stitches to fix the size. The mesh repeat depends on exactly 66 stitches.
Basket Base
Work in joined rounds with the right side facing. Ch 1 at the start of each round does not count as a stitch. Join each round with a sl st to the first sc. Keep the joins stacked: they mark the back center of the basket.
With teal, make a magic ring.
Rnd 1: Ch 1, 6 sc in ring, join. (6 sts)
Rnd 2: Ch 1, 2 sc in each st around, join. (12 sts)
Rnd 3: Ch 1, sc in next st, 2 sc in next st; repeat 6 times, join. (18 sts)
Rnd 4: Ch 1, sc in next 2 sts, 2 sc in next st; repeat 6 times, join. (24 sts)
Rnd 5: Ch 1, sc in next 3 sts, 2 sc in next st; repeat 6 times, join. (30 sts)
Rnd 6: Ch 1, sc in next 4 sts, 2 sc in next st; repeat 6 times, join. (36 sts)
Rnd 7: Ch 1, sc in next 5 sts, 2 sc in next st; repeat 6 times, join. (42 sts)
Rnd 8: Ch 1, sc in next 6 sts, 2 sc in next st; repeat 6 times, join. (48 sts)
Rnd 9: Ch 1, sc in next 7 sts, 2 sc in next st; repeat 6 times, join. (54 sts)
Rnd 10: Ch 1, sc in next 8 sts, 2 sc in next st; repeat 6 times, join. (60 sts)
Rnd 11: Ch 1, sc in next 9 sts, 2 sc in next st; repeat 6 times, join. (66 sts)
The base should lie flat and measure 5.25 in (13.3 cm) across. If it ruffles, your tension is loose; try a smaller hook. If it cups, try a larger one.
Basket Wall
From here on you work straight up with no increases, so the wall rises at a right angle.
Rnd 12 (fold round): Ch 1, sc in BLO of each st around, join. (66 sts) The unused front loops form a ridge on the outside, which gives the basket a crisp bottom edge.
Rnds 13–14: Ch 1, sc in each st around, join. (66 sts)
This solid lower band is 3 rounds tall, about 0.75 in (1.9 cm).
Rnd 15 (first mesh round): Ch 5 (counts as dc and ch 2), sk next 2 sts, dc in next st, ch 2, sk next 2 sts; repeat 21 times. Join with a sl st to the 3rd ch of the beginning ch-5. (22 dc and 22 ch-2 sps)
Check the math: 22 repeats × 3 sts (1 dc and 2 skipped) = 66, so the last ch-2 lands exactly on the beginning ch-5.
Rnds 16–17: Ch 5 (counts as dc and ch 2), dc in next dc, ch 2; repeat 21 times. Join with a sl st to the 3rd ch of the beginning ch-5. (22 dc and 22 ch-2 sps)
Keep each dc straight above the dc below it, so the openings line up into neat square columns. The 3 mesh rounds measure 1.5 in (3.8 cm), for a wall height of 2.25 in (5.7 cm) before the border.
Border (Solid Rim)
Border gauge: the same as the basket, 4 sc and 4 rnds per 1 in (2.5 cm).
Rnd 18 (conversion round): Ch 1, sc in the joining st (the top of the beginning ch-5), 2 sc in the next ch-2 sp, sc in next dc, 2 sc in next ch-2 sp; repeat 21 times, join.
Count: 22 sc (1 in each dc) + 44 sc (2 in each of 22 spaces) = 66 sts.
Rnds 19–21: Ch 1, sc in each st around, join. (66 sts)
Rnd 22 (edge round): Ch 1, rev sc in each st around, join. (66 sts) Fasten off and weave in the ends.
Why the math works: the rim returns to exactly 66 stitches, the same count as base Rnd 11. Because the base, lower band, and rim all hold the same circumference of 16.5 in (41.9 cm), the wall stays straight and doesn’t flare or pull in. The rim adds 4 sc rounds (1 in / 2.5 cm) plus the reverse sc edge (0.25 in / 0.6 cm), for a border depth of 1.25 in (3.2 cm). The total wall height is 2.25 + 1.25 = 3.5 in (8.9 cm).
For placing the flower, count the rim as two halves of 33 stitches each. The join sits at the back center, and stitch 34 (counting the stitch after the join as stitch 1) is the front center.
Daisy Appliqué
With cream, make a magic ring.
Rnd 1: Ch 1, 10 sc in ring, join with a sl st to the first sc. (10 sts) Pull the ring closed, but leave a small center hole about 0.25 in (0.6 cm) wide, as in the photo.
Rnd 2 (petals): Ch 6, sc in 2nd ch from hook, hdc in next ch, dc in next 2 ch, hdc in last ch, sl st in the same sc at the base of the petal, sl st in the next sc; repeat 10 times, ending with the last sl st in the first sl st. (10 petals of 5 sts each)
Each petal is about 1 in (2.5 cm) long, so the flower measures 2.5 in (6.4 cm) across. Fasten off and leave a 12 in (30.5 cm) tail for sewing.
Attaching the flower: center it at front stitch 34, so the flower’s center hole lines up with the middle mesh round (Rnd 16). The top and bottom petals will overlap slightly onto the solid band and the rim, as in the photo. Pin it in place, then whipstitch around the center ring and tack the tip of each petal down with 1 small stitch. Sew through the dc posts and solid stitches, not across the empty mesh openings.
Make All Pieces
- Baskets: 5 in teal, 25 g / 43 m each, for 125 g / 213 m in total
- Flowers: 5 in cream, 4 g / 7 m each, for 20 g / 34 m in total
Sew 1 flower to each basket. Layout on a five-step rack, from the top left down to the bottom right:
[B1]
    [B2]
        [B3]
            [B4]
                [B5]
Each basket sits on its own step with the flower facing out and the joining seam against the rack.
Joining (Attaching to the Rack)
The baskets are not joined to each other with yarn. Each one is attached to its own step of the rack independently. The wooden rack is not part of the crochet.
Method: cut two 12 in (30.5 cm) lengths of teal for each basket. Thread one through the rim at stitch 61 and the other at stitch 7, in Rnd 20. These spots are 6 stitches either side of the back-center join, so the ties sit 12 stitches, or 3 in (7.6 cm), apart and balance the load evenly. Tie each length around the rack’s upright board or over a small screw head, then knot it.
Stitch-to-stitch logic: always use the same two stitch positions on every basket. All 5 baskets will then sit at the same height on their steps, with the flowers centered.
Tension: pull the ties snug but don’t cinch them. The rim should stay round and 16.5 in (41.9 cm) around. If it goes oval, loosen the knots.
Size checkpoint: after mounting, slide a roll in. It should drop in freely and stand about 0.5 in (1.3 cm) proud of the rim.
Final Blocking
- Finish all 5 baskets and flowers, with the ends woven in, before you block.
- Lightly spray each flower and pin it flat to 2.5 in (6.4 cm), opening each petal evenly. Let it dry fully before sewing it on.
- Wrap a toilet roll in a thin towel until it measures 16.5 in (41.9 cm) around.
- Slide a basket over the form, upside down, so the base sits flat on top.
- Mist the whole basket until it is damp, not soaked.
- Straighten the mesh columns with your fingers so each opening is square. Smooth the rev sc edge level.
- Check that the wall is 3.5 in (8.9 cm) tall and the base is 5.25 in (13.3 cm) across.
- Let it dry completely, usually 6–8 hours, before removing it.
Final Quality-Control Checklist
- Base is flat, with exactly 66 sts in Rnd 11.
- The fold ridge goes all the way around.
- 22 even mesh openings in each of the 3 mesh rounds, lined up in columns.
- The rim has 66 sts and a smooth rev sc edge.
- Joins are stacked at the back center.
- Each flower has 10 petals, an open center, and is centered at front stitch 34.
- All 5 baskets measure 5.25 in × 3.5 in (13.3 cm × 8.9 cm), within 0.25 in (0.6 cm).
- Ties are at stitches 7 and 61 on every basket.
Troubleshooting
- Base ruffles: you are working loosely or added extra increases. Recount the stitches and go down a hook size.
- Base cups before the wall: your tension is too tight. Go up a hook size.
- Wall flares out: you probably missed the BLO round, or the rim count went above 66. Recount Rnd 18.
- Mesh spirals: you placed the dc into a chain instead of into the dc below. In Rnds 16–17, work each dc into the top of the dc below it.
- Uneven last mesh: you miscounted in Rnd 15. There must be 22 repeats of 3 sts.
- Petals curl: block the flower flat before sewing.
- Roll won’t fit: use a larger hook, or block over a slightly wider form, up to 17 in (43.2 cm) around.
Care
Hand wash in cool water with a mild soap, press out the water in a towel, and reshape the basket over a roll to dry. Avoid the dryer, which can shrink cotton.
Final Notes
The measurement chain is short and consistent. A 66-stitch base of 5.25 in (13.3 cm) carries straight up into a 0.75 in (1.9 cm) solid band and a 1.5 in (3.8 cm) mesh section, for 2.25 in (5.7 cm) before the border. A 66-stitch rim of 1.25 in (3.2 cm) brings the basket to 3.5 in (8.9 cm). Add a 2.5 in (6.4 cm) daisy and repeat 5 times for a matching set.
Happy crocheting!