

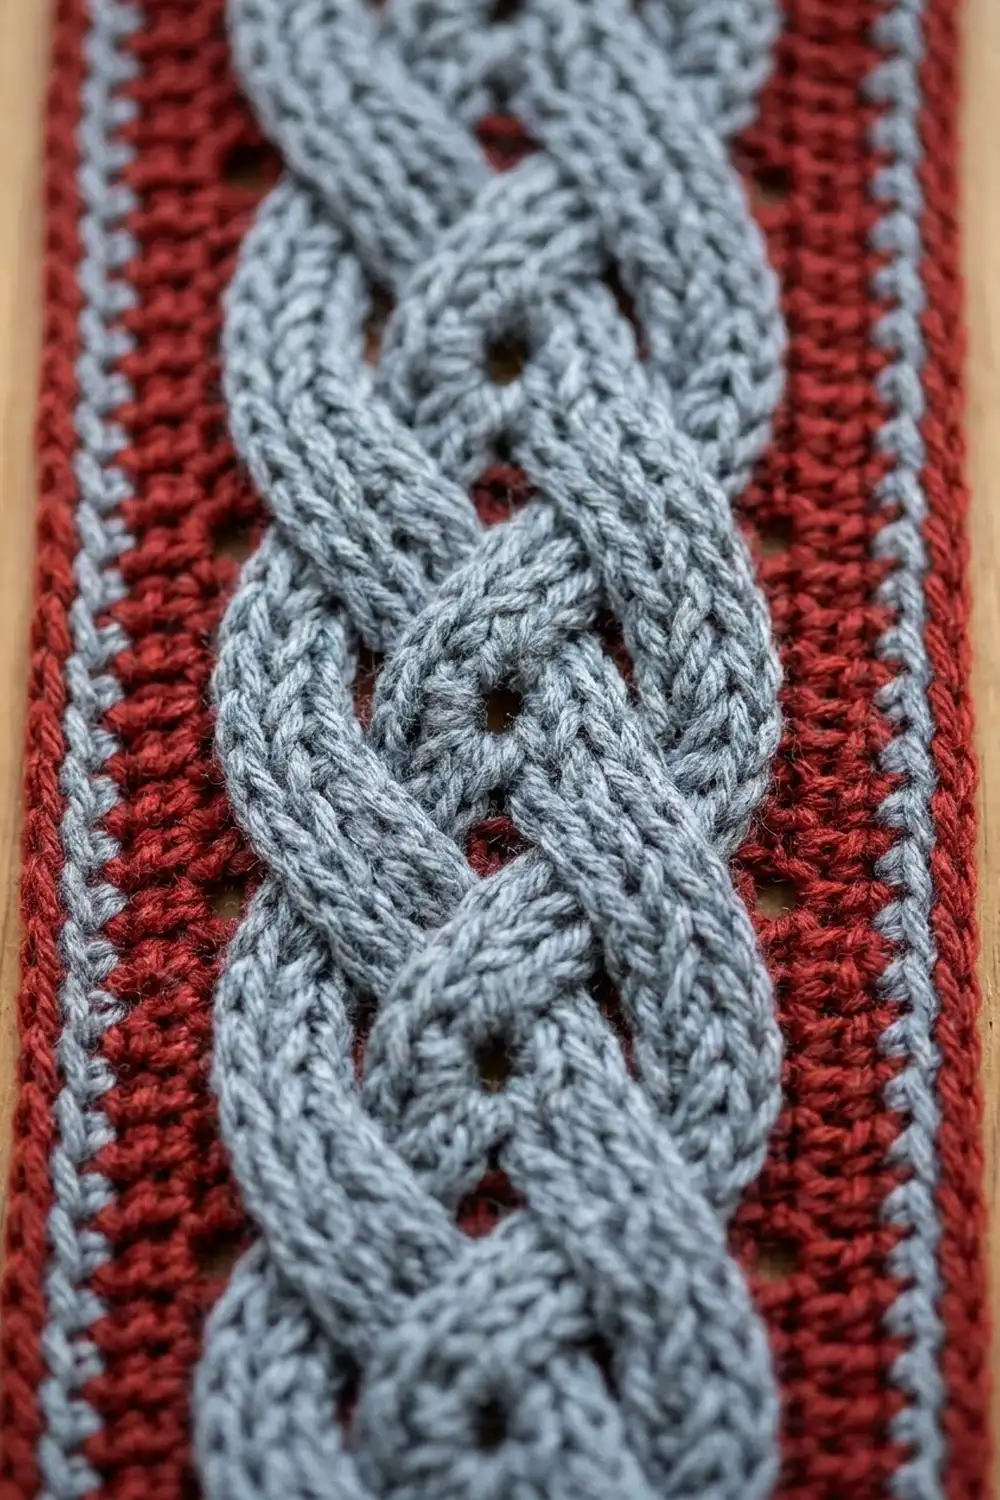
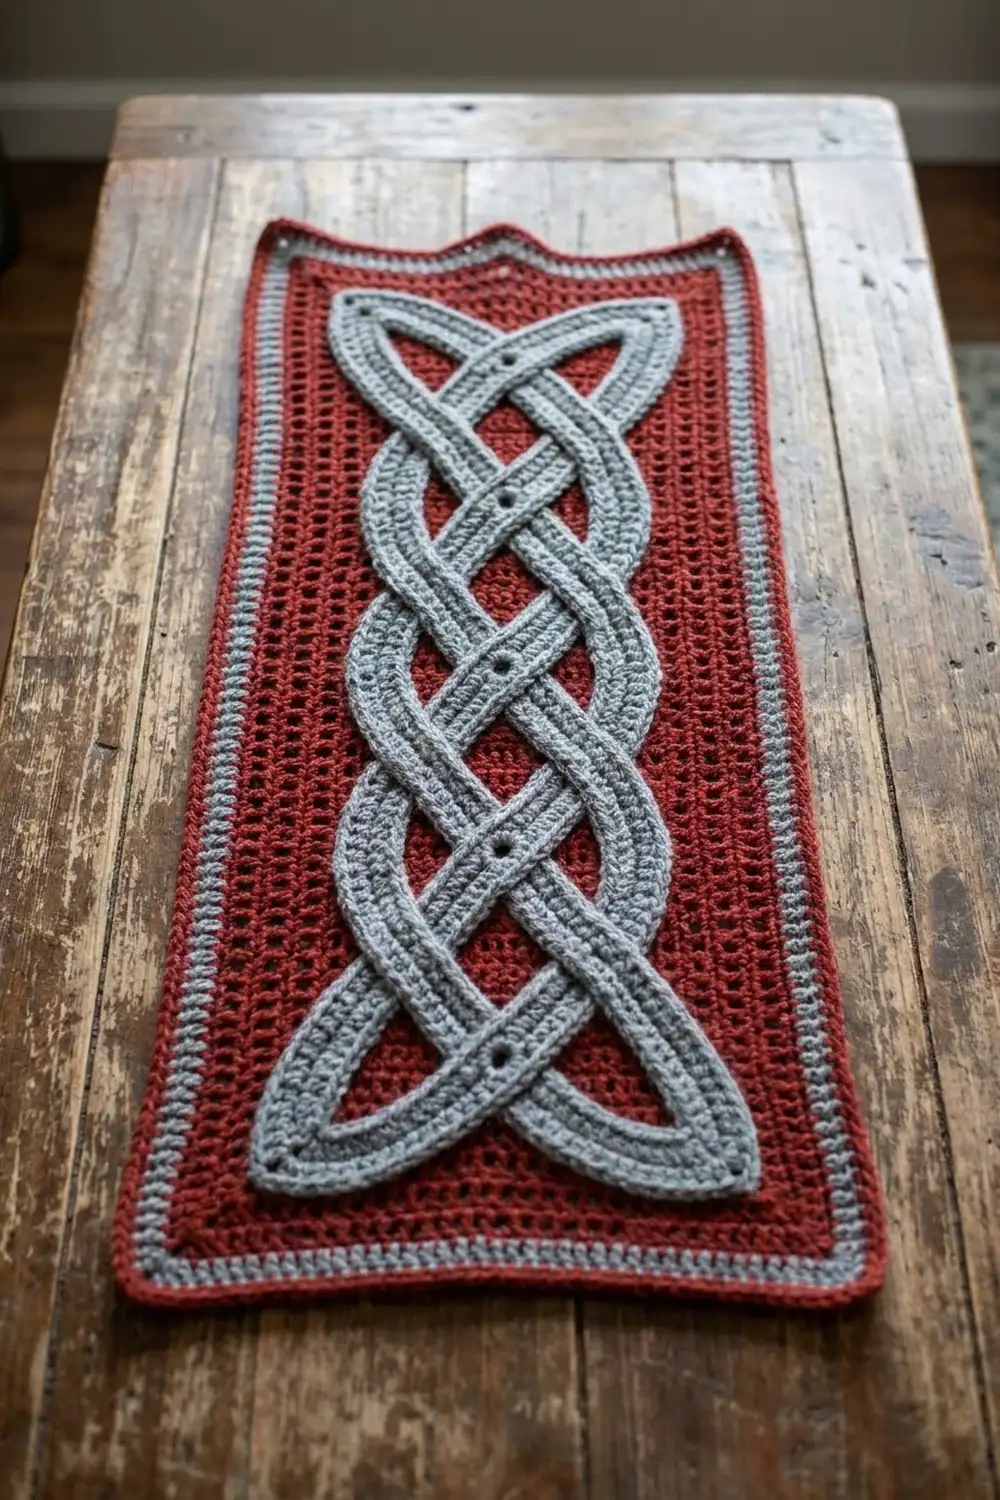
The Crimson Plait Panel is a single rectangular crochet piece with a Celtic braid running down its full length. Three soft gray cords, each with a line of tiny eyelets down its center, weave over and under each other across a deep red mesh background. A gray stripe and a red outer round frame the panel, and both short ends are shaped into a shallow crown of three points.
The colors are a classic, calm pairing of brick red and heather gray. The style sits between traditional Celtic knotwork and modern textured crochet. The raised cords stand out in strong relief, and the small holes in the red mesh add depth behind them.
This pattern uses US crochet terms. The finished panel measures 8.25 x 17.25 in (21.0 x 43.8 cm), measured from side to side and from point to point.
The construction follows a simple order:
- Crochet the red mesh background in rows.
- Crochet three gray eyelet cords.
- Plait the cords, pin them over the background, and stitch them down.
- Work a four-round border with rippled short ends, then block.
Finished Size and Construction
- Finished size: 8.25 x 17.25 in (21.0 x 43.8 cm), point to point
- Skill level: Intermediate
- Terminology: US crochet terms
- Yarn weight: Worsted (#4)
- Hook: 5.0 mm (H-8)
- Number of pieces: 1 finished panel, built from 1 background + 3 appliqué cords
- Layout: one vertical panel, with the plait centered lengthwise
- Background size before border: 6.25 x 15.25 in (15.9 x 38.7 cm)
- Cord size: 21.25 x 0.75 in (54.0 x 1.9 cm) each
- Border depth: 1 in (2.5 cm), 4 rounds
Materials
Choose a smooth worsted-weight yarn with good stitch definition. Acrylic, wool blends and cotton blends all work. Avoid fuzzy or highly textured yarns, because they hide the eyelets and blur the over-under crossings of the plait.
- Color A, brick red: 80 g / 160 m (175 yd)
- Color B, heather gray: 50 g / 100 m (109 yd)
These quantities include a margin of roughly 15 percent for your gauge swatch and small differences in tension.
Tools:
- 5.0 mm (H-8) crochet hook
- Tapestry needle
- 4 stitch markers
- Rustproof pins (about 30)
- Blocking mat and spray bottle
- Scissors and a tape measure
Abbreviations (US Terms)
- ch – chain
- sc – single crochet
- dc – double crochet
- sk – skip
- st(s) – stitch(es)
- sp – space
- sl st – slip stitch
- RS – right side
- rnd – round
Special stitch – sc3tog (single crochet 3 together): (Insert hook in next st, yarn over, pull up a loop) 3 times, yarn over, pull through all 4 loops on hook. This uses 3 stitches and makes 1. It forms the valleys of the pointed ends.
Gauge and Checkpoints
Gauge:
- 4 sts = 1 in (2.5 cm) in the background pattern.
- One sc row = 0.25 in (0.6 cm) tall.
- One mesh row = 0.5 in (1.3 cm) tall.
- Four rows (2 sc + 2 mesh) = 1.5 in (3.8 cm).
Test one piece first. With Color A, ch 18 and work Rows 1–9 of the background on 17 sts. Your swatch should measure 4.25 in (10.8 cm) wide and 3.25 in (8.3 cm) tall.
- Too big? Go down to a 4.5 mm hook.
- Too small? Go up to a 5.5 mm hook.
Fix the width first, because the border math depends on 4 sts per inch.
Checkpoints:
- After background Row 9: 6.25 in (15.9 cm) wide, 3.25 in (8.3 cm) tall.
- After background Row 41: 6.25 x 15.25 in (15.9 x 38.7 cm).
- After each cord Row 1: 21.25 in (54.0 cm) long.
- After each cord Rnd 2: 0.75 in (1.9 cm) wide.
- After border Rnd 4: 8.25 x 17.25 in (21.0 x 43.8 cm).
Background Panel
With Color A, ch 26.
Row 1 (RS): Sc in 2nd ch from hook and in each ch across, turn. (25 sc)
Row 2 (mesh row): Ch 3 (counts as dc), sk first sc, *ch 1, sk next sc, dc in next sc; rep from * across, turn. (13 dc + 12 ch-1 sps = 25 sts)
Row 3 (sc row): Ch 1, sc in each dc and each ch-1 sp across, ending with sc in top of turning ch-3, turn. (25 sc)
Rows 4–41: Rep Rows 2–3 nineteen more times. Every even row is a mesh row and every odd row is a sc row. Row 41 is the last row.
Row count check: 41 rows total = 21 sc rows + 20 mesh rows. Height = (21 x 0.25 in) + (20 x 0.5 in) = 5.25 + 10 = 15.25 in (38.7 cm).
The ch-1 spaces stack directly above each other, with sc rows between them. This creates the small eyelet texture in the red background behind the plait.
Fasten off and weave in ends. Do not work the border yet. Sew the cords on first so that the border covers their tips.
Eyelet Cords (Make 3)
Each cord is a narrow band of dc with a ch-1 eyelet between each pair of dc, edged all around with sc. The ch-1 spaces form the dotted center line of each strand.
With Color B, ch 88.
Row 1: Dc in 6th ch from hook (first 5 ch count as dc + ch-1 sp + skipped ch), *ch 1, sk next ch, dc in next ch; rep from * to end. Do not turn. (43 dc + 42 ch-1 sps = 85 sts)
Rnd 2:
- Ch 1 and rotate to work along the top. Sc in each dc and each ch-1 sp across. (85 sc)
- Work 5 sc around the post of the end dc.
- Rotate and work along the foundation chain: sc in each ch at the base of a dc and in each skipped ch. (85 sc)
- Work 5 sc around the turning-ch post.
- Join with sl st to first sc. (180 sc)
Fasten off, leaving a 30 in (76.2 cm) tail for sewing. Each cord should measure 21.25 x 0.75 in (54.0 x 1.9 cm). Steam the three cords lightly so they lie flat before you plait them.
Plaiting and Appliqué
Lay the background RS up with Row 1 at the bottom. Mark a line 0.25 in (0.6 cm) in from each long edge. The plait sits inside this 5.75 in (14.6 cm) wide channel.
- Lay the three cords side by side at the bottom, about 1 in (2.5 cm) above the lower edge. Call them Left, Center and Right.
- Plait loosely: cross Left over Center, then Right over the new Center. Repeat to the top. Each strand swings from one side of the channel to the other in a smooth S-curve.
- Space the crossings evenly, about one every 1.5 in (3.8 cm), which is every 4 background rows. You should have about 9 crossings in total.
- Keep every curve round. The outer edge of each loop should just touch the channel line.
- At each end, curve the outer strands inward toward the center strand. Tuck all three cord tips under the top strand so the plait closes in a rounded point. The tips should sit about 1 in (2.5 cm) from the background edge, in line with the center point of the border.
- Pin every 1 in (2.5 cm) and at every crossing.
Sewing:
- Using the gray tails, whipstitch the outer sc edges of each cord to the background.
- Sew into the sc rows of the background rather than the mesh holes, so the stitches stay hidden.
- At each crossing, sew only the top strand along its edges. The strand underneath stays held in place beneath it.
- Do not pull the stitches tight. The cords should stay raised and rounded.
Weave in all tails on the wrong side.
Border
Border gauge: 4 sc = 1 in (2.5 cm). Four rounds = 1 in (2.5 cm) of depth.
Each side count below includes that side’s 2 corner sc. The ch-2 corner spaces are not counted.
Rnd 1 (Color A): With RS facing, join A in the top right corner st.
- Corners: Work (sc, ch 2, sc) in each corner st.
- Short ends: Sc in each st. (23 sc between corners)
- Long sides: Work 2 sc in each mesh row end and 1 sc in each sc row end. Rows 2–40 give (20 mesh rows x 2) + (19 sc rows x 1) = 59 sc between corners.
Join with sl st to first sc and fasten off.
Count per side: short ends 1 + 23 + 1 = 25 sc; long sides 1 + 59 + 1 = 61 sc. Total: (2 x 25) + (2 x 61) = 172 sc.
Rnd 2 (Color B): Join B in any corner ch-2 sp. Work (sc, ch 2, sc) in each corner sp.
- Long sides: Sc in each st. (61 + 2 corner sc = 63 sc per side)
- Short ends (ripple): After the corner sc, work: sc in next 5 sts, sc3tog, sc in next 4 sts, 3 sc in next st (center), sc in next 4 sts, sc3tog, sc in next 5 sts. Then work the next corner sc. (1 + 5 + 1 + 4 + 3 + 4 + 1 + 5 + 1 = 25 sc per short end)
Join. Total: (2 x 25) + (2 x 63) = 176 sc.
Rnd 3 (Color B): Do not fasten off. Sl st into the corner ch-2 sp and repeat Rnd 2. Each sc3tog falls over the previous sc3tog, and each 3-sc group goes into the center st of the previous 3-sc group.
Long sides: 65 sc. Short ends: 25 sc. Total: (2 x 25) + (2 x 65) = 180 sc. Fasten off.
Rnd 4 (Color A): Join A in a corner sp and repeat Rnd 2 once more.
Long sides: 67 sc. Short ends: 25 sc. Total: (2 x 25) + (2 x 67) = 184 sc. Fasten off and weave in ends.
Why the math works:
- Long sides: Each round adds only the 2 corner sc, so each long side grows by 2 sc per round. That matches the extra length the corners gain and keeps the gauge at 4 sc per inch. Rnd 1 has 61 sc over 15.25 in (38.7 cm), which is exactly 4 sc per inch.
- Short ends: The two sc3tog remove 4 sts, while the center 3-sc group adds 2 and the corners add 2. The net change is 0, so each short end stays at 25 sc. This pushes the corners and center outward and pulls the valleys inward, which creates the three-point crown.
- Point depth: After 3 ripple rounds, the points stand about 0.5 in (1.3 cm) beyond the valleys.
Final Blocking
- Soak the panel in cool water for 10 minutes, or spray it until it is evenly damp.
- Press out the water in a towel. Do not wring.
- Lay the panel RS up on the blocking mat.
- Pin the four corners to a rectangle of 8.25 x 17.25 in (21.0 x 43.8 cm).
- Pin the two center points on the short ends, in line with the corners.
- Pin each valley 0.5 in (1.3 cm) inward from the line of the points.
- Smooth the long sides straight, pinning every 2 in (5.1 cm).
- Use your fingers to round the plait curves and lift the cords slightly. Do not pin through the cords.
- Let the panel dry completely before you unpin it.
Final Quality-Control Checklist
- The panel measures 8.25 x 17.25 in (21.0 x 43.8 cm).
- The background shows 20 even mesh rows with aligned eyelets.
- All three cords are the same length, with a clean line of eyelets down the center.
- The plait alternates over and under at every crossing.
- Crossings are evenly spaced, about 1.5 in (3.8 cm) apart.
- The cord tips are hidden at both ends.
- No sewing stitches show on the gray cords.
- Border counts are 172, 176, 180 and 184 sc.
- Each short end has three points and two matching valleys.
- The long sides lie flat, with no ripples or cupping.
- All ends are woven in securely.
Troubleshooting
The background is narrower at the top than the bottom. You may be skipping the turning ch-3 on sc rows. Always sc into the top of the turning ch.
The cords twist into a spiral. Rnd 2 is tighter on one side. Steam the cords flat before plaiting, and keep Rnd 2 relaxed.
The plait looks crowded at one end. Re-pin from the center outward and check the 1.5 in (3.8 cm) spacing between crossings.
The long border edges ruffle. You worked more than 2 sc in a mesh row end. Recount Rnd 1 to 61 sc per long side.
The long border edges pull in. Your sc tension is tight. Use a hook one size larger for the border only.
The points are flat. Check that each 3-sc group goes into the center st of the previous 3-sc group, and that each sc3tog sits centered over the previous valley.
The background puckers under the cords. Your appliqué stitches are too tight. Snip them and resew with looser, slightly longer stitches.
Care
Hand wash in cool water with mild soap and dry flat, reshaping the points while damp. Do not tumble dry, because heat can flatten the raised cords.
Final Notes
The Crimson Plait Panel depends on a short chain of measurements:
- Your swatch sets the gauge at 4 sts per inch.
- That gauge gives a background of 25 sts x 41 rows, or 6.25 x 15.25 in (15.9 x 38.7 cm).
- Three cords of 85 sts each make strands of 21.25 in (54.0 cm), long enough to plait the full length.
- Four border rounds add 1 in (2.5 cm) on every side.
The result is a finished panel of 8.25 x 17.25 in (21.0 x 43.8 cm), with a crown of three points at the top and bottom.
Check each number as you go. The plait will sit evenly, the border will lie flat and the points will match.
Happy crocheting!