

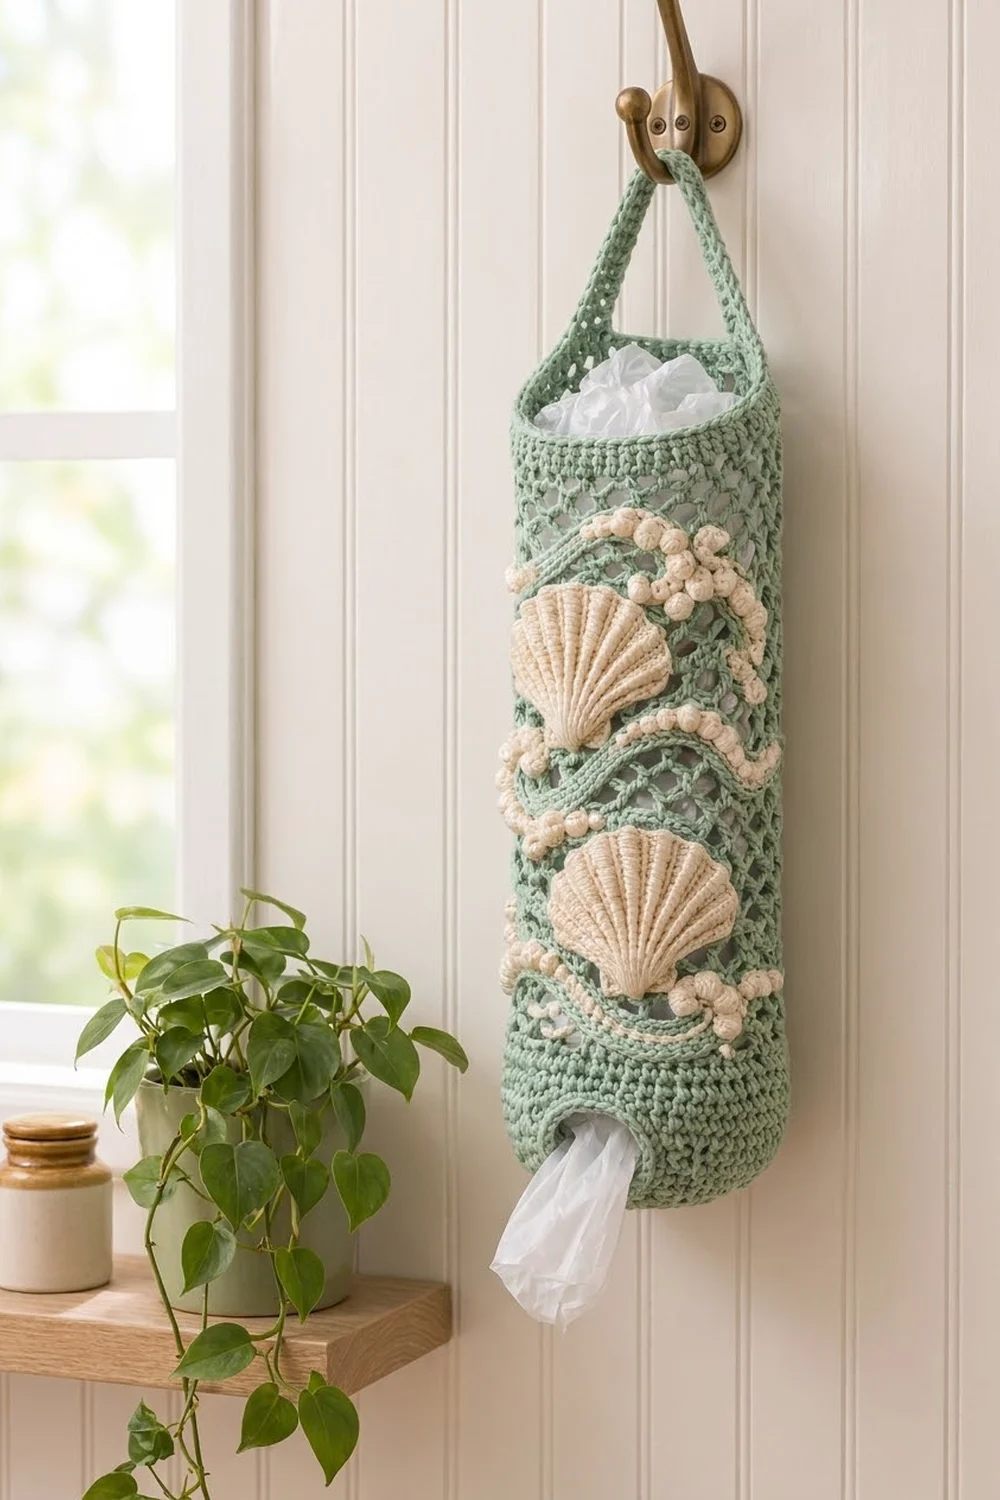
This bag holder brings a bit of the beach to your kitchen or laundry room. A sage green tube with an open diamond net holds a stash of plastic bags. You pull them out one at a time through a neat round hole in the base.
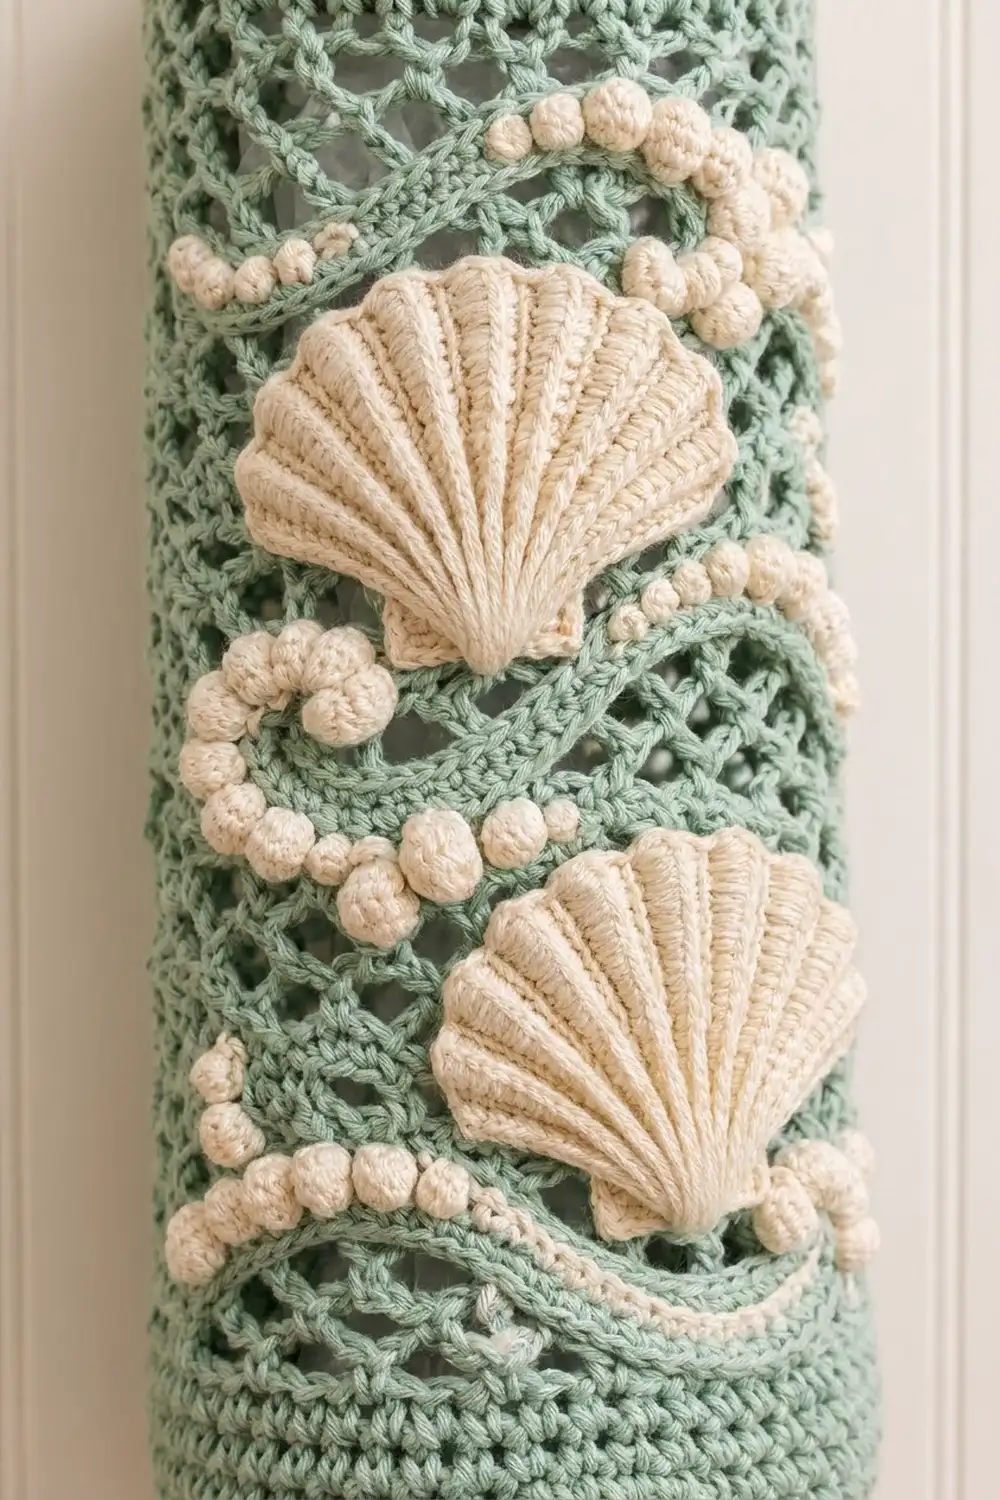
The front has two ribbed cream scallop shells, three curving wave strips and strands of bobble “pearls” that look like sea foam. Cream on sage looks soft and coastal, and the same pattern works in peach, dusty blue or any color you like.
The pattern uses US crochet terms. The finished holder is 7.7 in (19.6 cm) wide when flat and 17 in (43.2 cm) tall. The strap adds a hanging loop of about 3.5 in (8.9 cm), for a total hanging length of about 20.5 in (52.1 cm).
You start with the base, working outward from a chain ring. Then you work the sides up in solid rounds, a net section and a top band. The strap is worked in rows from the rim and joined to the opposite side. Last, you add the edging, then make the shells, waves and pearl strands and sew them on.
Finished Size and Construction
- Finished size: 7.7 in (19.6 cm) wide flat, 15.4 in (39.1 cm) around, 17 in (43.2 cm) tall
- Skill level: Intermediate
- Terminology: US
- Yarn weight: Worsted (#4) cotton
- Hook: US H-8 (5 mm)
- Number of pieces: 1 body worked in one piece, plus 8 small appliqués (2 shells, 3 wave strips, 3 pearl strands)
- Layout: Single tube; appliqués on the front face, between the strap ends
- Base: 2.2 in (5.6 cm) hole, 4.9 in (12.4 cm) outer diameter
- Size before border: 16.75 in (42.5 cm) tall
- Border depth: 0.25 in (0.6 cm), one round of sc
Materials
Use a smooth worsted cotton or cotton blend. Cotton holds its shape, and the shells and pearls show up crisply. Acrylic also works, but the net will stretch more when the holder is full.
- Sage green (main color): 170 g, about 290 m
- Cream (contrast color): 70 g, about 120 m
These amounts include a margin of about 15% for your gauge swatch and small differences in tension.
Tools:
– US H-8 (5 mm) crochet hook
– Locking stitch markers
– Tapestry needle
– Scissors
– Rust-proof pins
– Rolled towel or a cardboard tube, about 5 in (12.7 cm) across, for blocking and sewing
Abbreviations (US Terms)
- ch – chain
- sl st – slip stitch
- sc – single crochet
- hdc – half double crochet
- dc – double crochet
- FPdc / BPdc – front post / back post double crochet
- sp – space
- sk – skip
- st(s) – stitch(es)
- RS / WS – right side / wrong side
Bobble (5-dc bobble): Yarn over, insert hook in the stitch, yarn over and pull up a loop, yarn over and pull through 2 loops. Repeat from * to * 4 more times in the same stitch (6 loops on hook). Yarn over and pull through all 6 loops.
Note on rounds: Join each body round with a sl st to the first sc. The ch 1 at the start of a round does not count as a stitch.
Gauge and Checkpoints
Solid gauge: 14 sc and 16 rounds = 4 in (10.2 cm)
Net gauge: 8 net rounds = 5 in (12.7 cm)
Work the base (Rounds 1–6) first and treat it as your gauge test. Lay it flat and measure across.
- After Round 6: outer diameter 4.9 in (12.4 cm), hole 2.2 in (5.6 cm)
- After Round 13: sides 1.75 in (4.4 cm) tall, measured from the edge of the base
- After the net: 15.5 in (39.4 cm) from the base edge
- Before border: 16.75 in (42.5 cm)
- Finished: 17 in (43.2 cm)
If the base is more than 0.25 in (0.6 cm) too big, change to a smaller hook. If it is too small, change to a larger hook. Change hooks before you go further, because the base sets the stitch count for the whole tube.
Base
With sage, ch 24 and join with a sl st to the first ch to form a ring. Make sure the chain is not twisted.
Round 1: Ch 1, sc in each ch around; join. (24 sc)
Round 2: Ch 1, sc in next 3 sts, 2 sc in next st; repeat from * 6 times; join. (30 sc)
Round 3: Ch 1, sc in next 4 sts, 2 sc in next st; repeat 6 times; join. (36 sc)
Round 4: Ch 1, sc in next 5 sts, 2 sc in next st; repeat 6 times; join. (42 sc)
Round 5: Ch 1, sc in next 6 sts, 2 sc in next st; repeat 6 times; join. (48 sc)
Round 6: Ch 1, sc in next 7 sts, 2 sc in next st; repeat 6 times; join. (54 sc)
The base cups slightly. This is what gives the holder its rounded bottom.
Sides and Net
Rounds 7–13: Ch 1, sc in each st around; join. (54 sc in each round)
The sides now stand up from the base. Mark the join with a stitch marker. This seam line is the side of the holder, and one strap end will cover it later.
Net Round 1: Ch 1, sc in first st, ch 5, sk 2 sts, sc in next st; repeat from * 17 times. To close the round, ch 2, sk the last 2 sts, then dc in the first sc. (18 loops: 17 ch-5 loops plus the closing ch 2 and dc loop)
The ch 2 and dc together make the 18th loop and leave your hook at the center of that loop.
Net Rounds 2–22: Ch 1, sc around the post of the dc just made, ch 5, sc in next ch-5 sp; repeat 17 times. To close, ch 2 and dc in the first sc. (18 loops in each round)
After Net Round 22, the net is 13.75 in (34.9 cm) tall. The total height from the base edge is 15.5 in (39.4 cm).
Top Band
Top Round 1 (conversion): Ch 1, work 3 sc in the closing loop (working around the dc post), then 3 sc in each of the next 17 ch-5 sps; join. (18 loops × 3 sc = 54 sc)
Every stitch in this round goes into a loop, so the round adds 54 new stitches. The total matches the solid band below, so the tube stays straight.
Top Rounds 2–5: Ch 1, sc in each st around; join. (54 sc in each round)
The top band is 1.25 in (3.2 cm) tall. The body measures 16.75 in (42.5 cm). Do not fasten off.
Strap
Number the top stitches 1 to 54, starting at the join. The strap sits on sts 1–7, and its other end attaches to sts 28–34. That leaves 20 free stitches (sts 8–27 and sts 35–54) on each side of the rim.
Row 1: Ch 1, sc in the same st as the join and in the next 6 sts. Turn. (7 sc)
Rows 2–40: Ch 1, sc in each st across. Turn. (7 sc in each row)
The strap is now 10 in (25.4 cm) long and 2 in (5.1 cm) wide.
Attach the strap: Bring Row 40 over to sts 28–34 with the RS facing out, and check that the strap is not twisted. Hold Row 40 against the inside of the rim. Work 7 sl sts through both layers, one through each pair of matching stitches. Fasten off and weave in the tail.
Border
Border gauge: Work 1 sc in each top stitch of the rim and 1 sc in the end of each strap row.
The strap and rim now form two openings, one on each side of the strap.
Border Round A: Join sage at st 8. Sc in sts 8–27 (20 sc). Then work 1 sc in the end of each strap row up one edge (40 sc); join. (60 sc: 20 + 40)
Border Round B: Join sage at st 35. Sc in sts 35–54 (20 sc). Then work 1 sc in the end of each strap row up the other strap edge (40 sc); join. (60 sc: 20 + 40)
Border Round C (hole): Join sage in the free loops of the foundation chain. Sc in each of the 24 loops around; join. (24 sc)
Why the math works: Each rim side has exactly 20 unused stitches, because 54 − 7 − 7 = 40, split into two sides of 20. Each strap edge has 40 rows, so it gets 40 sc. The edging round adds 0.25 in (0.6 cm) of height, which brings the body from 16.75 in (42.5 cm) to 17 in (43.2 cm). It also widens the strap to about 2.5 in (6.4 cm). Round C matches the 24 foundation chains one for one, which gives the hole a firm lip without making it smaller.
Shell Appliqué (Make 2)
Use cream.
Row 1 (RS): Make a magic ring, ch 2 (does not count), work 7 dc in the ring. Pull the ring closed. Turn. (7 sts)
Row 2 (WS): Ch 2. For each of the first 6 sts, work BPdc around the st, then dc in the top of the same st. Work BPdc around the last st. Turn. (13 sts: 7 BPdc ribs + 6 dc)
Row 3 (RS): Ch 2, FPdc around the first rib, 2 dc in next dc, FPdc around next rib; repeat 6 times. Turn. (19 sts: 7 ribs + 12 dc)
Row 4 (WS): Ch 2, BPdc around the first rib, dc in next st, 2 dc in next st, BPdc around next rib; repeat 6 times. Turn. (25 sts: 7 ribs + 18 dc)
Row 5 (RS, scallop edge): Ch 1, sc in the top of the first rib, hdc in next st, 3 dc in next st, hdc in next st, sc in the top of next rib; repeat 6 times. (37 sts with 6 scallops)
The post stitches worked from the WS stand up on the RS, so the 7 ribs fan out from the ring to the edge.
Hinge Row 1: Turn the shell so you are working along the straight bottom edge. Ch 1. Work 2 sc in the end of each of Rows 4, 3, 2 and 1, then 2 sc in the end of each of Rows 1, 2, 3 and 4 on the other side. Turn. (16 sc)
Hinge Row 2: Ch 1, sc in next 5 sts, sl st in next 6 sts, sc in last 5 sts. (16 sts)
The sl sts in the middle make a dip, and the sc on each side make the two small ears. Fasten off and leave a 12 in (30.5 cm) tail for sewing. Each shell is about 4.5 in (11.4 cm) wide and 3 in (7.6 cm) tall.
Wave Strips (Make 3)
Use cream.
Ch 31.
Row 1: Sc in the 2nd ch from the hook and in each ch across. Turn. (30 sc)
Row 2: Ch 1, sc in each st across. (30 sc)
Fasten off and leave a long tail. Each strip is 8.6 in (21.8 cm) long and 0.5 in (1.3 cm) wide.
Pearl Strands (Make 3)
Use cream.
Ch 3, bobble in the 3rd ch from the hook. Ch 3, bobble in the 3rd ch from the hook; repeat from * to * 13 more times. (14 pearls)
Fasten off. Each pearl is about 0.4 in (1.0 cm) across, and each strand is about 7 in (17.8 cm) long.
Attach the Appliqués
Slide a rolled towel inside the tube so you only sew through the front layer. The front is the face between the strap ends, centered on st 17 or 18. All heights below are measured up from the edge of the base.
- Lower wave: Pin one strip in a gentle S-curve at about 3 in (7.6 cm). Curl one end into a small spiral.
- Lower shell: Center it at about 6.5 in (16.5 cm), tilted slightly to the right, with the hinge pointing down.
- Middle wave: Pin it at about 9 in (22.9 cm), sweeping between the shells.
- Upper shell: Center it at about 11.5 in (29.2 cm), tilted slightly to the left.
- Upper wave: Pin it at about 14 in (35.6 cm), just below the top band.
- Pearls: Lay one pearl strand along the upper edge of each wave. Let the extra pearls trail into the curls.
Whipstitch around the edges, catching the bars of the net. Tack each pearl down with one stitch through its base. Keep the stitches snug but not tight, so the net does not pucker.
Final Blocking
- Wet the holder lightly or mist it until it is evenly damp.
- Slide the rolled towel or cardboard tube inside, about 5 in (12.7 cm) across.
- Press the net into even diamonds with your fingers.
- Shape each shell so the ribs radiate evenly and the scallops lie flat.
- Gently stretch the strap to 10 in (25.4 cm) and lay it flat.
- Leave to dry completely, then check that the body is 17 in (43.2 cm) tall.
Final Quality-Control Checklist
- [ ] The base has 54 sc and lies cupped, not rippled
- [ ] The sides, rounds 7–13, have 54 sc in each round
- [ ] Every net round has 18 loops
- [ ] Top Round 1 has 54 sc
- [ ] The strap is 7 sc × 40 rows and is not twisted
- [ ] Each strap end sits directly opposite the other
- [ ] Border Rounds A and B have 60 sc each, and Round C has 24 sc
- [ ] Both shells have 7 ribs and 6 scallops
- [ ] The appliqués are sewn through the front layer only
- [ ] The finished height is 17 in (43.2 cm)
Troubleshooting
The base ruffles: Your tension is loose. Go down a hook size, or work the increases a little more tightly.
The base forms a deep bowl: Check that you made 6 increases in every round. Make sure you didn’t skip one.
The net slants or spirals: Always put the first sc around the post of the closing dc, then count 18 loops.
The tube flares above the net: Check Top Round 1. It must have exactly 3 sc in each loop.
The ribs don’t stand out on the shell: Work the post stitches from the side the pattern says, BPdc on WS rows and FPdc on RS rows.
The strap twists: Undo the sl st join, lay the strap flat and join again.
The net puckers under an appliqué: Remove the tight stitches and sew again with looser tension.
Care
Hand wash in cool water, press out the excess water in a towel and dry flat over a rolled towel to keep the round shape. Do not tumble dry, because heat can flatten the bobble pearls.
Final Notes
Everything is built on one chain of measurements. A 54-stitch base sets a tube 15.4 in (39.1 cm) around. That count becomes 18 net loops and then returns to 54 sc at 3 sc per loop. The solid band, net and top band reach 16.75 in (42.5 cm), and the border brings the body to 17 in (43.2 cm). Check your gauge on the base and count the stitches at every checkpoint, and the shells and waves will sit exactly where they should.
Happy crocheting!