

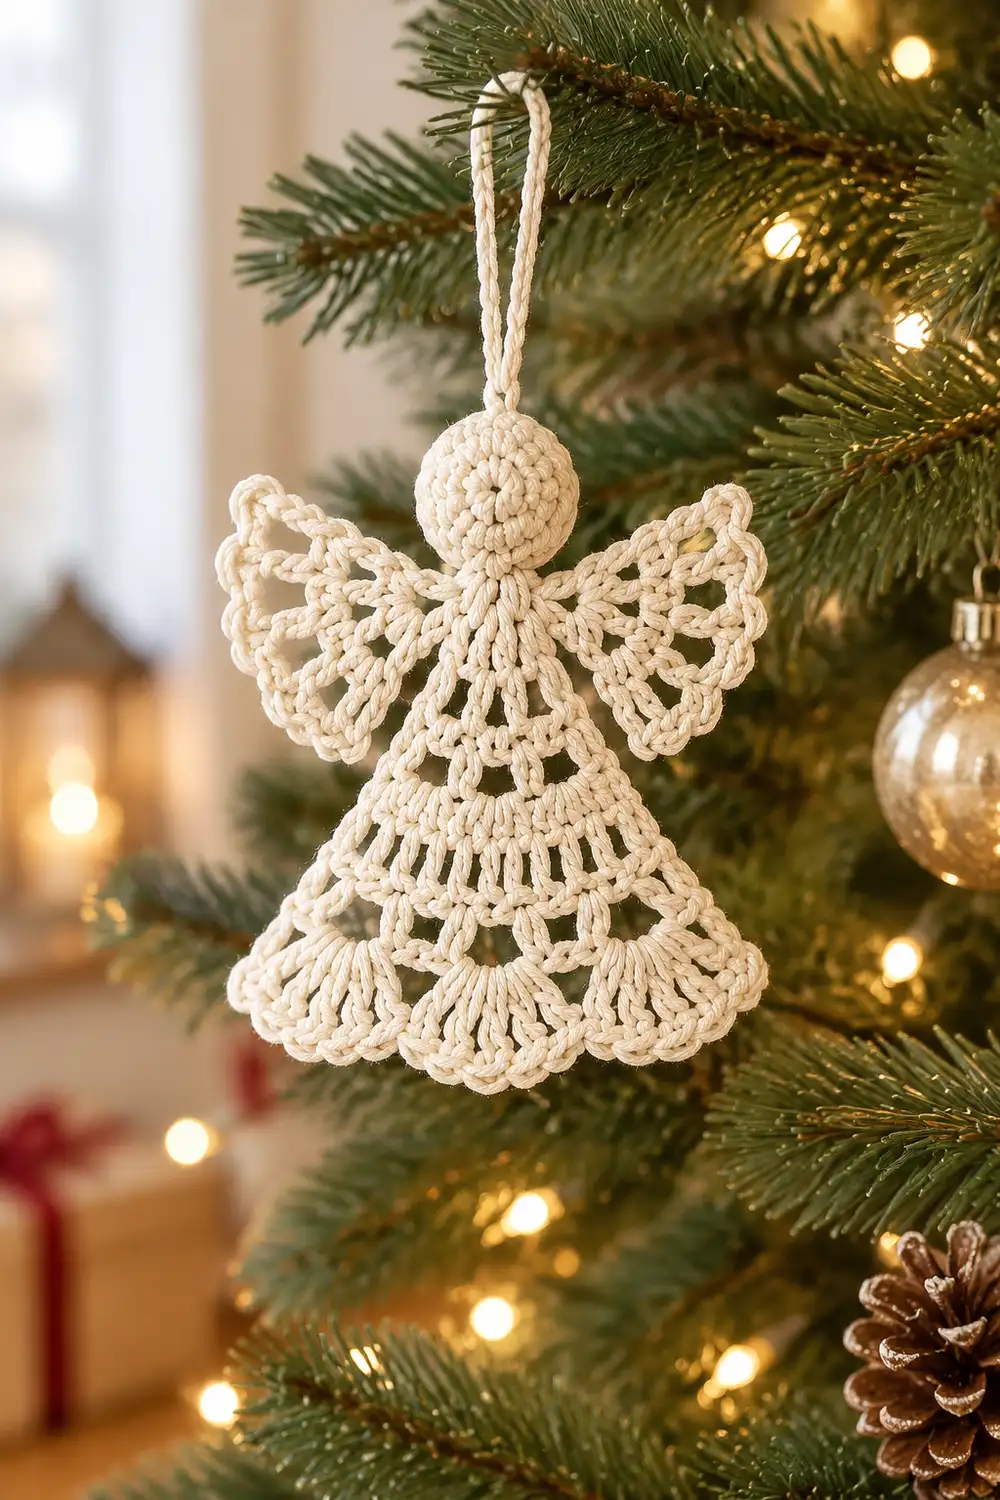
This little angel is made of airy cream lace. She has a round, softly stuffed head, two fan-shaped wings edged with picot shells, and a bell-shaped openwork skirt that ends in a scalloped shell hem. A twisted cream loop at the top lets her hang from a tree branch, a window latch, or a gift.
The natural off-white cotton suits a classic, heirloom Christmas style. The open stitches let light and tree lights show through, so a cluster of angels looks delicate rather than heavy.
The pattern uses US crochet terms. The finished angel measures about 3.25 in (8.3 cm) tall from the top of the head to the hem, without the loop. The wingspan is 3.25 in (8.3 cm) and the hem is 3 in (7.6 cm) wide.
She is made as one integrated piece, with no sewing. You crochet the spherical head in the round and continue straight into the neck and skirt rows. You then work the wings directly onto the sides of the yoke and finish with the scalloped hem. The twisted loop is anchored inside the head before you close it.
Finished Size and Construction
- Finished size: 3.25 in (8.3 cm) tall, excluding loop; wingspan 3.25 in (8.3 cm); hem 3 in (7.6 cm) wide
- Hanging loop: extends 1.5 in (3.8 cm) above the head
- Skill level: Intermediate (small scale, working into posts and spaces)
- Terminology: US crochet terms
- Yarn weight: Fine / sport (#2) cotton
- Hook: 2.5 mm (US B/1–C/2, depending on brand)
- Number of pieces: 1 (wings and hem are worked onto the body; no sewing)
- Layout: single ornament; no assembly layout
- Piece size: 3.25 × 3.25 in (8.3 × 8.3 cm)
- Size before border (hem scallops): 3 in (7.6 cm) tall; skirt 2.75 in (7.0 cm) wide at Row 6
- Border depth: 0.25 in (0.6 cm)
Materials
Yarn: Choose a soft, matte, sport-weight cotton or cotton blend in natural cream. Mercerized cotton also works, but it shows less of the cozy, rope-like texture seen in the photo. Avoid splitty yarns, because you will work into small spaces and around posts.
- Cream: 8 g (about 24 m). This covers the head, skirt, wings, hem, twisted loop, and the yarn scraps used to stuff the head.
All quantities include a safety margin of about 30% over what one angel uses.
Tools:
- 2.5 mm crochet hook
- Tapestry needle
- 2 locking stitch markers
- Small scissors
- Rustproof pins and a foam blocking board
- Spray bottle with water
- Optional: spray starch or fabric stiffener for crisper wings
Abbreviations (US Terms)
- ch – chain
- sl st – slip stitch
- sc – single crochet
- dc – double crochet
- sc2tog – single crochet 2 together
- MR – magic ring
- st(s) – stitch(es)
- sp(s) – space(s)
- RS – right side
Special stitches
- V-st: (dc, ch 1, dc) in the same stitch or space.
- Picot: ch 3, then sl st in the 3rd ch from the hook.
- Picot shell: (2 dc, picot, 2 dc) in the same space.
- Fan: 5 dc in the same space.
Gauge and Checkpoints
Gauge:
- 7 sc and 8 sc rounds = 1 in (2.5 cm)
- 3 dc rows = 1 in (2.5 cm)
Exact gauge matters more here than in most projects, because small differences add up across a tiny piece.
Test one piece first. Crochet the head (Rounds 1–7) before anything else and measure it. It is a quick, built-in swatch.
Checkpoints:
- Head after Round 7: about 7/8 in (2.2 cm) across, firm and round
- Skirt after Row 2: 1.25 in (3.2 cm) wide
- Skirt after Row 4: 2.25 in (5.7 cm) wide
- Skirt after Row 6: 2.75 in (7.0 cm) wide; 3 in (7.6 cm) from head top to Row 6
- Wing after Row W2: about 0.75 in (1.9 cm) long, measured outward from the body
- Finished angel: 3.25 in (8.3 cm) tall and 3.25 in (8.3 cm) wide across the wings
If your piece is too big: go down 0.25 mm in hook size and remake the head.
If it is too small: go up 0.25 mm.
Tolerance: If you are within 1/8 in (0.3 cm) at each checkpoint, keep going. Blocking will even it out.
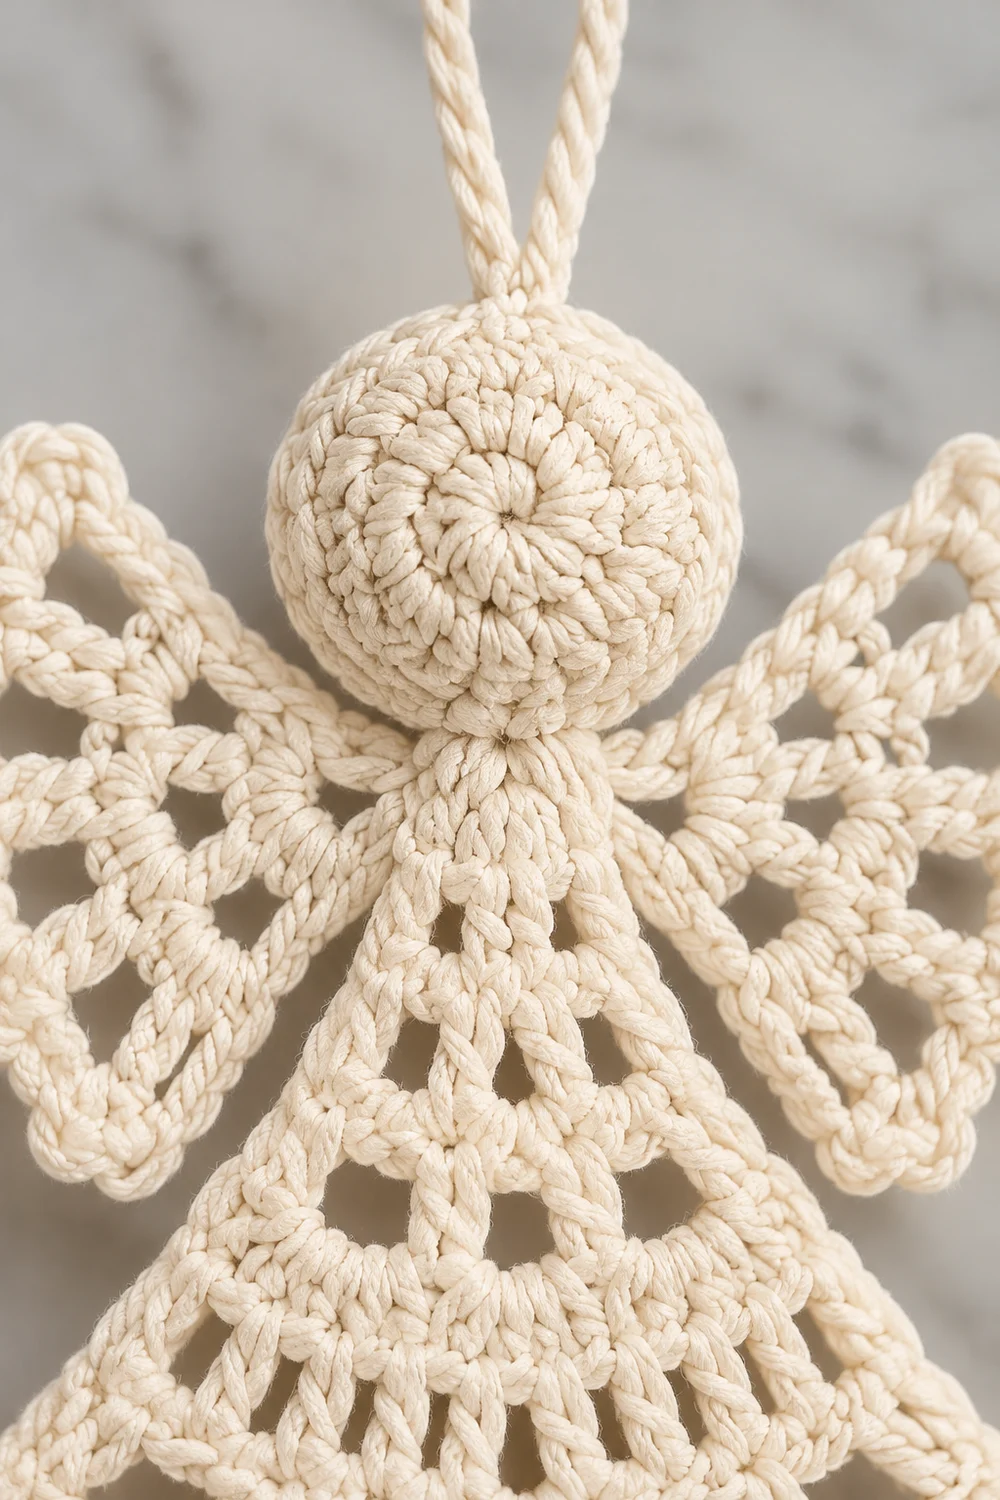
Twisted Hanging Loop (Make First)
- Cut a 16 in (40.6 cm) strand of cream yarn.
- Anchor one end and twist the strand in its natural direction until it kinks back on itself.
- Fold the strand in half and let the two halves twist together. You now have a twisted cord about 7 in (17.8 cm) long.
- Knot each end so the cord cannot unwind.
- Set the cord aside. You will attach it inside the head after Round 5.
Head (Spherical, Worked in the Round)
Work in a continuous spiral. Place a marker in the first stitch of each round and move it up as you go.
- Rnd 1: Make a MR, then work 6 sc into the ring. Pull the ring tight. (6 sc)
- Rnd 2: 2 sc in each st around. (12 sc)
- Rnd 3: [sc in next st, 2 sc in next st] 6 times. (18 sc)
- Rnds 4–5: sc in each st around. (18 sc)
Attach the loop:
- Fold the twisted cord in half. The fold becomes the top of the hanging loop.
- With the tapestry needle, push both cord ends from the outside through the center of the magic ring into the head.
- Adjust the cord so 1.5 in (3.8 cm) of loop shows above the head.
- Tie the two ends together inside the head in a double knot that is larger than the ring hole.
- Trim the tails to 0.5 in (1.3 cm).
Shape the bottom of the head:
- Rnd 6: [sc in next st, sc2tog] 6 times. (12 sc) Stuff the head firmly with cream yarn scraps, packing them around the knot.
- Rnd 7: sc2tog 6 times. (6 sc) Add a little more stuffing if needed so the head is a smooth sphere.
Checkpoint: The head should be 7/8 in (2.2 cm) across and should not flatten when pressed lightly.
Neck and Yoke
- Rnd 8 (neck): sc in each st around. (6 sc) Sl st in the next st.
Now switch from rounds to flat rows. Flatten the neck so 3 stitches lie in front and 3 behind. In Row 1, insert the hook through one front stitch and the back stitch directly behind it, and treat each pair as one stitch. This closes the neck and turns the round into a flat, 3-stitch base.
- Skirt Row 1 (yoke): ch 3 (counts as dc), dc in the same pair, 2 dc in each of the next 2 pairs. Turn. (6 dc)
The yoke is about 7/8 in (2.2 cm) wide.
Skirt (Openwork Bell)
The turning chains count as stitches throughout. Work the last stitch of each row into the top of the previous row’s turning chain.
- Row 2: ch 3 (counts as dc), 2 dc in next st, [dc in next st, 2 dc in next st] 2 times. Turn. (9 dc)
- Check: 1 + 2 + 1 + 2 + 1 + 2 = 9.
-
Width: 1.25 in (3.2 cm).
-
Row 3 (first lace row): ch 4 (counts as dc + ch 1), [dc in next st, ch 1] 7 times, dc in last st. Turn. (9 dc, 8 ch-1 sps)
-
Check: dc count is 1 + 7 + 1 = 9; ch-1 spaces are 1 + 7 = 8.
-
Row 4 (solid): ch 3 (counts as dc), [dc in next ch-1 sp, dc in next dc] 8 times. Turn. (17 dc)
- Check: 1 + (8 × 2) = 17. The last dc goes into the 3rd ch of the ch-4.
-
Width: 2.25 in (5.7 cm).
-
Row 5 (V-st lace): ch 4 (counts as dc + ch 1), dc in the first st (this makes the first V-st), [skip next st, V-st in next st] 8 times. Turn. (9 V-sts)
-
Check: V-sts land on stitches 1, 3, 5 … 17, so 1 + (2 × 8) = 17. The last V-st falls in the top of the turning chain.
-
Row 6 (pairs): sl st into the first V-sp, ch 3 (counts as dc), dc in the same sp, [ch 1, 2 dc in next V-sp] 8 times. (18 dc in 9 pairs, 8 ch-1 sps)
- Width: 2.75 in (7.0 cm).
- Height: 3 in (7.6 cm) from the head top.
Do not fasten off. Pull up a long loop and secure it with a locking marker. You will return to this loop for the hem.
Wings (Worked onto the Yoke)
Make two wings, one on each side edge of Skirt Row 1. Use a separate length of yarn about 3 yd (2.7 m) long for each wing.
-
Row W1: With RS facing, join yarn with a sl st around the post of the end dc of Skirt Row 1. ch 3 (counts as dc), work 5 dc around the same post. Turn. (6 dc)
-
Row W2: ch 4 (counts as dc + ch 1), dc in the same st, [V-st in next dc] 5 times. Turn. (6 V-sts = 12 dc, 6 V-sps)
-
The wing should now be about 0.75 in (1.9 cm) long.
-
Row W3 (picot shells): ch 1, sc in the first dc, [picot shell in next V-sp, sc in the sp between V-sts] 5 times, picot shell in the last V-sp, sc in the top of the turning ch. (6 picot shells = 24 dc and 6 picots, plus 7 sc)
- Check: 6 V-spaces give 6 shells. The 5 gaps between V-sts plus the 2 ends give 7 sc.
Fasten off. Repeat on the opposite edge of Row 1, joining around the post of that edge’s end dc.
Each finished wing is a fan about 1.125 in (2.9 cm) long and 1.5 in (3.8 cm) tall along its picot edge. Wingspan: 7/8 in (2.2 cm) yoke + 2 × 1.125 in (2.9 cm) wings, plus the picots, gives 3.25 in (8.3 cm).
Border: Scalloped Shell Hem
Border gauge: One fan plus its anchoring sc makes a scallop about 0.375 in (1.0 cm) wide and 0.25 in (0.6 cm) deep.
The hem is the only bordered edge. It runs along the bottom of the skirt only; the side edges of the skirt are left plain, because the fans already finish them.
Remove the marker, put the live loop back on your hook, and turn.
- Row 7 (hem): ch 1, sc in the first dc, [fan in next ch-1 sp, sc in the sp between the 2 dc of the next pair] 7 times, fan in the last ch-1 sp, sc in the top of the beginning ch-3. (8 fans = 40 dc, plus 9 sc)
Fasten off.
Why the math works:
- Row 6 has 9 pairs separated by 8 ch-1 spaces. Each space holds one fan, so you get 8 fans.
- Each fan is anchored by an sc. Seven sc sit between pairs 2–8, and one sc sits at each end, for 7 + 2 = 9 sc.
- Because 8 is even, the center of the hem falls on the sc in pair 5. The scallops are mirror-symmetric around the angel’s center line.
- 8 scallops × 0.375 in (1.0 cm) = 3 in (7.6 cm). The hem flares slightly past the 2.75 in (7.0 cm) width of Row 6, which gives the bell shape.
- The finished height is 3 in (7.6 cm) + 0.25 in (0.6 cm) = 3.25 in (8.3 cm).
Weave in all ends along the solid dc rows (Rows 1, 2, and 4), where they will not show through the lace.
Final Blocking
- Lightly mist the whole angel with water until it is damp, not soaked.
- Lay her face up on the blocking board.
- Pin the hem first. Place one pin in the center of each of the 8 fans, so the hem measures 3 in (7.6 cm) across.
- Pin each wing open into a fan shape. Place a pin in each of the 6 picots, so the wingspan measures 3.25 in (8.3 cm).
- Open up the lace holes in Rows 3 and 5 with a fingertip or a pin.
- Do not pin through or flatten the head. Gently roll it between your fingers to keep it round.
- Optional: spray the wings and skirt with starch for a crisper finish.
- Let the angel dry completely, usually 6–12 hours, before unpinning.
Final Quality-Control Checklist
- Head is round and firm, about 7/8 in (2.2 cm) across, with no stuffing showing.
- Loop is twisted, centered, and sits 1.5 in (3.8 cm) above the head.
- Loop knot is secure inside the head; a gentle tug does not move it.
- Row 3 has 9 dc and 8 holes; Row 5 has 9 V-sts.
- Each wing has 6 picot shells and both wings are the same size.
- Hem has 8 even fans, centered on the middle pair.
- Finished angel is 3.25 in (8.3 cm) tall and 3.25 in (8.3 cm) wide.
- All ends are woven into solid rows and trimmed close.
Troubleshooting
The head is lumpy or pointed. Add more stuffing before Rnd 7 and roll the head between your palms. Using yarn scraps instead of fiberfill keeps the color even.
Row 1 turned into a tube. You worked into only the front stitches. Flatten the neck and work through both layers, 3 pairs in total.
The skirt cups or curls. Your dc rows are too tight. Go up 0.25 mm in hook size, or block more firmly.
The skirt ruffles. Check Rows 4 and 5 for extra stitches. You should have exactly 17 dc and 9 V-sts.
The hem is lopsided. Count the fans. There must be 8, with the center sc in pair 5.
The wings droop. Re-block them and apply starch.
The wings are uneven. Make sure both wings are joined around the post of Row 1’s end dc, not Row 2’s.
The loop untwists. Re-knot the cord ends tightly before attaching the loop.
Care
Hand wash in cool water with mild soap, press out the water in a towel, and re-pin the angel to dry flat. Store her in a box away from crushing weight, so the head stays round.
Final Notes
The measurement chain is short and easy to check as you go:
- Spherical head, 7/8 in (2.2 cm) across
- Yoke, 7/8 in (2.2 cm) wide
- Row 2, 1.25 in (3.2 cm) wide
- Row 4, 2.25 in (5.7 cm) wide
- Row 6, 2.75 in (7.0 cm) wide and 3 in (7.6 cm) tall
- Eight 0.375 in (1.0 cm) fans, bringing the hem to 3 in (7.6 cm) and the height to 3.25 in (8.3 cm)
- Two 1.125 in (2.9 cm) picot wings, completing a 3.25 in (8.3 cm) wingspan
- Twisted loop, 1.5 in (3.8 cm) above the head
Optional: crochet several angels for a matching set of tree ornaments.
Happy crocheting!