

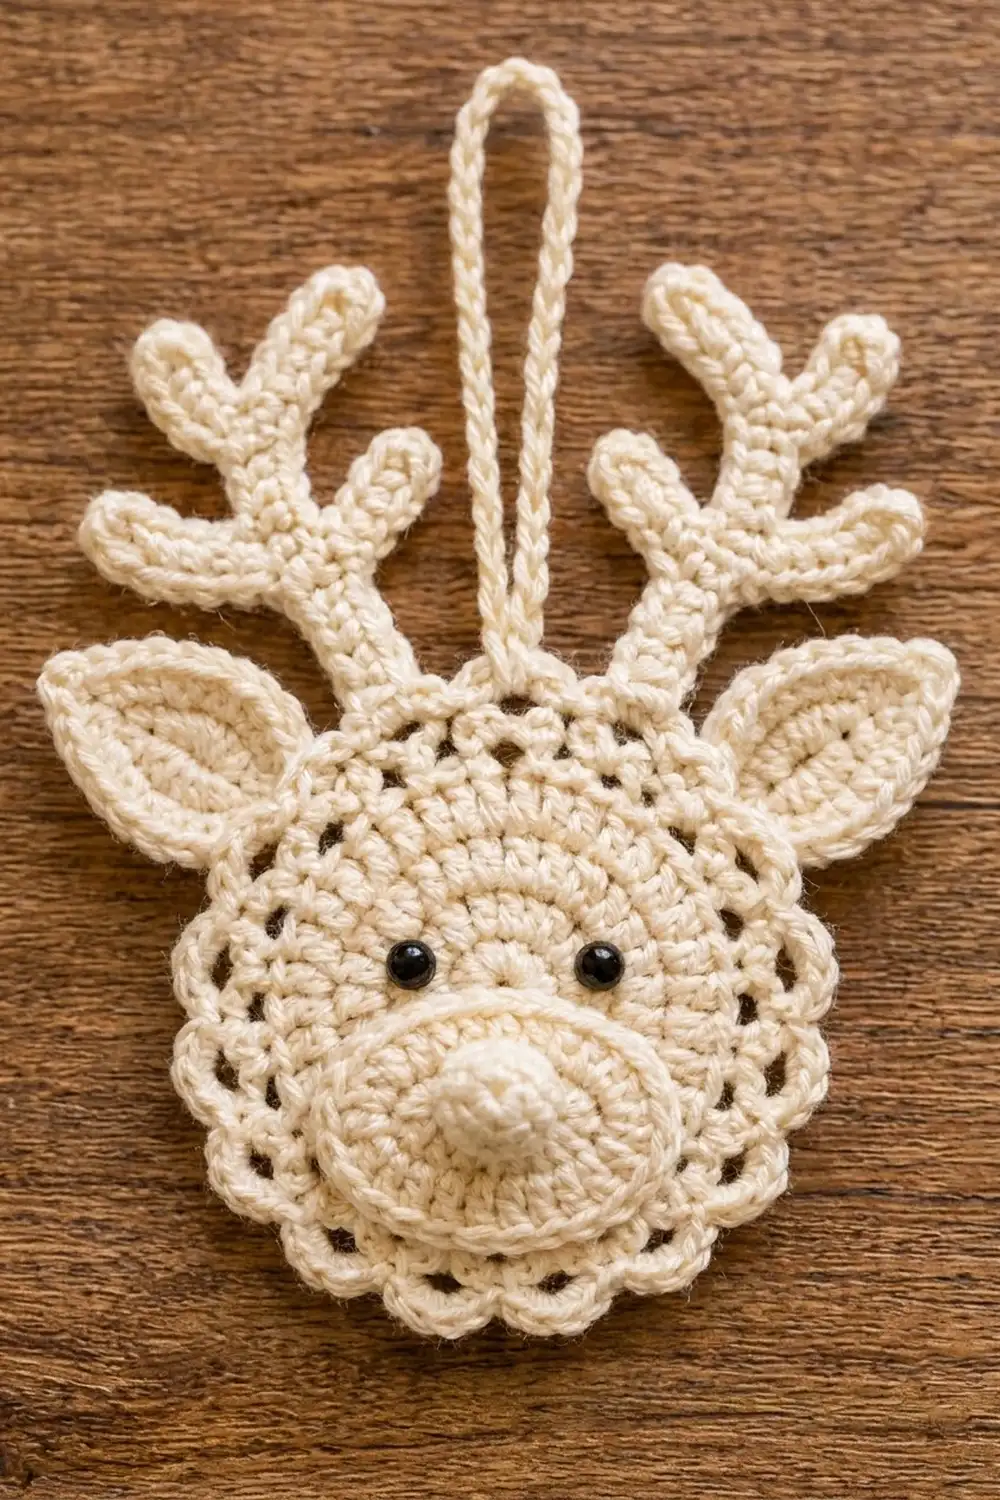
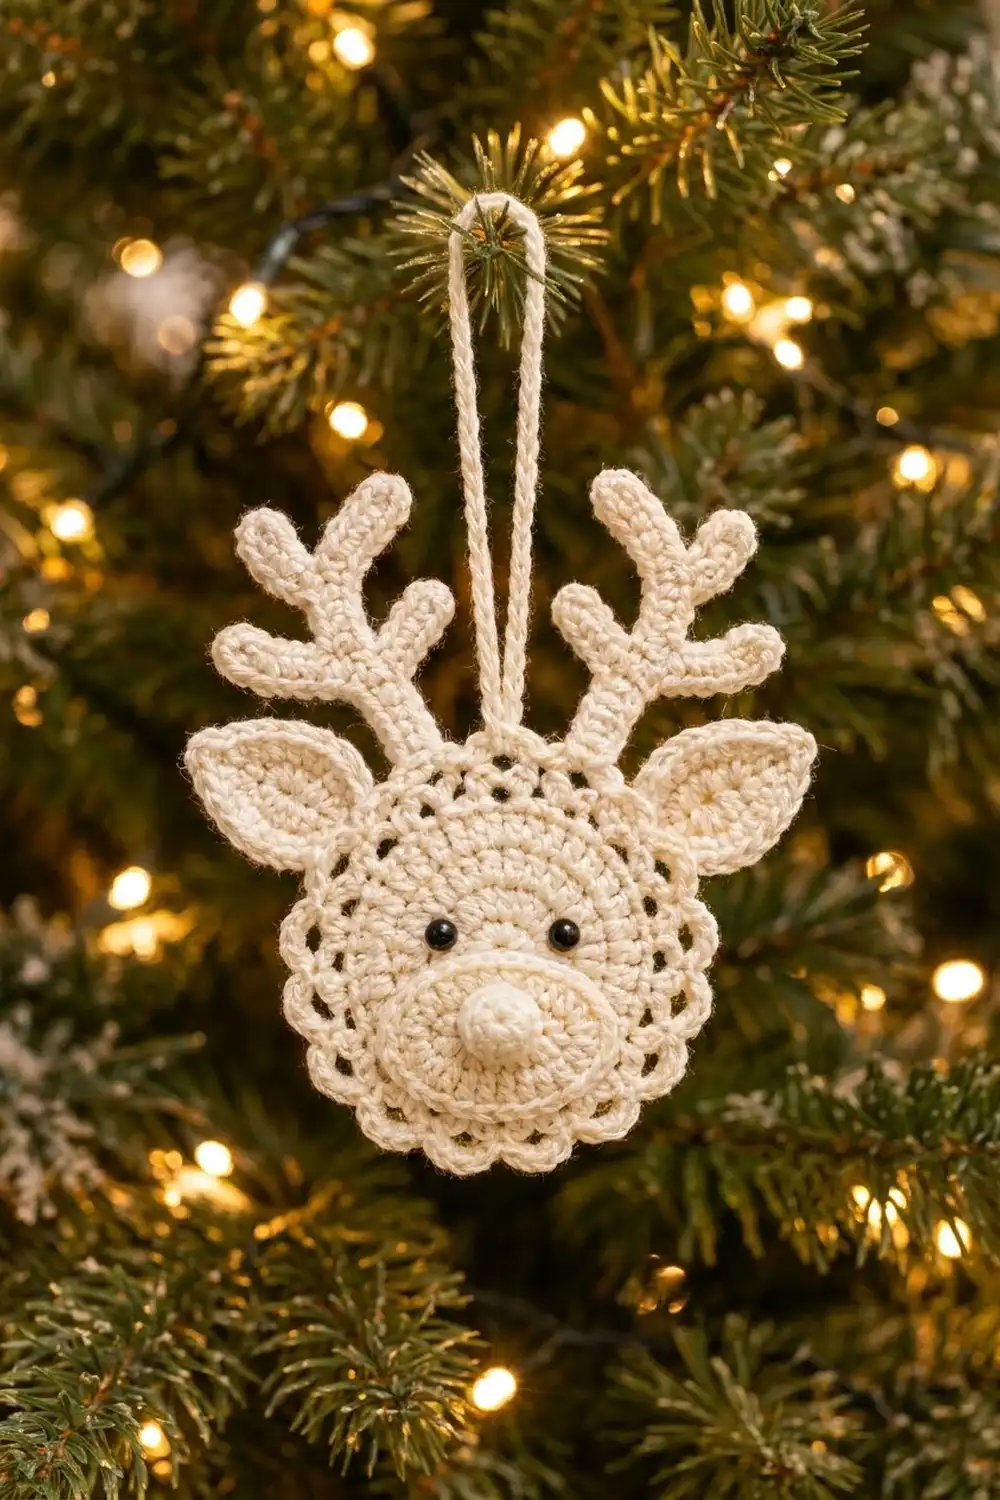
The Snowberry Reindeer is a small, lacy holiday ornament crocheted entirely in soft cream cotton. Its base is a round face with a solid center and a scalloped, openwork edge. On top of the face go a raised oval muzzle, a small bobble nose, two pointed leaf ears and a pair of branched antlers. Two tiny black eyes and a long chain loop finish it.
The style is quiet and Scandinavian: one color, lots of texture, and a doily-style edge that catches the tree lights. It works well on a natural or all-white tree, as a gift topper, or tied to a wreath.
This pattern uses US crochet terms. The finished ornament is about 5.5 in (14.0 cm) wide across the ears and 5 in (12.7 cm) tall from chin to antler tips, plus a 2.5 in (6.4 cm) hanging loop. The face alone is 3.6 in (9.1 cm) across.
Construction is simple. You crochet the face in rounds and add two lace border rounds. Then you make the muzzle, nose, ears and antlers as separate appliqué parts and sew them all onto the face, so you end up with one ornament.
Finished Size and Construction
- Finished size: 5.5 in (14.0 cm) wide x 5 in (12.7 cm) tall, plus a 2.5 in (6.4 cm) loop
- Skill level: Advanced beginner
- Terminology: US crochet terms
- Yarn weight: DK (#3 light) cotton or cotton blend
- Hook: 3.5 mm (E-4)
- Number of pieces: 1 finished ornament, assembled from 1 face, 1 muzzle, 1 nose, 2 ears, 2 antlers and 1 loop
- Layout: muzzle and nose on the lower face; ears and antlers stitched behind the upper edge
- Face size: 3.6 in (9.1 cm) diameter
- Size before border: 2.6 in (6.6 cm) diameter after Round 3
- Border depth: 0.5 in (1.3 cm) all around (Rounds 4 and 5)
Materials
Choose a smooth combed or mercerized cotton in DK weight. Cotton gives crisp stitch definition and keeps the scallops and antler tines sharp. Avoid fuzzy or very splitty yarn, because the lace edge will lose its shape.
- Cream (main color): 25 g, about 58 m (63 yd)
- Black (optional, for embroidered eyes): 1 g, about 1 m (1.1 yd)
These quantities include a comfortable margin for a test face and sewing tails. One ornament actually uses about 20 g of cream.
Tools:
- 3.5 mm (E-4) crochet hook
- Tapestry needle
- 2 black beads or shank buttons, 6 mm (or black yarn for French knots)
- Sewing needle and black thread
- A pinch of fiberfill or cream yarn scraps for the nose
- Stitch markers
- Scissors, ruler, rustproof pins, spray bottle and a blocking mat
Abbreviations (US Terms)
- ch: chain
- sl st: slip stitch
- sc: single crochet
- hdc: half double crochet
- dc: double crochet
- sc2tog: single crochet 2 together
- sp: space
- st(s): stitch(es)
- MR: magic ring
- rep: repeat
Special stitch: Scallop. Work 5 dc into the same ch-1 space.
Gauge and Checkpoints
Make the face first and measure it before you crochet any other part. All the appliqué sizes are designed around a 3.6 in (9.1 cm) face, so the face is your test piece.
Gauge: 11 sc = 2 in (5.1 cm) in a row. Rounds 1–3 of the face = 2.6 in (6.6 cm) in diameter.
Checkpoints:
- After Round 1: 1 in (2.5 cm)
- After Round 2: 1.8 in (4.6 cm)
- After Round 3: 2.6 in (6.6 cm)
- After Round 4: 3.1 in (7.9 cm)
- After Round 5: 3.6 in (9.1 cm)
- Muzzle: 2 x 1.25 in (5.1 x 3.2 cm)
- Ear: 1.75 in (4.4 cm) long
- Antler beam: 2 in (5.1 cm) long
If your face is too big (more than 0.1 in / 0.3 cm over at Round 3), switch to a 3.25 mm hook. If it is too small, switch to a 3.75 mm hook. Use the same hook for every part so the proportions stay right.
Face Center
Work in joined rounds with the right side facing you. The beginning ch 2 does not count as a stitch.
Round 1: Make a MR. Ch 2 and work 12 dc into the ring. Pull the ring closed. Sl st to the first dc. (12 dc)
Round 2: Ch 2, then work 2 dc in each st around. Sl st to the first dc. (24 dc)
Round 3: Ch 2, dc in next st, 2 dc in next st; rep from * 11 more times. Sl st to the first dc. (36 dc)*
Measure now. The disc should be 2.6 in (6.6 cm) across and lie completely flat. Don’t fasten off; go straight on to the border below.
Muzzle
The muzzle is a flat oval worked around both sides of a foundation chain.
Ch 7.
Round 1: Sc in 2nd ch from hook and in the next 4 ch, then 3 sc in the last ch. Working along the other side of the chain, sc in the next 4 ch, then 2 sc in the same ch as the first sc. Sl st to the first sc. (14 sc)
Round 2: Ch 1. Work 2 sc in the first st, sc in the next 4 sts, 2 sc in each of the next 3 sts, sc in the next 4 sts, and 2 sc in each of the last 2 sts. Sl st to the first sc. (20 sc)
Round 3: Ch 1. Work 2 sc in the first st, then sc in the next 5 sts. Work (2 sc in next st, sc in next st) 3 times, then sc in the next 4 sts. Work (sc in next st, 2 sc in next st) 2 times. Sl st to the first sc. (26 sc)
Fasten off, leaving a 12 in (30.5 cm) tail. The oval should measure 2 x 1.25 in (5.1 x 3.2 cm), with all the increases at the two rounded ends.
Nose
Round 1: Work 6 sc into a MR. (6 sc)
Round 2: 2 sc in each st around. (12 sc)
Round 3: Sc in each st around. (12 sc)
Stuff the ball firmly with fiberfill or yarn scraps.
Round 4: Sc2tog 6 times. (6 sc)
Fasten off, leaving an 8 in (20.3 cm) tail. Weave the tail through the front loops of the last 6 sts and pull tight. The finished ball is about 0.6 in (1.5 cm) across.
Ears (Make 2)
Ch 9.
Round 1: Working from the 2nd ch from the hook: sc, hdc, dc in each of the next 3 ch, hdc, sc. Work (sc, ch 2, sc) in the last ch for the tip. Working along the other side of the chain: sc, hdc, dc in each of the next 3 ch, hdc, and sc in the same ch as the first sc. Sl st to the first sc. (16 sts and 1 ch-2 tip sp)
Round 2: Ch 1. Sc in each of the first 7 sts, then sc in the next sc. Work (sc, ch 2, sc) in the ch-2 tip space, then sc in the next sc and sc in the last 7 sts. Sl st to the first sc. (18 sc and 1 ch-2 tip sp)
Fasten off, leaving a 10 in (25.4 cm) tail. Each ear is a pointed leaf about 1.75 in (4.4 cm) long and 1 in (2.5 cm) wide. The tall dc stitches give it its full middle, and the sc stitches taper both ends.
Antlers (Make 2)
Each antler is a chain beam with three chain tines. Every stitch is worked into the back bumps of the chain.
Ch 12.
- Sc in the 2nd ch from the hook and in the next 2 ch (3 beam sts).
- Tine 1: Ch 5, sc in 2nd ch from hook and in the next 3 ch (4 sts).
- Sc in the next 3 beam ch.
- Tine 2: Ch 4, sc in 2nd ch from hook and in the next 2 ch (3 sts).
- Sc in the next 3 beam ch.
- Tine 3: Ch 4, sc in 2nd ch from hook and in the next 2 ch (3 sts).
- Sc in the last 2 beam ch.
Count: beam 3 + 3 + 3 + 2 = 11 sc, which matches the 11 workable chains. Tines 4 + 3 + 3 = 10 sc. That makes 21 sc in total.
Fasten off, leaving a 10 in (25.4 cm) tail. The beam is 2 in (5.1 cm) long. Make the second antler the same way and flip it over so the tines point outward on both sides.
Hanging Loop
Ch 36, leaving a 6 in (15.2 cm) tail at each end. Fasten off. Folded in half, the chain makes a loop about 2.5 in (6.4 cm) tall.
Face Border
Border gauge: each border round adds 0.25 in (0.6 cm) on every side, so the two rounds add 0.5 in (1.3 cm) all around. The diameter grows from 2.6 in (6.6 cm) to 3.6 in (9.1 cm).
A circle doesn’t have corners, so the counts below are given per half (left and right of the vertical center line) as well as in total.
Round 4 (conversion round, openwork): Ch 4 (counts as dc and ch 1). Dc in next st, ch 1; rep from * 34 more times. Sl st to the 3rd ch of the beginning ch-4.
Count: 36 dc (1 per existing stitch) + 36 ch-1 sps added.* Each half has 18 dc and 18 ch-1 sps. Checkpoint: 3.1 in (7.9 cm).
Round 5 (trim round, scallops): Sl st into the first ch-1 sp. Ch 1, sc in the same sp, then work a Scallop in the next ch-1 sp. Sc in next ch-1 sp, Scallop in next ch-1 sp; rep from * 16 more times. Sl st to the first sc.
Count: 18 sc + 90 dc = 108 sts, making 18 scallops.* Each half has 9 sc and 9 scallops. Checkpoint: 3.6 in (9.1 cm).
Fasten off and weave in the ends.
Why the math works: Round 3 has 36 stitches, so Round 4 has exactly 36 ch-1 spaces. Round 5 uses a 2-space repeat (one sc and one Scallop), and 36 ÷ 2 = 18 repeats with nothing left over. Because 18 is even, if you turn the face so one scallop sits at top center, another lands exactly at bottom center. That keeps the ornament symmetrical. The ch-1 spaces in Round 4 give the scallops enough room to fan out without ruffling.
Assembly
- Turn the face so a scallop sits at 12 o’clock. Mark it.
- Muzzle: Pin the muzzle horizontally on the lower face. Its bottom edge should sit about 0.4 in (1.0 cm) above the tips of the bottom scallops, so it covers the lower part of Rounds 3 and 4. Whipstitch all the way around through the back loops of muzzle Round 3.
- Nose: Sew the nose to the top center of the muzzle so that it overlaps the muzzle’s upper edge slightly.
- Eyes: Sew on the beads in Round 3, just above the muzzle. Space them 0.75 in (1.9 cm) apart, about 4 stitches. For ornaments that small children can reach, embroider French knots instead.
- Ears: Place the ears behind the face at 10 and 2 o’clock, angled outward. Tuck 0.4 in (1.0 cm) of each ear base behind the border and sew it to the back of Round 4.
- Antlers: Place the antlers behind the face at 11 and 1 o’clock, with the tines pointing outward. Tuck 0.5 in (1.3 cm) of each beam base behind the border and sew it to the back of Rounds 3–4.
- Loop: Fold the chain and sew both ends to the back of Round 3 at 12 o’clock.
Weave all the tails in on the back.
Final Blocking
- Mist the ornament lightly with water until it is damp but not soaked.
- Lay it face up on the blocking mat.
- Pin the face to a 3.6 in (9.1 cm) circle, putting one pin at the tip of each scallop.
- Pin out each ear tip and each antler tine so they point cleanly.
- Gently roll the nose between your fingers to round it out again.
- Let it dry completely, which takes about 4–6 hours.
- Unpin, then check the overall size: 5.5 x 5 in (14.0 x 12.7 cm).
Final Quality-Control Checklist
- The face is 3.6 in (9.1 cm) across and lies flat.
- Round 5 has 18 even scallops.
- The muzzle is centered and the sewing doesn’t show from the front.
- The eyes are level and 0.75 in (1.9 cm) apart.
- The ears and antlers match each other and stand symmetrically.
- The loop is centered and holds the ornament straight.
- All tails are woven in on the back.
Troubleshooting
The face is cupping: Your tension is too tight. Go up a hook size, or make your dc slightly taller.
The face is ruffling: Recount Round 3; it must be 36. If the count is right, go down a hook size for Rounds 4–5.
The scallops are uneven: Make sure each Scallop goes into its own ch-1 sp and that you aren’t skipping or doubling a space.
The muzzle is lopsided: The increases have to stay at the two ends. Recount Round 2 (20) and Round 3 (26).
The antlers are floppy: Work the sc firmly into the back bumps, or add a light spray starch when you block.
The ornament hangs crooked: Move the loop exactly to the 12 o’clock scallop.
Care
Hand wash in cool water with mild soap, press out the water in a towel, and dry flat, reshaping it as before. Store the ornament flat in tissue so the antlers don’t bend.
Final Notes
Everything in this pattern depends on the face measurements. Rounds 1–3 make a 2.6 in (6.6 cm) center, Round 4 brings it to 3.1 in (7.9 cm), and Round 5 brings it to 3.6 in (9.1 cm). The 2 in (5.1 cm) muzzle, 1.75 in (4.4 cm) ears and 2 in (5.1 cm) antlers are sized for that face. Together they give a finished ornament of 5.5 x 5 in (14.0 x 12.7 cm). Check your measurements at each stage and every reindeer you make will come out the same size.
Happy crocheting!