

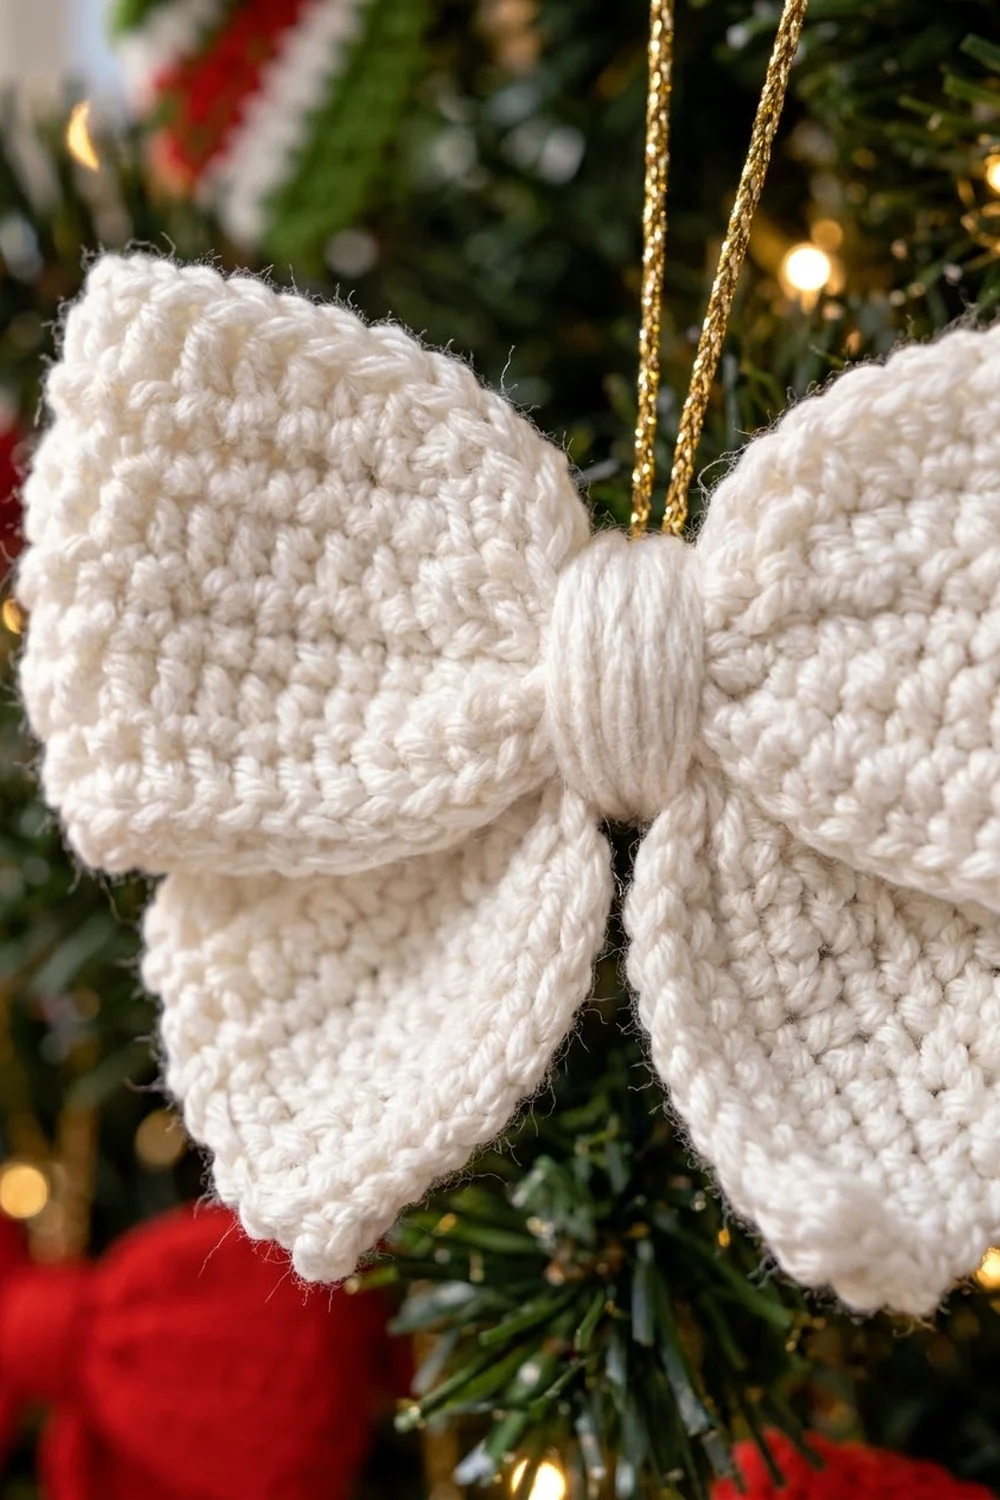
The Snowdrift Bow is a plump, classic ribbon-style bow ornament worked in dense single crochet. Two looped bands are stacked on top of each other, two flared tails hang below, and a smooth yarn-wrapped knot sits in the center. A raised slip-stitch outline frames every piece, so the bow looks crisp and tailored, not floppy.
The featured bow is soft winter white, which stands out against dark green branches. The same pattern works in solid red, solid green, or any holiday shade. The style is cozy and traditional.
This pattern uses US crochet terms. The finished ornament measures about 5 in (12.7 cm) wide and 4.5 in (11.4 cm) tall, not counting the hanging cord.
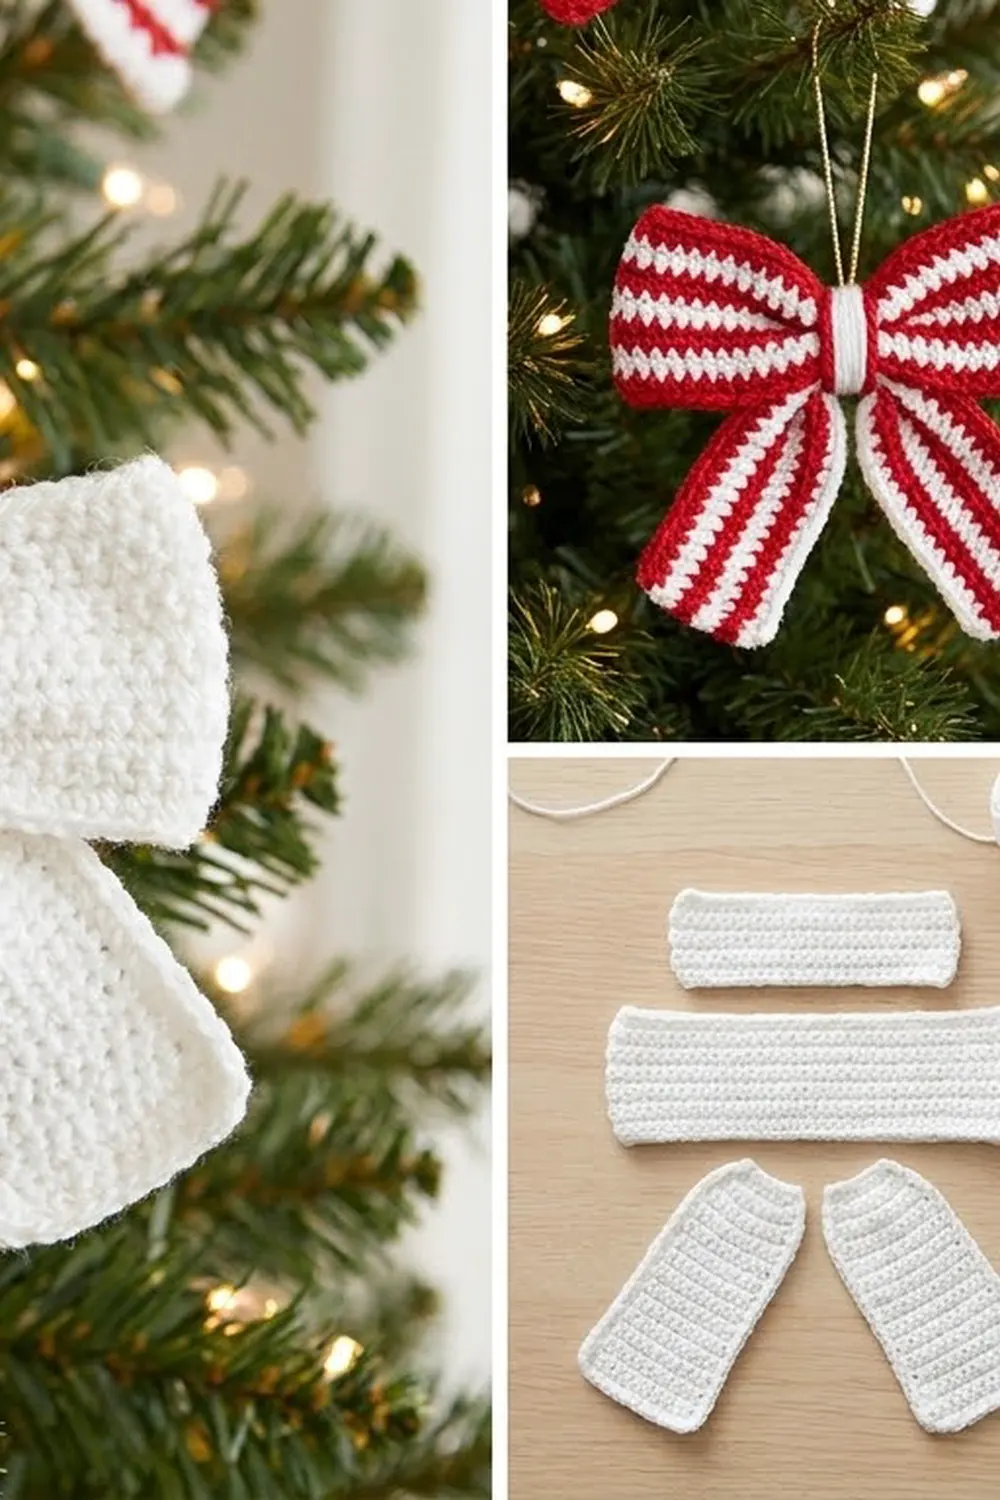
Construction is simple. You crochet four flat pieces in rows: two rectangular bands and two trapezoid tails. You edge each piece with a two-round border and steam the pieces flat. Then you fold the bands into loops, stack them, add the tails, and wrap the center tightly with yarn.
Finished Size and Construction
- Finished size: about 5 in (12.7 cm) wide x 4.5 in (11.4 cm) tall
- Skill level: Easy
- Terminology: US crochet terms
- Yarn weight: Worsted (#4 medium)
- Hook: 4.0 mm (US G-6)
- Number of pieces: 4 crocheted pieces (Band A, Band B, 2 Tails) plus a yarn-wrapped center
- Layout: Band A (front loops) stacked on Band B (back loops), with the Tails behind the center
- Piece sizes (edged): Band A 8.5 x 2.5 in (21.6 x 6.4 cm); Band B 10.5 x 2.9 in (26.7 x 7.4 cm); Tail 3.6 in (9.1 cm) top, 1.8 in (4.6 cm) bottom, 2.5 in (6.4 cm) tall
- Size before border: Band A 8 x 2 in (20.3 x 5.1 cm); Band B 10 x 2.4 in (25.4 x 6.1 cm); Tail 3.1 in (7.9 cm) top, 1.3 in (3.3 cm) bottom, 2 in (5.1 cm) tall
- Border depth: about 0.25 in (0.6 cm) on every side
Materials
Pick a smooth worsted-weight yarn with good stitch definition. Cotton or a cotton blend gives the crispest loops. Soft acrylic also works and weighs a little less on the branch.
- White (main color): 20 g, about 40 m (44 yd)
- Optional extra colors: red or green for more ornaments, 20 g, about 40 m (44 yd) each
These quantities include a margin of about 25 percent for the gauge check and the center wrap.
Tools:
- 4.0 mm (US G-6) crochet hook
- Tapestry needle
- Scissors
- Gold metallic cord, about 8 in (20.3 cm) per ornament
- Blocking mat and rust-proof pins
- Spray bottle or steamer
- Optional: fabric stiffener
Abbreviations (US Terms)
- ch – chain
- sc – single crochet
- sl st – slip stitch
- st(s) – stitch(es)
- inc – increase (2 sc in the same st)
- RS / WS – right side / wrong side
Special technique – rounded corner: On each straight stitch-edge side of the border, work 2 sc in the first st and 2 sc in the last st of that side. Using 2 sc here in place of a 3-sc corner turns the corner gently, so it looks rounded, not pointed.
Gauge and Checkpoints
Gauge: 18 sc and 20 rows = 4 in (10.2 cm) in sc worked in rows. That is 4.5 sts and 5 rows per inch.
Make Band A first and use it as your gauge piece. It is small, it uses every technique, and it shows you whether the whole bow will come out the right size.
Checkpoints:
- Band A after Row 10: 8 x 2 in (20.3 x 5.1 cm)
- Band A after border: 8.5 x 2.5 in (21.6 x 6.4 cm)
- Band B after Row 12: 10 x 2.4 in (25.4 x 6.1 cm)
- Tail after Row 10: 3.1 in (7.9 cm) across the top, 2 in (5.1 cm) tall
If your piece is too big, go down 0.5 mm in hook size and make it again. If it is too small, go up 0.5 mm. Don’t change the stitch counts, because all the proportions depend on them.
Work firmly. A bow made at a loose tension will sag.
Band A (Front Loops)
Make 1 in white.
Foundation: Ch 37.
Row 1 (RS): Sc in 2nd ch from hook and in each ch across, turn. (36 sc)
Rows 2-10: Ch 1 (does not count as a st), sc in each st across, turn. (36 sc)
Don’t fasten off. Go straight into the Border.
Checkpoint: 8 x 2 in (20.3 x 5.1 cm).
Band B (Back Loops)
Make 1 in white.
Foundation: Ch 46.
Row 1 (RS): Sc in 2nd ch from hook and in each ch across, turn. (45 sc)
Rows 2-12: Ch 1, sc in each st across, turn. (45 sc)
Don’t fasten off. Continue into the Border.
Checkpoint: 10 x 2.4 in (25.4 x 6.1 cm).
Tails
Make 2 in white. Each tail starts at the narrow bottom end and widens toward the top.
Foundation: Ch 7.
Row 1 (RS): Sc in 2nd ch from hook and in each ch across, turn. (6 sc)
Row 2: Ch 1, inc in first st, sc in next 4 sts, inc in last st, turn. (8 sc)
Row 3: Ch 1, sc in each st across, turn. (8 sc)
Row 4: Ch 1, inc in first st, sc in next 6 sts, inc in last st, turn. (10 sc)
Row 5: Ch 1, sc in each st across, turn. (10 sc)
Row 6: Ch 1, inc in first st, sc in next 8 sts, inc in last st, turn. (12 sc)
Row 7: Ch 1, sc in each st across, turn. (12 sc)
Row 8: Ch 1, inc in first st, sc in next 10 sts, inc in last st, turn. (14 sc)
Rows 9-10: Ch 1, sc in each st across, turn. (14 sc)
Don’t fasten off. Continue into the Border.
Checkpoint: 3.1 in (7.9 cm) across the top, 1.3 in (3.3 cm) across the bottom, 2 in (5.1 cm) tall. The sides should slant evenly into a trapezoid.
Make All Pieces
All pieces are in one color:
- Band A: 1 (36 sc x 10 rows)
- Band B: 1 (45 sc x 12 rows)
- Tails: 2 (6 to 14 sc x 10 rows)
Work the Border (below) on every piece before you assemble the bow. Seen from the front, the stacked layout looks like this:
   [ loop A ][knot][ loop A ]      <- Band A, front layer
 [  loop B  ][knot][  loop B  ]    <- Band B, back layer
       [ Tail ]    [ Tail ]        <- behind, angled down and out
Joining (Assembly)
Start with all four pieces edged and lightly steamed flat. Cut a 12 in (30.5 cm) length of white yarn for sewing and a separate 6 ft (182.9 cm) length for the center wrap.
1. Fold Band B. Lay Band B WS up. Bring both short ends to the center so they meet edge to edge, with no overlap. Whipstitch the ends together through the outer loops of the slip-stitch outline, stitch for stitch. Each short end has 12 border sts, so they line up 1 to 1. Tack the joined ends to the center of the band with 2-3 small stitches. Flattened, Band B measures 5.25 in (13.3 cm) wide.
2. Fold Band A. Repeat with Band A. Its short ends have 10 border sts each, which again match 1 to 1. Flattened, Band A measures 4.25 in (10.8 cm) wide.
3. Stack. Center Band A on top of Band B, both RS out, so Band A’s top edge sits about 0.5 in (1.3 cm) above Band B’s top edge. Tack them together through all layers at the center.
4. Add the tails. Place both tails behind Band B with their wide ends up. Put their top edges at the bow’s horizontal center line. Angle each tail outward about 20 degrees, with the tops overlapping 0.75 in (1.9 cm) at the center. Tack them through all layers.
5. Cinch and wrap. Pinch the center of the whole stack into soft gathers. Wrap the long yarn firmly around the center 20-25 times, building a band about 0.5 in (1.3 cm) wide. Lay each wrap flat beside the last one, not on top of it. Thread the end onto the needle, slide it under the wraps at the back, and weave it in.
Tension advice: Pull each wrap snug enough to hold the gathers, but not so tight that the yarn bites in or rolls. Even tension gives you the smooth, barrel-shaped knot.
Size checkpoint: Cinching takes up about 0.25 in (0.6 cm), so the bow should now be about 5 in (12.7 cm) wide and 4.5 in (11.4 cm) tall.
6. Hanger. Thread the gold cord under the wraps at the back, knot the ends, and trim.
Border
Work the border on every piece before assembly. It has two rounds. The first is a single crochet round that squares up the edges and rounds the corners. The second is a slip-stitch round that makes the raised outline.
Border gauge: On the stitch edges, work 1 sc in each st. On the row-end edges, work 1 sc in each row end. At this gauge, 1 sc per row end lies flat without ruffling.
Band A Border
Rnd 1: Ch 1 and work along the last row: 2 sc in first st, sc in next 34 sts, 2 sc in last st (38 sc). Sc in each of the 10 row ends down the short side (10 sc). Along the foundation chain: 2 sc in first ch, sc in next 34 ch, 2 sc in last ch (38 sc). Sc in each of the 10 row ends up the other short side (10 sc). Join with sl st to first sc.
Count per side: each long side is 36 worked 1 per st + 2 extra = 38. Each short side is 10. Total: 96 sc.
Rnd 2: Sl st loosely in each st around. Join and fasten off. (96 sl st)
Band B Border
Rnd 1: Ch 1, 2 sc in first st, sc in next 43 sts, 2 sc in last st (47 sc). Sc in each of the 12 row ends (12 sc). 2 sc in first ch, sc in next 43 ch, 2 sc in last ch (47 sc). Sc in each of the 12 row ends (12 sc). Join.
Count per side: each long side is 45 worked 1 per st + 2 extra = 47. Each short side is 12. Total: 118 sc.
Rnd 2: Sl st loosely in each st around. Join and fasten off. (118 sl st)
Tail Border
Rnd 1: Ch 1. Along the top (Row 10): 2 sc in first st, sc in next 12 sts, 2 sc in last st (16 sc). Sc in each of the 10 row ends down the slanted side (10 sc). Along the bottom foundation: 2 sc in first ch, sc in next 4 ch, 2 sc in last ch (8 sc). Sc in each of the 10 row ends up the other side (10 sc). Join.
Count per side: the top is 14 worked 1 per st + 2 extra = 16. The bottom is 6 worked 1 per st + 2 extra = 8. Each slanted side is 10. Total: 44 sc.
On the narrow bottom, the 2 extra pairs sit only 6 sts apart, so the bottom curves into a soft rounded end.
Rnd 2: Sl st loosely in each st around. Join and fasten off. (44 sl st)
Why the math works: Every side starts from its own count of one sc per stitch or row end. The only extras are the 2 sc per stitch-edge side that round the corners, and every count above includes them. Together the two rounds add about 0.25 in (0.6 cm) to each edge. That turns Band A’s 8 x 2 in (20.3 x 5.1 cm) into 8.5 x 2.5 in (21.6 x 6.4 cm), and Band B’s 10 x 2.4 in (25.4 x 6.1 cm) into 10.5 x 2.9 in (26.7 x 7.4 cm). Folding halves the band length: 10.5 / 2 = 5.25 in (13.3 cm).
Final Blocking
- Weave in any remaining ends, hiding them inside the loops.
- Lightly mist the bow with water, or hold a steamer just above it without touching.
- Push a rolled piece of tissue paper into each loop to round it out.
- Pin the tails to the mat at matching angles, with their rounded ends level.
- Let the bow dry completely, at least 6 hours.
- Optional: brush thinned fabric stiffener inside the loops for extra crispness, then let it dry again.
- Remove the tissue and check the size: 5 x 4.5 in (12.7 x 11.4 cm).
Final Quality-Control Checklist
- Band A has 36 sc per row, Band B has 45, and each tail ends at 14
- Border counts are 96 (A), 118 (B), and 44 (each tail)
- The corners are rounded, not pointed
- The slip-stitch outline is even, with no puckers
- The loops are the same size on both sides
- The tails mirror each other in angle and length
- The center wrap is smooth, about 0.5 in (1.3 cm) wide
- The bow measures about 5 x 4.5 in (12.7 x 11.4 cm)
- The hanging cord is centered and secure
Troubleshooting
The border ruffles. The sc round has extra stitches or is too loose. Recount it, and work the row-end sc a little tighter.
The border pulls the edges in. Your slip stitches are too tight. Work Rnd 2 with a hook 0.5 mm larger.
The corners look pointed. Check that you worked 2 sc, not 3, in the first and last stitches of each side.
The loops collapse. The fabric is too loose. Go down a hook size, or use stiffener.
One loop is bigger than the other. The short ends weren’t centered. Unpick the tack and refold.
The tails twist. Pin them flat and steam them before you attach them.
Care
Spot clean with cool water and mild soap, then reshape and dry flat with tissue in the loops. Store the bow in a box so the loops keep their shape from year to year.
Final Notes
The whole bow follows one measurement chain. A gauge of 18 sc and 20 rows = 4 in (10.2 cm) gives Band A at 8 x 2 in (20.3 x 5.1 cm) and Band B at 10 x 2.4 in (25.4 x 6.1 cm). The 0.25 in (0.6 cm) border brings them to 8.5 x 2.5 in (21.6 x 6.4 cm) and 10.5 x 2.9 in (26.7 x 7.4 cm). Folding gives loop widths of 4.25 in (10.8 cm) and 5.25 in (13.3 cm). Cinching settles the finished bow at 5 x 4.5 in (12.7 x 11.4 cm). If each checkpoint matches, the ornament will come out right.
Happy crocheting!