

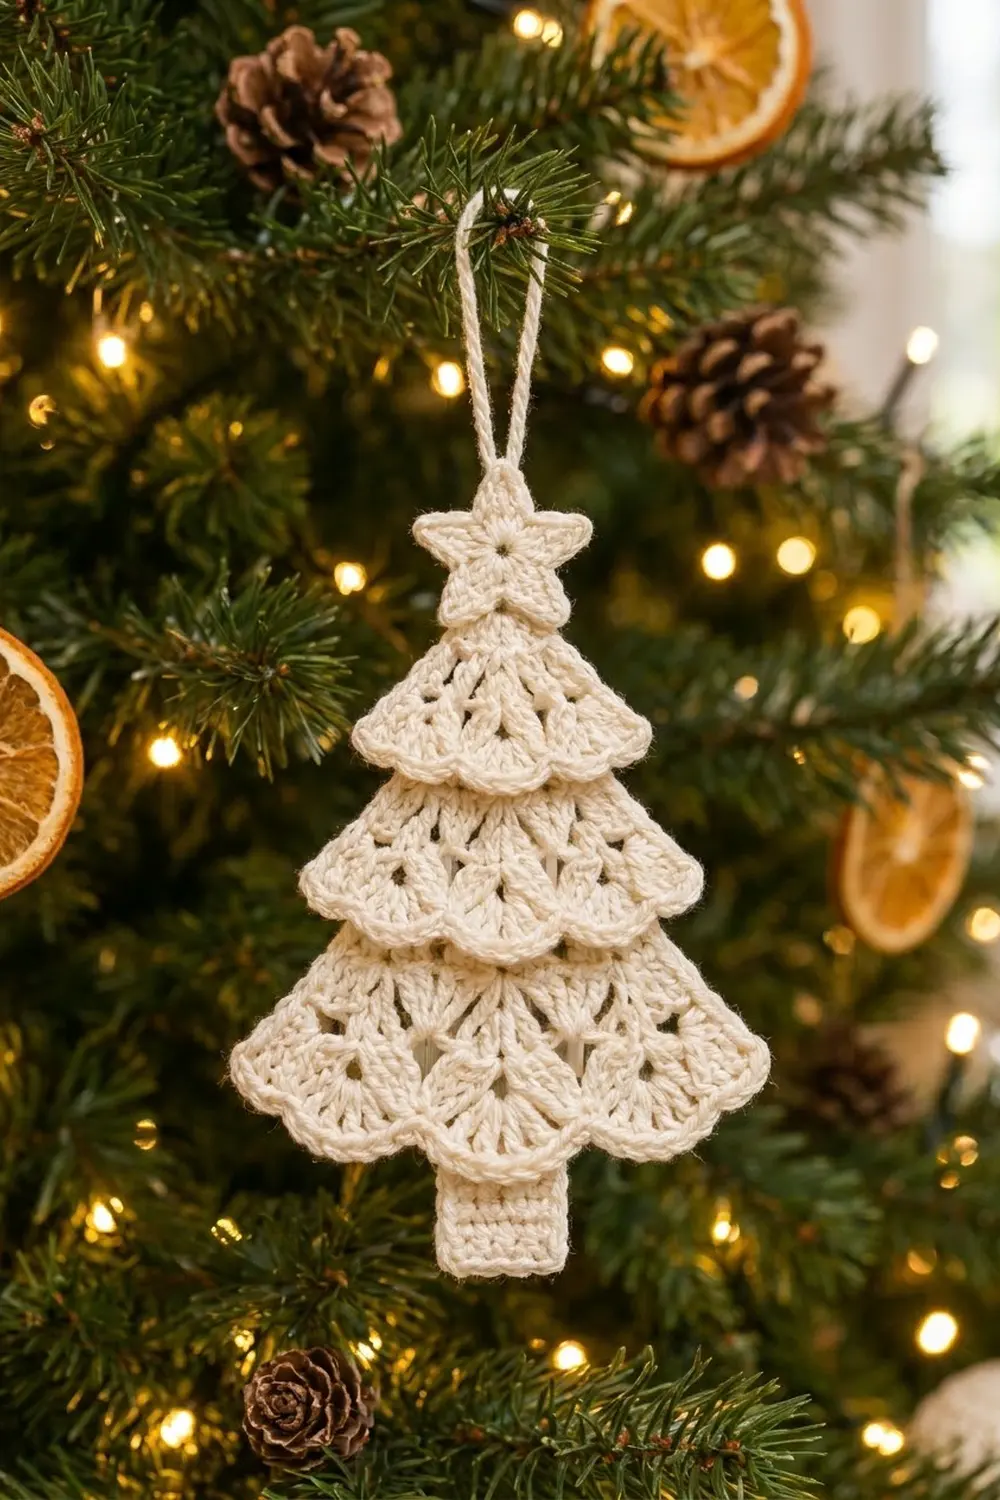
This small tree is a lacy Christmas ornament in one shade of soft cream cotton. Three scalloped tiers stack from small to large, a five-point star sits on top, and a short solid trunk sticks out below. A thin chain loop at the star’s tip lets it hang from a branch.
All the texture is in the tiers. Each one has a row of open V-stitches, then a row of fans with tiny chain-1 eyelets, then a smooth edging that turns every fan into a rounded scallop. The star and trunk are kept plain so the lace stands out.
The pattern uses US crochet terms. The finished ornament is about 4.25 in (10.8 cm) wide at the bottom tier and 5.5 in (14.0 cm) tall from the star tip to the bottom of the trunk. The hanging loop adds 1.5 in (3.8 cm).
Construction is simple. You make five small pieces (one star, three tiers and one trunk) and add the scallop edging to each tier. Then you block everything and sew the layers together from the bottom up.
Finished Size and Construction
- Finished size: 4.25 in (10.8 cm) wide x 5.5 in (14.0 cm) tall, plus a 1.5 in (3.8 cm) loop
- Skill level: Easy-intermediate
- Terminology: US crochet terms
- Yarn weight: Sport weight (#2) cotton
- Hook: 2.75 mm (US C-2)
- Number of pieces: 5 (1 star, 3 tiers, 1 trunk), joined into one ornament
- Layout: Vertical stack: star, top tier, middle tier, bottom tier, trunk
- Piece sizes: Star 1.25 in (3.2 cm). Tiers are each 1.5 in (3.8 cm) tall, and 2.55 in (6.5 cm), 3.4 in (8.6 cm) and 4.25 in (10.8 cm) wide. Trunk 0.8 x 1.4 in (2.0 x 3.6 cm).
- Tier size before border: 1.25 in (3.2 cm) tall; the bottom tier is 4.0 in (10.2 cm) wide
- Border depth: 0.25 in (0.6 cm) scallop edging on each tier
Materials
Choose a smooth mercerized cotton or cotton blend in sport weight. Mercerized cotton shows each stitch clearly, holds its shape after blocking and keeps the eyelets open. Avoid fuzzy or very soft acrylics, because the lace will blur and the scallops will curl.
- Cream: 10 g, about 30 m (33 yd)
That is enough for one ornament. The amount includes about 25 percent extra for your gauge swatch and sewing tails.
Tools:
- 2.75 mm (US C-2) crochet hook
- Tapestry needle
- Scissors
- Stitch marker
- Rust-proof pins and a foam blocking mat
- Spray bottle with water (optional: light spray starch)
- Ruler or tape measure
Abbreviations (US Terms)
- ch – chain
- sl st – slip stitch
- sc – single crochet
- hdc – half double crochet
- dc – double crochet
- sp – space
- st(s) – stitch(es)
- RS / WS – right side / wrong side
Special stitches
- V-st (V-stitch): (dc, ch 2, dc) in the same stitch.
- Fan: (dc, ch 1) 4 times, then dc, all in the same space. One fan has 5 dc and 4 ch-1 sps.
Gauge and Checkpoints
Gauge: 12 sc and 14 rows = 2 in (5.1 cm) in rows of sc.
After the fan row is edged and blocked, one fan repeat (a V-st plus the sc beside it) is about 0.85 in (2.2 cm) wide.
Before making all five pieces, crochet the top tier. It is the smallest piece and uses every stitch in the pattern, so it works as a test piece.
Checkpoints:
- After Row 1 of the top tier: 13 sc measure about 2.2 in (5.6 cm).
- After Row 3 (before the edging): the tier is about 1.25 in (3.2 cm) tall.
- After Row 4 (edging): the tier is 1.5 in (3.8 cm) tall and about 2.55 in (6.5 cm) wide across the scallops.
If your piece is too big, change to a 2.5 mm (US B-1.5) hook. If it is too small, change to a 3.0 mm hook. If only the fans are off, check your chain-1 spaces. Tight chains make the fans cup, and loose chains make them ruffle.
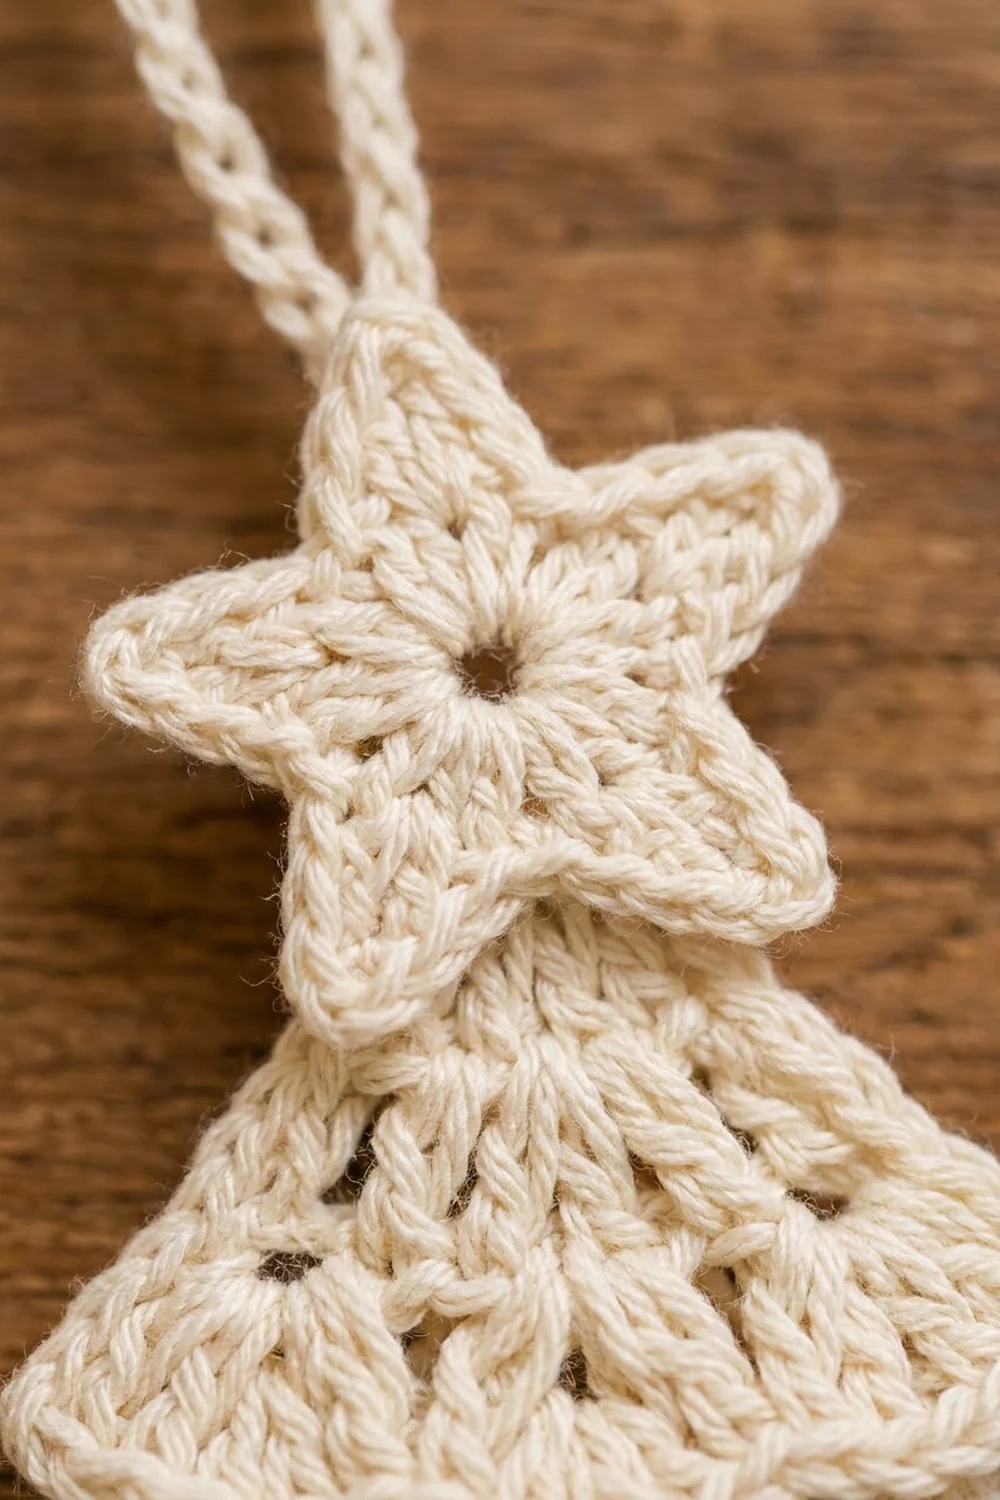
Star
Make 1.
Rnd 1 (RS): Make a magic ring, ch 1, work 10 sc in the ring, then sl st in the first sc to join. Pull the ring snug but leave a small hole in the center. (10 sc)
Rnd 2: *Ch 4, sl st in 2nd ch from hook, sc in next ch, hdc in next ch, skip next sc, sl st in next sc; repeat from * 4 more times. The last sl st lands in the joining sc. (5 points)
Each point uses 2 sc of Rnd 1 (one skipped and one sl st), so 5 points use all 10 sc.
Hanging loop: Don’t fasten off. Sl st up the side of the next point to its tip. Ch 24, then sl st in the same tip stitch. Fasten off, leaving a 6 in (15.2 cm) tail.
Checkpoint: the star is about 1.25 in (3.2 cm) from point to point, and the folded loop stands 1.5 in (3.8 cm) high.
Tiers
All three tiers use the same four rows. Only the number of repeats (N) changes.
| Tier | Repeats (N) | Foundation ch | Row 1 sc | Fans | Row 4 sts |
|---|---|---|---|---|---|
| Top | 3 | 14 | 13 | 3 | 43 |
| Middle | 4 | 18 | 17 | 4 | 57 |
| Bottom | 5 | 22 | 21 | 5 | 71 |
Each tier is worked from the top edge down. The fans spread wider than the foundation, which gives each tier its flared bell shape.
Foundation: Ch (4 x N) + 2. Leave a 10 in (25.4 cm) tail for sewing.
Row 1 (RS): Sc in 2nd ch from hook and in each ch across, turn.
(Top 13 sc / Middle 17 sc / Bottom 21 sc, which is 4N + 1)
Checkpoint: Row 1 measures 2.2 in (5.6 cm) / 2.8 in (7.1 cm) / 3.5 in (8.9 cm).
Row 2 (WS, V-st row): Ch 1, sc in first sc, *skip 1 sc, V-st in next sc, skip 1 sc, sc in next sc; repeat from * across, turn.
(Top 3 V-sts and 4 sc / Middle 4 V-sts and 5 sc / Bottom 5 V-sts and 6 sc)
Each repeat uses 4 sc of Row 1. Add the first sc and you get 1 + 4N, which matches Row 1 exactly. The skipped stitches open the small triangle-shaped eyelets on each side of every V.
Row 3 (RS, fan row): Ch 1, sc in first sc, *fan in ch-2 sp of next V-st, sc in next sc; repeat from * across, turn.
(Top 3 fans and 4 sc / Middle 4 fans and 5 sc / Bottom 5 fans and 6 sc)
Each fan has 5 dc and 4 ch-1 sps, so Row 3 holds 5N dc, 4N ch-1 sps and N + 1 sc.
Checkpoint: the tier is now about 1.25 in (3.2 cm) tall. Don’t fasten off. Row 4 is the border, which is worked in the Border section below.
Make All Pieces
You need five pieces, all in Cream:
- Star with loop: 1 (about 1 g)
- Top tier: 1 (about 1.5 g)
- Middle tier: 1 (about 2 g)
- Bottom tier: 1 (about 3 g)
- Trunk: 1 (about 0.5 g)
The remaining 2 g is your extra yarn.
Trunk
Foundation: Ch 6.
Row 1: Sc in 2nd ch from hook and in each ch across, turn. (5 sc)
Rows 2–10: Ch 1, sc in each sc across, turn. (5 sc)
Fasten off, leaving an 8 in (20.3 cm) tail. The trunk measures 0.8 in (2.0 cm) wide and 1.4 in (3.6 cm) tall.
Layout grid (front view, top to bottom):
        [ STAR + LOOP ]
       [   TOP TIER    ]     3 scallops
     [   MIDDLE TIER     ]   4 scallops
   [    BOTTOM TIER        ] 5 scallops
           [TRUNK]
Each piece lies over the front of the piece below it. Only the trunk goes behind the tier above it.
Joining
Join the pieces after blocking (see Final Blocking), so they lie flat and the overlaps are easy to measure. Work from the bottom up, using the foundation tails and a tapestry needle.
Trunk to bottom tier: Lay the bottom tier RS up. Slide the top 0.4 in (1.0 cm) of the trunk behind the center fan, so 1.0 in (2.5 cm) of trunk shows. Whipstitch the trunk’s top row to the back of Row 3. Catch only the back strands so nothing shows on the front.
Bottom tier to middle tier: Place the middle tier over the bottom tier so its scallops overlap the bottom tier by 0.5 in (1.3 cm). Line up the center sc of the bottom tier’s Row 1 (the 11th of 21) with the center dc of the middle tier’s center fan. Whipstitch each Row 1 sc to the back of the middle tier’s fan row, one stitch per sc. Gather the 3.5 in (8.9 cm) edge slightly as you sew so it spans 3.2 in (8.1 cm). This keeps its top corners hidden behind the outer scallops.
Middle tier to top tier: Repeat the same way. Line up the 9th of 17 sc with the center dc of the top tier’s middle fan and overlap by 0.5 in (1.3 cm). Gather the 2.8 in (7.1 cm) edge so it spans 2.4 in (6.1 cm).
Star to top tier: Place the star with the loop point straight up. Overlap the two lower points 0.25 in (0.6 cm) over the top tier’s Row 1. Tack the center of the star’s back to the 7th of 13 sc, then tack down each lower point.
Tension advice: Pull each stitch just firm enough to close the gap. Pulling hard puckers the scallops and makes the tree shorter.
Size checkpoint: The pieces should sit at these heights, measured down from the star tip:
- Star: 0 to 1.25 in (0 to 3.2 cm)
- Top tier: 1.0 to 2.5 in (2.5 to 6.4 cm)
- Middle tier: 2.0 to 3.5 in (5.1 to 8.9 cm)
- Bottom tier: 3.0 to 4.5 in (7.6 to 11.4 cm)
- Trunk: 4.1 to 5.5 in (10.4 to 14.0 cm)
Total height: 5.5 in (14.0 cm). Total width: 4.25 in (10.8 cm).
Border: Scallop Edging
The border is Row 4 of each tier. Work it straight on from Row 3 with the same hook.
Border gauge: 13 sc around one fan measure about 1.1 in (2.8 cm) along the curve. The edging adds 0.25 in (0.6 cm) to the depth of the tier.
Row 4 (WS, scallop edging): Ch 1, sc in first sc, *[sc in next dc, 2 sc in next ch-1 sp] 4 times, sc in next dc, sc in next sc; repeat from * across. Fasten off.
Each fan gets 5 sc (one in each dc) plus 8 sc (two in each ch-1 sp), for 13 sc. Each repeat is those 13 sc plus 1 sc in the dip between fans, so the row totals 1 + 14N.
- Top tier: 1 + (3 x 14) = 43 sc
- Middle tier: 1 + (4 x 14) = 57 sc
- Bottom tier: 1 + (5 x 14) = 71 sc
Why the math works: A fan is a half circle. Its outer edge is longer than its base, so it needs more stitches than the 5 dc alone. Two sc in each ch-1 space add just enough length to follow the curve without ruffling. The single sc in the dip between fans adds no extra length, so the edge dips sharply there and each fan looks like a separate rounded scallop.
The tiers are worked in rows, so there are no corners to count. The bottom curve is the only edge that gets a border.
Final Blocking
- Weave in all ends except the sewing tails.
- Soak the pieces in cool water for 10 minutes, then press out the water in a towel. Don’t wring them.
- Pin the star with all five points pulled straight out. Check that it measures 1.25 in (3.2 cm).
- Pin each tier with Row 1 straight across the top. Pin every scallop tip and every sc in the dips between them so the scallops are evenly spaced.
- Check the widths: 2.55 in (6.5 cm), 3.4 in (8.6 cm) and 4.25 in (10.8 cm). Check that each tier is 1.5 in (3.8 cm) tall.
- Pin the trunk flat at 0.8 x 1.4 in (2.0 x 3.6 cm).
- Pull the loop straight and pin it flat.
- Mist with water or light spray starch and let everything dry completely.
- Join the pieces (see Joining). If any layer lifts, lightly mist the finished ornament and press it under a clean cloth.
Final Quality-Control Checklist
- The star has 5 even points and a small open center.
- The loop is centered on the top point and stands 1.5 in (3.8 cm) high.
- The tiers have 3, 4 and 5 scallops, from top to bottom.
- Every fan has 5 dc and 4 open eyelets.
- The edging counts are 43, 57 and 71 sc.
- Each tier overlaps the one below by 0.5 in (1.3 cm).
- No tier corners stick out at the sides.
- 1.0 in (2.5 cm) of trunk shows below the bottom tier.
- The total size is 4.25 x 5.5 in (10.8 x 14.0 cm).
- No sewing shows from the front.
Troubleshooting
The scallops ruffle or wave. Your ch-1 spaces are loose. Keep your chains the same height as your sc, or go down a hook size for Row 3 only.
The scallops cup upward. Your chains are too tight, or you worked only 1 sc in some ch-1 spaces. Recount Row 4 against the totals above.
The stitch count is off in Row 2. Make sure you skip 1 sc on each side of every V-st. The last repeat should end with a sc in the last sc.
The star points curl. Work the point chains a little looser and block with starch.
Tier corners show after joining. Gather Row 1 a little more as you sew, or tack the outer corner stitch to the back of the tier above.
The ornament hangs crooked. The loop is off-center. Re-attach it at the exact tip of the top star point.
Care
Hand wash in cool water with mild soap, press dry in a towel and reshape flat. Store flat in tissue paper so the scallops stay crisp.
Final Notes
Every size in this ornament comes from your gauge. At 12 sc and 14 rows to 2 in (5.1 cm), Row 1 of the three tiers measures 2.2 in (5.6 cm), 2.8 in (7.1 cm) and 3.5 in (8.9 cm). The fans and the 13-stitch edging make each tier 1.5 in (3.8 cm) tall, with each scallop 0.85 in (2.2 cm) wide. Stack the tiers with 0.5 in (1.3 cm) overlaps, add the 1.25 in (3.2 cm) star and leave 1.0 in (2.5 cm) of trunk showing. The finished tree measures 4.25 x 5.5 in (10.8 x 14.0 cm).
Once you’ve made one and hung it up, you’ll probably want a few more for the tree.
Happy crocheting!