

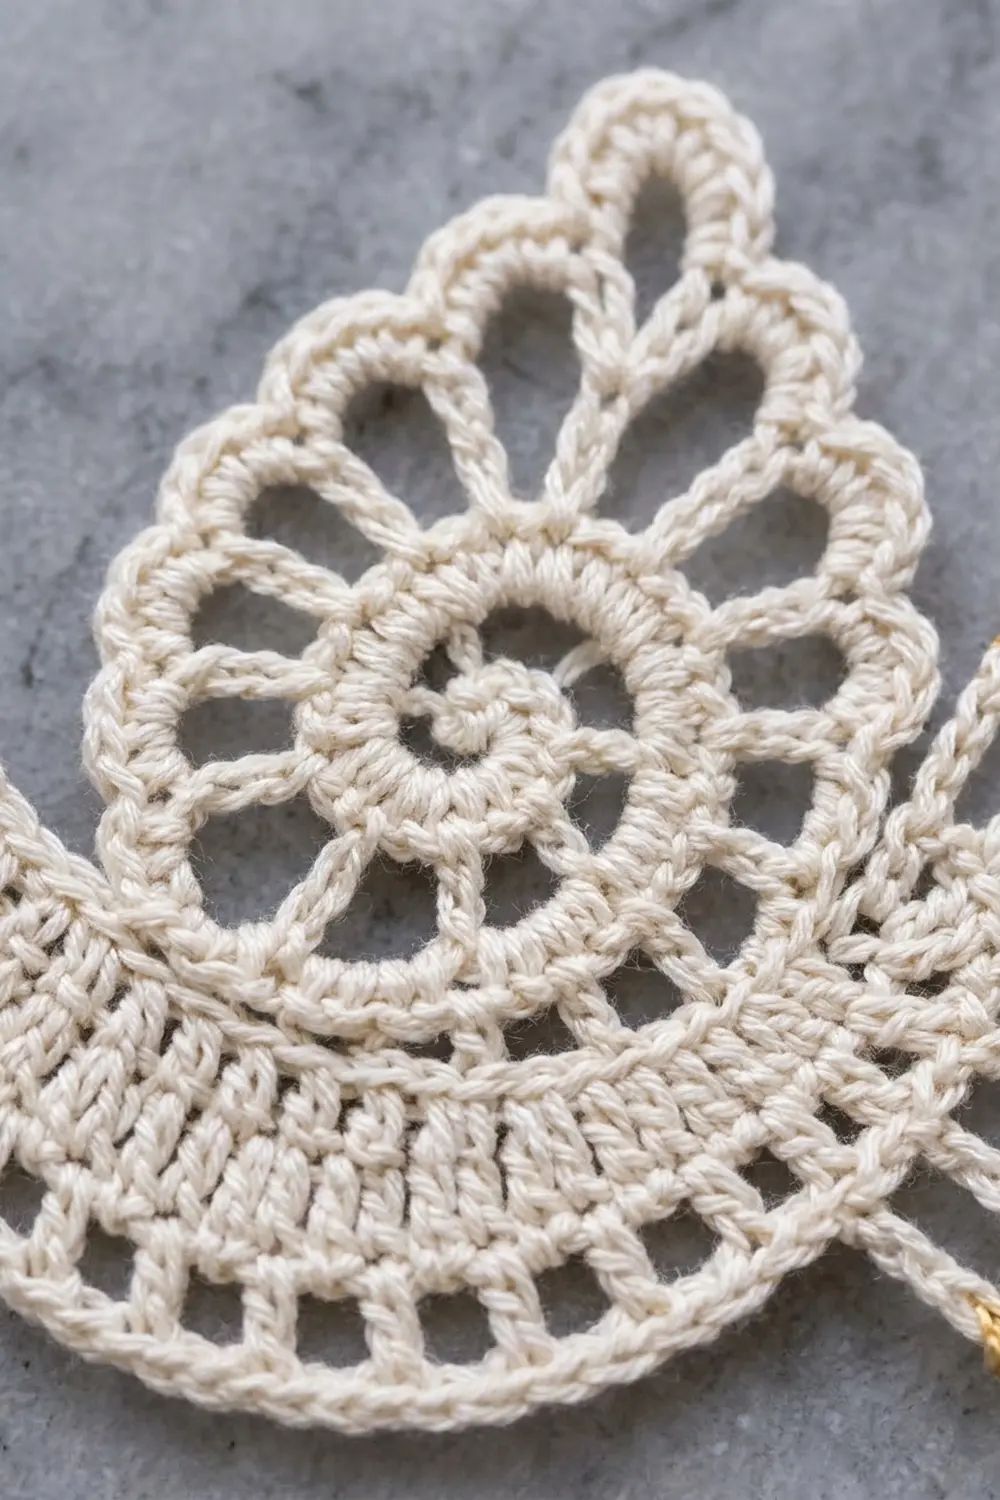
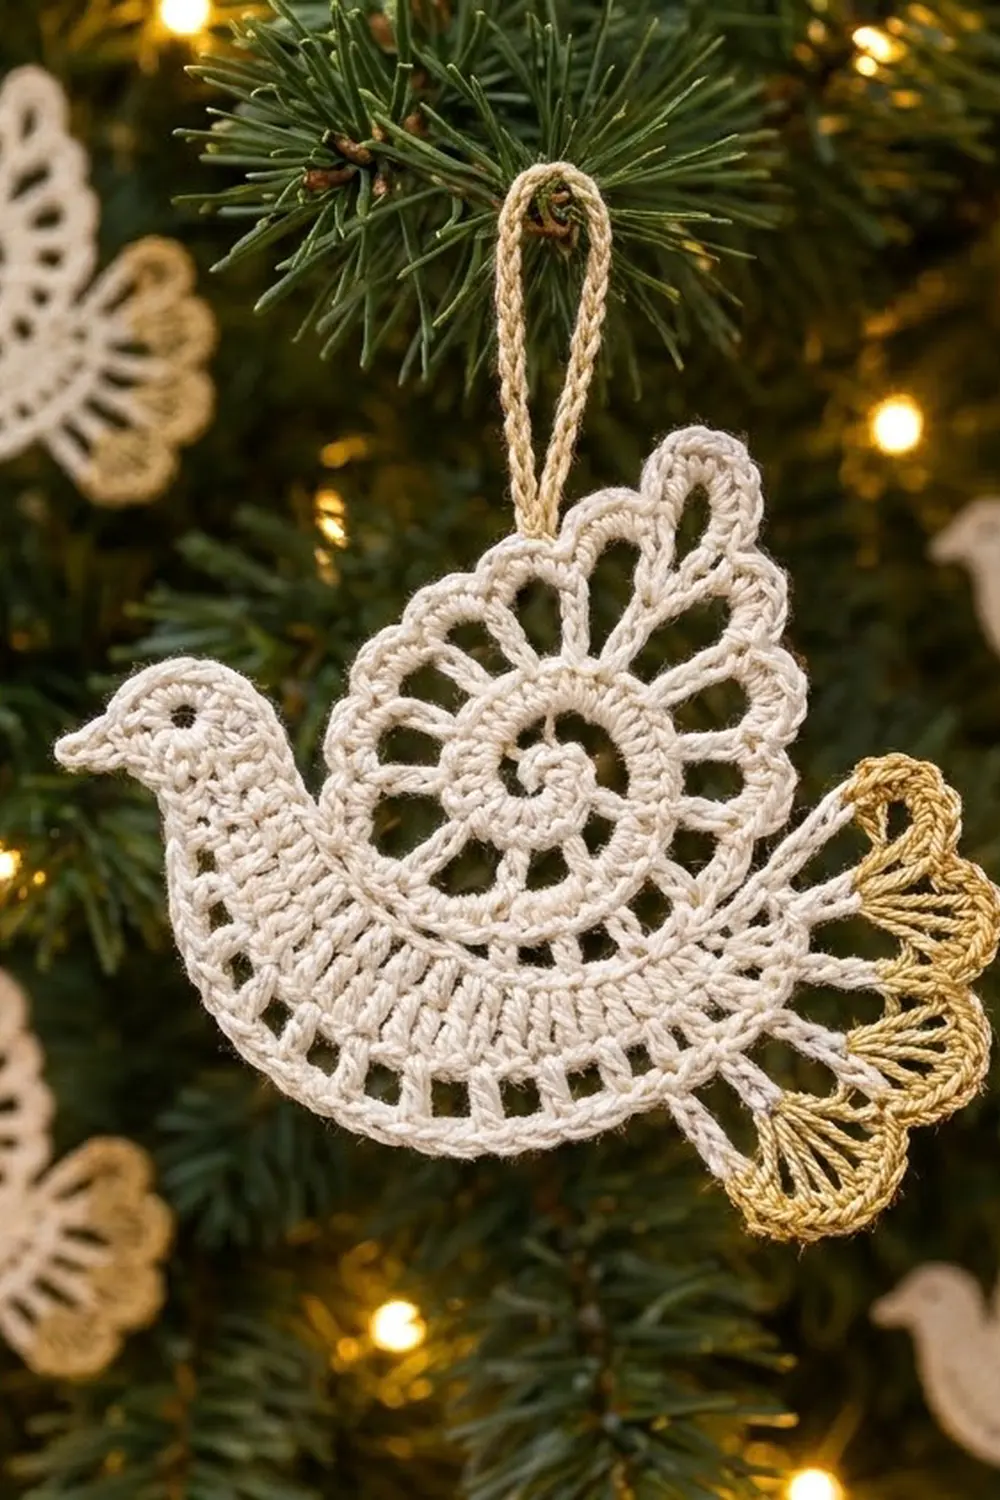
This little dove is a lacy cream ornament with a round spiral wing, a crescent body with an open mesh band, and a fanned tail edged in gold. It looks delicate on a tree branch, yet it is sturdy enough to handle and hang year after year.
The palette is simple: cream cotton thread for the dove, with a bright gold thread on the tips of the tail. The style is classic Irish-lace inspired. Solid stitches give the body its outline, and the open spaces in the wing and tail let the light through.
The pattern uses US crochet terms. The finished dove measures about 6 in (15.2 cm) wide from beak to tail tip and about 4 in (10.2 cm) tall, not counting the hanging loop.
Construction is straightforward. You work the body as a short curved strip in rows. Next you add the head on the unused foundation loops and work one cream edging around the body and head. Then you work the tail onto the right end, make the spiral wing as a separate motif, sew it in place and add the hanging loop.
Finished Size and Construction
- Finished size: about 6 in (15.2 cm) wide × 4 in (10.2 cm) tall, plus a 1.75 in (4.4 cm) hanging loop
- Skill level: Intermediate
- Terminology: US crochet terms
- Yarn weight: Size 3 cotton crochet thread (light fingering)
- Hook: 2.25 mm (US B-1)
- Number of pieces: 1 finished ornament (body with head and tail worked on, plus one wing sewn on)
- Layout: Dove facing left, with the wing centred over the top of the body
- Body strip: 4 in (10.2 cm) along the top edge, 1 in (2.5 cm) deep
- Size before edging (body and head): about 4.75 in (12.1 cm) wide
- Edging depth: 0.125 in (0.3 cm) all around, so the body and head measure 5 in (12.7 cm) wide after edging
Materials
Use a smooth, mercerized cotton thread. Mercerized cotton gives crisp stitch definition and takes blocking well, so your mesh and rays stay open. Avoid fuzzy or very soft thread, because it blurs the spiral.
- Cream, size 3 cotton thread: about 8 g, about 30 m
- Gold, size 3 cotton or metallic-blend thread: about 3 g, about 10 m
- 2.25 mm (US B-1) crochet hook
- Tapestry needle
- Scissors
- 2 locking stitch markers
- Blocking board or foam mat, rust-proof pins
- Spray bottle with water, plus optional fabric stiffener or starch
The quantities include a margin of about 20% for your gauge swatch and weaving in ends.
Abbreviations (US Terms)
- ch – chain
- sl st – slip stitch
- sc – single crochet
- hdc – half double crochet
- dc – double crochet
- sc2tog – single crochet 2 together
- sk – skip
- sp – space
- BLO – back loop only
- RS – right side
Special stitches
Scallop: sk 2 sts, 7 dc in the next st, sk 2 sts, sl st in the next st. Each scallop uses 6 stitches.
Beak point: sc in the stitch, ch 3, sl st in the 3rd ch from the hook, then continue the edging.
Gauge and Checkpoints
Gauge: 7 sc and 8 sc rows = 1 in (2.5 cm) with size 3 thread and a 2.25 mm hook. One dc row is about 3/8 in (1.0 cm) tall.
Before making the whole ornament, make a 2 in (5.1 cm) square of sc: 14 sc across, 16 rows. If the square comes out larger, change to a 2.0 mm hook. If it comes out smaller, change to a 2.5 mm hook.
Checkpoints
- After Body Row 1: the strip is 4 in (10.2 cm) long.
- After Body Row 4: the strip is 1 in (2.5 cm) deep and curves into a crescent.
- After Head Row 5: the head is about 5/8 in (1.6 cm) tall.
- After the edging: the body and head together are 5 in (12.7 cm) wide.
- Wing after Round 2: 0.75 in (1.9 cm) across. After Round 4: 2.25 in (5.7 cm). After Round 5: 2.75 in (7.0 cm).
- Tail after Row 5: about 1.25 in (3.2 cm) long.
If a checkpoint is off: If the piece measures more than 0.125 in (0.3 cm) bigger than the checkpoint, rip back and go down a hook size. If it is smaller by the same amount, go up a hook size. Do not fix size by changing stitch counts, because every later count depends on them.
Body (Cream)
The body is worked in rows. Row 1 forms the top edge. The increases in Row 2 and the mesh in Row 3 make the lower edge longer, so the strip curves into a crescent.
Foundation: Ch 29.
Row 1 (RS): Sc in the 2nd ch from the hook and in each ch across. (28 sc)
Row 2: Ch 3 (counts as the first dc) and turn. Sk the first sc. 2 dc in the next sc, dc in each of the next 2 sc. Repeat from * to * 9 times in total. (37 dc: 1 turning ch + 9 × 4)
Row 3 (mesh): Ch 5 (counts as dc + ch 2) and turn. Sk the next dc, then dc in the next dc. Ch 2, sk 1 dc, dc in the next dc. Repeat from * to * 17 times; the last dc goes in the top of the turning ch. (19 dc and 18 ch-2 sps, 55 sts in total)
Row 4: Ch 1 and turn. Sc in the first dc. 2 sc in the next ch-2 sp, sc in the next dc. Repeat from * to * 18 times; the last sc goes in the 3rd ch of the turning ch-5. (55 sc: 1 + 18 × 3) Fasten off.
Checkpoint: the top edge is 4 in (10.2 cm) and the strip is 1 in (2.5 cm) deep. The lower edge is about twice as long as the top edge, so the strip lies in a gentle crescent. The 18 mesh windows form the open band along the lower curve.
Head (Cream)
Turn the body so the foundation chain is at the top and the left end faces you. You will work the head into the unused foundation loops.
Row 1: Join cream in the first foundation loop at the left end. Ch 1, then sc in the same loop and in the next 6 loops. (7 sc)
Row 2: Ch 1 and turn. 2 sc in the first sc, sc in the next 5 sc, 2 sc in the last sc. (9 sc)
Row 3 (eye row): Ch 1 and turn. Sc in the next 3 sc, ch 1, sk 1 sc, sc in the last 5 sc. (8 sc + 1 ch-1 sp = 9 sts) The ch-1 space becomes the eyelet eye. Check that it sits toward the front (left) of the head.
Row 4: Ch 1 and turn. Sc2tog, sc in the next 2 sc, sc in the ch-1 sp, sc in the next 2 sc, sc2tog. (7 sts)
Row 5: Ch 1 and turn. Sc2tog, sc in the next 3 sc, sc2tog. (5 sts) Fasten off.
Checkpoint: the head is about 5/8 in (1.6 cm) tall and its widest row is about 1.25 in (3.2 cm) across.
Edging (Border)
This single cream round of sc smooths the outline of the body and head and adds the beak. You do not work it along the right end, because the tail goes there.
Edging gauge: Work 1 sc in each sc, 1 sc in each sc row-end and 2 sc in each dc row-end. These ratios keep the edge flat.
With RS facing, join cream in the first sc of Row 4 at the right end of the body. Ch 1, then work the sections below in order.
- Lower curve: Sc in each sc of Row 4. (55 sc)
- Left end of the body: Work up the row-ends: 1 sc in the Row 4 end, 2 sc in the Row 3 end, 2 sc in the Row 2 end, 1 sc in the Row 1 end. (6 sc)
- Front of the head: Work up the head row-ends with 1 sc in each end. Make the beak point in the Row 3 end. (5 sc + beak)
- Top of the head: Sc in each st of Head Row 5. (5 sc)
- Back of the head: Work down the row-ends with 1 sc in each end. (5 sc)
- Top of the body: Sc in each of the remaining 21 foundation loops (28 loops − 7 used for the head). (21 sc)
Total: 97 sc plus the beak point. Fasten off.
Why the math works: Each section is worked 1-to-1 into existing stitches or row-ends. Sc row-ends are about one sc tall, and dc row-ends are about two sc tall, so the counts at the ends match the height of the fabric. Turning points are already included in each section’s count, so do not add extra corner stitches. The edging adds 0.125 in (0.3 cm) at each end, taking the width from 4.75 in (12.1 cm) to 5 in (12.7 cm).
Tail (Cream with Gold Edge)
With RS facing, turn the body so the right end is at the top.
Row 1 (cream): Join cream at the Row 4 end. Ch 1. Work 2 sc in the Row 4 end, 3 sc in the Row 3 end, 3 sc in the Row 2 end and 2 sc in the Row 1 end. (10 sc)
Row 2: Ch 1 and turn. Sc in the first sc. Ch 6, sk 2 sc, sc in the next sc. Repeat from * to * 3 times. (4 sc and 3 ch-6 loops; stitches used: 1 + 3 × 3 = 10)
Row 3: Ch 1 and turn. Sc in the first sc. In the next ch-6 loop, work (dc, ch 1) 6 times, then 1 more dc. Sc in the next sc. Repeat from * to * 3 times. (3 fans, each with 7 dc and 6 ch-1 sps, plus 4 sc) Fasten off cream.
Row 4 (gold): With RS facing, join gold in the first sc. Ch 1, then sc in the same sc. Across the next fan, sc in each dc and in each ch-1 sp (13 sc per fan). Sl st in the next sc. Repeat from * to * 3 times; on the last repeat, work a sc instead of the sl st. (39 sc on the fans + 2 end sc + 2 sl sts)
Row 5 (gold picot scallops): Ch 1 and turn. Sc in the first sc. Across the next fan, sc in the first sc, then (ch 3, sk 1, sc in the next sc) 6 times. Sl st in the next sl st. Repeat from * to * 3 times; on the last repeat, work a sc in the end sc. (6 ch-3 loops per fan, 18 in total; stitches used per fan: 1 + 12 = 13) Fasten off.
Checkpoint: the tail is about 1.25 in (3.2 cm) long, and the three fans spread out evenly.
Spiral Wing (Cream)
Round 1: Ch 4 and sl st to the first ch to form a ring. Ch 1, then work 8 sc into the ring. Do not join. (8 sc)
Round 2: Working in a spiral in BLO, work 2 sc in each sc. Sl st in the next st to smooth the step. (16 sc) The unused front loops form the visible spiral line.
Round 3: Ch 5 (counts as dc + ch 2). Dc in the next st, ch 2. Repeat from * to * 15 times. Sl st in the 3rd ch of the beginning ch-5. (16 dc and 16 ch-2 sps)
Round 4: Sl st into the first ch-2 sp. Ch 1, then work 3 sc in each ch-2 sp. Sl st in the first sc. (48 sc)
Checkpoint: the wing is 2.25 in (5.7 cm) across.
Round 5 (feathers, partial round): Mark the joining sl st as st 1. Work a Scallop 4 times. (4 scallops, 28 dc; sts 1–25 used) Sts 26–48 stay plain. Fasten off and leave a 12 in (30.5 cm) tail for sewing.
Checkpoint: the wing is 2.75 in (7.0 cm) across, measured across the scallops.
Assembly and Hanging Loop
- Lay the body flat with RS up. Place the wing so that its plain stitches (sts 26–48) overlap the top edge of the body by about 0.5 in (1.3 cm). The scallops should face up and slightly toward the tail. The centre of the wing should sit about 2.25 in (5.7 cm) from the beak.
- Using the long tail, whipstitch the bottom 15 plain wing stitches to the body edging and through Body Row 1. Keep your stitches on the wrong side.
- Hanging loop: Join cream in the sl st between Scallops 2 and 3. Ch 30, then sl st in the same st. Turn and sl st in each ch around the loop. (30 sl sts) Fasten off. The loop stands about 1.75 in (4.4 cm) tall.
- Weave in all ends along stitches of the same colour.
Final Blocking
- Lightly spray the ornament with water until it is evenly damp, or dip it in diluted stiffener and squeeze out the excess.
- Pin it to the board RS up. Start at the beak, then pin the tail tip, so the width is 6 in (15.2 cm).
- Pin each of the 18 mesh windows square, and stretch the crescent into a smooth curve.
- Pin out each wing ray and each feather scallop, pulling slightly outward from the spiral centre.
- Open each gold picot loop with one pin.
- Check that the height is 4 in (10.2 cm). Leave the ornament to dry completely, at least 12 hours, before unpinning.
Final Quality-Control Checklist
- [ ] Body Row 1 has 28 sc and Row 4 has 55 sc.
- [ ] There are 18 mesh windows, all open and evenly sized.
- [ ] The eyelet eye is visible and the beak point is crisp.
- [ ] The edging totals 97 sc and lies flat.
- [ ] The tail has 3 fans and 18 gold picots.
- [ ] The wing has 16 rays and 4 scallops, and the spiral is visible.
- [ ] The wing is sewn securely with no stitches showing on the RS.
- [ ] The finished size is 6 in × 4 in (15.2 cm × 10.2 cm).
- [ ] All ends are woven in.
Troubleshooting
The body is straight, not curved: Recount Row 2. Leaving out increases flattens the curve.
The body ruffles: Your mesh chains are too loose. Make tighter ch-2s, or switch to a smaller hook for Row 3 only.
The edging puckers: Check the row-end counts. You need 2 sc per dc row-end, not 3.
The wing cups: Round 3 chains are too tight. Loosen them, or block the wing flat with more water.
The spiral doesn’t show: Make sure Round 2 is worked in BLO only.
The tail fans overlap: Block them apart, or add 1 ch to each Row 2 loop and rework Row 3.
Care
Hand wash in cool water with mild soap. Reshape the ornament and dry it flat, re-stiffening if needed. Store it flat in tissue paper between seasons.
Final Notes
Every measurement depends on the one before it. A gauge of 7 sc per inch (2.5 cm) gives a body top edge of 4 in (10.2 cm). The body, head and edging together reach 5 in (12.7 cm). The tail brings the full width to 6 in (15.2 cm), and the 2.75 in (7.0 cm) wing brings the height to 4 in (10.2 cm). If you check each stage as you go, the dove will come out right on the first try. Make one, then make a whole flock for the tree.
Happy crocheting!