

This little strawberry vine hangs from your rearview mirror and sways gently as you drive. A corded green stem holds one plump red strawberry, a smaller blush-pink berry, a tiny red bud at the tip, three cream blossoms and eight outlined leaves. It looks like a cottage-garden strawberry patch shrunk down to pocket size.
The colors are tomato red, blush pink, sage green, cream and mustard yellow. The style is soft and realistic: tight amigurumi berries with embroidered seeds, flat leaves with a crisp slip-stitch edge, and simple five-petal flowers.
The finished charm is about 8.75 in (22.2 cm) long from the top of the loop to the tip of the bottom berry, and about 3.5 in (8.9 cm) wide at its widest point. All instructions use US crochet terms.
You make each small part separately and then sew them onto one continuous cord stem. That stem is folded at the top to form the hanging loop. The leaves get a slip-stitch “border” round that gives them their raised outline.
Finished Size and Construction
- Finished size: 8.75 in (22.2 cm) long × 3.5 in (8.9 cm) wide
- Skill level: Advanced beginner / intermediate
- Terminology: US crochet terms
- Yarn weight: DK / light worsted cotton (#3)
- Hook: 2.5 mm
- Number of pieces: 17 components, assembled into 1 charm
- Layout: One vertical stem with components placed down both sides
- Piece sizes: large strawberry 2 in (5.1 cm) tall × 1.9 in (4.8 cm) wide; pink strawberry 1.4 in (3.6 cm) × 1.2 in (3.0 cm); mini berry 0.75 in (1.9 cm); flower 1.1 in (2.8 cm); leaf 1.1 in (2.8 cm) × 0.6 in (1.5 cm)
- Leaf size before border: 1 in (2.5 cm) × 0.5 in (1.3 cm)
- Border depth: about 0.06 in (0.2 cm) per edge, on leaves only
Materials
Use a smooth, mercerized or combed cotton. It holds the berry shapes firmly, shows the seed stitches clearly and won’t fuzz in sunlight. Every part is small, so leftover yarn works well.
- Red: 6 g / 14 m (large strawberry, mini berry)
- Blush pink: 3 g / 7 m (small strawberry)
- Sage green: 8 g / 18 m (stem, branches, calyxes, leaves)
- Cream: 3 g / 7 m (flower petals, seeds)
- Mustard yellow: 1 g / 2 m (flower centers)
Tools:
– 2.5 mm crochet hook
– Tapestry needle
– Stitch marker
– Small amount of polyester fiberfill
– Scissors
– Rustproof pins
– Spray bottle for blocking
All quantities include a margin of about 20% for gauge swatches and sewing tails.
Abbreviations (US Terms)
- ch – chain
- sl st – slip stitch
- sc – single crochet
- hdc – half double crochet
- dc – double crochet
- inc – 2 sc in the same stitch
- dec – single crochet 2 together (invisible decrease recommended)
- MR – magic ring
- BLO – back loop only
- st(s) – stitch(es)
- rnd – round
Special stitch: back-bump slip-stitch cord. Make a chain. Then work 1 sl st into the back bump (the horizontal bar on the back of each chain) of the 2nd ch from the hook and each ch after it. This makes the firm, rope-like stem you see in the photo.
Gauge and Checkpoints
Body gauge: 10 sc × 10 rnds = 2 in (5.1 cm) when worked in a spiral. That is 5 sts per 1 in (2.5 cm).
Cord gauge: 12 back-bump sl sts = 2 in (5.1 cm). That is 6 sts per 1 in (2.5 cm).
Make one large strawberry first and test it before you make anything else. It uses the most stitches, so if it comes out right, the rest of the charm will too.
Checkpoints:
– Large strawberry after Rnd 7: the cone measures 1.4 in (3.6 cm) from tip to edge.
– Large strawberry finished and stuffed: 2 in (5.1 cm) tall.
– Pink strawberry after Rnd 4: 0.8 in (2.0 cm) tall.
– Leaf before border: 1 in (2.5 cm) long.
– Cord: 60 sts = 10 in (25.4 cm).
If your pieces are too big: go down to a 2.25 mm hook, or tighten your tension on the yarn.
If your pieces are too small: go up to a 2.75 mm hook. Keep the amigurumi fabric dense so the stuffing doesn’t show through.
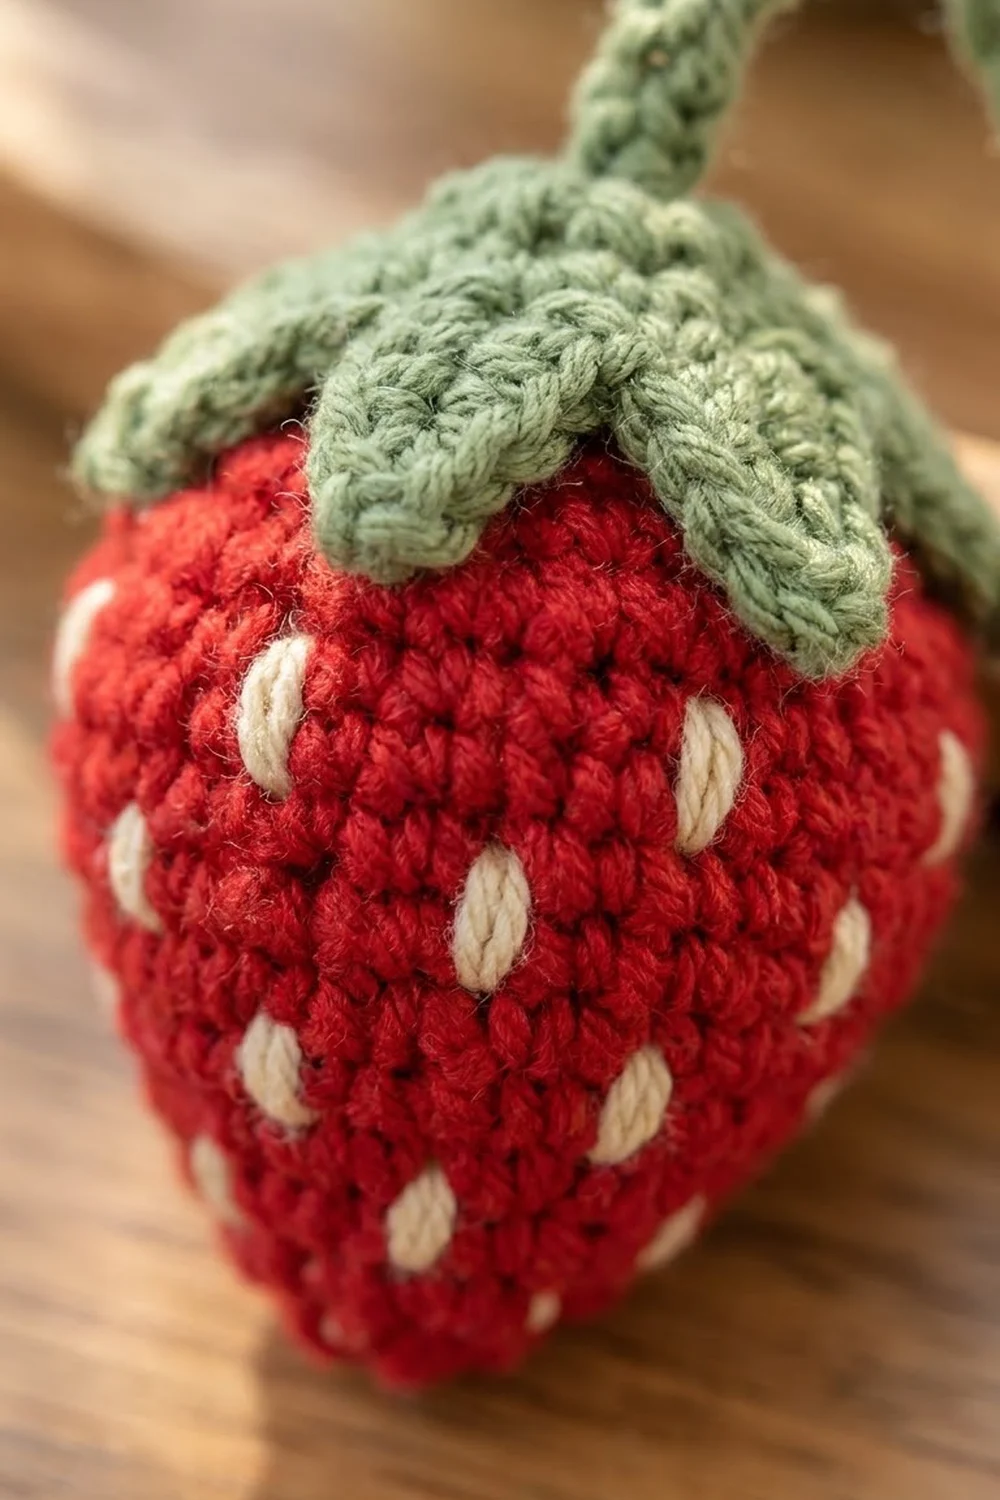
Large Red Strawberry (make 1)
Work in a continuous spiral and place a marker in the first st of each round. You start at the pointed tip.
Rnd 1: With red, 6 sc in MR. (6)
Rnd 2: [sc, inc] 3 times. (9)
Rnd 3: [2 sc, inc] 3 times. (12)
Rnd 4: [3 sc, inc] 3 times. (15)
Rnd 5: [4 sc, inc] 3 times. (18)
Rnd 6: [2 sc, inc] 6 times. (24)
Rnd 7: [3 sc, inc] 6 times. (30)
Rnds 8–10: Sc in each st around. (30)
Rnd 11: [3 sc, dec] 6 times. (24)
Rnd 12: [2 sc, dec] 6 times. (18)
Stuff firmly. Push the fiberfill well down into the tip.
Rnd 13: [sc, dec] 6 times. (12)
Rnd 14: Dec 6 times. (6)
Fasten off. Weave the tail through the front loops of the last 6 sts and pull it closed.
The slow increases in Rnds 2–5 make the pointed tip. The quick increases in Rnds 6–7 make the full shoulders, and the fast decreases in Rnds 11–14 give the flat-topped berry shape.
Seeds: Thread cream yarn onto the tapestry needle. Embroider 18 seeds, each one a single straight stitch 1 rnd tall, running from tip to top. Stagger them in rows: 3 seeds on Rnd 4, 5 on Rnd 6, 6 on Rnd 8 and 4 on Rnd 10. Leave at least 2 sts between neighboring seeds.
Small Pink Strawberry (make 1)
Rnd 1: With pink, 6 sc in MR. (6)
Rnd 2: [sc, inc] 3 times. (9)
Rnd 3: [2 sc, inc] 3 times. (12)
Rnd 4: [sc, inc] 6 times. (18)
Rnds 5–7: Sc in each st around. (18)
Rnd 8: [sc, dec] 6 times. (12)
Stuff firmly.
Rnd 9: Dec 6 times. (6)
Fasten off and close the opening. With cream, embroider 10 seeds: 3 on Rnd 3, 4 on Rnd 5 and 3 on Rnd 7.
Mini Red Berry (make 1)
Rnd 1: With red, 6 sc in MR. (6)
Rnd 2: Inc in each st around. (12)
Rnds 3–4: Sc in each st around. (12)
Stuff lightly.
Rnd 5: Dec 6 times. (6)
Fasten off and close the opening. Leave this berry plain, without seeds, so it reads as a young bud.
Calyxes (make 3)
All three calyxes are worked in sage green. Each sepal is worked down a short chain and then anchored back into the ring.
Large calyx (6 points):
– Rnd 1: 6 sc in MR. (6)
– Rnd 2: [ch 5, sl st in 2nd ch from hook, sc in next ch, hdc in next ch, dc in last ch, sl st in next sc of Rnd 1] 6 times. (6 sepals)
Small calyx (5 points):
– Rnd 1: 5 sc in MR. (5)
– Rnd 2: [ch 4, sl st in 2nd ch from hook, sc in next ch, hdc in last ch, sl st in next sc] 5 times. (5 sepals)
Mini calyx (5 points):
– Rnd 1: 5 sc in MR. (5)
– Rnd 2: [ch 3, sl st in 2nd ch from hook, sc in last ch, sl st in next sc] 5 times. (5 sepals)
Leave a 6 in (15.2 cm) tail on each calyx for sewing.
Flowers (make 3)
Rnd 1: With yellow, 10 sc in MR. Join with a sl st to the first sc. Pull the ring tight so the center domes up slightly. (10)
Change to cream.
Rnd 2: [(hdc, 3 dc, hdc) in next st, sl st in next st] 5 times. Join. (5 petals; 30 sts: 25 petal sts + 5 sl sts)
Fasten off. Each petal sits on one st, and each sl st between petals pinches the petals apart. That gives you 5 rounded, separate petals around a raised yellow center.
Leaves (make 8)
Rnd 1: With sage green, ch 7.
– Starting in the 2nd ch from the hook: sc, hdc, dc, hdc, sc. (5 sts along side 1)
– 3 sc in the last ch. (3 sts at the base)
– Rotate the piece and work along the other side of the foundation chain: sc, hdc, dc, hdc, sc. (5 sts along side 2)
– At the tip: ch 2, then sl st into the skipped ch at the tip.
Round total: 13 sts + 1 ch-2 tip.
The foundation chain stays visible along the middle of the leaf and reads as the center vein.
Stem and Branches (make 3 cords)
Main stem cord: Ch 61. Sl st in the back bump of the 2nd ch from the hook and in each ch across. (60 sl sts, 10 in / 25.4 cm)
Large-berry branch: Ch 10. Sl st in the back bump of the 2nd ch from the hook and each ch across. (9 sl sts, 1.5 in / 3.8 cm)
Pink-berry branch: Ch 7. Sl st in the back bump of the 2nd ch from the hook and each ch across. (6 sl sts, 1 in / 2.5 cm)
Hanging loop: Fold the first 24 sts of the main cord back on itself. Sew st 1 firmly to st 24. This makes a loop with a 4 in (10.2 cm) circumference that hangs 2 in (5.1 cm) long. The remaining 36 sts form the main stem, which is 6 in (15.2 cm) long.
Make All Pieces
Quantities per color:
– Red: 1 large strawberry, 1 mini berry
– Pink: 1 small strawberry
– Sage green: 3 cords, 3 calyxes, 8 leaves
– Yellow + cream: 3 flowers, plus cream seeds on 2 berries
That makes 17 components in total.
Layout grid. Each distance is measured down the stem from the loop seam, which counts as 0 in.
0 in  (0 cm) ........ [ LOOP SEAM ]
0.25 in (0.6 cm) .... Leaf L | Flower 1 L | Leaf R
1.5 in (3.8 cm) ..... Flower 2 R
1.75 in (4.4 cm) .... Large-berry branch L
2.5 in (6.4 cm) ..... Leaf R
3.5 in (8.9 cm) ..... Leaf L | Pink-berry branch R (Flower 3 on calyx)
4.5 in (11.4 cm) .... Leaf L | Leaf R
5.5 in (14.0 cm) .... Leaf L
6 in (15.2 cm) ...... Mini calyx + mini berry at stem end
Leaf count: 2 + 1 + 1 + 2 + 1 = 7 on the stem, plus 1 leaf at the base of the large-berry branch, for 8 in total.
Joining (Assembly)
Sew everything with matching tails and small whipstitches. Work stitch-to-stitch: each sewing pass goes through one cord sl st and one edge st of the piece you’re attaching. Never skip a cord stitch, because a gap lets the piece twist.
- Calyxes to berries: Center each calyx over the closed top of its berry. Tack Rnd 1 of the calyx all the way around, then tack the base of each sepal so the points sit flat against the berry.
- Branches to berries: Push the free end of each branch cord 0.25 in (0.6 cm) into the calyx center and sew it through the berry top.
- Flower 3: Sew it onto the pink calyx, offset toward the stem, so it stacks above the berry.
- Branches to stem: Sew the top end of each branch to the stem at its marked position. Use 3 passes through 3 consecutive stem sts.
- Leaves: Sew each leaf by its 3 base sts to 1 stem st. This lets the leaf tip angle outward and down.
- Flowers 1 and 2: Tack them at the center back only, so the petals stay free.
- Mini berry: Sew the mini calyx to the last 2 sts of the stem, then sew the berry under it.
Tension: Pull each pass snug but not tight. If you see dimples in the berries or a puckered stem, loosen up.
Size checkpoint: Hang the charm. It should measure 8.75 in (22.2 cm): a 2 in (5.1 cm) loop, plus a 6 in (15.2 cm) stem, plus a 0.75 in (1.9 cm) berry.
Border (Leaf Edging)
The only border on this charm is a slip-stitch outline around each leaf. It adds about 0.06 in (0.2 cm) per edge and makes the leaves 1.1 in (2.8 cm) × 0.6 in (1.5 cm). That raised rim is what you see in the photo.
Border gauge: 1 sl st per Rnd 1 st, worked loosely so the edge doesn’t cup.
Rnd 2: Continuing from the tip, sl st in the BLO of each st around:
– Side 1: 5 sl st
– Base: 3 sl st
– Side 2: 5 sl st
– Tip: (sl st, ch 1, sl st) in the ch-2 tip space
Total: 13 sl sts on the sides and base + 2 sl sts at the tip = 15 sl sts + 1 ch.
Why the math works: Each straight side gets exactly 1 sl st per existing st, so it doesn’t stretch or ruffle. The only extra stitches go where the edge curves sharply. The 3 base sts already contain their own turn, so they get 1 sl st each. The ch-2 tip is the only place that needs added sts (2 sl sts + ch 1) to keep the point sharp. Because nothing extra goes on the sides, the leaf stays flat.
Fasten off, leaving an 8 in (20.3 cm) tail for sewing.
Final Blocking
- Lightly mist the leaves, flowers and calyxes. Don’t wet the stuffed berries.
- Pin each leaf flat to a foam board. Pull the tip into a point and the base into a gentle curve.
- Pin the flower petals open into an even five-point star.
- Pinch each calyx sepal into a point and press it against its berry with your fingers.
- Hang the charm with a light clip on the bottom berry for 1 hour to straighten the cord.
- Let everything dry completely, about 4–6 hours, before unpinning.
Final Quality-Control Checklist
- The large strawberry is 2 in (5.1 cm) tall, firm, with a pointed tip and 18 seeds.
- The pink strawberry is 1.4 in (3.6 cm) tall, with 10 seeds.
- The mini berry is 0.75 in (1.9 cm) and has no stuffing showing.
- The calyxes have 6, 5 and 5 points, all lying flat.
- All 3 flowers have 5 even petals and a domed yellow center.
- All 8 leaves have a continuous raised edge and a sharp tip.
- The loop hangs 2 in (5.1 cm) and fits over your mirror stem.
- The total length is 8.75 in (22.2 cm).
- All tails are woven in at least 1 in (2.5 cm).
Troubleshooting
- The strawberry is round, not pointed: Your Rnd 2–5 increases are bunching. Stagger the increase positions each round.
- Stuffing shows through: Go down a hook size, or use a less fluffy fiberfill.
- The leaves curl: Your border sl sts are too tight. Rework Rnd 2 more loosely.
- The cord is stretchy or thin: Work into the back bump only, not the top loops.
- The petals blend together: Check that each sl st between petals goes into its own st.
- The charm twists when hanging: Re-sew the branches through 3 stem sts instead of 1.
Care
Spot clean with a damp cloth and mild soap, then air dry flat. Cotton holds up well in a sunny car, but rotate or store the charm occasionally to slow fading.

Final Notes
Here is how the measurements connect. A gauge of 5 sc per 1 in (2.5 cm) produces a 2 in (5.1 cm) red strawberry, a 1.4 in (3.6 cm) pink berry and a 0.75 in (1.9 cm) bud. A cord gauge of 6 sl st per 1 in (2.5 cm) turns 60 sts into a 10 in (25.4 cm) cord, which folds into a 2 in (5.1 cm) loop and a 6 in (15.2 cm) stem. Leaves start at 1 in (2.5 cm) and the border brings them to 1.1 in (2.8 cm). Altogether the charm comes out at 8.75 in (22.2 cm). Check your gauge on the large berry first, and everything else will fall into place.
Happy crocheting!