

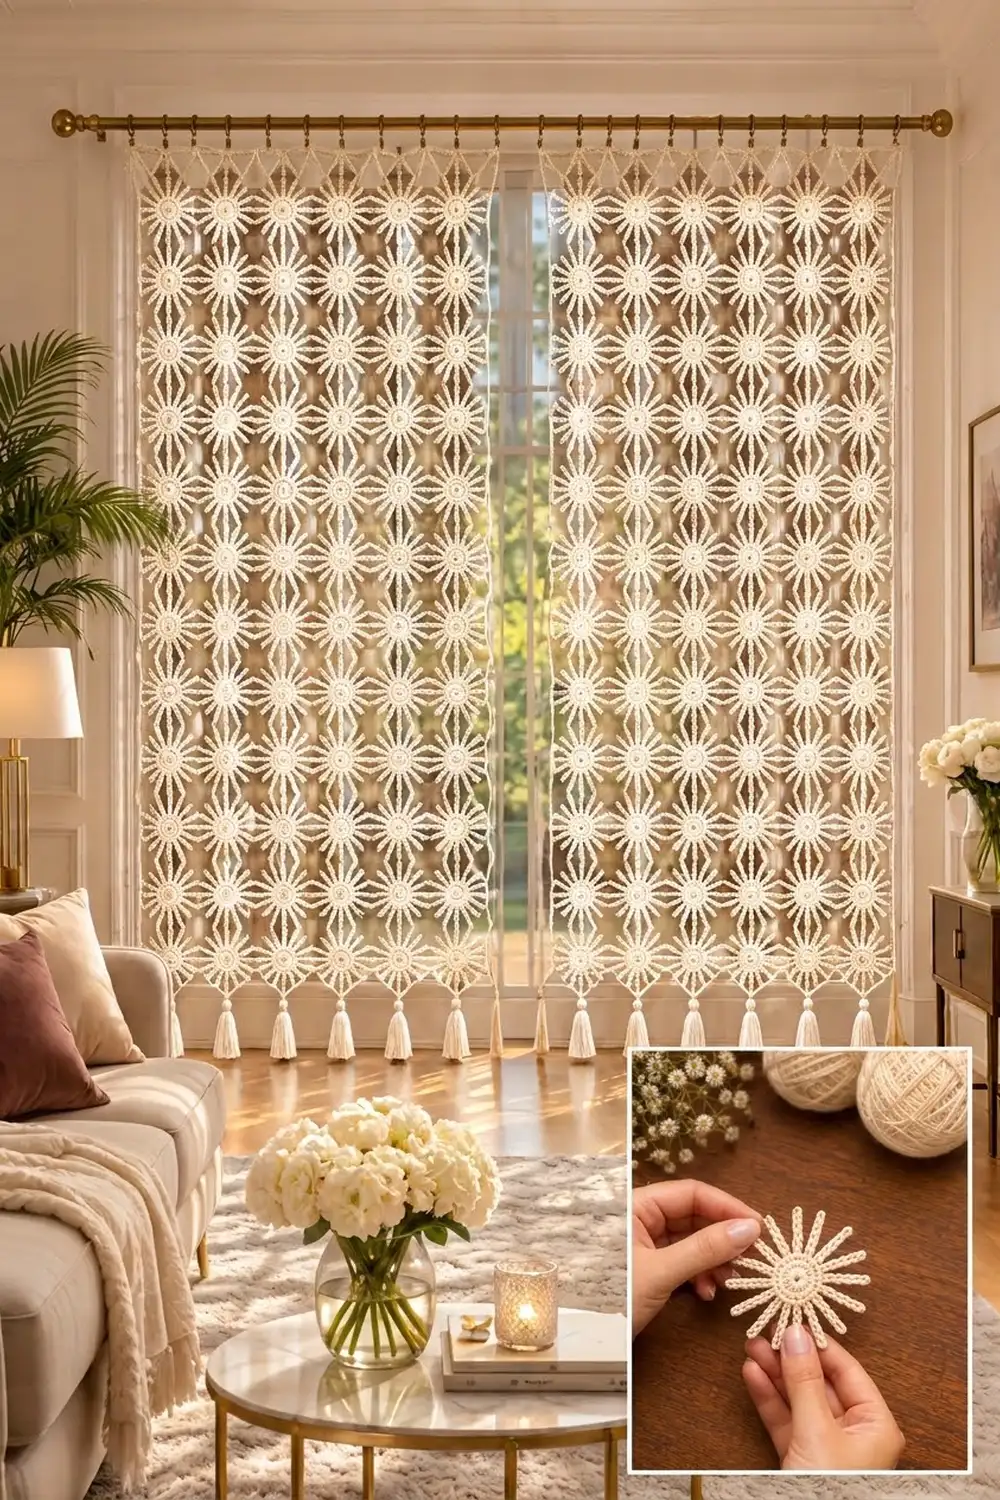
The Sunburst Lattice Curtain Panel is an airy window curtain built from one repeating motif: a small solid center with 16 slim spokes, framed by a fine square outline. When the squares are joined, the spokes and outlines form a lattice of diamonds and stars that lets light through while still softening a window.
The design uses a single color, a warm cream cotton, so the texture does all the work. The look sits somewhere between boho and classic, and it suits natural wood, brass rods and pale linen. A row of short tassels finishes the bottom edge.
This pattern uses US crochet terms. One finished panel measures 43 x 71 in (109.2 x 180.3 cm) including the border, plus 4 in (10.2 cm) of tassels, for a total drop of 75 in (190.5 cm). The curtain in the photo is two matching panels hung side by side, so make two panels to recreate it.
Construction is simple and repetitive. You crochet each square motif in the round: a center, then spokes, then a two-round outline. Next you join 60 motifs into a 6 x 10 grid with a flat slip-stitch seam, work a 3-round single crochet border, and add tassels.
Finished Size and Construction
- Finished panel size: 43 x 71 in (109.2 x 180.3 cm), plus 4 in (10.2 cm) tassels
- Skill level: Intermediate
- Terminology: US crochet terms
- Yarn weight: DK (light worsted, #3) cotton
- Hook: 3.75 mm (F-5)
- Number of pieces: 60 motifs per panel (120 for a pair)
- Layout: 6 motifs across x 10 motifs down
- Motif size: 7 x 7 in (17.8 x 17.8 cm)
- Size before border: 42 x 70 in (106.7 x 177.8 cm)
- Border depth: 0.5 in (1.3 cm), 3 rounds
Materials
Yarn: Use a smooth, mercerized or combed DK cotton. Cotton holds the straight lines of the spokes, blocks crisply, and doesn’t stretch much under its own weight when hung. Avoid fuzzy or very soft acrylics, which blur the lattice and can droop.
- Cream (one color only): 800 g / about 1,920 m (2,100 yd) per panel, which is 16 balls of 50 g / 120 m. For a pair of panels you need 1,600 g / about 3,840 m (4,200 yd).
- Each motif uses about 11 g / 26 m (28 yd). The border uses about 60 g / 140 m (153 yd), and the tassels use about 40 g / 90 m (98 yd).
These quantities include a margin of about 7% for gauge differences and swatching. Buy all balls from one dye lot, because color differences show clearly against window light.
Tools:
– 3.75 mm (F-5) crochet hook
– Tapestry needle
– Stitch markers
– Scissors
– Measuring tape
– Blocking mats and rustproof pins
– Spray bottle
– Stiff card 4.5 in (11.4 cm) tall, for tassels
– 13 curtain clip rings per panel, plus a curtain rod
Abbreviations (US Terms)
- ch – chain
- sl st – slip stitch
- sc – single crochet
- dc – double crochet
- sp – space
- st(s) – stitch(es)
- rep – repeat
- RS / WS – right side / wrong side
Special stitch – Spoke (N): Ch N, sl st in 2nd ch from hook and in each remaining ch back to the base. That makes N − 1 sl sts. The skipped chain at the far end is the tip ch. Each spoke reads as two parallel strands of chain.
- Corner spoke: Spoke (20), 19 sl sts
- Side spoke: Spoke (14), 13 sl sts
- Middle spoke: Spoke (13), 12 sl sts
Gauge and Checkpoints
Gauge: 20 sc and 24 rows = 4 in (10.2 cm) in rows of sc, after blocking. Chains measure about 5 ch per 1 in (2.5 cm).
Make one complete motif and block it before starting the rest. Check it at each stage:
- After Rnd 2: center diameter 2 in (5.1 cm)
- After Rnd 3: middle spokes 2.4 in (6.1 cm), side spokes 2.6 in (6.6 cm), corner spokes 3.8 in (9.7 cm) long
- After Rnd 5, blocked: 7 x 7 in (17.8 x 17.8 cm), with a tolerance of ±0.25 in (0.6 cm)
Too big? Go down 0.25 mm in hook size, or chain more firmly. Over the panel, an extra 0.25 in (0.6 cm) per motif adds 1.5 in (3.8 cm) to the width and 2.5 in (6.4 cm) to the length.
Too small? Go up 0.25 mm in hook size. If only the spokes are short, loosen your chains and slip stitches. Don’t add chains, because that changes the stitch counts.
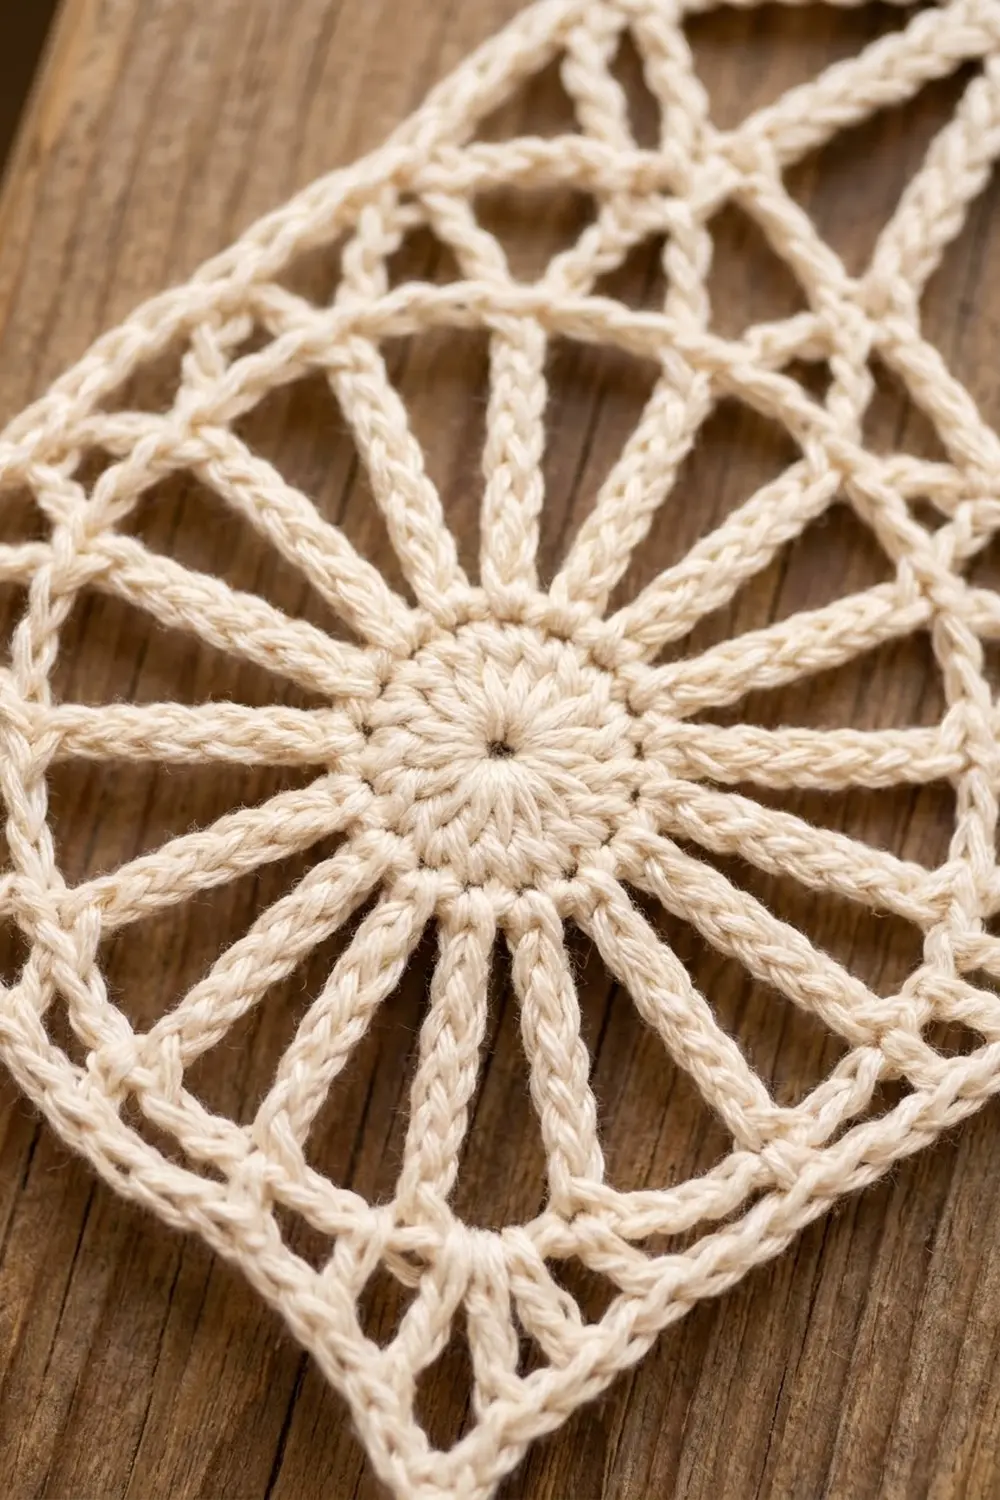
Motif (make 60 per panel)
Rnd 1 (RS): Make a magic ring, ch 1, 16 sc in ring, then sl st to the first sc and pull the ring tight. (16 sc)
Rnd 2: Ch 3 (counts as dc), dc in the same st, then 2 dc in each of the next 15 sts. Sl st to the top of ch-3. (32 dc) The center should be a flat solid disc 2 in (5.1 cm) across.
Rnd 3 (spokes): Here you make 16 spokes, one in every other dc. The spokes go in this order, repeated 4 times: corner, side, middle, side.
Make a Corner spoke, sl st in each of the next 2 dc. Make a Side spoke, sl st in each of the next 2 dc. Make a Middle spoke, sl st in each of the next 2 dc. Make a Side spoke, sl st in each of the next 2 dc. Rep from * 3 more times. The last sl st lands in the joining st of Rnd 2. Fasten off. (16 spokes: 4 corner, 8 side, 4 middle)
The different spoke lengths are what turn a round starburst into a square. The corner spokes reach the diagonal corners, and the middle spokes reach the midpoints of the sides.
Rnd 4 (outline): With the RS facing, join yarn with a sc in the tip ch of any corner spoke. Ch 9, sc in the tip ch of the next side spoke, ch 6, sc in the tip ch of the middle spoke, ch 6, sc in the tip ch of the next side spoke, ch 9, sc in the tip ch of the next corner spoke. Rep from * 3 more times. On the last rep, sl st to the first sc instead of working the final sc.
(16 sc + 120 ch = 136 sts; each side has 9 + 6 + 6 + 9 = 30 ch)
Rnd 5 (square outline, conversion round): Ch 1. Work (sc, ch 2, sc) in the first sc (corner). Sc in each of the next 9 ch, sc in the sc, sc in each of the next 6 ch, sc in the sc, sc in each of the next 6 ch, sc in the sc, sc in each of the next 9 ch, then (sc, ch 2, sc) in the corner sc. Rep from * 3 more times. On the last rep, skip the final corner group and sl st to the first sc. Fasten off and weave in the ends.
(132 sts worked 1 sc per st + 4 corner sc worked as 2 sc each = 8 sc → 140 sc, plus 4 ch-2 corner sps)
Per side: 1 corner sc + 9 + 1 + 6 + 1 + 6 + 1 + 9 + 1 corner sc = 35 sc. These 35 sts include both of that side’s corner sc. Four sides × 35 = 140, so the count checks out. At 5 sc per inch, 35 sc = 7 in (17.8 cm).
Lightly block each motif to 7 x 7 in (17.8 x 17.8 cm) before joining. Pin the spoke tips so that the spokes lie straight.
Make All Pieces
- Cream: 60 motifs per panel (120 for the pair shown)
Layout for one panel, 6 across x 10 down (M = motif):
Row 1:  M  M  M  M  M  M
Row 2:  M  M  M  M  M  M
Row 3:  M  M  M  M  M  M
Row 4:  M  M  M  M  M  M
Row 5:  M  M  M  M  M  M
Row 6:  M  M  M  M  M  M
Row 7:  M  M  M  M  M  M
Row 8:  M  M  M  M  M  M
Row 9:  M  M  M  M  M  M
Row 10: M  M  M  M  M  M
All motifs are identical, so you can turn them in any direction.
Joining
Method: Use a flat slip-stitch seam on the RS, worked through the back loops only.
- Lay two motifs side by side, RS up, with the edges touching.
- Join yarn in the corner ch-2 sp of both motifs and sl st through both sps together.
- Then sl st through the back loop of each matching sc pair, working across: 35 pairs, which includes the corner sc on each motif.
- Finish with a sl st through the next pair of corner ch-2 sps.
Stitch-to-stitch logic: Each side has exactly 35 sc, so the stitches match 1 to 1 and nothing is added or skipped. The seam doesn’t take up any width, because the joined stitches stay in place and simply lie side by side.
Order: First join the motifs into 10 horizontal strips of 6. Then join the strips along the long edges. Where four corners meet, work a single sl st through all 4 ch-2 sps together so the intersection stays flat.
Tension: Keep the seam sl sts the same height as your sc. If the seam puckers, loosen up or go up one hook size for the seams only. If the lattice looks gappy, tighten slightly.
Size checkpoint: The joined panel should measure 42 x 70 in (106.7 x 177.8 cm). That’s 6 × 7 in and 10 × 7 in.
Border
Border gauge: 20 sc = 4 in (10.2 cm), and 3 rounds = 0.5 in (1.3 cm).
Starting counts: Short sides: 6 motifs × 35 sc = 210 sc. Long sides: 10 motifs × 35 sc = 350 sc. Where seams meet the outer edge, skip the joined pair of ch-2 sps and don’t work into them. No stitches are added at the seams.
Rnd 1: With the RS facing, join with a sc in the first sc after any outer corner ch-2 sp of the panel. Sc in each sc along the side, skipping the seam ch-2 sps. At each outer panel corner, ch 2 and skip the corner ch-2 sp. Sl st to the first sc.
(210 sc on each short side, 350 sc on each long side, 1,120 sc total plus 4 ch-2 corners)
Rnd 2: Ch 1. Sc in each sc, and work (sc, ch 2, sc) in each corner ch-2 sp. Sl st to join.
(212 sc on each short side, 352 on each long side, 1,128 sc total)
Rnd 3: Repeat Rnd 2. Fasten off.
(214 sc on each short side, 354 on each long side, 1,136 sc total)
Why the math works: 210 sc at 5 sc per inch equals exactly 42 in (106.7 cm), and 350 sc equals 70 in (177.8 cm). So Rnd 1 lies flat without ruffling or pulling. Rnds 2 and 3 add only 2 sts per side, at the corners, to turn the corners neatly. Three rounds add 0.5 in (1.3 cm) on every edge, which gives 43 x 71 in (109.2 x 180.3 cm).
Tassels (make 13 per panel): Wrap yarn 25 times around the 4.5 in (11.4 cm) card. Tie the loops at the top and cut them open at the bottom. Wrap a second strand around the bundle 0.75 in (1.9 cm) below the top tie. Trim the tassel to 4 in (10.2 cm).
Along the bottom edge, attach one tassel at each panel corner, one at each of the 5 seams, and one at the center of each motif (st 18 of its 35). That’s 7 + 6 = 13 tassels. Clip the 13 rings to the top edge at the same positions.
Final Blocking
- Lay out the panel in sections on blocking mats. Work 2 rows of motifs at a time if your space is limited.
- Spray it until it’s evenly damp, but not soaked.
- Pin the outer edges straight to 43 x 71 in (109.2 x 180.3 cm).
- Pin every motif corner where the seams cross so the grid stays square.
- Pin the spoke tips that sag so each spoke lies straight.
- Let each section dry completely before moving to the next.
- Steam the tassels lightly, then comb and re-trim them to 4 in (10.2 cm).
Final Quality-Control Checklist
- Every motif has 16 spokes in the order corner, side, middle, side.
- Every motif side has 35 sc and measures 7 in (17.8 cm).
- All 60 motifs are joined with matched stitches and four-corner intersections lie flat.
- The joined panel measures 42 x 70 in (106.7 x 177.8 cm).
- The border counts are 214 and 354 sc per side after Rnd 3.
- The finished panel measures 43 x 71 in (109.2 x 180.3 cm).
- There are 13 tassels, evenly spaced and trimmed to 4 in (10.2 cm).
- All ends are woven in securely, with no tails visible through the lattice.
Troubleshooting
- The center cups: Your Rnd 2 is too tight. Go up a hook size for Rnds 1–2 only.
- The center ruffles: You have too many sts. Recount to 32 dc.
- The spokes curl or twist: Work the sl sts loosely into the back bump of each ch, then pin the spokes during blocking.
- The outline is round instead of square: The spokes are probably in the wrong order. Check that the long corner spokes fall where the Rnd 4 sequence expects them.
- The motif is wavy along the sides: Your Rnd 4 chains are too loose compared with Rnd 5. Chain more firmly.
- The border flares: Recount Rnd 1. Most likely you worked into seam ch-2 sps.
- The panel stretches when hung: Cotton can grow slightly. Re-block, then hang it with all 13 clips so the weight is spread evenly.
Care
Hand wash in cool water with a mild detergent, gently press out the water, and dry flat, re-pinning it to size. Don’t tumble dry or wring the panel, and dust it occasionally with a cool hair dryer setting.
Final Notes
The measurement chain is simple. Gauge of 20 sc = 4 in gives a 35-sc side of 7 in (17.8 cm). A 6 x 10 grid of motifs gives 42 x 70 in (106.7 x 177.8 cm). Three border rounds bring the panel to 43 x 71 in (109.2 x 180.3 cm), and 4 in (10.2 cm) tassels give a 75 in (190.5 cm) drop. Check the motif first, check the grid second, and the border will fall into place.
Happy crocheting!