

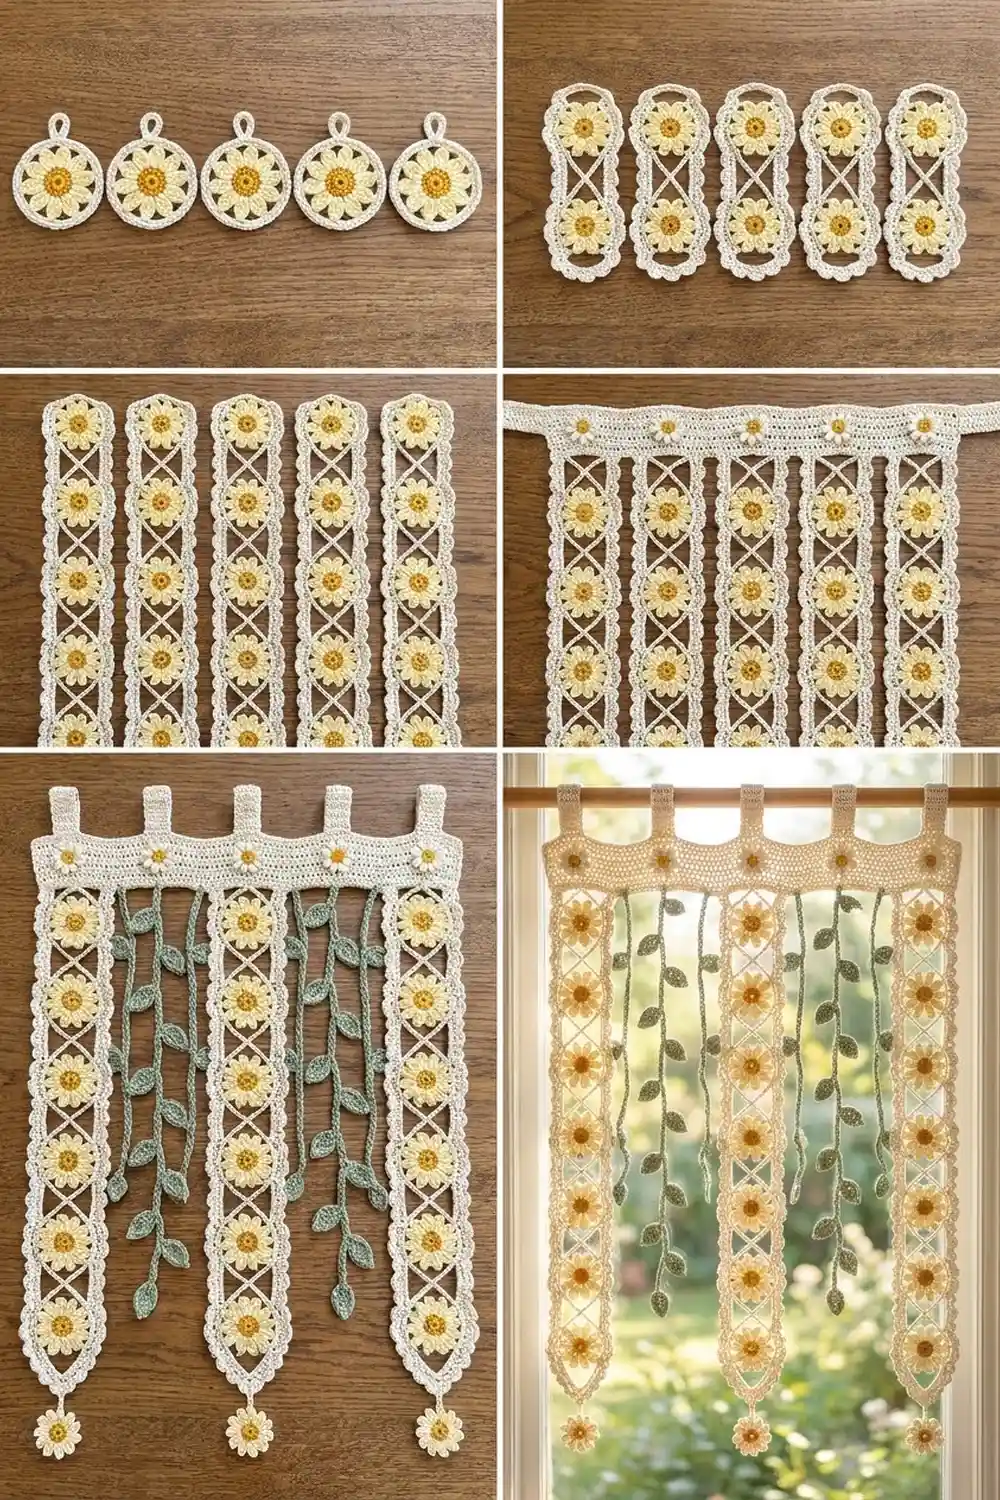
This curtain combines lace and garden flowers. Five long cream lattice strips each hold a column of eight butter-yellow daisies with golden centers. Four sage-green leaf vines hang freely between the strips, and a small daisy dangles below each pointed strip tip.
The palette is soft and warm:
– Cream: frames, header and tabs
– Pale yellow: petals
– Golden marigold: flower centers
– Sage green: vines
In a window, light shines through the open lattice and the daisies seem to float.
All instructions use US crochet terms. The finished curtain is 23.5 in (59.7 cm) wide and 37.5 in (95.3 cm) long, measured from the top of the tab loops to the bottom of the dangling daisies.
The construction is modular:
1. Make the framed daisy motifs, joining each one to the motif above it as you go. Crossed loops between motifs form the X lattice.
2. Give each strip a pointed tip and an edging round.
3. Join the five strips with a three-row header and work the tabs up from it.
4. Add the vines and the small daisies.
Finished Size and Construction
- Finished size: 23.5 in (59.7 cm) x 37.5 in (95.3 cm), including tabs and dangles
- Skill level: Intermediate
- Terminology: US
- Yarn weight: DK (light, #3) cotton
- Hook: 4.0 mm (G-6)
- Number of pieces: 40 large framed motifs (5 strips of 8), 4 leaf vines, 10 small daisies
- Layout: 5 strips side by side, 1.5 in (3.8 cm) apart, with a vine hanging in each gap
- Piece size: each framed motif is 3.25 in (8.3 cm) across. Each edged strip is 3.5 in (8.9 cm) wide x 32 in (81.3 cm) long.
- Size before border: 23.5 in (59.7 cm) x 32.25 in (81.9 cm) after header Row 1
- Border depth: header Rows 2–3 add 0.5 in (1.3 cm), and the tabs rise 2 in (5.1 cm) above the header
Materials
Use smooth mercerized cotton. It gives clean stitch definition and keeps the lattice crisp. The meter amounts assume about 120 m per 50 g.
- Cream: 280 g / 672 m (frames, edging, points, header, tabs, dangles)
- Pale yellow: 150 g / 360 m (petals)
- Golden marigold: 50 g / 120 m (centers)
- Sage green: 50 g / 120 m (vines)
All quantities include a margin of about 15–20 percent.
Tools:
– 4.0 mm (G-6) hook
– Tapestry needle
– 10 locking stitch markers
– Rust-proof pins and blocking mats
– Spray bottle
– Tape measure
– Scissors
Abbreviations (US Terms)
- ch – chain
- sl st – slip stitch
- sc – single crochet
- hdc – half double crochet
- dc – double crochet
- sp(s) – space(s)
- rep – repeat
- RS / WS – right side / wrong side
Picot: ch 3, then sl st in the third ch from the hook.
Loop numbering: Label the 12 loops of Rnd 5 like a clock face. Loop 12 is at the top, loop 3 on the right, loop 6 at the bottom and loop 9 on the left.
Gauge and Checkpoints
Gauge:
– 16 sc and 16 rows = 4 in (10.2 cm)
– 20 ch = 5 in (12.7 cm)
Make one complete framed motif first, then check these measurements:
- After Rnd 3: 2.25 in (5.7 cm) across
- After Rnd 5: 3.25 in (8.3 cm) across
- Two joined motifs: 7.25 in (18.4 cm) tall, with a 0.75 in (1.9 cm) lattice gap between them
- Edged strip: 3.5 in (8.9 cm) wide
If your motif is too big, go down 0.5 mm in hook size. If it is too small, go up 0.5 mm. If only the frame is off, change the frame chains by no more than one chain, and make the same change on every motif.
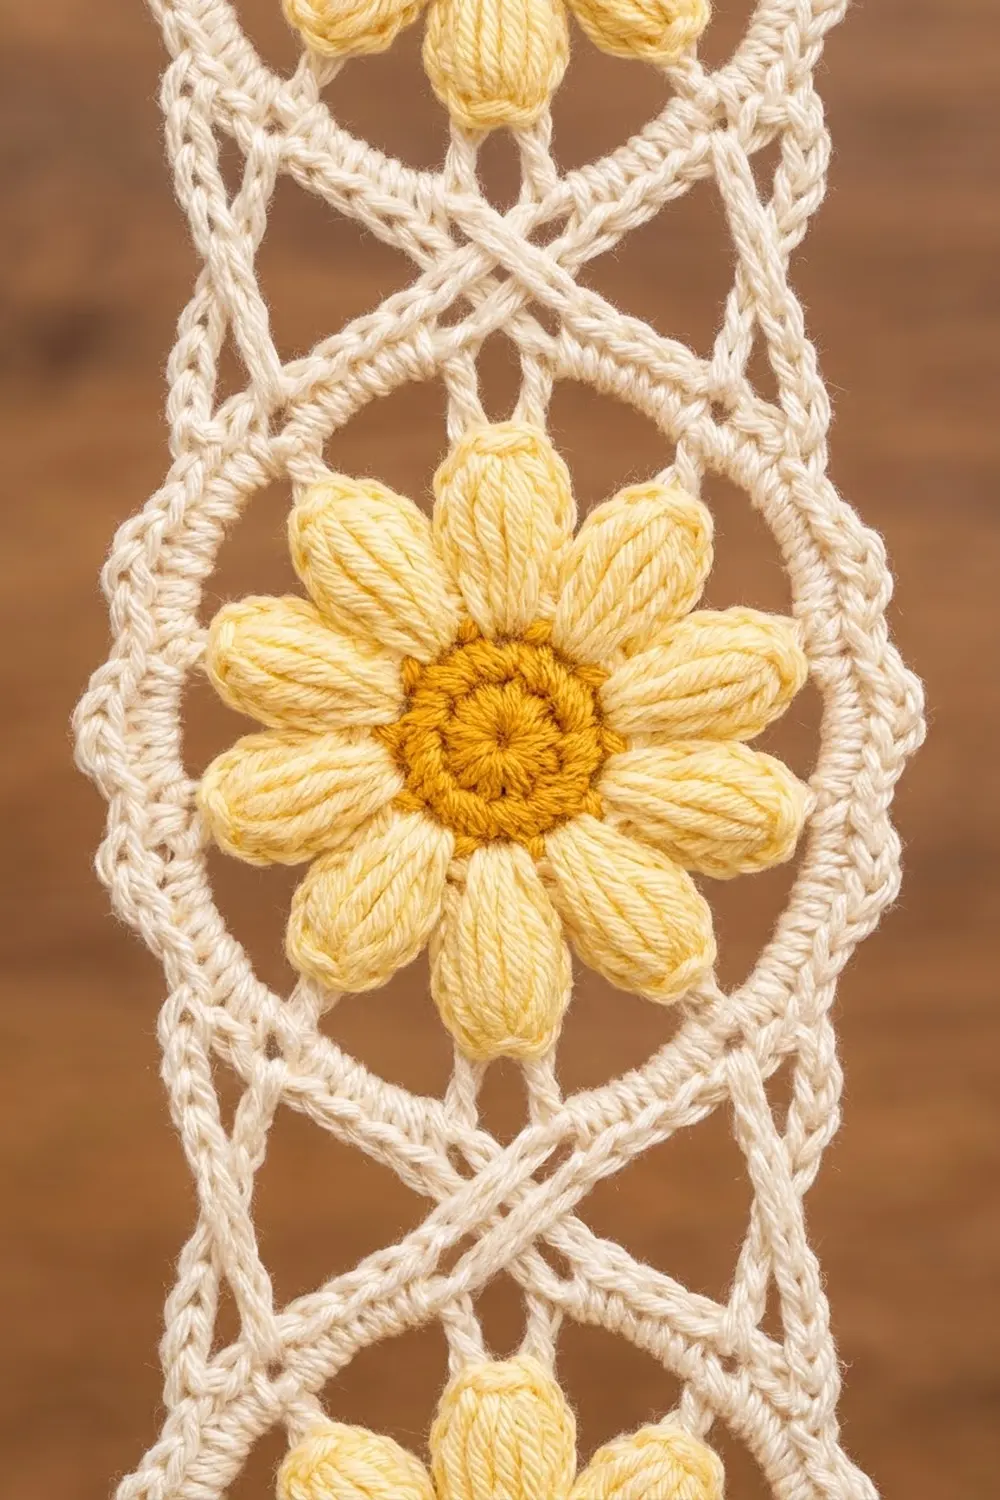
Large Daisy Motif (make 40)
Rnd 1 (golden marigold): Make a magic ring and ch 1. Work 6 sc in the ring, then join with a sl st. (6 sc)
Rnd 2: Ch 1. Work 2 sc in each sc around and join. (12 sc) Fasten off.
Rnd 3 (pale yellow, petals):
1. Join yellow with a sl st in any sc.
2. Ch 5. Starting in the second ch from the hook, work sc, hdc, dc, dc. Sl st in the next sc of Rnd 2.
3. Repeat step 2 eleven more times. Place the last sl st in the joining stitch.
(12 petals) Fasten off.
Rnd 4 (cream, frame base):
1. Join cream with sc in the tip of any petal (the skipped ch at the tip).
2. Ch 2, then sc in the tip of the next petal.
3. Repeat step 2 around, ending with ch 2. Join to the first sc.
(12 sc worked 1 per petal tip + 12 ch-2 sps)
Rnd 5: first motif of each strip
- Sl st into the ch-2 sp at the 2 o’clock position.
- Ch 5, then sc in the next ch-2 sp.
- Repeat step 2 around, ending with ch 5. Sl st to the first sl st.
(12 sc + 12 ch-5 loops) Fasten off.
Rnd 5: joining round for motifs 2–8
Place the previous motif directly above the new one, both RS up. Begin at loop 2 and work counterclockwise. Loops 1, 12 and 11 join to the motif above:
- Loop 1: Ch 4, sl st in loop 7 of the motif above (its lower left), ch 4, then sc in the next sp.
- Loop 12: Ch 2, sl st in loop 6 of the motif above, ch 2, then sc in the next sp.
- Loop 11: Ch 4, sl st in loop 5 of the motif above (its lower right), ch 4, then sc in the next sp.
- Loops 10 to 3: Work the regular “ch 5, sc in next sp” for each loop, then join.
(12 sc + 9 ch-5 loops + 3 joining loops)
Loops 1 and 11 cross on the diagonal to form the X. Loop 12 anchors the X at its center.
Join 8 motifs this way to complete one strip. Make 5 strips.
Strip Point and Edging
Point (cream, on motif 8):
1. Join cream with sc in loop 5.
2. Ch 8, then sl st in the fourth ch from the hook. This forms the tip ring.
3. Ch 4, then sc in loop 7.
Fasten off. (2 arms of 4 ch + 1 tip ring) Loop 6 stays free inside the V.
Edging round (cream): Join with sc in loop 2 of motif 1 and work counterclockwise around the strip.
- Top edge, motif 1:
- 2 sc in loop 2 (the joining sc counts as the first)
- 3 hdc in loop 1
- 4 sc in loop 12
- 3 hdc in loop 11
- 2 sc in loop 10
(14 sts) The hdc fill the shoulders of the curve so the top edge lies straight.
– Left side, going down:
– (3 sc, picot, 3 sc) in loops 9 and 8 of motif 1
– For each of motifs 2–8: ch 5 (rail) to skip past the joined loops, then (3 sc, picot, 3 sc) in loops 10, 9 and 8
(23 loops: 138 sc + 23 picots + 7 rails)
– Point:
– 5 sc over the first arm
– (3 sc, ch 3, 3 sc) in the tip ring
– 5 sc over the second arm
(16 sc + 1 ch-3 tip sp)
– Right side, going up: Work loops 4, 3 and 2 of motifs 8 to 2, with a ch-5 rail between motifs. Finish with loops 4 and 3 of motif 1. (138 sc + 23 picots + 7 rails)
Join and fasten off. Total: 306 sc and hdc, 46 picots, 14 rails, 1 tip sp.
Checkpoint: The strip should be 3.5 in (8.9 cm) wide and 32 in (81.3 cm) long:
– 8 motifs x 3.25 in (8.3 cm)
– plus 7 lattice gaps x 0.75 in (1.9 cm)
– plus a 0.75 in (1.9 cm) point
Small Daisy (make 10)
Rnd 1 (golden marigold): In a magic ring, ch 1 and work 10 sc. Join. (10 sc) Fasten off.
Rnd 2 (pale yellow):
1. Join with a sl st in any sc.
2. Ch 3, sl st in the second ch from the hook, sc in the next ch, then sl st in the next sc.
3. Repeat step 2 nine more times.
(10 petals) Each small daisy measures 1.25 in (3.2 cm).
Leaf Vine (make 4)
With sage green, ch 126.
Bottom leaf: Starting in the second ch from the hook, work sc, hdc, dc, hdc, sl st.
Stem:
1. Sl st in each of the next 6 ch.
2. Ch 6. Starting in the second ch from the hook, work sc, hdc, dc, hdc, sl st. This makes one leaf.
3. Repeat steps 1–2 nineteen more times.
(20 side leaves + 1 bottom leaf)
Turn the work before each new leaf so the leaves alternate sides. Leave a 12 in (30.5 cm) tail. The stem is 120 ch, or 30 in (76.2 cm) long, with a leaf every 1.5 in (3.8 cm).
Make All Pieces
- Large motifs: 40 (gold Rnds 1–2, yellow Rnd 3, cream Rnds 4–5)
- Points and edgings: 5 (cream)
- Small daisies: 10 (gold and yellow)
- Vines: 4 (sage)
 T       T       T       T       T      <- tabs
[=============== HEADER, 94 sts ===============]
 S1  V1  S2  V2  S3  V3  S4  V4  S5     <- S = strip, V = vine
 8   |   8   |   8   |   8   |   8      <- motifs per strip
 V   |   V   |   V   |   V   |   V      <- points
 *       *       *       *       *      <- dangling daisies
Joining: Header Row 1
Lay the five strips RS up. Line up their top edges and leave a 1.5 in (3.8 cm) gap between neighbors.
Row 1 (RS, cream):
1. Join with sc in the first top stitch of S1, then sc in the remaining 13 top stitches.
2. Ch 6, then sc in each of the 14 top stitches of the next strip.
3. Repeat step 2 three more times.
(5 x 14 = 70 sc + 4 x 6 = 24 ch = 94 sts)
Each top stitch takes exactly one sc, so the strips don’t gather. The ch-6 bridges are the only stitches added between strips. Chain them at the same tension as the sc. Tight bridges pull the strips together until they overlap.
Checkpoint: 94 sts at 4 sts per inch = 23.5 in (59.7 cm).
Border: Header Rows 2–3 and Tabs
Border gauge: 4 sc and 4 rows per inch (1.6 per cm).
Row 2 (WS): Ch 1 and turn. Sc in each sc and in each ch. (94 sc)
Row 3 (RS): Ch 1 and turn. Sc across. (94 sc) Fasten off.
Each short end of the header is 3 row-ends deep and lines up with the strip edging below.
Tabs (make 5): Each strip’s part of the header is 14 sts wide: sts 1–14, 21–34, 41–54, 61–74 and 81–94. Each tab sits on the center 6 sts of its section: sts 5–10, 25–30, 45–50, 65–70 and 85–90. That leaves 4 sts free on each side of every tab.
- With RS facing, join cream and sc in each of the 6 tab sts. (6 sc)
- Ch 1 and turn, then sc across. Repeat for 15 more rows. (16 rows = 4 in / 10.2 cm)
- Fold the tab to the back and sew it to header Row 1. The finished loop is 2 in (5.1 cm) deep and fits a rod up to 1 in (2.5 cm) thick.
Why the math works: 5 tabs x 6 sts, plus 5 x 8 free sts, plus 24 bridge sts, totals 94. Each tab is 1.5 in (3.8 cm) wide, so the weight hangs evenly from five points.
Assembly:
– Sew a small daisy to the front of the header, centered under each tab.
– Sew the top of each vine to the back of the header behind its bridge, at sts 17–18, 37–38, 57–58 and 77–78.
– For each dangle, join cream in the ch-3 tip sp of a strip and ch 6. Sl st into the back of a small daisy’s center and fasten off. Each dangle hangs 2.75 in (7.0 cm) below the tip.
Final Blocking
- Weave in all ends along the frame rounds.
- Pin the curtain RS up to 23.5 in (59.7 cm) x 32.75 in (83.2 cm), measured from the top of the header to the point tips.
- Pin each daisy round. Open each X so its crossing sits centered.
- Pin the picots outward and shape each point into a sharp V.
- Lay the vines straight, with the leaves alternating sides.
- Mist evenly and let the curtain dry completely before unpinning.
Final Quality-Control Checklist
- Each strip has 8 motifs, 7 centered X joins and a sharp point.
- Each strip is 3.5 in (8.9 cm) x 32 in (81.3 cm).
- Every header row has 94 sts.
- The 5 tabs are 6 sts wide and centered on their strips.
- Each vine has 21 leaves and is centered in its gap.
- All 10 small daisies are attached and all ends are secured.
Troubleshooting
- Frame ruffles: Use a hook one size smaller for Rnd 5 only.
- Daisy cups: Rnd 4 is too tight. Work ch 3 between petal tips instead of ch 2, on every motif.
- X is lopsided: Loop 1 must join to loop 7 of the motif above, not to loop 5.
- Top edge bows: Check that the top edge has 14 sts and that the shoulders are worked in hdc.
- Header is narrower than the strips: The bridge chains are too tight. Rework them with a larger hook.
- Vines twist: Wet-block them and pin them straight.
Care
Hand wash in cool water with a mild soap. Press out the water with a towel, reshape the curtain and dry it flat.
Final Notes
Here is the full measurement chain:
– Daisy: 2.25 in (5.7 cm)
– Framed motif: 3.25 in (8.3 cm)
– Edged strip: 3.5 in (8.9 cm) x 32 in (81.3 cm)
– Header: 94 sts, or 23.5 in (59.7 cm)
– Tabs: 2 in (5.1 cm), and dangles: 2.75 in (7.0 cm), for a total length of 37.5 in (95.3 cm)
Check each measurement before you move on, and the curtain will hang straight and even.
Happy crocheting!