

This curtain is made of ginkgo leaves hanging on long strands. Sage green and cream leaves alternate down each cord, small bud sprigs fill the gaps, and a dense row of leaves along the rod hides the header band. In a sunny window the ribbed fans glow and the light comes through between the strands.
The leaves are worked in back-loop single crochet with short rows, which gives each fan raised ribs that run out from the stem. A scalloped edging with one center notch gives the classic ginkgo shape. The finished look is soft and botanical, and it suits cottage or Scandinavian rooms.
The pattern uses US crochet terms. The finished curtain is 37 in (94.0 cm) wide and about 48 in (121.9 cm) long from the top of the header to the tip of the lowest leaf.
How it’s built: you make 60 leaves, 36 bud sprigs, and 12 header tabs. You join the tabs into a band, add a two-round border, chain one cord down from each tab, and sew the leaves and sprigs along the cords.
Finished Size and Construction
- Finished size: 37 in (94.0 cm) wide x 48 in (121.9 cm) long
- Skill level: Intermediate
- Terminology: US crochet terms
- Yarn weight: DK / light worsted (weight 3) cotton
- Hook: 3.5 mm (E-4)
- Number of pieces: 12 tabs, 60 leaves, 36 sprigs, 108 buds
- Layout: 12 strands side by side, each hanging from its own 3 in (7.6 cm) tab
- Leaf size: fan 5 in (12.7 cm) wide x 3 in (7.6 cm) tall, plus a 2 in (5.1 cm) stem
- Header size before border: 36 in x 2 in (91.4 cm x 5.1 cm)
- Border depth: about 0.5 in (1.3 cm) on each edge, so the header measures 37 in x 3 in (94.0 cm x 7.6 cm)
Materials
Use a smooth mercerized or combed cotton. It shows the ribs clearly, hangs straight, and won’t fuzz in sunlight. Cotton-linen blends also work well.
- Color A, sage green: 250 g / about 500 m (547 yd)
- Color B, cream: 175 g / about 350 m (383 yd)
The quantities include a margin of about 15–20% for gauge swatches and differences in tension.
Tools:
– 3.5 mm (E-4) crochet hook
– Tapestry needle
– Stitch markers
– Measuring tape
– Blocking mats and rust-proof pins
– Spray bottle
– 12 clip curtain rings and a rod
Abbreviations (US Terms)
- ch – chain
- sl st – slip stitch
- sc – single crochet
- hdc – half double crochet
- dc – double crochet
- BLO – back loop only
- sc2tog – single crochet 2 together
- st(s) – stitch(es)
- sp – space
- RS – right side
Special stitch: spike sc. Insert the hook into the fabric 2 sts in from the edge, in the gap between the two center rows. Yarn over and pull up a long loop to the height of the working row. Yarn over and pull through both loops on the hook. This stitch draws the edge inward to make the ginkgo notch.
Gauge and Checkpoints
Gauge: 16 sc x 18 rows = 4 in (10.2 cm) in sc. Back-loop sc should be close to this gauge. Chains should measure about 4 ch per 1 in (2.5 cm).
Make one complete leaf before anything else and measure it.
- Checkpoint 1: the foundation row of 12 sc measures 3 in (7.6 cm).
- Checkpoint 2: after Row 26, each straight side is 3 in (7.6 cm), and the outer edge is about 5.75 in (14.6 cm) before edging.
- Checkpoint 3: after edging, the fan is 5 in (12.7 cm) wide and 3 in (7.6 cm) tall.
- Checkpoint 4: one header tab measures 3 in x 2 in (7.6 cm x 5.1 cm).
If your piece is too big, go down a hook size (3.25 mm). If it’s too small, go up (3.75 mm). Check again before making more pieces, because the header width depends on 12 tabs at exactly 3 in (7.6 cm) each.
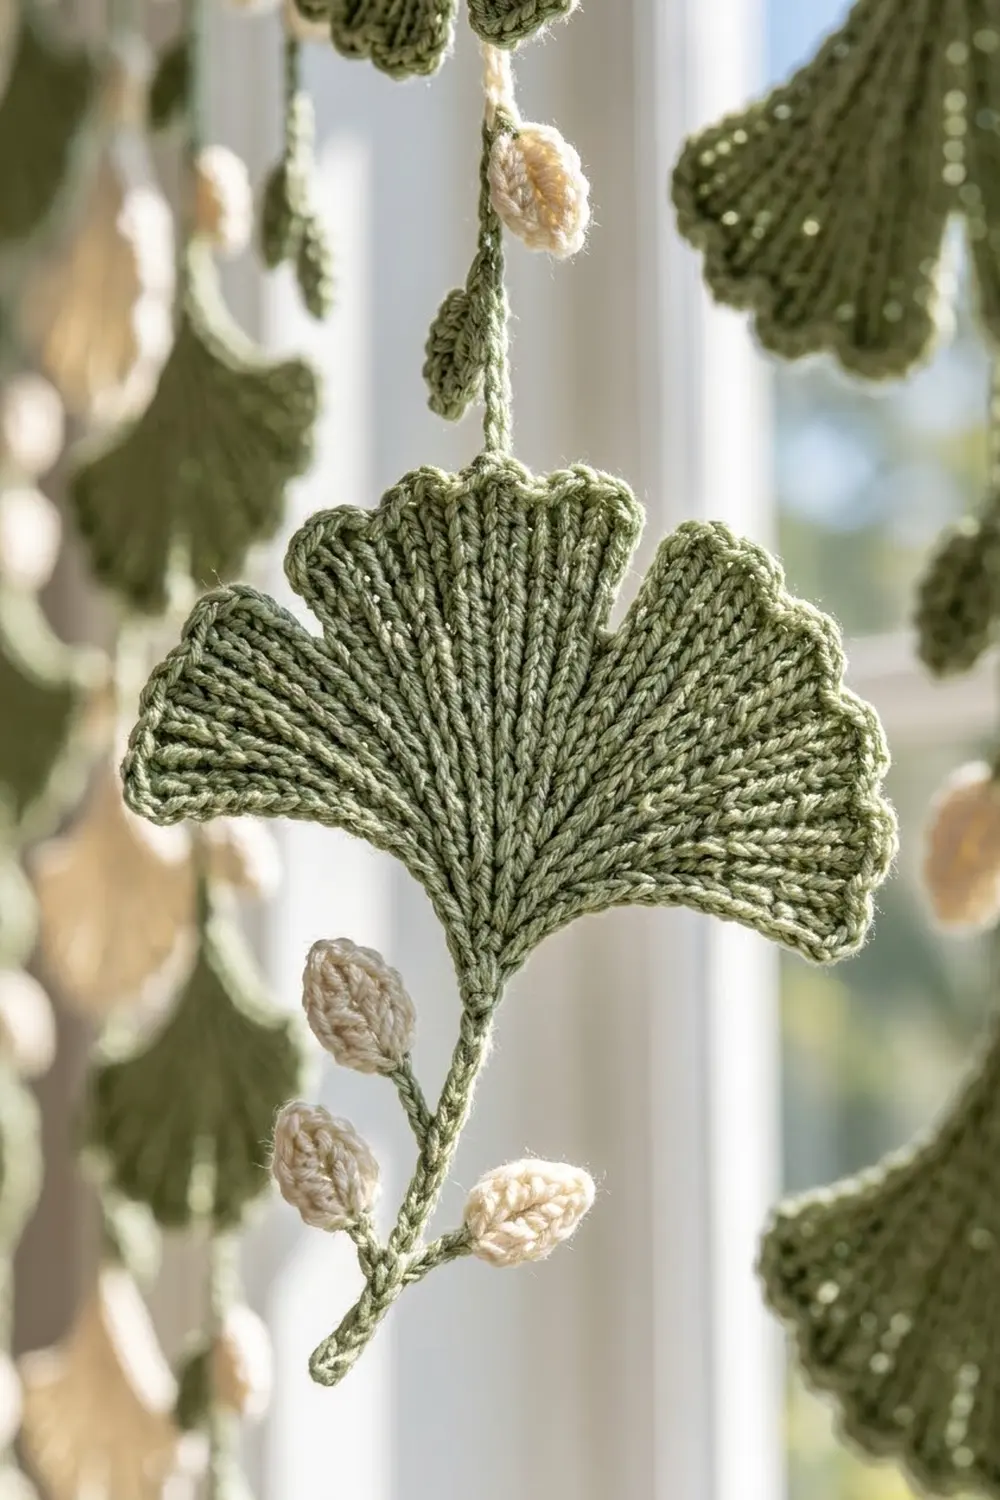
Ginkgo Leaf (make 60: 30 in A, 30 in B)
The leaf is worked in rows that run from the outer edge to the base. Full rows run the whole length. Short rows stop 4 sts before the base, so the outer edge grows faster and the piece curves into a fan. Leave a 10 in (25.4 cm) starting tail at the base.
Row 1 (RS): Ch 13. Sc in 2nd ch from hook and in each ch across. Turn. (12 sc)
The slip-knot end is the base, so this row runs from the outer edge to the base.
Row 2: Ch 1, sc BLO in each st across. Turn. (12 sc)
Row 3 (short row): Ch 1, sc BLO in next 8 sts. Leave the last 4 sts (at the base) unworked. Turn. (8 sc)
Row 4: Ch 1, sc BLO in each of the 8 sts. Turn. (8 sc)
Row 5: Ch 1, sc BLO in next 8 sts, then continue with sc BLO in the 4 unworked sts at the base. Turn. (12 sc)
Row 6: Ch 1, sc BLO in each st across. Turn. (12 sc)
Rows 7–8: Repeat Rows 3–4. (8 sc each)
Rows 9–24: Repeat Rows 5–8 four more times.
Rows 25–26: Repeat Rows 5–6. (12 sc each)
Do not fasten off. You should now have 26 row-ends along the outer edge and about 13 raised ribs on the RS. The 14 full rows each have one row-end at the base.
Gather the base: Thread the starting tail onto the needle. Weave it through the 14 row-ends at the base, pull it snug to close the point, and secure it.
Edging (conversion round): Turn the piece so you can work across the outer row-ends.
- Sc in row-end 1.
- Over row-ends 2–13, work [sc, hdc, 2 dc, hdc, sc] twice, one st in each row-end. This makes 2 lobes.
- Work a spike sc in the gap between rows 13 and 14.
- Over row-ends 14–25, work [sc, hdc, 2 dc, hdc, sc] twice. This makes 2 more lobes.
- Sc in row-end 26.
That gives 26 sts worked one per row-end, plus 1 spike sc, for 27 sts along the outer edge.
Continue down the side made by the foundation chain: sc in each of the 12 chain loops to the base. (12 sc)
Stem: Ch 9. Sl st in 2nd ch from hook and in each ch back to the base. (8 sl st, 2 in / 5.1 cm)
Work up the Row 26 side: sc in each of the 12 sts, then sl st to the first edging st. (12 sc)
Edging total: 27 + 12 + 12 = 51 sts, plus the stem. Fasten off and leave a 12 in (30.5 cm) tail for sewing.
Bud (make 108: 54 in A, 54 in B)
Rnd 1: Ch 5. Sc in 2nd ch from hook and in next 2 ch, then 3 sc in the last ch. Working along the opposite side of the chain, sc in next 2 ch, then 2 sc in the ch that holds the first sc. Sl st to first sc. (10 sc)
Rnd 2: Ch 1. Work 2 sc in the first st, sc in next 2 sts, 2 sc in each of next 3 sts, sc in next 2 sts, and 2 sc in each of the last 2 sts. Sl st to first sc. (16 sc)
The bud measures 1.25 in x 0.75 in (3.2 cm x 1.9 cm). Leave an 8 in (20.3 cm) tail.
Bud Sprig (make 36: 18 in A, 18 in B)
Stem: Ch 13. Sl st in 2nd ch from hook and in each ch across. (12 sl st, 3 in / 7.6 cm)
Sew 3 buds of the same color onto the stem: one at the tip, one 1 in (2.5 cm) above it on the left, and one 2 in (5.1 cm) above the tip on the right. The sprig measures about 4 in (10.2 cm) including the tip bud.
Header Tab (make 12 in A)
Row 1: Ch 13. Sc in 2nd ch from hook and in each ch across. Turn. (12 sc)
Rows 2–9: Ch 1, sc in each st across. Turn. (12 sc)
Fasten off. The tab measures 3 in x 2 in (7.6 cm x 5.1 cm).
Make All Pieces
- Color A: 30 leaves, 54 buds, 18 sprigs, 12 tabs
- Color B: 30 leaves, 54 buds, 18 sprigs
The two strand types alternate across the curtain, A B A B and so on. Positions are measured down the cord from the bottom edge of the header.
Position        Strand A (1,3,5,7,9,11)  Strand B (2,4,6,8,10,12)
Top (on tab)    Leaf A                   Leaf B
6 in / 15.2 cm  Leaf B                   Leaf A
12 in / 30.5 cm Sprig A                  Sprig B
17 in / 43.2 cm Leaf A                   Leaf B
23 in / 58.4 cm Sprig B                  Sprig A
28 in / 71.1 cm Leaf B                   Leaf A
34 in / 86.4 cm Sprig A                  Sprig B
40 in / 101.6 cm Leaf A (cord end)       Leaf B (cord end)
Each Strand A uses 3 A leaves, 2 B leaves, 2 A sprigs, and 1 B sprig. Each Strand B uses the opposite colors. Six strands of each type give 30 leaves and 18 sprigs per color.
Joining
Method: Join the tabs into one band with a slip-stitch seam on the wrong side.
- Hold two tabs with right sides together and their row-ends lined up.
- Using A, sl st through both layers, 1 sl st per row-end pair, for 9 sl st.
- Join all 12 tabs in a line the same way.
The seam doesn’t add any stitches to the top or bottom edges.
Stitch-to-stitch logic: Each tab has 9 row-ends, so the seam matches 9 to 9 with nothing left over. Keep the slip stitches as loose as the fabric itself. If the seam is tight, the band will pucker.
Size checkpoint: The band should measure 36 in x 2 in (91.4 cm x 5.1 cm), which is 12 tabs x 3 in (7.6 cm).
Border
The border uses the same gauge as the tabs: 16 sc = 4 in (10.2 cm). The corner ch-1 spaces are not counted as stitches.
Starting counts:
– Top edge: 12 tabs x 12 sts = 144 sts
– Bottom edge: 12 tabs x 12 foundation-chain loops = 144 sts
– Each short side: the 9 row-ends of the end tab
Rnd 1: Join A in the top right corner.
1. Ch 1. Sc in each of the 144 sts across the top. Ch 1 for the corner.
2. Work 9 sc down the side, one per row-end. Ch 1.
3. Work 144 sc across the bottom, one in each chain loop. Ch 1.
4. Work 9 sc up the other side. Ch 1, and sl st to the first sc.
Total: 144 + 9 + 144 + 9 = 306 sc, plus 4 corner ch-1 spaces.
Rnd 2: Ch 1. Sc in each sc around, and work (sc, ch 1, sc) in each corner space. Sl st to the first sc.
Each side gains exactly 2 sc, one at each corner. The new counts are top 146, sides 11, and bottom 146, for a total of 314 sc plus 4 ch-1 spaces. Fasten off.
Why the math works: Each tab adds 12 sts to the long edges, so 144 sts at 4 sts per inch gives 36 in (91.4 cm). Each border round adds about 0.25 in (0.6 cm) to every edge. That brings the header to 37 in x 3 in (94.0 cm x 7.6 cm).
Cords:
1. Join A in the bottom border, at the 6th st of each tab’s 12-st section.
2. Ch 161. Sl st in 2nd ch from hook and in each ch back up to the header (160 sl st), then sl st into the border.
3. Each cord should measure 40 in (101.6 cm).
Attaching:
1. Sew each top leaf by its stem tip to the top center of its tab. The fan hangs down over the band and overlaps the leaves next to it by about 1 in (2.5 cm).
2. Sew the remaining leaves and sprigs to the cord by their stem tips, following the grid, so the fans open downward.
Final Blocking
- Lightly mist all leaves and sprigs before you attach them.
- Pin each fan to 5 in x 3 in (12.7 cm x 7.6 cm). Pin each lobe out and the notch in.
- Straighten the ribs so they run out evenly from the base.
- Pin the header flat to 37 in x 3 in (94.0 cm x 7.6 cm).
- Let everything dry completely.
- After assembly, hang the curtain and mist the cords lightly. Their own weight will straighten them as they dry.
Final Quality-Control Checklist
- [ ] All 60 leaves measure 5 in x 3 in (12.7 cm x 7.6 cm), each with a 2 in (5.1 cm) stem.
- [ ] Each edging has 51 sts and a visible center notch.
- [ ] All 36 sprigs have 3 secure buds.
- [ ] The header measures 37 in (94.0 cm) wide, with 146 sts on the top and bottom.
- [ ] All 12 cords hang to 40 in (101.6 cm).
- [ ] Colors alternate correctly across the strands and down each cord.
- [ ] All ends are woven in securely.
- [ ] The rings are clipped above each strand.
Troubleshooting
- The fan cups instead of lying flat: Your short rows are too tight. Loosen your tension or go up a hook size.
- The fan ruffles: Your outer edge is too long. Check that each short row stops exactly 4 sts before the base.
- Holes at the short-row turns: When you work the first base st of a full row, pick up the side bar of the turn along with the back loop.
- No notch is visible: Pull the spike sc loop a little deeper, or pinch the notch in when blocking.
- The cords stretch over time: Hang them weighted for a day before you sew on the leaves. Then trim and re-chain if needed.
- The header is narrower than 36 in (91.4 cm): The tabs are under gauge. Remake them with a larger hook.
Care
Hand wash in cool water with mild soap, then press the water out in a towel without wringing. Lay the pieces flat to reshape, then rehang the curtain while it’s slightly damp so the cords dry straight.
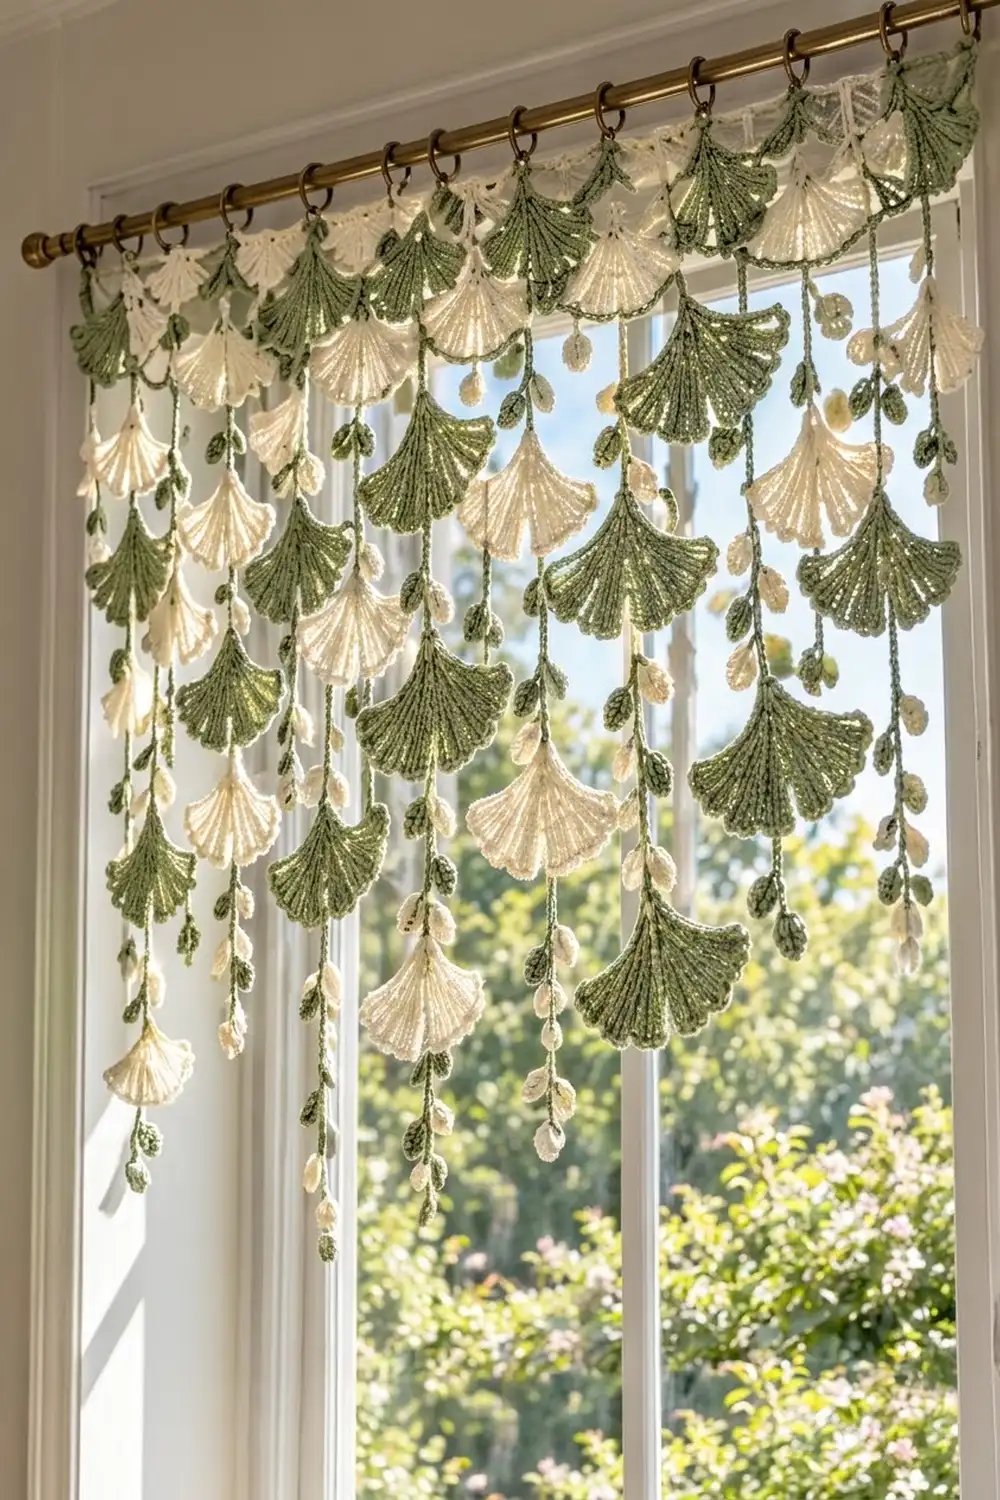
Final Notes
The measurements build on each other. A 12-st leaf side gives a 3 in (7.6 cm) radius and a 5 in (12.7 cm) fan. Twelve 3 in (7.6 cm) tabs make a 36 in (91.4 cm) band, and the border brings it to 37 in (94.0 cm). Forty-inch (101.6 cm) cords, plus the 3 in (7.6 cm) header and a 5 in (12.7 cm) bottom leaf, give a total length of 48 in (121.9 cm). If you check gauge on your first leaf and first tab, the rest will follow.
Happy crocheting!