

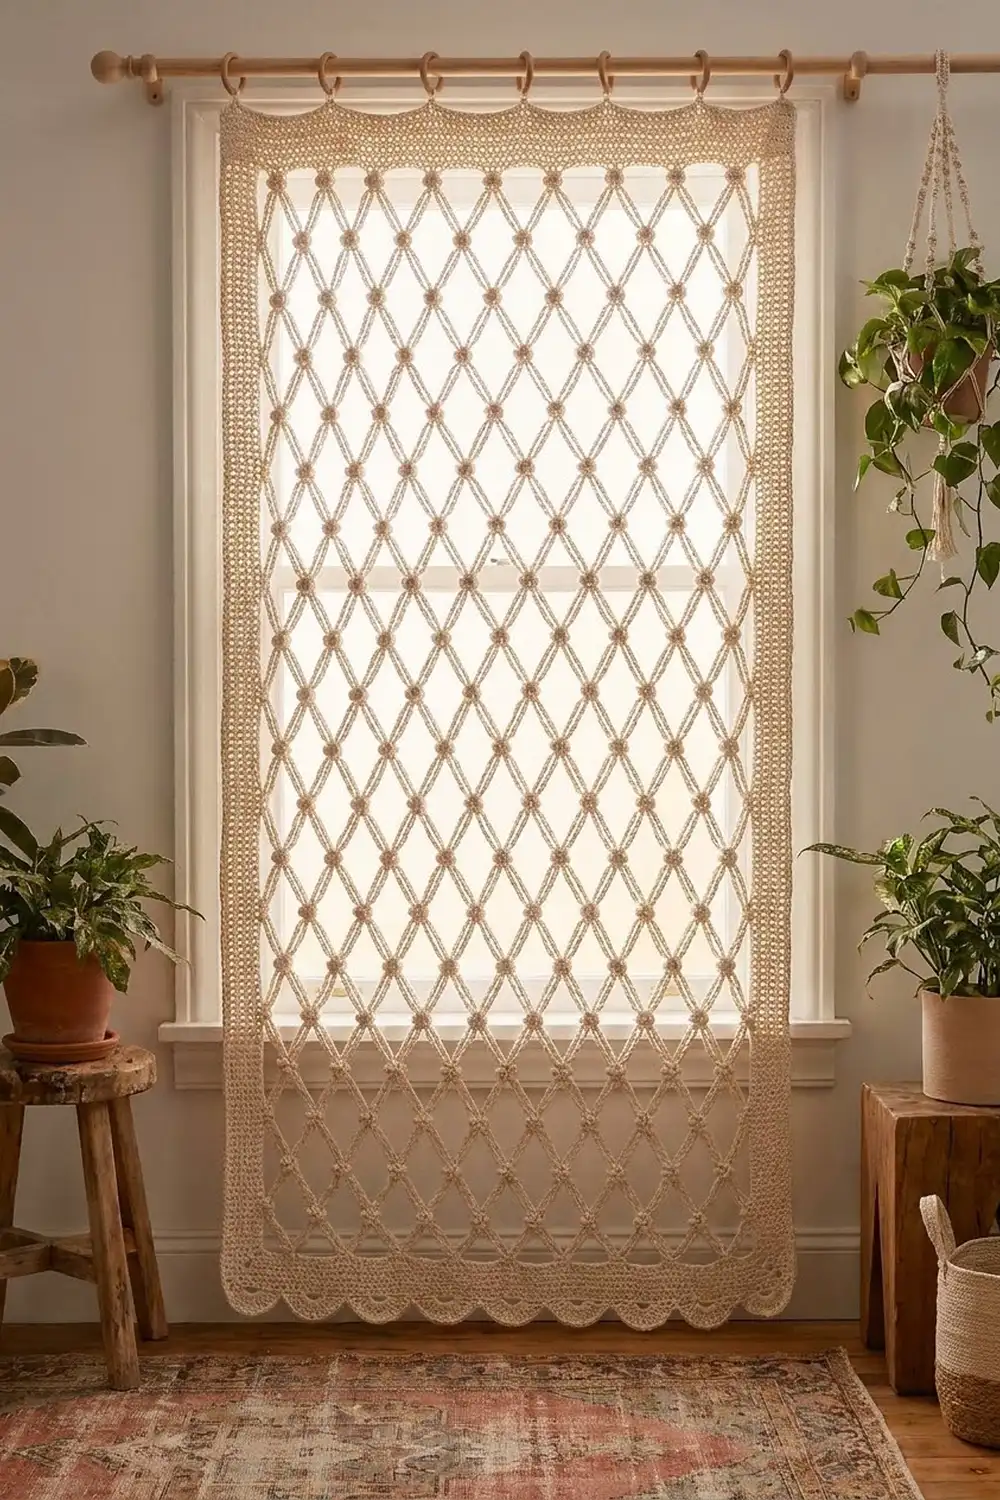
The Sunlit Lattice Curtain Panel is a light, open window panel made in one piece from rounded chain loops and small knot clusters. Light comes through the open diamonds. A firm header, narrow side bands and a scalloped hem keep the panel neat and straight.
The design uses one color, natural cream cotton. Its soft, cord-like texture gives a relaxed boho-farmhouse look that suits linen, wood and houseplants. All instructions use US crochet terms.
After blocking, the panel measures 40.75 in (103.5 cm) wide by 83.25 in (211.5 cm) long. It hangs from clip curtain rings attached to the solid header.
You work from the top down. First crochet a single-crochet header, then 63 rows of lattice mesh and one closing row that straightens the bottom. Next, work a border down one side, across the bottom and up the other side. A row of shell scallops finishes the hem. For a pair of curtains, make a second identical panel.
Finished Size and Construction
- Finished size: 40.75 in (103.5 cm) wide x 83.25 in (211.5 cm) long
- Skill level: Easy-intermediate
- Terminology: US crochet terms
- Yarn weight: Worsted (#4) cotton
- Hook: 5.5 mm (I-9)
- Number of pieces: 1 (one panel)
- Layout: One rectangle, worked top-down in rows
- Piece size before border: 39.25 in (99.7 cm) wide x 81.5 in (207.0 cm) long
- Border depth: 0.75 in (1.9 cm) on the sides; 1.75 in (4.4 cm) at the bottom, including scallops
- Top edge: No border; the header is clipped to rings
Materials
Choose a smooth, firmly twisted worsted yarn in 100% cotton or a cotton blend. Cotton holds the lattice open and hangs well. Avoid very soft cotton that splits easily, because the knots will look fuzzy and the chains will stretch.
- Cream/natural (only color): 600 g, about 930 m
These amounts include roughly 25% extra for swatching, gauge differences and weaving in ends. Buy all the yarn from one dye lot.
Tools:
- 5.5 mm (I-9) crochet hook
- Tapestry needle
- At least 6 stitch markers
- Measuring tape
- Rust-proof pins and space to block (a clean floor covered with towels works)
- Spray bottle
- 13 clip curtain rings
- Scissors
Abbreviations (US Terms)
- ch – chain
- sc – single crochet
- dc – double crochet
- tr – treble crochet
- sk – skip
- sp – space
- st(s) – stitch(es)
- rep – repeat
- RS / WS – right side / wrong side
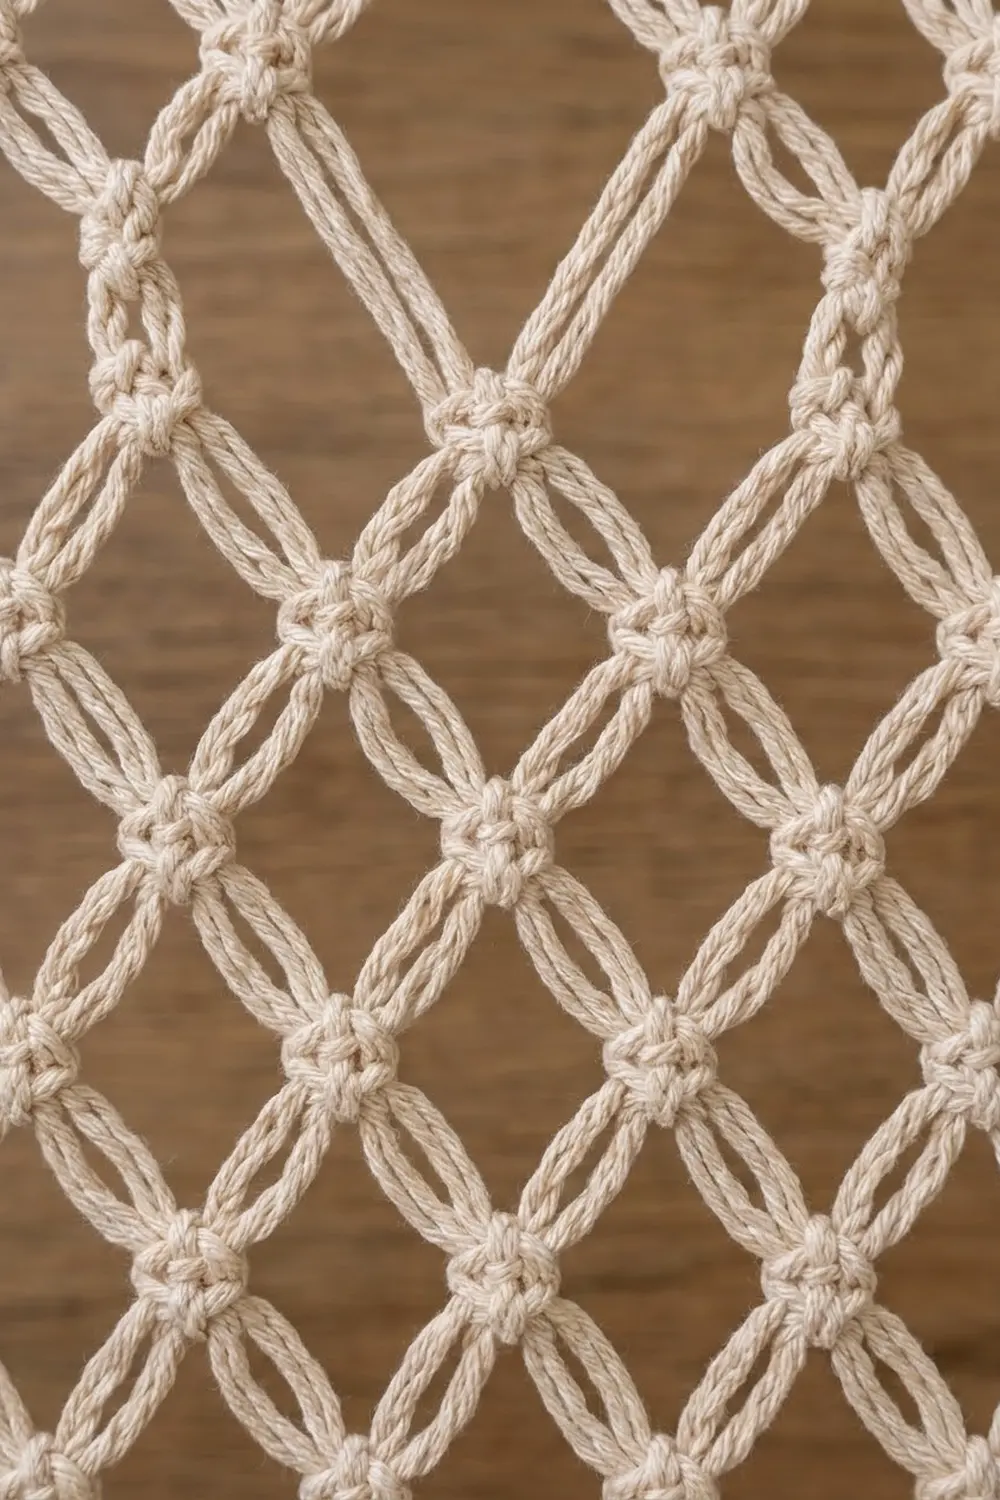
Special stitch – Knot (K): Work into the ch-6 sp named in the instructions. (Yarn over, insert hook into sp, yarn over, pull up a loop to about 0.5 in [1.3 cm]) 3 times. Yarn over and pull through all 7 loops on the hook, then ch 1 tightly to lock. The cluster pinches the center of the chain loop below and forms the small knot where four lattice arms meet.
Gauge and Checkpoints
Single crochet gauge: 16 sc and 16 rows = 4 in (10.2 cm).
Mesh gauge: 1 mesh repeat (6 sts of the header) = 1.5 in (3.8 cm) wide. 4 mesh rows = 5 in (12.7 cm) tall, so each mesh row is 1.25 in (3.2 cm).
Make a test swatch first. This is one large piece, so check gauge before you start. Ch 26 and work the header pattern on 25 sc for 6 rows. Then work mesh Rows 1–8 using 4 repeats instead of 26. Lightly spray the swatch and pin it flat.
- Swatch width: 6.25 in (15.9 cm)
- Header height: 1.5 in (3.8 cm)
- 8 mesh rows: 10 in (25.4 cm)
Checkpoints while you work the panel:
- After header Row 6: 39.25 in (99.7 cm) wide x 1.5 in (3.8 cm) tall
- After mesh Row 8: 11.5 in (29.2 cm) from the top edge
- After mesh Row 32: 41.5 in (105.4 cm) from the top edge
- After mesh Row 63: 80.25 in (203.8 cm) from the top edge
- After Row 64: 81.5 in (207.0 cm) from the top edge
Measure the mesh lying on a flat surface, lightly stretched, not while it hangs. A hanging panel gets longer under its own weight.
If your swatch is too big: go down 0.5 mm in hook size or chain more firmly. If it is too small: go up 0.5 mm. If only the mesh height is wrong, change just the arm length (ch 5 for shorter, ch 7 for longer) and keep every other count the same.
Header
Row 1 (RS): Ch 158, sc in 2nd ch from hook and in each ch across. (157 sc)
Rows 2–6: Ch 1, turn, sc in each sc across. (157 sc)
Checkpoint: 39.25 in (99.7 cm) wide x 1.5 in (3.8 cm) tall. Place a marker every 30 sts to make counting easier.
Lattice Mesh
The mesh alternates two kinds of row. Odd rows are anchored at 27 points: 2 edge sc plus the Knots. Even rows have 26 Knots plus an edge dc at each end.
Mesh Row 1: Ch 1, turn, sc in first sc, *ch 6, sk 5 sc, sc in next sc; rep from * 25 more times. (27 sc, 26 ch-6 sps)
Check: 1 + (26 x 6) = 157, so the last sc lands in the last header st.
Mesh Row 2 (even rows): Ch 6 (counts as dc + ch 3), turn, K in first ch-6 sp, *ch 6, K in next ch-6 sp; rep from * 24 more times, ch 3, dc in last sc. (26 K, 25 ch-6 sps, 2 ch-3 half sps, 2 edge dc)
Mesh Row 3 (odd rows): Ch 1, turn, sc in first dc, *ch 6, K in next ch-6 sp; rep from * 24 more times, ch 6, sc in 3rd ch of turning ch-6. (2 sc, 25 K, 26 ch-6 sps)
Skip the ch-3 half spaces of the even row. The first and last arms of the odd row pass over them, which keeps the edge Knots in line.
Mesh Rows 4–63: Work Row 2 on every even row and Row 3 on every odd row, ending after Row 63. Every even row has 26 K. Every odd row has 25 K plus 2 edge sc.
Each Knot sits in the center of a chain loop from the row below. This pulls the loops into long, rounded diamonds that line up on diagonals.
Working tips: Keep every ch-6 the same length; even chains make the lattice look regular. Pull each Knot snug, but not so tight that the arms bunch. Every 8 rows, lay the work flat and check that the Knots form clean diagonals. A missed loop shows right away as a crooked line.
Row 64 (Closing Row): Ch 4 (counts as tr), turn, *ch 2, sc in next ch-6 sp, ch 2, tr in top of next K (or in the edge sc on the final repeat); rep from * 25 more times. (27 tr including turning ch, 26 sc, 52 ch-2 sps)
The tall tr fills the low point at each Knot and the sc sits at the top of each loop, which gives a straight edge.
Checkpoint: 39.25 in (99.7 cm) wide x 81.5 in (207.0 cm) long. Fasten off.
Border
Border gauge: same as the header, 4 sc and 4 rows per 1 in (2.5 cm). Each border row adds 0.25 in (0.6 cm) to each edge it covers.
Work the border in turned rows around three edges only: down one long side, across the bottom and up the other long side. The top header has no border.
Border Row 1 (RS): Join yarn at the top corner of one long side. Working into the row ends, sc 1 in each header row end (6 sc), then 5 sc evenly across each mesh row end, including Row 64 (64 x 5 = 320 sc). Side total: 326 sc. Ch 2 for the corner. Working across Row 64, sc in each tr and each sc, and 2 sc in each ch-2 sp (157 sc). Ch 2 for the corner. Work the second long side to match (326 sc).
Row 1 total: 326 + 157 + 326 = 809 sc, plus 2 corner ch-2 sps. The corner chains don’t count as side sts.
Why these counts work: the side is 81.5 in (207.0 cm) long, and 81.5 x 4 = 326. The bottom is 39.25 in (99.7 cm) wide, and 39.25 x 4 = 157.
Border Row 2 (WS): Ch 1, turn, sc in each sc to corner, (sc, ch 2, sc) in corner sp, sc in each sc to next corner, (sc, ch 2, sc) in corner sp, sc in each sc to end. (Sides 327 sc each, bottom 159 sc; 813 sc total)
Border Row 3 (RS): Rep Row 2. (Sides 328 sc each, bottom 161 sc; 817 sc total)
Each corner adds 1 sc to each side per row. At 4 sts per inch, that matches the 0.25 in (0.6 cm) of growth per row, so the corners lie flat. After Row 3, the panel is 40.75 in (103.5 cm) wide: 161 sc plus the two corner spaces equals 163 st widths, and 163 / 4 = 40.75.
Fasten off.
Border Row 4 – Scallops (bottom only, RS): Join yarn in one bottom corner ch-2 sp. Sc in corner sp, *sk 2 sc, 7 tr in next sc, sk 2 sc, sc in next st; rep from * 26 more times. The last sc lands in the opposite corner ch-2 sp. (27 shells, 28 sc)
Check: corner sp + 161 sc + corner sp = 163 positions, and 1 + (27 x 6) = 163. The scallops are 1 in (2.5 cm) deep, which makes the full bottom border 1.75 in (4.4 cm) deep.
Fasten off. Weave all ends securely into the solid bands.
Final Blocking
- Soak the panel in cool water for 15 minutes, then gently press the water out. Do not wring it.
- Roll it in towels to remove excess water.
- Lay it flat on towels or blocking mats, RS up.
- Pin the header straight first: 40.75 in (103.5 cm) across, including the side bands.
- Pin each long side to the full length of 83.25 in (211.5 cm), working from the top down.
- Ease the lattice evenly so each mesh repeat is 1.5 in (3.8 cm) wide and each mesh row is 1.25 in (3.2 cm) tall.
- Pin the tip of each scallop to open the shells.
- Let the panel dry completely, then unpin it. Clip 13 rings to the header, one every 13 header sts (3.25 in / 8.3 cm apart), starting and ending at the outer corners.
Final Quality-Control Checklist
- The header has 157 sc and measures 39.25 in (99.7 cm).
- Every even mesh row has 26 Knots. Every odd row has 25 Knots plus 2 edge sc.
- All Knots line up on clean diagonals with no skipped loops.
- Row 64 has 27 tr and 26 sc.
- Border Row 1 has 326 sc on each side and 157 sc across the bottom.
- Border Row 3 has 328 sc on each side and 161 sc across the bottom.
- There are 27 scallops, with the end sc in both corner spaces.
- The blocked panel measures 40.75 in (103.5 cm) x 83.25 in (211.5 cm).
- Ends are woven into the solid areas, not the open mesh.
Troubleshooting
Mesh narrower than the header: Your Knots are too tight. Pull each loop up a full 0.5 in (1.3 cm) before closing the cluster, and block the mesh to width.
Panel getting too long: Your chains are loose. Chain more firmly or use ch-5 arms.
Wavy side edges: Check the ch-3 half arms and the edge dc on even rows. Skipping them makes the side pull in.
Knots tilting to one side: Make sure you work every Knot into the center of the chain loop, not near one end.
Bottom corners curling: Make sure you worked (sc, ch 2, sc) in each corner on Border Rows 2 and 3.
Scallops don’t fit evenly: Recount Border Row 3. The bottom must have exactly 161 sc.
Side band ruffles: You may have more than 5 sc in some mesh row ends. Recount so each side has exactly 326 sc. If it still ruffles, go down one hook size for the border only.
Care
Hand wash in cool water, or machine wash on a gentle cycle inside a mesh laundry bag. Reshape and dry the panel flat; don’t hang it to dry while wet, because the cotton will stretch.
Final Notes
The measurements build on each other. At 4 sts per inch, the 157-stitch header is 39.25 in (99.7 cm) wide, and 26 mesh repeats of 6 sts fit that width exactly. Sixty-four rows at 1.25 in (3.2 cm) each add 80 in (203.2 cm), for 81.5 in (207.0 cm) including the header. The border adds 0.75 in (1.9 cm) to each side and the bottom, and the scallops add 1 in (2.5 cm). That gives a finished panel of 40.75 in (103.5 cm) by 83.25 in (211.5 cm).
Check your swatch, count your Knots as you go, and let blocking do the final shaping.
Happy crocheting!