

This small tree ornament is made from six lavender half-circle fans stacked in three tiers: one fan at the top, two in the middle and three along the bottom. Cream chain lattice zigzags between the tiers and outlines the two slanted sides. It ends in a long chain hanging loop at the tip. A short cream trunk in single crochet finishes the base.
The colors are soft and wintry, with lavender for the fans and cream for everything else. The ornament looks light and lacy, but it lies flat and keeps its triangle shape. It hangs neatly on a tree branch, a gift box or a window hook.
The pattern uses US crochet terms. The finished tree body measures about 4.7 in (11.9 cm) wide and 2.85 in (7.2 cm) tall. With the trunk, the ornament is about 3.75 in (9.5 cm) tall, plus a 1.5 in (3.8 cm) hanging loop.
Construction is simple. You crochet six identical fans and lay them out in a 1-2-3 triangle. Then you join the tiers with two cream zigzag bands and work one cream border up the slanted sides, with the hanging loop at the top. Last, you add the trunk in rows.
Finished Size and Construction
- Finished size: tree body 4.7 in (11.9 cm) wide x 2.85 in (7.2 cm) tall; 3.75 in (9.5 cm) tall with the trunk; 1.5 in (3.8 cm) loop
- Skill level: Easy-intermediate
- Terminology: US crochet terms
- Yarn weight: Sport weight (#2) cotton
- Hook: 2.75 mm (C-2)
- Number of pieces: 6 fan motifs joined into one ornament, plus a trunk worked directly onto it
- Layout: 3 tiers: 1 fan (top), 2 fans (middle), 3 fans (bottom)
- Piece size: each fan is 1.5 in (3.8 cm) wide x 0.75 in (1.9 cm) tall
- Size before border: 4.5 in (11.4 cm) wide x 2.75 in (7.0 cm) tall
- Border depth: about 0.1 in (0.3 cm) along the slanted sides and at the top
Materials
Choose a smooth sport-weight cotton, either mercerized or matte. Cotton gives crisp fan stitches and blocks flat. A fuzzy or very soft acrylic will blur the rays of the fans and make the lattice look heavy.
- Lavender (Color A): 6 g, about 20 m (22 yd), for 6 fans
- Cream (Color B): 4 g, about 14 m (15 yd), for the lattice bands, border, loop and trunk
Tools:
- 2.75 mm (C-2) crochet hook
- Tapestry needle
- Scissors
- 4 locking stitch markers
- Blocking mat and rustproof pins
- Spray bottle with water
The quantities include a margin of about 20 percent, so one small skein of each color is enough for several ornaments.
Abbreviations (US Terms)
- ch: chain
- sl st: slip stitch
- sc: single crochet
- dc: double crochet
- st(s): stitch(es)
- sp: space
- RS: right side
- MR: magic ring
Stitch numbering: Each finished fan has 30 sc: 21 sc along the curved edge and 9 sc along the flat edge. With the RS facing and the flat edge at the bottom, number the curved-edge sts 1 to 21 from left to right. Number the flat-edge sts 1 to 9 from left to right. The two groups share no stitches, so no corner stitch is counted twice.
Gauge and Checkpoints
Gauge is measured on one finished fan. Make one fan first and measure it before you make the rest.
- After Row 1: the half circle is about 0.8 in (2.0 cm) wide
- After Row 2: the half circle is about 1.3 in (3.3 cm) wide
- After Rnd 3 (edging): the fan is 1.5 in (3.8 cm) wide x 0.75 in (1.9 cm) tall
If your fan is wider than 1.5 in (3.8 cm), switch to a 2.5 mm hook. If it is narrower, switch to a 3.0 mm hook. An error of only 0.1 in (0.3 cm) per fan grows to 0.3 in (0.8 cm) across the bottom tier, so it is worth checking.
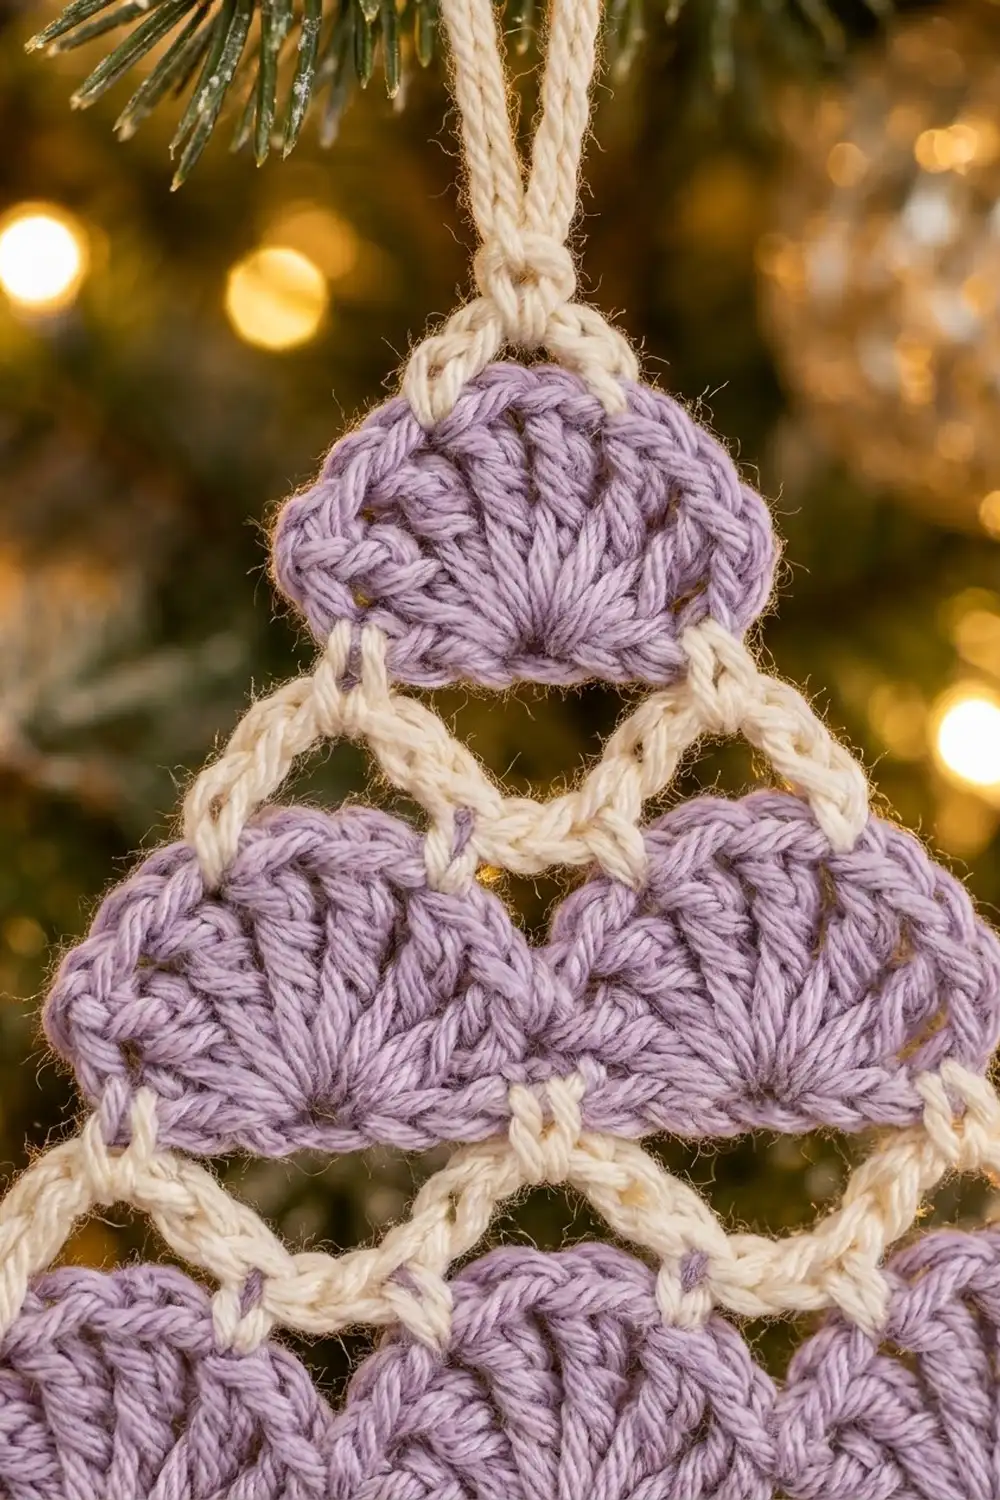
Fan Motif (Make 6)
With Color A:
Row 1: Make a MR, ch 3 (counts as dc), then work 6 dc in the ring. Pull the ring closed snugly but not completely, so the dc fan out into a half circle. Turn. (7 dc)
Row 2: Ch 3 (counts as dc), dc in the same st, then 2 dc in each of the next 6 sts, working the last pair into the top of the beginning ch-3. Turn. (14 dc)
Rnd 3 (edging, worked all around): Ch 1, then work the curved edge: sc in next st, 2 sc in next st; rep from * 6 more times. Curved edge = 14 sts worked once + 7 extra sts = 21 sc*.
Rotate to work along the flat edge in this order:
– 2 sc over the post of the Row 2 end st
– 2 sc over the post of the Row 1 end st
– 1 sc into the center of the ring
– 2 sc over the post of the Row 1 end st on the other side
– 2 sc over the post of the Row 2 end st
Flat edge = 9 sc. Join with a sl st to the first sc.
Fan total: 21 + 9 = 30 sc. The side facing you during Rnd 3 is the RS. Fasten off and weave in the ends on the wrong side.
The two dc rows create the radiating lines in each fan, and the sc edging gives the clean rounded outline. Pin the fan flat, let it dry and then compare it with the gauge checkpoints.
Make All Pieces
Make 6 identical fans in Color A:
- Top tier: 1 fan (T)
- Middle tier: 2 fans (M1, M2)
- Bottom tier: 3 fans (L1, L2, L3)
Lay them out RS up with the flat edges at the bottom:
          [ T ]
      [ M1 ][ M2 ]
  [ L1 ][ L2 ][ L3 ]
- Bottom tier: the three fans sit side by side, with their flat edges in one straight line.
- Middle tier: M1 is centered over the point where L1 and L2 meet. M2 is centered over the point where L2 and L3 meet.
- Top tier: T is centered over the point where M1 and M2 meet.
Leave a gap of about 0.25 in (0.6 cm) between tiers. Place a marker in curved-edge st 11 (the center) of L1, L2 and L3.
Joining
Cream zigzag bands join the tiers. Each band alternates between a sc on the curved edge of a lower fan and a sc on the flat edge of the fan above, with a ch-3 between them. The chains run up and down in V shapes that wrap the domes and form the open lattice.
Stitch-to-stitch logic: Each upper fan’s flat edge is 9 sts wide:
– Flat st 1 sits above the center of the lower fan to its left.
– Flat st 5 sits above the gap between the two lower fans.
– Flat st 9 sits above the center of the lower fan to its right.
Each lower fan is caught at curved-edge sts 6 and 16, one on each side of its center.
Band 1 (bottom tier to middle tier): With the RS facing, join Color B with a sc in L1 st 6. Then:
– Ch 3, sc in M1 flat st 1, ch 3, sc in L1 st 16.
– Ch 3, sc in M1 flat st 5, ch 3, sc in L2 st 6.
– Ch 3, sc in M1 flat st 9, then sc in M2 flat st 1 with no chain between them. This joins M1 and M2 tip to tip.
– Ch 3, sc in L2 st 16, ch 3, sc in M2 flat st 5.
– Ch 3, sc in L3 st 6, ch 3, sc in M2 flat st 9, ch 3, sc in L3 st 16.
Fasten off. (12 sc, 10 ch-3 sps)
Check: 6 sc on the bottom tier (2 per fan x 3 fans) + 6 sc on the middle tier (3 per fan x 2 fans) = 12 sc. Twelve sc leave 11 gaps, and one gap has no chain, so there are 10 ch-3 sps.
Band 2 (middle tier to top): With the RS facing, join Color B with a sc in M1 curved st 6. Then:
– Ch 3, sc in T flat st 1, ch 3, sc in M1 st 16.
– Ch 3, sc in T flat st 5, ch 3, sc in M2 st 6.
– Ch 3, sc in T flat st 9, ch 3, sc in M2 st 16.
Fasten off. (7 sc, 6 ch-3 sps)
Check: 4 sc on the middle tier (2 per fan x 2 fans) + 3 sc on the top fan = 7 sc, with 6 ch-3 sps between them.
Tension advice: Keep each ch-3 relaxed but not loose. The chains should lie flat across the gap without pulling the fans out of line or standing up in loops. If the tiers pucker, the chains are too tight. If the lattice sags, they are too loose.
Size checkpoint: After Band 1, the two lower tiers measure 4.5 in (11.4 cm) wide x 1.75 in (4.4 cm) tall. After Band 2, the joined body measures 4.5 in (11.4 cm) wide x 2.75 in (7.0 cm) tall.
Border
The border is a single cream round. It runs up the left slanted side, makes the hanging loop at the top and comes back down the right side. The flat bottom edge stays lavender.
Border gauge: One ch-4 spans about 0.4 in (1.0 cm) when laid flat, which matches the slanted distance between fan corners. The border adds about 0.1 in (0.3 cm) to each slanted side and to the top.
Border round: With the RS facing, join Color B with a sc in L1 curved st 1 (the bottom left corner).
Left side: Ch 4, sc in M1 curved st 1, ch 4, sc in T curved st 1, ch 4, sc in T st 6, ch 4, sc in T st 11 (top center).
Hanging loop: Ch 30, then sl st in the same T st 11.
Right side: Ch 4, sc in T st 16, ch 4, sc in T st 21, ch 4, sc in M2 curved st 21, ch 4, sc in L3 curved st 21 (the bottom right corner). Fasten off.
Counts per side:
- Left side: 3 fans along the side x 1 corner anchor sc each (L1 st 1, M1 st 1, T st 1) = 3 sc, plus 1 extra anchor on T (st 6). That gives 4 sc and 4 ch-4 sps, ending at the shared top sc.
- Top: 1 shared sc in T st 11, plus the ch-30 loop.
- Right side: the mirror of the left side, with 1 extra anchor on T (st 16) + 3 corner anchors (T st 21, M2 st 21, L3 st 21). That gives 4 sc and 4 ch-4 sps.
- Total: 9 sc, 8 ch-4 sps and 1 ch-30 loop.
Why the math works: Each side touches exactly 3 fans, one per tier, so it needs exactly 3 corner anchors. The top fan’s curve is longer than the gap between tiers, so it gets one extra anchor per side to keep the chain hugging the curve. Both sides share the top sc, so it is counted only once. Each side has 4 ch-4 sps, so the triangle stays symmetrical. The ch-30 loop folds to about 1.5 in (3.8 cm).
Trunk
Turn the ornament upside down. With the RS facing, join Color B in L2 flat st 3.
Row 1: Ch 1, sc in the same st and in each of the next 4 sts (sts 3 to 7). Turn. (5 sc)
Rows 2–6: Ch 1, sc in each st across. Turn. (5 sc)
Fasten off after Row 6. The trunk is centered under L2, with 2 flat-edge sts left free on each side. It measures about 0.8 in (2.0 cm) wide x 0.9 in (2.3 cm) tall.
Final Blocking
- Weave in all ends on the wrong side, through stitches of the same color.
- Mist the ornament with water until it is damp but not soaked.
- Lay it RS up on the blocking mat.
- Pin the bottom left and bottom right corners 4.7 in (11.9 cm) apart, keeping the bottom edge straight.
- Pin the top center so the tree body is 2.85 in (7.2 cm) tall.
- Pin the trunk straight down so it is square and centered.
- Ease each lattice chain flat and open each fan so the rays are even.
- Pin the hanging loop straight up from the tip.
- Let it dry completely before you unpin it.
Final Quality-Control Checklist
- Each of the 6 fans has 30 sc (21 curved + 9 flat).
- Each fan measures 1.5 in (3.8 cm) x 0.75 in (1.9 cm).
- Band 1 has 12 sc and 10 ch-3 sps. Band 2 has 7 sc and 6 ch-3 sps.
- M1 and M2 meet tip to tip above the center of L2.
- Each side of the border has 4 sc and 4 ch-4 sps.
- The hanging loop is centered at the tip.
- The trunk has 5 sc in each of its 6 rows and is centered under L2.
- The finished body is 4.7 in (11.9 cm) x 2.85 in (7.2 cm).
- No ends show on the RS.
Troubleshooting
Fans curl into a cup: The MR is too tight or the hook is too small. Loosen the ring slightly and block firmly.
Fans ruffle: Row 2 is too loose. Go down a hook size or tighten your dc.
Tiers are off-center: Recount the flat-edge sts. St 5 of each upper fan must sit exactly over the gap between the two lower fans.
Lattice puckers: The chains are too tight. Rework with a looser ch-3, or use ch-4.
Triangle leans to one side: Check that both border sides have 4 ch-4 sps and that the loop is anchored in T st 11.
Trunk slants: Make sure the trunk starts in flat st 3 of L2 and ends in st 7.
Care
Hand wash in cool water with mild soap, press out the water in a towel and dry flat. Re-pin to shape if needed.
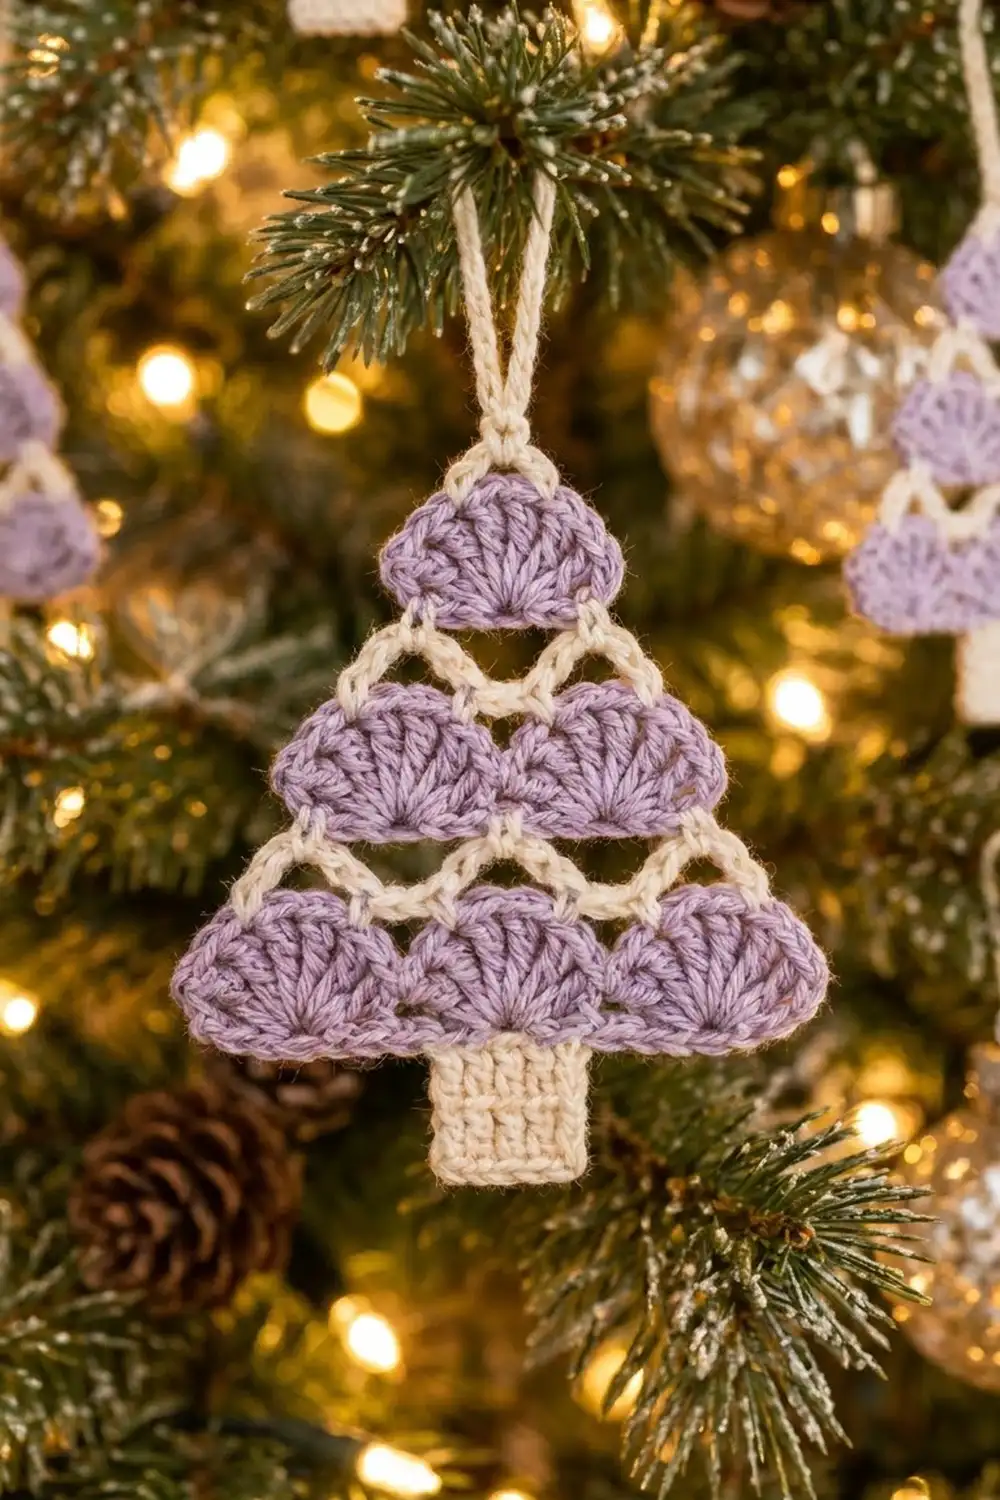
Final Notes
Every measurement in this ornament builds on the one before it:
– Each fan is 1.5 in (3.8 cm) wide x 0.75 in (1.9 cm) tall.
– Three fans make a bottom tier 4.5 in (11.4 cm) wide.
– Three tiers plus two bands of about 0.25 in (0.6 cm) each give a body 2.75 in (7.0 cm) tall before the border.
– The border adds about 0.1 in (0.3 cm), so the tree body finishes at 4.7 in (11.9 cm) x 2.85 in (7.2 cm).
– The 0.9 in (2.3 cm) trunk brings the total height to 3.75 in (9.5 cm), plus a 1.5 in (3.8 cm) hanging loop.
If your first fan matches the gauge, every measurement after it will follow.
Happy crocheting!