

These floor-length curtain panels are made from pointed leaf motifs joined into an open lattice. Each leaf has a sage green frame with a center vein, an openwork outline, and six plump butter-yellow puff leaflets. Every other leaf is worked all in green, so the panel reads as a soft checkerboard of yellow and green leaves with small diamond-shaped windows between them.
The style is botanical and airy. Light comes through the diamond openings, and the puff leaflets give the surface texture. The bottom edge stays as a row of free leaf points, the sides keep their leaf scallops, and a solid green header with tab tops goes across the top.
This pattern uses US crochet terms. Each finished panel measures 40 in (101.6 cm) wide by 85¼ in (216.5 cm) long including the header, plus tab loops that rise 2 in (5.1 cm) above it. The instructions make a pair of panels.
Construction overview: each leaf is worked in five rounds around a foundation chain. The leaves are joined as you go during the last round, 10 across and 12 down. Then a header is worked across the top, and the tabs are worked on the header.
Finished Size and Construction
- Finished panel size: 40 in × 85¼ in (101.6 cm × 216.5 cm), plus 2 in (5.1 cm) tab loops
- Skill level: Intermediate
- Terminology: US
- Yarn weight: Worsted (#4)
- Hook: 5.0 mm (H-8)
- Number of pieces: 240 leaf motifs (120 per panel), joined into 2 panels
- Layout: 10 leaves across × 12 leaves down per panel
- Leaf size: 7 in × 4 in (17.8 cm × 10.2 cm)
- Panel size before header: 40 in × 84 in (101.6 cm × 213.4 cm)
- Header depth: 1¼ in (3.2 cm) above the leaf tips
Materials
Choose a smooth worsted cotton or cotton blend at about 200 m per 100 g. Cotton holds the puffs well, hangs straight, and doesn’t stretch much under its own weight. Avoid fuzzy yarns, which fill in the diamond openings.
- Sage green (Color G): 1,750 g (3,500 m)
- Butter yellow (Color Y): 350 g (700 m)
These quantities include a margin of about 10%.
Tools:
- 5.0 mm (H-8) crochet hook
- Tapestry needle
- Stitch markers
- Tape measure
- Blocking mats and rust-proof pins
- Spray bottle
- Curtain rod for tab tops
Abbreviations (US Terms)
- ch – chain
- sl st – slip stitch
- sc – single crochet
- tr – treble crochet
- tr2tog – treble 2 together
- sp – space
- sk – skip
- RS / WS – right side / wrong side
- TP – tall puff (see below)
Tall Puff (TP): (Yo, insert hook in st, yo, pull up a loop to 1 in [2.5 cm]) 5 times; yo, draw through all 11 loops; ch 1 firmly to lock. The locking ch is the “lock ch” used in Round 3.
tr2tog across a valley: (Yo twice, insert in first sp, yo, pull up a loop, [yo, draw through 2] twice); repeat in second sp; yo, draw through all 3 loops.
Gauge and Checkpoints
Make one Version A leaf before anything else, and measure it after every round.
- Base gauge: 16 sc = 4 in (10.2 cm); 16 sc rows = 4 in (10.2 cm)
- After Round 1: 5½ in × ½ in (14.0 cm × 1.3 cm)
- After Round 2: about 5½ in × 2½ in (14.0 cm × 6.4 cm) with the puffs laid flat
- After Round 3: 6¼ in × 3 in (15.9 cm × 7.6 cm)
- After Round 4: 6½ in × 3½ in (16.5 cm × 8.9 cm)
- After Round 5: 7 in × 4 in (17.8 cm × 10.2 cm)
If your leaf is more than ¼ in (0.6 cm) too big in either direction, go down a hook size. If it’s too small, go up a size. Over 10 leaves, an error of ¼ in (0.6 cm) per leaf adds up to 2½ in (6.4 cm) across the panel, so get the gauge right first.
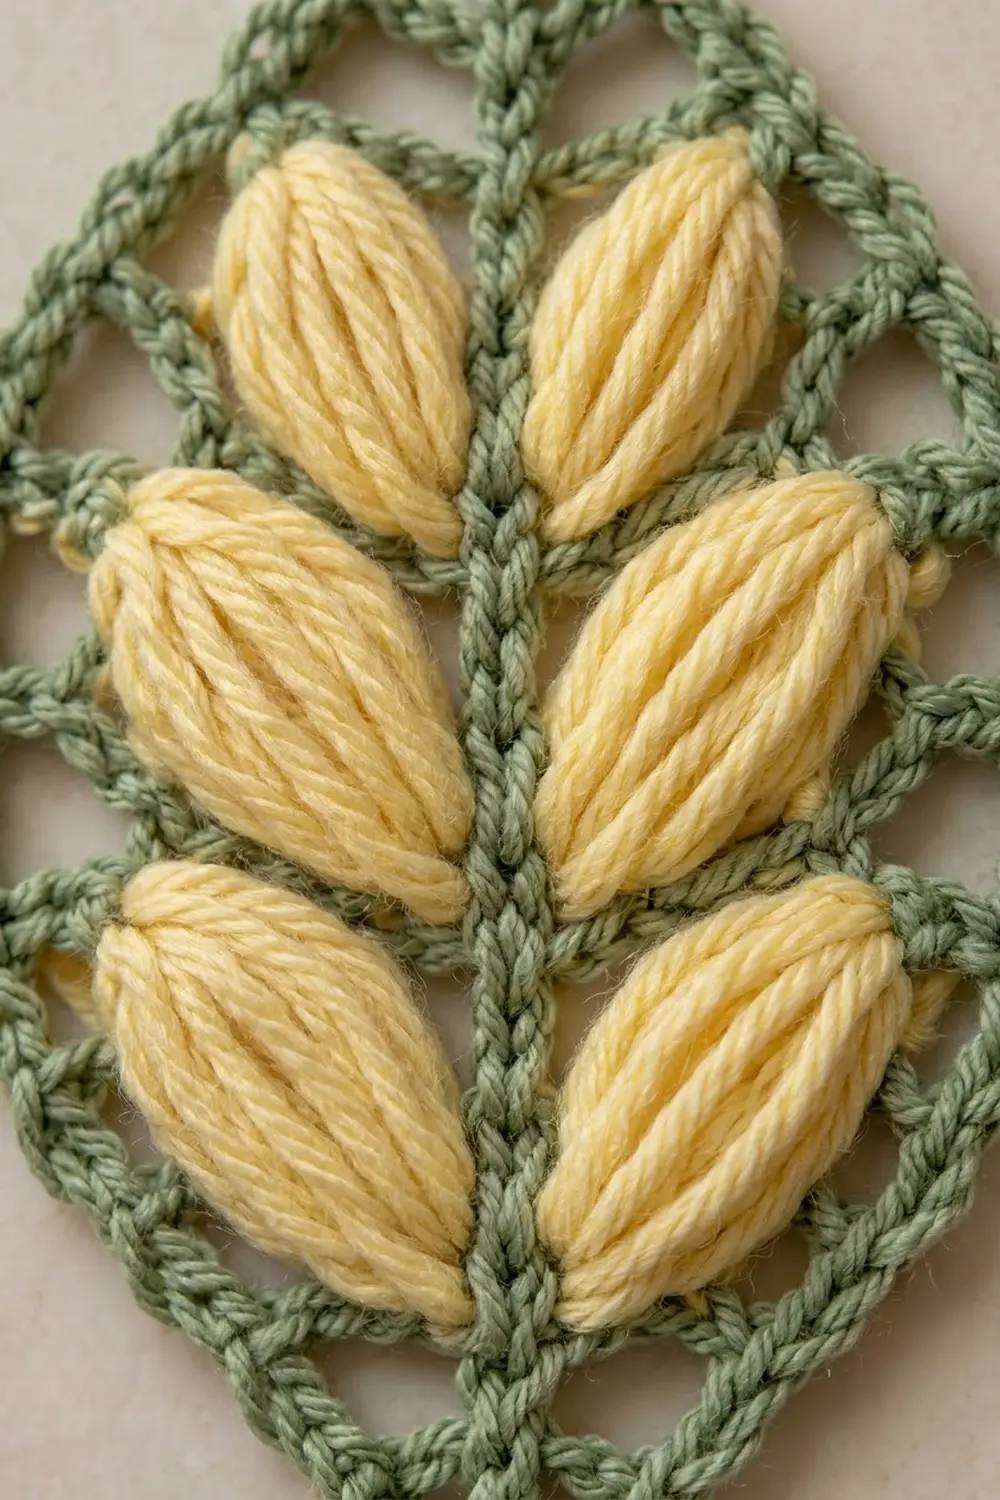
Leaf Motif
There are two colorways:
- Version A: Rounds 1, 3, 4, and 5 in G; Round 2 in Y
- Version B: all rounds in G
Foundation (G): Ch 23.
Round 1 (spine): Sc in 2nd ch from hook and in each ch across (22 sc). Ch 3 for the top tip. Working in the free loops on the other side of the foundation, sc in each ch across (22 sc). Ch 3 for the base tip. Join with sl st to first sc. Fasten off G for Version A.
Count: 44 sc, 2 ch-3 tip sps.
Round 2 (leaflets): Join Y (or continue in G for Version B) with sl st in base ch-3 sp. Ch 1, (sc, ch 2, sc) in same sp.
– Side 1: Sc in next 4 sc, TP in next sc, sc in next 5 sc, TP in next sc, sc in next 5 sc, TP in next sc, sc in next 5 sc (22 sts).
– Top: (Sc, ch 2, sc) in top ch-3 sp.
– Side 2: Sc in next 5 sc, TP in next sc, sc in next 5 sc, TP in next sc, sc in next 5 sc, TP in next sc, sc in next 4 sc (22 sts).
Join to first sc and fasten off. The puffs on side 2 now mirror those on side 1.
Count: 42 sc + 6 TP = 48 sts, 2 ch-2 tip sps.
Lay each puff flat so it points toward the top tip at a slight angle, like a leaflet on a stem.
Round 3 (veins): Join G with sl st in base ch-2 sp. Ch 1, sc in same sp.
– Side 1: Ch 4, sc in lock ch of TP 1, ch 3, tr in 3rd sc of next 5-sc group, ch 3, sc in lock ch of TP 2, ch 3, tr in 3rd sc of next 5-sc group, ch 3, sc in lock ch of TP 3, ch 4.
– Top: (Sc, ch 3, sc) in top ch-2 sp.
– Side 2: Work the same sequence for TP 4, 5, and 6.
– Base: Sc in base ch-2 sp, ch 3, join to first sc.
The tr stitches become the diagonal green bars between the leaflets. The sc in each lock ch holds each puff tip in place.
Count: 4 tip sc + 6 lock sc + 4 tr = 14 sts; 12 side ch-sps (2 ch-4 and 4 ch-3 per side), 2 ch-3 tip sps.
Round 4 (outline): Sl st in base ch-3 sp. Ch 1, (sc, ch 3, sc) in same sp.
– Side 1: Sc in next sc, 4 sc in ch-4 sp, sc in next sc, [3 sc in ch-3 sp, sc in next st] 4 times, 4 sc in ch-4 sp, sc in next sc (27 sc).
– Top: (Sc, ch 3, sc) in top ch-3 sp.
– Side 2: Repeat side 1 (27 sc).
Join to first sc.
Count: 54 side sc + 4 tip sc = 58 sc, 2 ch-3 tip sps.
Round 5 (lattice edge): Sl st in base ch-3 sp. Ch 1, (sc, ch 3, sc) in same sp. You now have 29 sc on each side between the tip sps: 27 side sc plus 1 tip sc at each end.
– Side 1: [Ch 2, sk next sc, sc in next sc] 14 times, ch 2, sk last sc.
– Top: (Sc, ch 3, sc) in top ch-3 sp.
– Side 2: Repeat side 1.
Join to first sc and fasten off.
Count: 28 side sc + 4 tip sc = 32 sc; 30 ch-2 sps (15 per side), 2 ch-3 tip sps.
The small ch-3 loop at each tip gives the leaf its point. Number the ch-2 sps 1–15 on each side, counting up from the base. Sps 6–10 sit across the widest part of the leaf. With the RS facing and the tip pointing up, side 1 is the right side (R1–R15) and side 2 is the left side (L1–L15).
Make All Pieces
For one panel, make 60 Version A leaves and 60 Version B leaves. For the pair, make 120 of each. Make each leaf through Round 4 only, because Round 5 is the joining round. The first leaf of each panel gets a plain Round 5.
Layout for each panel (A = yellow leaflets, B = all green):
Row 1:  A B A B A B A B A B
Row 2:  B A B A B A B A B A
Row 3:  A B A B A B A B A B
Row 4:  B A B A B A B A B A
...alternate in this way through...
Row 12: B A B A B A B A B A
Row 1 is the top of the curtain. Every leaf points up.
Joining
Use the join-as-you-go method in Round 5. Work the panel row by row from the top, from left to right in each row.
Side joins: On a new leaf, work L10 through L6 like this: ch 1, sl st in the matching R sp of the leaf to its left (L10 to R10, down to L6 to R6), ch 1, sc in next sc as usual. All other sps are a normal ch 2.
Tip joins: Every leaf from Row 2 down joins the leaf above it at the top tip. Work the top tip as sc, ch 1, sl st in the base ch-3 sp of the leaf above, ch 1, sc.
Stitch-to-stitch logic: Each joined sp is still about as wide as a ch-2, so the joined leaves keep their full width. Only the five middle sps join on each side, so the upper and lower edges of the leaves curve away from each other. That leaves the diamond windows between groups of four leaves.
Tension: Make each joining sl st the same height as the chains around it. If you pull it tight, the seam puckers. If you leave it loose, the leaves sag apart.
Size checkpoints: After Row 1, the strip should measure 40 in × 7 in (101.6 cm × 17.8 cm). After 3 rows, it should be 40 in × 21 in (101.6 cm × 53.3 cm). The finished body should be 40 in × 84 in (101.6 cm × 213.4 cm).
Border: Header and Tabs
Only the top edge gets a border. The sides keep their leaf scallops, and the bottom keeps its row of free leaf points.
Border gauge: 16 sc = 4 in (10.2 cm); 4 sc rows = 1 in (2.5 cm).
Row 1 (valley fill): With RS facing, join G in R12 of the rightmost Row 1 leaf. Ch 4 (counts as tr), ch 6, sc in top ch-3 sp of the same leaf. Ch 6, tr2tog with the first leg in L12 of the current leaf and the second leg in R12 of the next leaf to the left, ch 6, sc in top ch-3 sp of that leaf. Repeat from * 8 more times. Ch 6, tr in L12 of the last leaf. Turn.
Count: 2 tr + 9 tr2tog + 10 sc = 21 sts, 20 ch-6 sps.
Row 2: Ch 1, sc in first st, [7 sc in ch-6 sp, sc in next st] 20 times. Turn.
Count: 21 + (20 × 7) = 161 sc.
Rows 3–6: Ch 1, sc in each sc across. Turn. (161 sc)
Fasten off.
Why the math works: Each leaf gets two ch-6 sps (14 sc) plus its tip sc and one shared valley stitch, for 16 sts. That makes 10 × 16 = 160 sts, plus 1 st for the end post, which equals 161 sc. At 4 sc per inch, that’s 40¼ in (102.2 cm), which matches the 40 in (101.6 cm) leaf width within normal ease. Rows 2–6 are 5 rows, which comes to 1¼ in (3.2 cm) of header.
Tabs (make 5 per panel): Place each tab on these Row 6 stitches: 1–13, 38–50, 75–87, 112–124, and 149–161. Each tab is 13 sts wide, with 24-st gaps between tabs.
Join G in the first st of a tab position. Ch 1, sc in the same st and the next 12 sts (13 sc). Work 15 more rows of 13 sc, for 16 rows and 4 in (10.2 cm) total. Fasten off and leave a long tail. Fold the tab to the WS and whipstitch its last row along Row 2. This makes a loop 2 in (5.1 cm) deep and 3¼ in (8.3 cm) wide.
Final Blocking
- Weave in all ends inside the green frame stitches, never through the puffs.
- Lay the panel on mats in sections, RS up.
- Pin each leaf at both tips and at sp 8 on each side so it measures 7 in × 4 in (17.8 cm × 10.2 cm).
- Pin the header straight at 40 in (101.6 cm).
- Shape each puff so it angles toward the leaf tip.
- Mist thoroughly, then let each section dry completely before you move to the next one.
- Hang the panel for 24 hours to let the weight settle, and check the length.
Final Quality-Control Checklist
- Each panel has 120 leaves in a correct A/B checkerboard
- Every leaf has 6 puffs, 4 vein bars, and 15 ch-2 sps per side
- Sps 6–10 are joined on every shared side
- All tips below Row 1 are joined
- Header has 161 sc and lies flat
- 5 tabs are evenly spaced and the same depth
- Panel measures 40 in × 85¼ in (101.6 cm × 216.5 cm)
- All ends are secure and hidden
Troubleshooting
- Puffs look flat or thin: Pull every loop up to the full 1 in (2.5 cm) and lock the puff firmly.
- Leaf curls into a cup: Round 4 is too tight. Go up a hook size for Round 4 only.
- Leaf ruffles: Round 4 is too loose. Go down a hook size for Round 4 only.
- Panel narrower than 40 in (101.6 cm): The joining sl sts are too tight. Rework the joins with looser tension.
- Header waves: Work Rows 2–6 one hook size smaller. Keep the 161 stitches.
- Panel stretches long: Block the panel flat and dry it fully before hanging.
Care
Hand wash in cool water, press out the water in a towel, and dry the panels flat. Don’t hang them while they’re wet, because the weight of the water will stretch them.
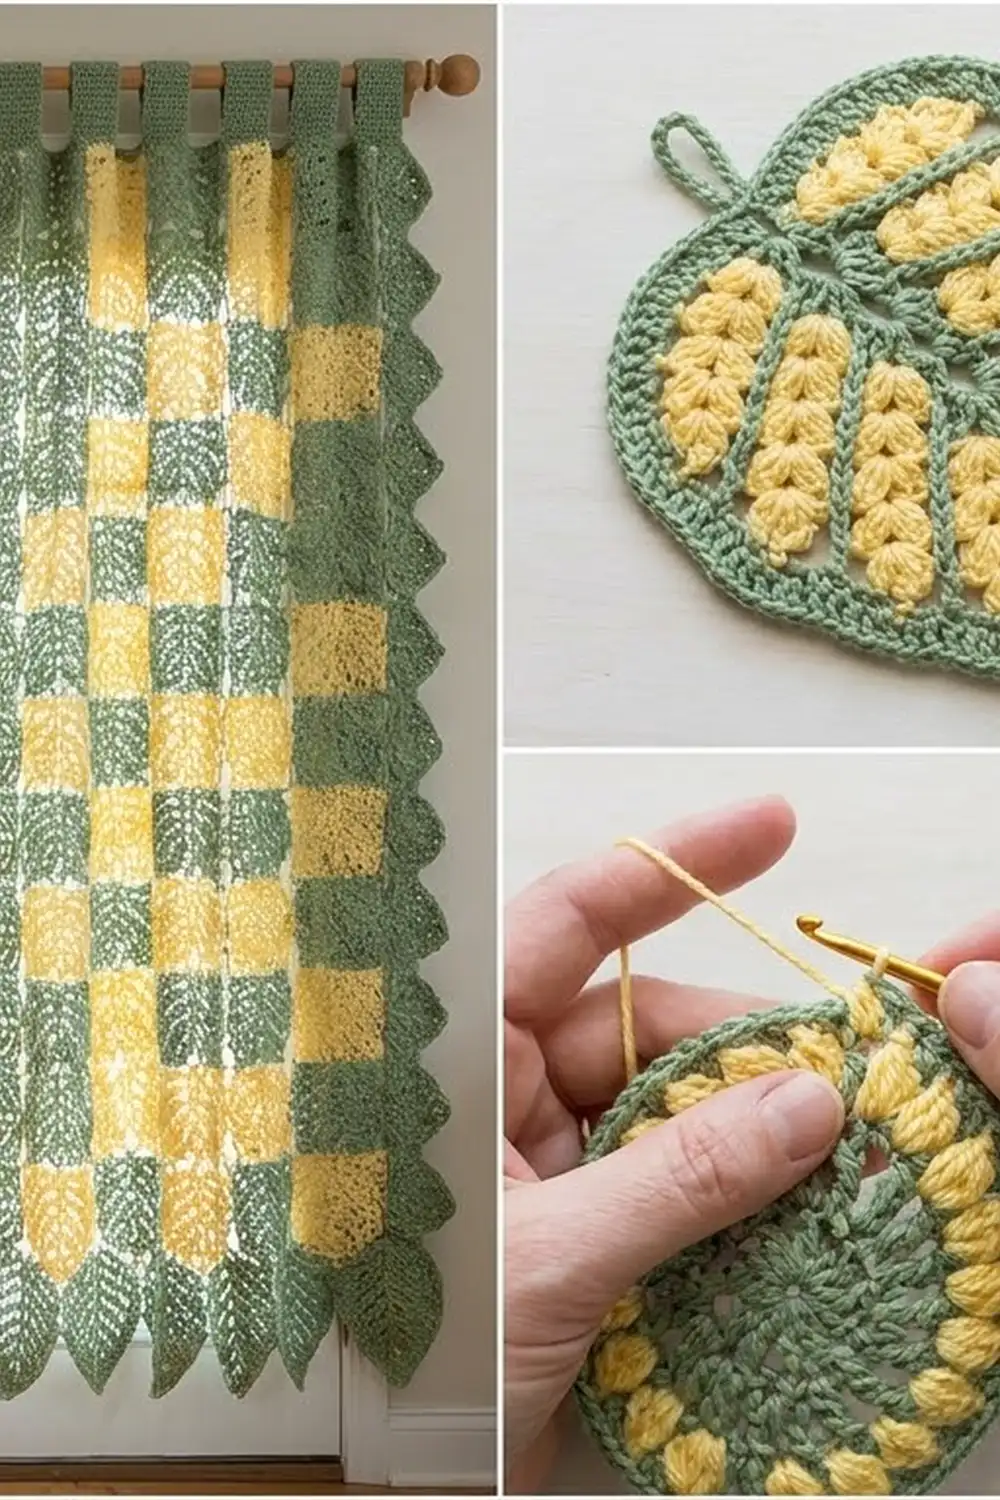
Final Notes
Each measurement leads to the next: a 5½ in (14.0 cm) spine gives a 7 in × 4 in (17.8 cm × 10.2 cm) leaf. Ten leaves across make 40 in (101.6 cm), and twelve leaves down make 84 in (213.4 cm). The 161-stitch header keeps the 40 in (101.6 cm) width and adds 1¼ in (3.2 cm), for a finished length of 85¼ in (216.5 cm). If your first leaf is the right size, the rest of the panel will be too.
Happy crocheting!