

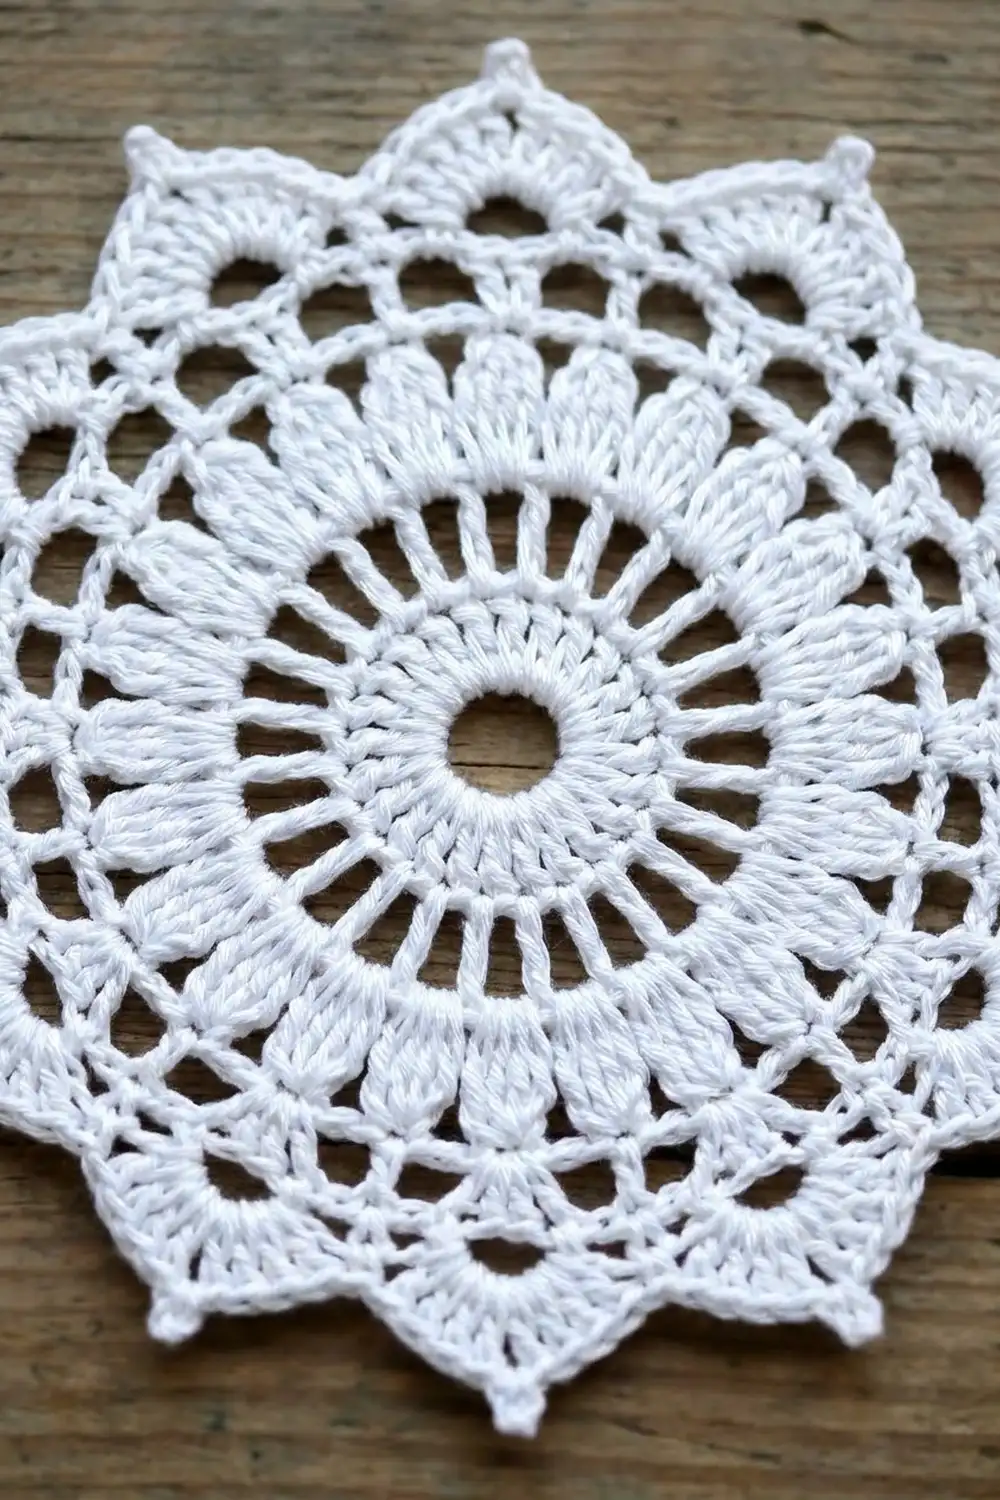
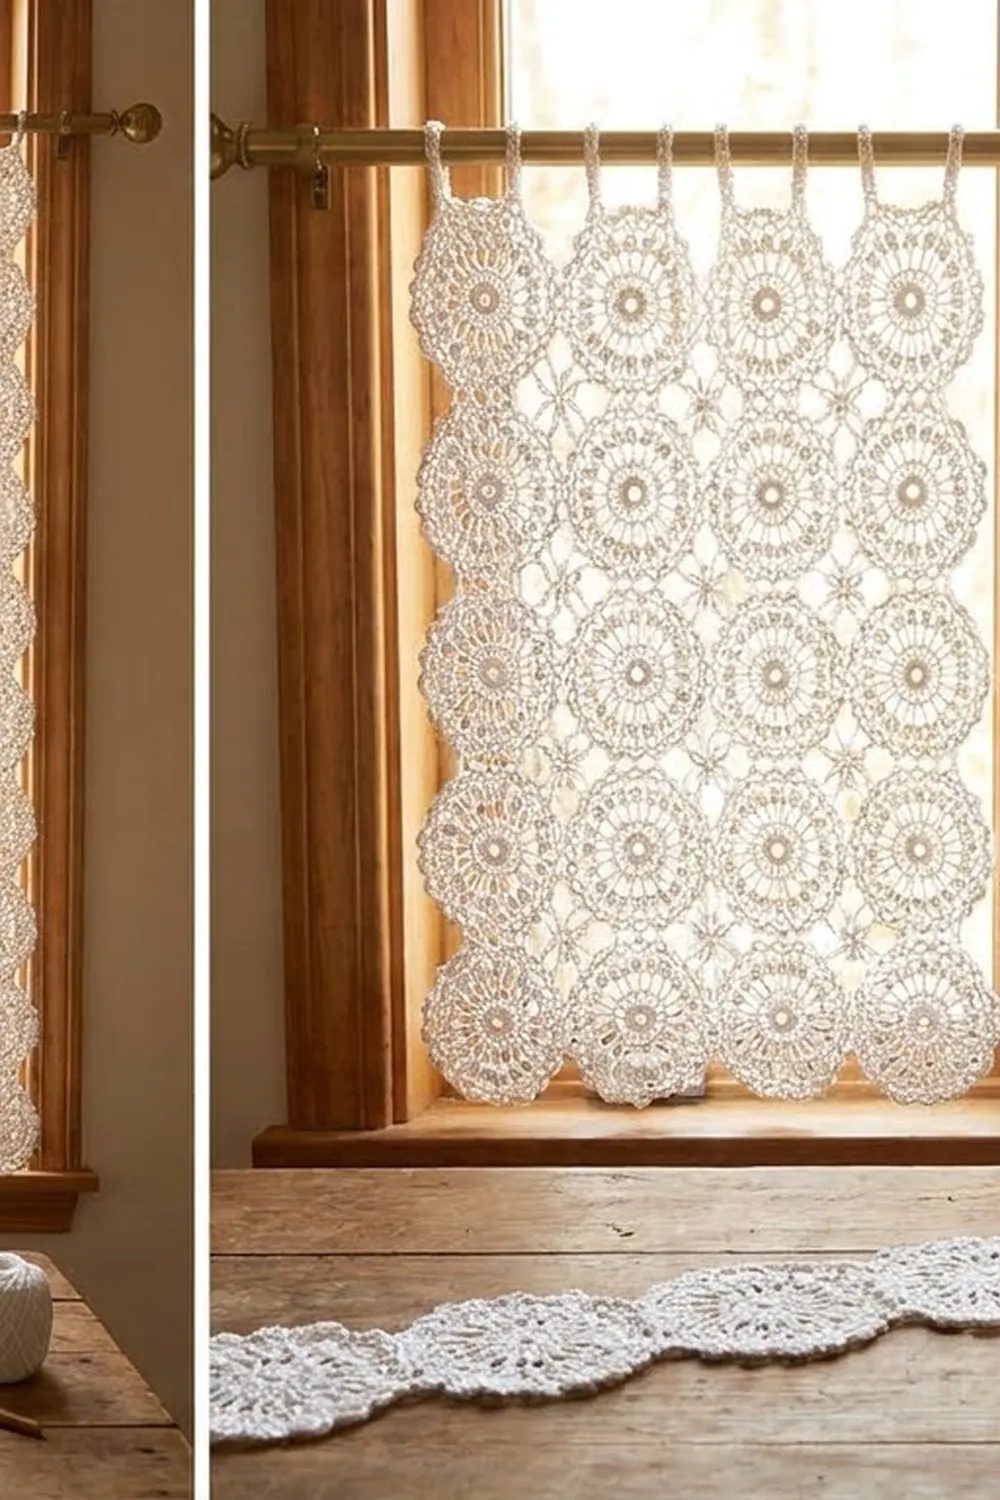
This curtain panel is made from round rosette motifs in bright white cotton. Each rosette has a small open center, a ring of tall spokes, 16 long cluster petals and a scalloped edge. The motifs join tip to tip in a straight grid, and small chain stars fill the gaps between them. In a sunny window, it casts soft lace shadows.
The whole panel is one color, so the texture carries the design. The style is classic cottage lace: light and clean, but sturdy enough to hang every day. The pattern uses US crochet terms.
One panel measures about 19 x 73 in (48.3 x 185.4 cm) without the hanging loops, which add about 2 in (5.1 cm) above the top edge. The photo shows a matching pair, so make two panels to match.
Here’s how it’s built. You crochet 36 rosettes, 3 across and 12 down, and join each one to its neighbors during its last round. Next, you crochet 22 star fillers into the gaps inside the grid. A four-round border straightens the scalloped edges into a clean rectangle. Last, you add a row of hanging loops along the top.
Finished Size and Construction
- Finished size (one panel): 19 x 73 in (48.3 x 185.4 cm), plus loops
- Skill level: Intermediate
- Terminology: US
- Yarn weight: Fingering (super fine) mercerized cotton
- Hook: 2.75 mm (US C-2)
- Number of pieces: 36 rosette motifs + 22 star fillers per panel
- Layout: 3 motifs wide x 12 motifs tall
- Motif size: 6 in (15.2 cm), tip to opposite tip
- Size before border: 18 x 72 in (45.7 x 182.9 cm)
- Border depth: 0.5 in (1.3 cm) per side
Materials
Choose a smooth, mercerized cotton in fingering weight, about 340 m per 100 g. Mercerized cotton shows the stitches clearly, blocks flat and doesn’t fuzz in sunlight. Avoid acrylic, because it won’t hold the lace open after blocking.
- White: 250 g / 850 m per panel (500 g / 1,700 m for the pair)
These amounts include about 20% extra for gauge swatches, a few remade motifs and the hanging loops.
Tools:
– 2.75 mm (US C-2) hook
– Tapestry needle
– Stitch markers
– Rust-proof pins and blocking mats, or a large clean sheet spread over carpet
– Spray bottle
– Measuring tape
Abbreviations (US Terms)
- ch: chain
- sl st: slip stitch
- sc: single crochet
- hdc: half double crochet
- dc: double crochet
- tr: treble crochet
- sp(s): space(s)
- st(s): stitch(es)
- rep: repeat
Special stitches
- Cl (3-tr cluster): *Yarn over twice, insert the hook in the space, pull up a loop, (yarn over, pull through 2 loops) twice; rep from * 2 more times. Yarn over and pull through all 4 loops on the hook.
- Beg Cl (beginning cluster): Ch 4, then work the cluster above with only 2 repeats instead of 3. Yarn over and pull through all 3 loops on the hook.
- GC (gap cluster): Triple treble two together. *Yarn over 3 times, insert the hook in the first named tip, pull up a loop, (yarn over, pull through 2 loops) 3 times. Rep from * in the second named tip. Yarn over and pull through all 3 loops.
- Join-tip: Ch 1, sl st in the ch-3 tip of the neighboring motif, ch 1. Work this in place of a ch-3 tip.
Gauge and Checkpoints
Make one complete motif before you start the panel, block it lightly and measure it. It should be this wide after each round:
- Rnd 1: 1.25 in (3.2 cm)
- Rnd 2: 2 in (5.1 cm)
- Rnd 3: 3 in (7.6 cm)
- Rnd 4: 3.75 in (9.5 cm)
- Rnd 5: 4.75 in (12.1 cm)
- Rnd 6: 6 in (15.2 cm), tip to opposite tip
Border gauge: 24 sc = 4 in (10.2 cm). Test this on a short strip of sc.
If your motif is too big, go down to a 2.5 mm hook. If it’s too small, go up to a 3 mm hook. An error of just 0.25 in (0.6 cm) per motif becomes 3 in (7.6 cm) over 12 rows.
Rosette Motif
Make 36 per panel. Work motif 1 in full. Every other motif joins to its neighbors during Rnd 6.
Rnd 1: Ch 8, sl st in the first ch to form a ring. Ch 3 (counts as dc), then work 31 dc in the ring. Sl st in the top of the ch-3 to join. (32 dc)
Rnd 2: Ch 5 (counts as tr + ch 1). Tr in the next dc, ch 1; rep from * around. Sl st in the 4th ch of the ch-5 to join. (32 tr, 32 ch-1 sps)*
Rnd 3: Sl st in the next ch-1 sp. Work a Beg Cl in the same sp, ch 4. Skip the next ch-1 sp, Cl in the next ch-1 sp, ch 4; rep from * 14 more times. Sl st in the top of the Beg Cl to join. (16 Cl petals, 16 ch-4 sps)*
Rnd 4: Sl st in each of the next 2 ch to reach the middle of the ch-4 sp. Ch 1, sc in the same sp. Ch 6, sc in the next ch-4 sp; rep from * 14 more times. Ch 6, sl st in the first sc to join. (16 sc, 16 ch-6 loops)*
Rnd 5: Sl st in each of the next 3 ch. Ch 1, sc in the same loop. Ch 7, sc in the next loop; rep from * 14 more times. Ch 7, sl st in the first sc to join. (16 sc, 16 ch-7 loops)*
Rnd 6 (scallops): Sl st in the next ch-7 loop. Ch 1, then work (sc, hdc, 2 dc, ch 3, 2 dc, hdc, sc) in that loop. Work the same scallop in each of the other 15 loops. Sl st in the first sc to join and fasten off. (16 scallops: 128 sts + 16 ch-3 tips)
Tip Map
As you work Rnd 6, count the scallops and split them into 4 sides:
- Side A: scallops 1-4
- Side B: scallops 5-8
- Side C: scallops 9-12
- Side D: scallops 13-16
On each side, scallops 2 and 3 are the joining tips. Scallops 1 and 4 are the corner tips, which later attach to fillers or the border.
Joining As You Go
Work the motifs one row at a time, starting at the top. Within each row, work from left to right.
Hold each new motif with Side A facing up and Side B facing left. If you crochet right-handed, Rnd 6 travels counterclockwise, so you reach the top side first and the left side next. If you crochet left-handed, work each row from right to left and mirror these directions.
How the joins line up: Each joining tip on the new motif connects to the joining tip it touches directly on the neighboring motif. Lay the motifs flat with no twist. On any side that has a neighbor, work the 2 joining tips as Join-tips. Work everything else on that side as usual.
- Row 1, motif 1: No joins.
- Row 1, motifs 2-3: Join Side B to the motif on the left (2 joins).
- Rows 2-12, first motif: Join Side A to the motif above (2 joins).
- Rows 2-12, motifs 2-3: Join Side A to the motif above and Side B to the motif on the left (4 joins).
Tension: Keep the ch 1 on each side of a Join-tip loose, so the join sits at the same height as a regular ch-3 tip. If the joins are tight, the motifs pucker.
Size checkpoint: After 4 rows, lay the piece flat. It should measure 18 x 24 in (45.7 x 61.0 cm). The finished grid should measure 18 x 72 in (45.7 x 182.9 cm).
Star Fillers
Make 22 per panel, one for each gap inside the grid where four motifs meet (2 gaps across x 11 gaps down). Each gap is surrounded by 8 free corner tips, 2 from each motif.
Rnd 1: Ch 6, sl st in the first ch to form a ring. Ch 1, 16 sc in the ring, sl st in the first sc to join. (16 sc)
Rnd 2 (arms): Ch 6, sl st in the next corner tip around the gap, ch 6, skip 1 sc, sl st in the next sc; rep from * 7 more times. The last sl st lands in the joining st. Fasten off. (8 arms)*
Keep the arms flat. The filler should fill the gap without pulling the motifs toward it.
Border
Two kinds of tips are free along the panel edge:
- Side tips: the 4 tips on each motif’s outer side
- Gap tips: the 2 corner tips that face each gap between motifs along the edge, one from each motif
Border gauge: 24 sc = 4 in (10.2 cm). That works out to 37 sts per 6 in (15.2 cm) motif.
Rnd 1 (leveling): With the right side facing, join the thread in the first side tip of the top-left motif’s top side. Work this segment for each motif along a side:
- Sc in tip 1, ch 6, sc in tip 2, ch 6, sc in tip 3, ch 6, sc in tip 4, ch 7.
Then:
- Between 2 motifs on the same side: Work a GC into the 2 gap tips, ch 7, then start the next segment.
- At each panel corner: Ch 1 (this is the corner sp), ch 7, then start the next side.
Because you started at tip 1, the round ends at the top-left corner: work the last ch 7, the corner ch 1 and one more ch 7, then sl st in the first sc to join.
Rnd 2: Ch 1. Work 1 sc in each sc and in each GC, 6 sc in each ch-6 sp, 7 sc in each ch-7 sp, and 3 sc in each corner ch-1 sp. Sl st to join.
- Per motif segment: 7 + 1 + 6 + 1 + 6 + 1 + 6 + 1 + 7 = 36 sts
- Top and bottom: (3 x 36) + 2 GC = 110 sts between corner groups
- Each long side: (12 x 36) + 11 GC = 443 sts between corner groups
- Total: 220 + 886 + 12 corner sts = 1,118 sts
Rnd 3: Ch 1. Sc in each st around, working 3 sc in the center st of each corner group. Sl st to join.
- Top and bottom: 114 sts between corner sts
- Each long side: 447 sts between corner sts
- Total: 228 + 894 + 4 = 1,126 sts
Rnd 4: Repeat Rnd 3, then fasten off.
- Top and bottom: 116 sts between corner sts
- Each long side: 449 sts between corner sts
- Total: 232 + 898 + 4 = 1,134 sts
Hanging loops: Counting both corner sts, the top edge has 118 sts. With the right side facing, join the thread with a sc in the top-right corner st. This sc is the base of the first loop.
*Ch 24, sl st in the same st, work 32 sc over the chain loop, sl st in the same base st. Sc in each of the next 12 sts, then sc in the next st (the base of the next loop). Rep from * 8 more times. Work the final loop in the top-left corner st (ch 24, sl st in the same st, 32 sc over the loop, sl st in the base st). Fasten off.
You now have 10 loops: 10 loop sts + (9 x 12) sc = 118. Each loop is about 4 in (10.2 cm) around and hangs about 2 in (5.1 cm) above the edge.
Why the math works: Each motif adds 36 border sts plus 1 GC at the gap beside it, which is 37 sts per 6 in (15.2 cm), exactly the border gauge. Across the top, 110 sts plus the corners span 18 in (45.7 cm), so the edge lies flat without ruffling or pulling in. Rnds 2-4 add 0.5 in (1.3 cm) of border on each side.
Final Blocking
- Weave in all ends along the chain loops, splitting the thread as you go so the ends stay hidden.
- Soak the panel in cool water for 15 minutes, then press the water out. Don’t wring it.
- Roll the panel in towels to remove extra moisture.
- Lay it flat and shape it to 19 x 73 in (48.3 x 185.4 cm).
- Pin each motif’s center ring first, then pin its scallop tips outward.
- Pin the border straight, using a measuring tape and a pin every 2 in (5.1 cm).
- Open each petal and star arm with your fingertips and mist the panel lightly.
- Let it dry completely before you unpin.
Final Quality-Control Checklist
- All 36 motifs have 16 petals and 16 scallops.
- Every join lies flat, with no twisted tips.
- All 22 fillers have 8 arms, each attached to the right tip.
- Border Rnd 2 has 110 sts on the top and bottom and 443 on each long side.
- The corners are square and the edges are straight.
- All 10 loops are the same size.
- The panel measures 19 x 73 in (48.3 x 185.4 cm).
Troubleshooting
- Motifs ruffle: Your Rnd 5 chains are too loose. Go down a hook size.
- Motifs cup: Your chains are too tight. Relax your tension or go up a hook size.
- Joins pucker: Loosen the ch 1 on each side of the Join-tips.
- Fillers pull the gaps in: Lengthen the arms to ch 7.
- Border waves: Check that you worked exactly 6 or 7 sc in each space.
- Border pulls in: Use a 3 mm hook for border Rnds 2-4 only.
- Panel stretches longer after hanging: Cotton lace drops over time. Block it again and dry it flat.
Care
Hand wash in cool water with mild soap, reshape while damp and dry flat. You can press cotton with a warm iron through a cloth.
Final Notes
Here’s how the measurements build:
- One motif is 6 in (15.2 cm).
- 3 x 12 motifs make 18 x 72 in (45.7 x 182.9 cm).
- The border uses 37 sts per motif, so the edges stay straight.
- A 0.5 in (1.3 cm) border on each side brings the panel to 19 x 73 in (48.3 x 185.4 cm).
- 10 loops along the top hold the panel on the rod.
Measure at every stage and the panel will hang straight. Make a second panel to complete the pair.
Happy crocheting!