

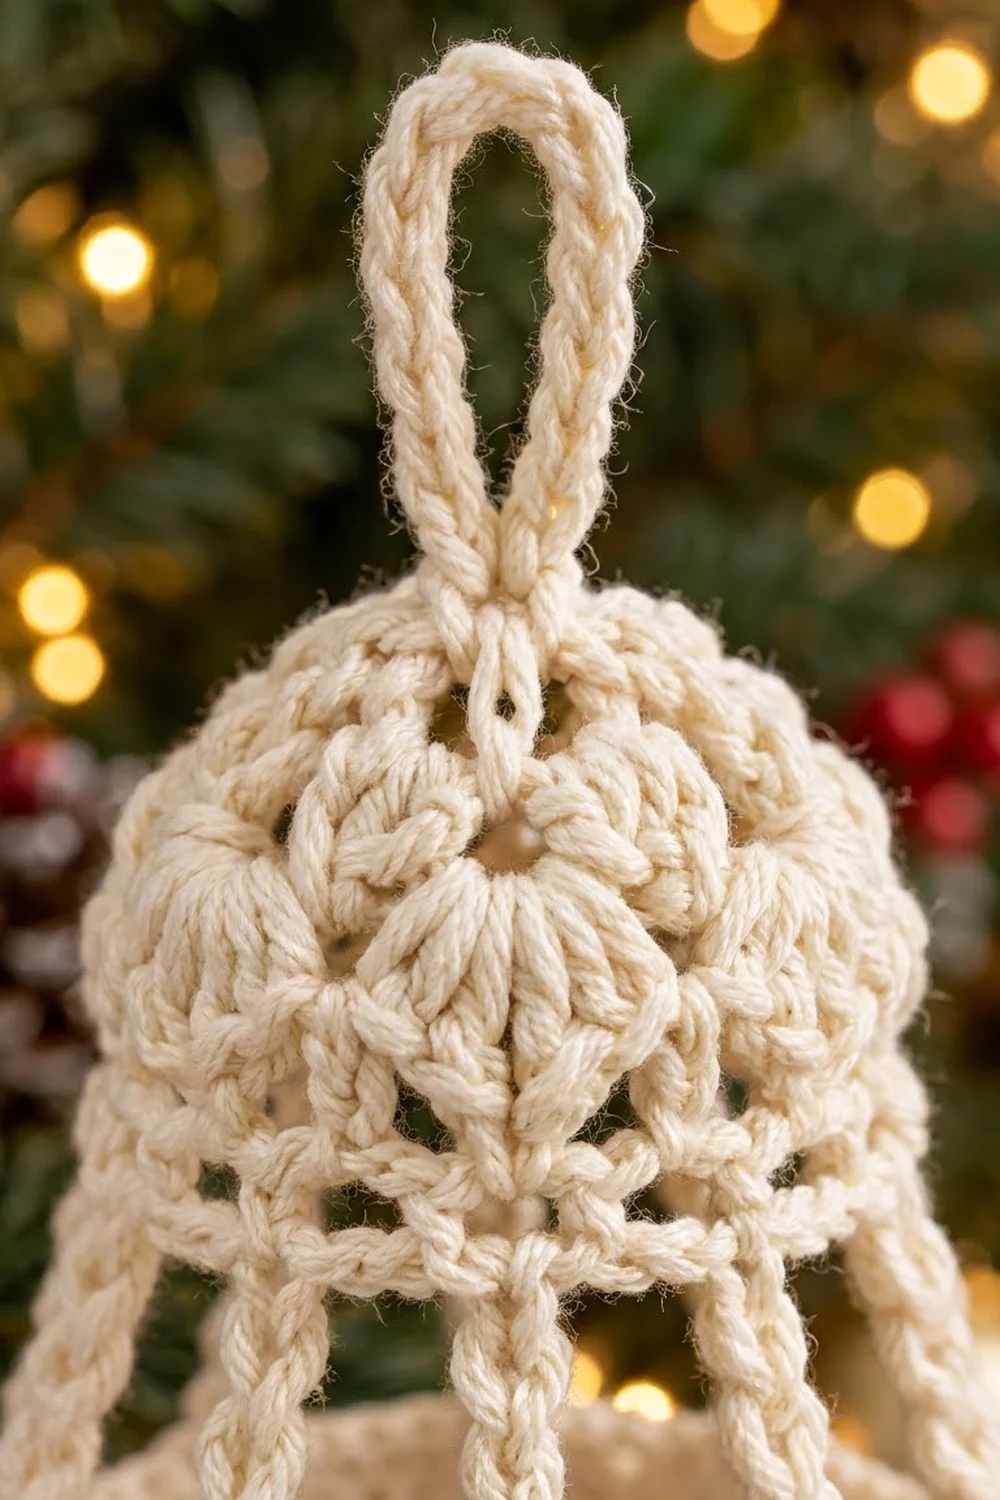
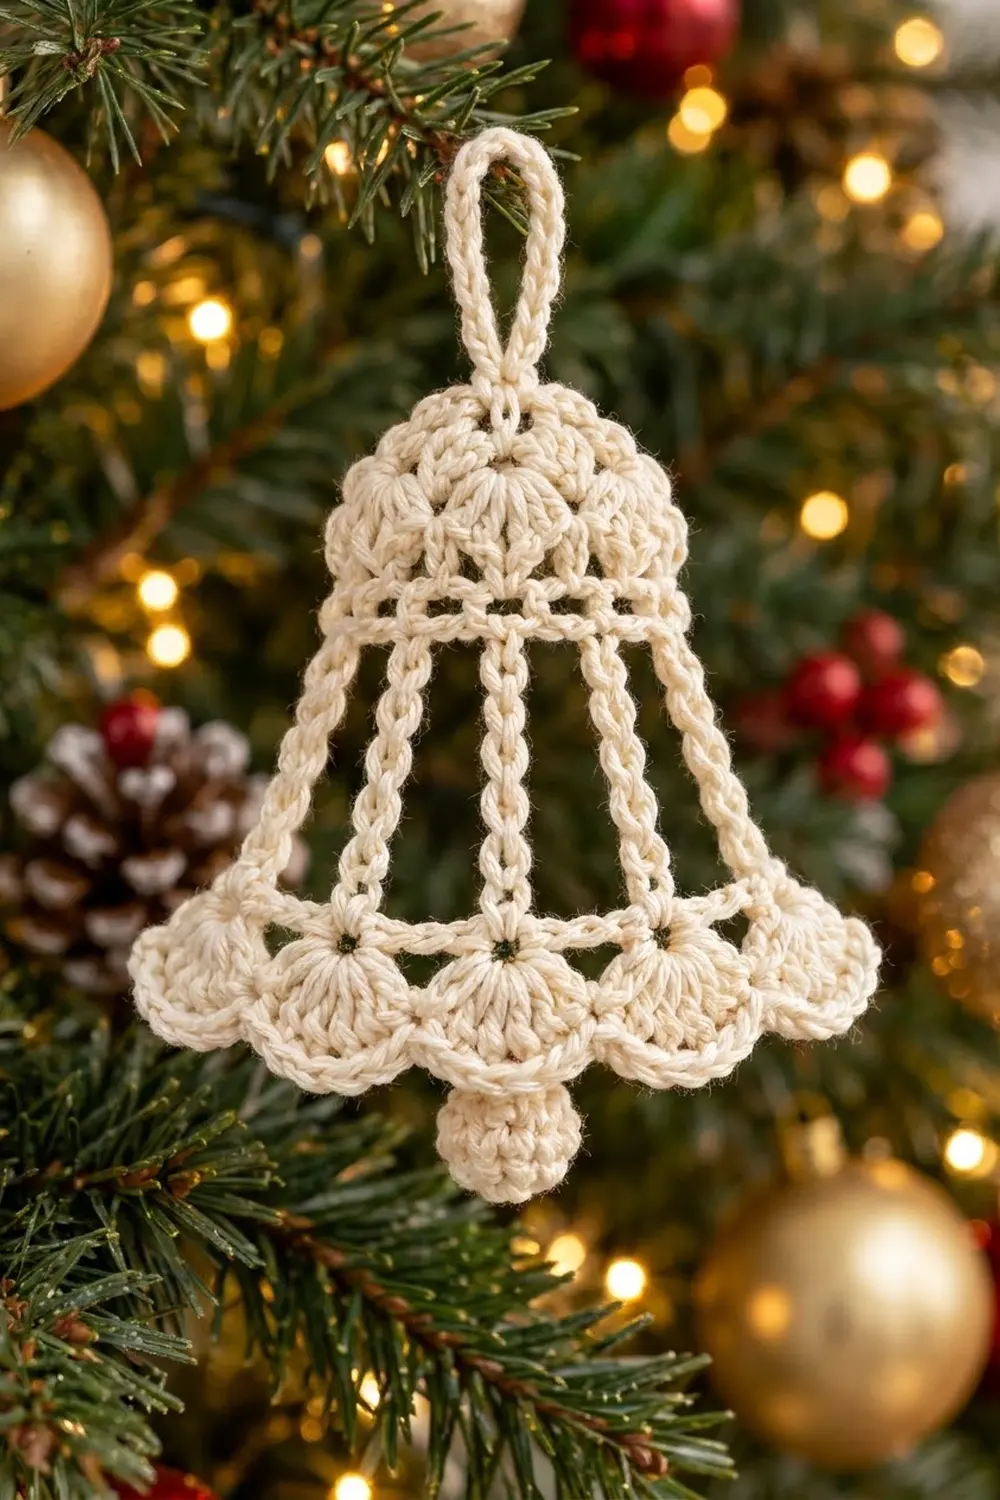
The Ivory Chime Bell is a lacy, flat Christmas ornament with a little vintage charm. It has a solid puff-stitch dome, a delicate mesh band, open bars that flare like the sides of a real bell, and a scalloped hem. A tiny round clapper and a sturdy hanging loop finish it.
The ornament is worked in one color, a soft cream or ivory cotton. This looks lovely against green branches, warm lights, and red or gold baubles. Make one as a gift topper, or a set for the whole tree.
This pattern uses US crochet terms. The finished bell body measures 4.25 in (10.8 cm) wide and 4.75 in (12.1 cm) tall. With the loop and clapper included, the ornament hangs 6.75 in (17.1 cm) long.
The bell is worked flat from the top down, in rows. You crochet the dome, then the band, adding five chain-and-slip-stitch bars as you go. Then you link the bar tips with a hem row, add shells, and finish with an edging round, a hanging loop, and the clapper.
Finished Size and Construction
- Finished size (bell body): 4.25 in (10.8 cm) wide × 4.75 in (12.1 cm) tall
- Total hanging length: 6.75 in (17.1 cm), including loop and clapper
- Skill level: Intermediate
- Terminology: US crochet terms
- Yarn weight: #2 fine / sport-weight cotton
- Hook: 3.0 mm
- Number of pieces: 1 ornament: a flat bell body plus a tiny clapper ball sewn on (no joining of motifs)
- Layout: Single ornament, hung vertically
- Piece size before border: 4 in (10.2 cm) wide × 4.25 in (10.8 cm) tall
- Border depth: 0.25 in (0.6 cm) at the top and at the hem; about 0.125 in (0.3 cm) at each side of the hem
Materials
Yarn: Use a smooth, mercerized sport-weight cotton. Cotton holds the scallops and bars crisply and takes starch well. Avoid fuzzy or very splitty yarns, because they blur the puffs and the open bars.
- Cream / ivory: about 12 g / 36 m
One ornament uses about 8 g. The quantity above includes a margin for your gauge swatch and tails. One 50 g ball makes several bells.
Tools:
- 3.0 mm crochet hook
- Tapestry needle
- Scissors
- 2 stitch markers
- A small pinch of fiberfill or matching yarn scraps (for the clapper)
- Foam blocking board and rust-proof pins
- Spray starch or fabric stiffener
Abbreviations (US Terms)
- ch – chain
- sl st – slip stitch
- sc – single crochet
- dc – double crochet
- sc2tog – single crochet 2 together
- st(s) – stitch(es)
- sp – space
- RS / WS – right side / wrong side
- tch – turning chain
Special stitches
- Puff: (Yarn over, insert hook in stitch, yarn over, pull up a loop to dc height) 3 times. Yarn over and pull through all 7 loops. This counts as 1 st.
- Bar: Ch 8, then sl st in the 2nd ch from the hook and in each of the next 6 ch (7 sl st). The bar is a firm cord about 1.25 in (3.2 cm) long, anchored to the stitch just made.
- Picot: Ch 3 (the edging below works it between two sc in the same stitch).
Gauge and Checkpoints
Gauge: 11 dc = 2 in (5.1 cm), and 4 dc rows = 1.5 in (3.8 cm), using a 3.0 mm hook.
The dome (Rows 1–4) is your gauge swatch. Work it, then measure before you go on.
Checkpoints:
- After Row 1: 0.9 in (2.3 cm) wide
- After Row 4: 2 in (5.1 cm) wide, 1.5 in (3.8 cm) tall
- After Row 6: 2.4 in (6.1 cm) wide across the band, 2.1 in (5.3 cm) tall
- Each bar: 1.25 in (3.2 cm) long
- After Row 7: hem chain row 3.8 in (9.7 cm) wide
- After Row 9: 4 in (10.2 cm) wide, 4.25 in (10.8 cm) tall (size before border)
- After the border: 4.25 in (10.8 cm) wide, 4.75 in (12.1 cm) tall
If your dome is too big, go down to a 2.75 mm hook. If it’s too small, go up to a 3.25 mm hook. A difference of even 0.25 in (0.6 cm) at Row 4 grows into about 0.5 in (1.3 cm) at the hem, so fix it now.
Pattern: Bell Body
Dome
Row 1 (RS): Ch 7. Dc in the 4th ch from the hook and in each of the next 3 ch. Turn. (5 sts; the 3 skipped ch count as the first dc)
Row 2 (WS): Ch 3 (counts as dc here and throughout), dc in the first st, dc in each of the next 3 sts, 2 dc in the top of the tch. Turn. (7 sts)
Row 3 (RS): Ch 3, dc in the first st, puff in the next st, dc in the next st, puff in the next st, dc in the next st, puff in the next st, 2 dc in the top of the tch. Turn. (9 sts: 6 dc, 3 puffs)
Row 4 (WS): Ch 3, dc in the first st, dc in each of the next 7 sts, 2 dc in the top of the tch. Turn. (11 sts)
Check: 2 in (5.1 cm) wide and 1.5 in (3.8 cm) tall. The puffs should sit on the RS as three soft bumps across the dome.
Band and Bars
Row 5 (RS, mesh): Ch 4 (counts as dc + ch 1). Skip the next st, dc in the next st, ch 1, skip the next st. Repeat from * 3 more times. Dc in the top of the tch. Turn. (6 dc and 5 ch-1 sps = 11 sts)
This row makes the ladder-like band.
Row 6 (WS, solid line with bars): Ch 1.
- In the first dc: sc, Bar, sc.
- Sc in the next ch-1 sp, sc in the next dc, Bar.
- Sc in the next ch-1 sp, sc in the next dc, sc in the next ch-1 sp, Bar.
- Sc in the next dc, sc in the next ch-1 sp, sc in the next dc, Bar.
- Sc in the next ch-1 sp, 2 sc in the 3rd ch of the tch, Bar.
Fasten off. (13 sc and 5 Bars)
The bars sit on sc numbers 1, 4, 7, 10, and 13, with exactly 3 sc between each pair. The band now measures 2.4 in (6.1 cm) wide. The 2 extra sc at the edges (11 + 2 = 13) give the slight flare above the bars.
Let the bars hang straight down. Keep each one untwisted, with the slip-stitch side facing the same way on all five.
Hem
Row 7 (RS, hem chain row): With the RS facing, join the yarn with a sc in the tip of the bar at the right-hand edge. Insert the hook through the end chain and its first sl st together. Ch 4, sc in the tip of the next bar. Repeat from * 3 more times. Turn. (5 sc + 16 ch = 21 sts)
The spacing between bars grows from 3 sts at the band to 5 sts at the hem. This is what fans the bars outward into a bell silhouette. Check: 3.8 in (9.7 cm) wide.
Row 8 (WS): Ch 1, sc in the first sc, 4 sc in the next ch-4 sp, sc in the next sc. Repeat from * 3 more times. Turn. (21 sc)
Row 9 (RS, shells): Ch 1, sc in the first sc, skip the next sc, 7 dc in the next sc, skip the next sc, sc in the next sc. Repeat from * 4 more times. Fasten off. (5 shells and 6 sc = 41 sts)
Each shell uses 4 base sts, and the row starts with 1 sc: 1 + (5 × 4) = 21 ✓. The third shell sits right under the center bar. Check: 4 in (10.2 cm) wide and 4.25 in (10.8 cm) tall.
Pattern: Clapper
Work in continuous rounds. Mark the first stitch of each round.
Rnd 1: Make a magic ring and work 6 sc into it. (6)
Rnd 2: 2 sc in each st. (12)
Rnds 3–4: Sc in each st. (12)
Rnd 5: Sc2tog 6 times. (6)
Stuff firmly with a small pinch of fiberfill or yarn scraps. Fasten off, leaving an 8 in (20.3 cm) tail. Weave the tail through the front loops of the last 6 sts and pull it tight to close.
The ball measures about 0.6 in (1.5 cm) across. Keep the tail for attaching.
Border
Border gauge: Work the edging sc at the same tension as the body. Seven sc should cover the 0.9 in (2.3 cm) top edge without pulling. Edging sc along the shells should lie flat around each curve.
Part A: Top and Side Edging with Hanging Loop
With the RS facing, join the yarn at the lower right corner of the band (the end of Row 6). Work up the right side, across the top, and down the left side.
- Right side: 1 sc in the end of Row 6, 2 sc in the end of Row 5, and 2 sc in the end of each of Rows 4, 3, 2, and 1. (11 sc)
- Top: Work across the underside of the foundation chain, into the base of each of the 5 sts of Row 1:
- 2 sc in the 1st st, sc in the 2nd st.
- In the 3rd st: sc, ch 18, sl st in the same st to close the loop. Work 24 sc into the ch-18 loop, then sl st in the same st again.
- Sc in the 4th st, 2 sc in the 5th st.
- That’s 7 sc on the top: 5 sts worked one per stitch, plus 2 extra at the corners. The loop’s 24 sc are counted separately.
- Left side: 2 sc in the end of each of Rows 1, 2, 3, and 4, 2 sc in the end of Row 5, and 1 sc in the end of Row 6. (11 sc)
Fasten off. (29 sc around the dome and band, plus a 24-sc hanging loop)
Why the math works: Dc row ends take 2 sc each, and sc row ends take 1. This matches the row heights, so the sides lie flat. The 2 corner extras round off the top of the dome instead of squaring it. Packing 24 sc onto 18 ch makes the loop firm, so it keeps its upright teardrop shape. The finished loop stands 1.25 in (3.2 cm) tall.
Part B: Picot Hem Edging
With the RS facing, join the yarn with a sl st in the first sc of Row 9 at the right edge.
Sc in each of the next 3 dc, (sc, ch 3, sc) in the next dc (the 4th, center dc), sc in each of the next 3 dc, sl st in the next sc. Repeat from * 4 more times. Fasten off.
Per scallop: 7 dc worked one per stitch + 1 extra sc at the center = 8 sc, plus 1 picot.
Total: 40 sc, 5 picots, 6 sl st.
Why the math works: Each shell has 7 dc, so the edging puts 1 sc on each dc. The single extra sc at the center lets the stitches turn the curve of the shell without cupping. The sl st in each valley keeps the 5 scallops separate and clearly defined. The edging adds 0.25 in (0.6 cm) at the hem and about 0.125 in (0.3 cm) at each side. That brings the bell to 4.25 in (10.8 cm) wide and 4.75 in (12.1 cm) tall.
Attach the Clapper
Use the clapper tail to sew the top of the ball to the center picot of the third shell. Leave a short thread stem, about 0.15 in (0.4 cm), so the ball hangs just below the hem. The clapper and stem together add 0.75 in (1.9 cm) to the hanging length.
Weave in all ends along the solid stitches, never along the bars.
Final Blocking
- Wet the ornament fully in cool water. Gently press out the water in a towel.
- Lay it RS up on the blocking board.
- Pin the top of the dome and the base of the loop on the center line.
- Pin the band corners so the band measures 2.4 in (6.1 cm) across.
- Ease the bars outward evenly. Pin each bar tip so the hem row measures 4 in (10.2 cm), with the bars making a symmetrical fan.
- Pin each scallop at its center picot, curving the shells evenly. The overall width should be 4.25 in (10.8 cm).
- Check that the height is 4.75 in (12.1 cm) from the top edging to the bottom of the picots.
- Spray generously with starch or brush on stiffener. Let it dry completely, at least 12 hours.
- Unpin. Pinch the loop into a neat teardrop shape and roll the clapper to round it.
Final Quality-Control Checklist
- [ ] Row stitch counts: 5, 7, 9, 11, 11, and 13 sc + 5 bars; then 21, 21, and 41
- [ ] Three puffs are visible on the RS of the dome
- [ ] Five bars, each 1.25 in (3.2 cm) long and untwisted
- [ ] The center bar lines up with the center shell and the clapper
- [ ] Five even scallops, each with a centered picot
- [ ] Width is 4.25 in (10.8 cm) and body height is 4.75 in (12.1 cm)
- [ ] Hanging loop is 1.25 in (3.2 cm), firm, and centered
- [ ] Clapper is round, firmly closed, and hangs straight
- [ ] All ends are woven in invisibly and trimmed close
Troubleshooting
The dome ruffles or cups. Ruffling means the puffs are too loose, so pull each puff up only to dc height. Cupping means the turning chains are too tight, so loosen them slightly.
The bars are different lengths. Count to exactly 7 sl st on every bar. If one is still longer, your sl sts were looser on that bar, so redo it with even tension.
The hem pulls the bars inward. Your ch-4 spaces are too tight. Work Row 7 with a 3.25 mm hook and keep the count the same.
The hem waves. The chains are too loose, so work Row 7 with a 2.75 mm hook.
The scallops look flat. Keep all 7 dc in each shell in the same sc. Don’t skip the extra center sc in the edging.
The loop flops over. Make sure you worked all 24 sc around it, then starch it again.
The clapper is lumpy. Remove some stuffing so the ball shapes evenly. Close the top tightly.
Care
Hand wash in cool water with mild soap, then reshape and re-starch while damp. Store the bell flat, away from heavy ornaments, so the bars and scallops keep their shape.
Final Notes
Here is the measurement chain:
- The dome grows to 2 in (5.1 cm) wide and 1.5 in (3.8 cm) tall.
- The band reaches 2.4 in (6.1 cm).
- The 1.25 in (3.2 cm) bars fan out to a 3.8 in (9.7 cm) hem chain.
- The shells bring the body to 4 in × 4.25 in (10.2 cm × 10.8 cm).
- The edging finishes it at 4.25 in × 4.75 in (10.8 cm × 12.1 cm).
- The loop and clapper bring the total hanging length to 6.75 in (17.1 cm).
If each checkpoint matches, the bell will block into a clean, symmetrical shape. Once you’ve made one, the rest of the set goes quickly.
Happy crocheting!