

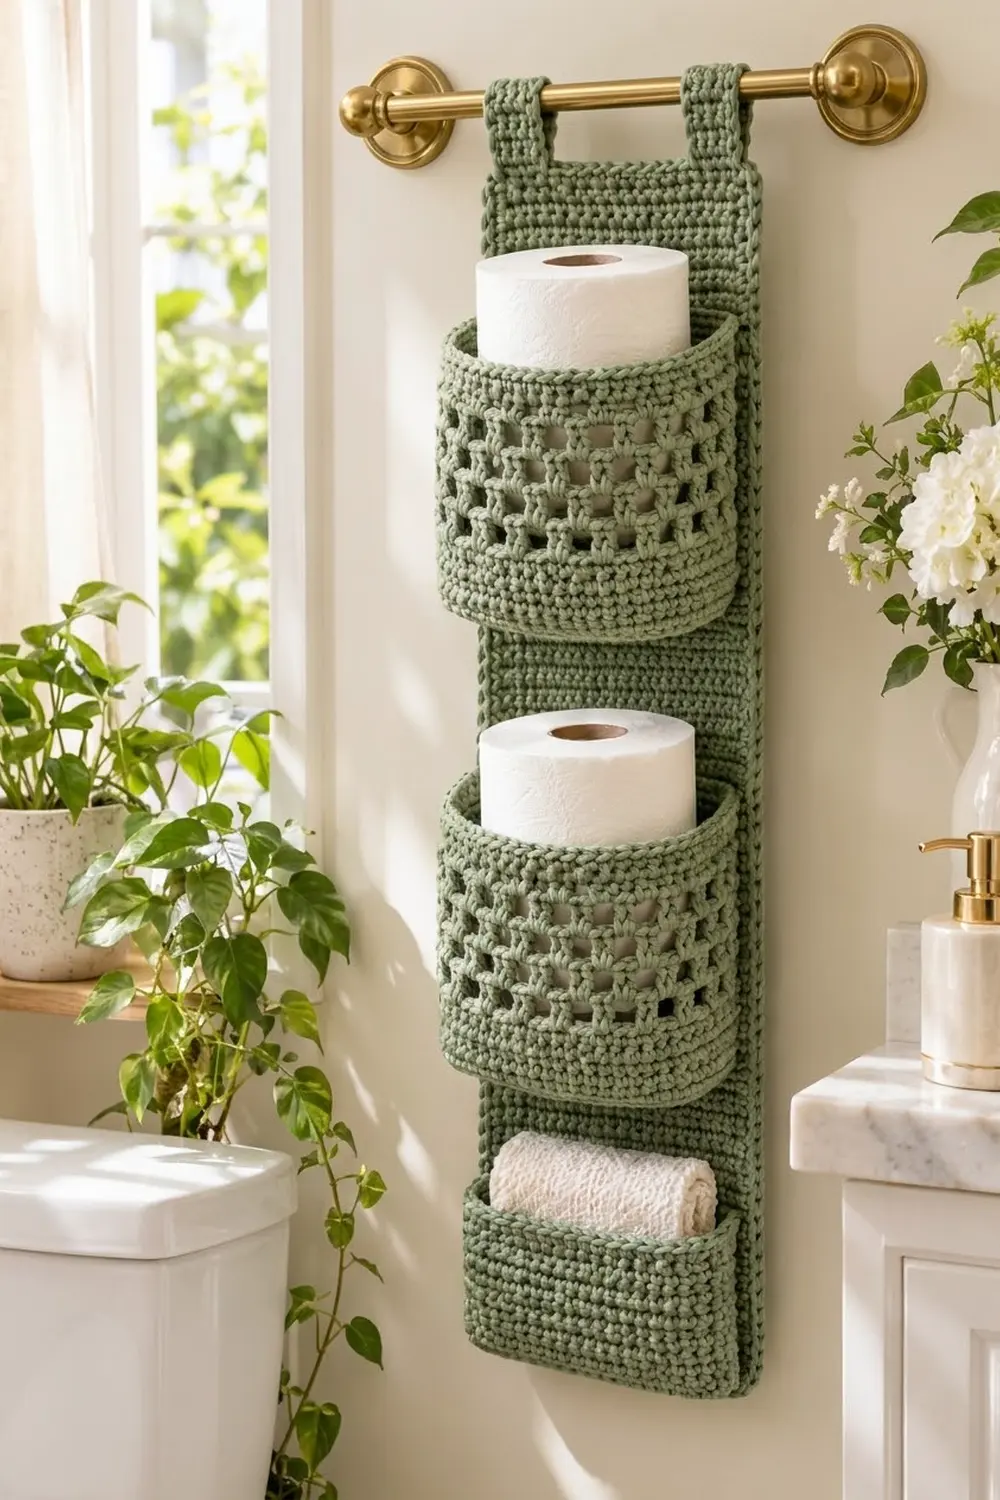
This hanging organizer keeps spare rolls tidy and in easy reach. A long sage-green panel hangs from a towel bar on two strap loops. Three pockets are sewn to the front: two deep mesh baskets that each hold a toilet roll, and a shorter solid pocket at the bottom for a rolled washcloth or small extras.
The look is calm and a little spa-like. The open lattice in the upper pockets shows off the rolls and keeps the piece light, and the solid single crochet bands give the rims and bases their structure. Use one color throughout. A soft sage looks good with brass, white marble, and green plants.
The pattern is written in US crochet terms. The finished panel measures 8 in wide × 27.8 in long (20.3 × 70.6 cm). Hanging height, including the strap loops, is about 29.8 in (75.7 cm).
Here is the construction in short. You work the backing panel flat in rows. Each pocket is worked as a small rectangular base, then its walls are worked in rounds, so it comes out as an open-topped box. You sew the back wall of each pocket flat onto the panel, add a two-round border around the panel, and finish by working two strap tabs off the top edge.
Finished Size and Construction
- Finished panel size: 8 × 27.8 in (20.3 × 70.6 cm)
- Hanging height with loops: about 29.8 in (75.7 cm)
- Skill level: Easy-intermediate
- Terminology: US
- Yarn weight: #4 worsted, cotton
- Hook: 5.0 mm (H-8)
- Number of pieces: 4 (1 panel, 3 pockets) plus 2 tabs worked directly onto the panel
- Layout: one vertical column of 3 pockets: mesh, mesh, solid
- Panel size before border: 7 × 27 in (17.8 × 68.6 cm)
- Pocket footprint: 6.5 × 4 in (16.5 × 10.2 cm)
- Pocket height: upper pockets 4 in (10.2 cm), lower pocket 3 in (7.6 cm)
- Border depth: 0.5 in (1.3 cm) on the long sides, 0.4 in (1.0 cm) at the top and bottom
Materials
Yarn: Use a smooth worsted-weight cotton or cotton blend. Cotton holds its shape under the weight of the rolls and stands up to bathroom humidity. Avoid fuzzy acrylic, because the mesh holes will blur.
- Sage green: 600 g, about 1,020 m (for example, six 100 g / 170 m skeins)
These quantities include a margin of about 15% for your gauge swatch and for tension differences.
Tools:
– 5.0 mm (H-8) crochet hook
– Yarn needle
– 8–10 locking stitch markers
– Measuring tape
– Rust-proof pins and a spray bottle for blocking
Abbreviations (US Terms)
- ch: chain
- sl st: slip stitch
- sc: single crochet
- dc: double crochet
- st(s): stitch(es)
- sk: skip
- sp: space
- BLO: back loop only
- rep: repeat
- Rnd: round
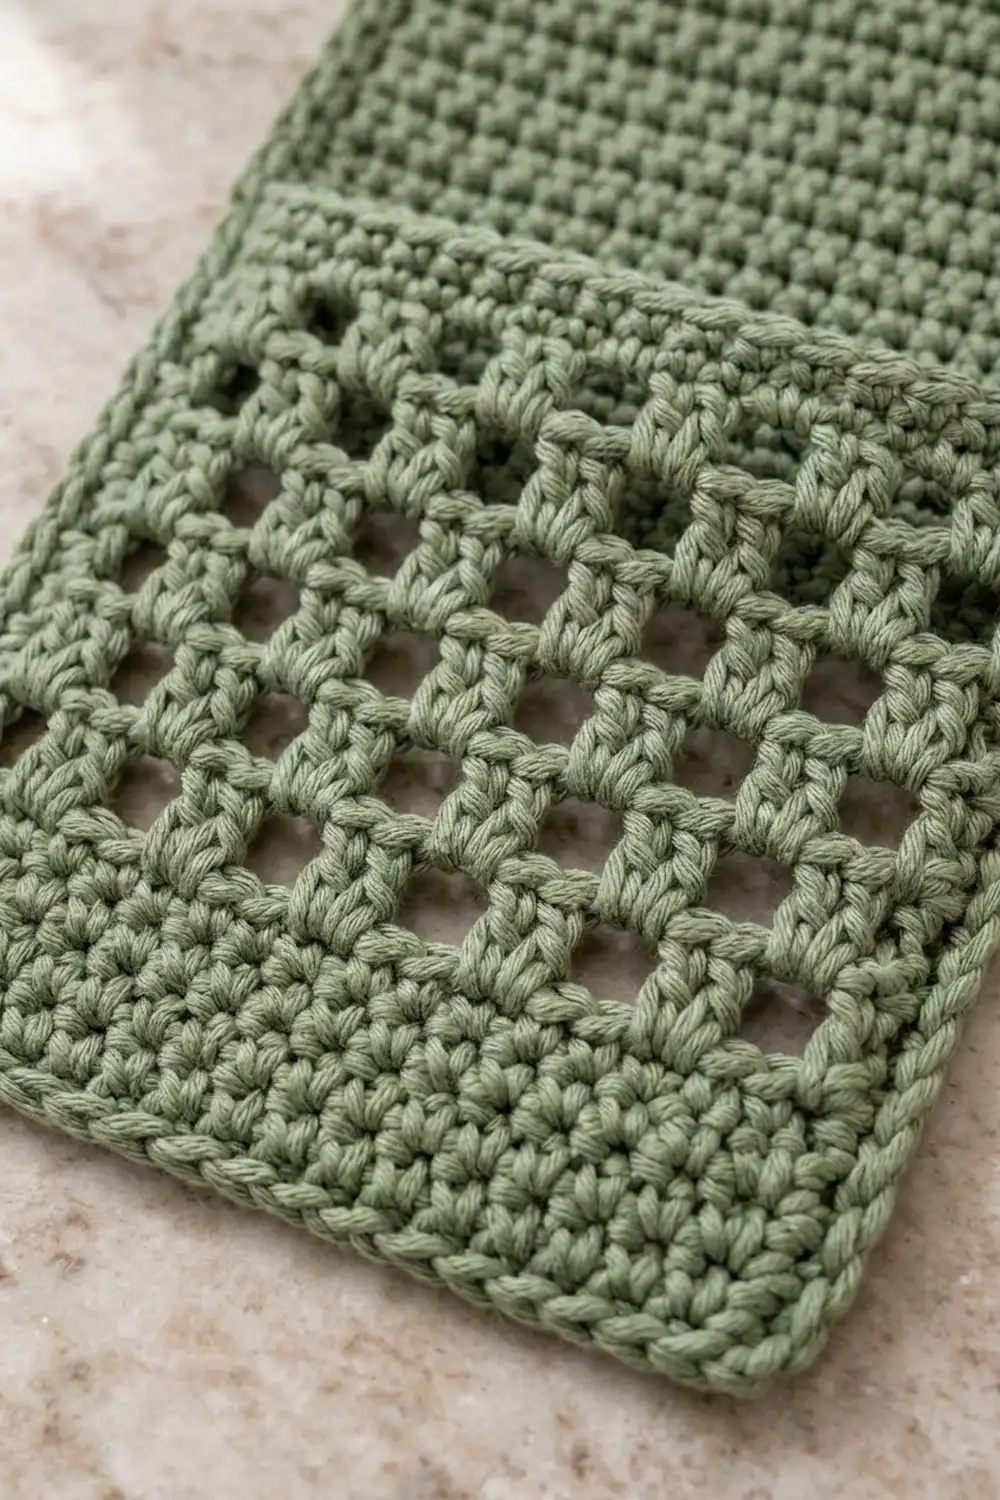
Mesh repeat: dc in each of the next 2 sts, ch 2, sk the next 2 sts. Each repeat uses 4 stitches and makes one square hole.
Gauge and Checkpoints
Gauge: 16 sc × 20 rows = 4 in (10.2 cm). That is 4 sts and 5 rows per inch. In the mesh, one repeat is 1 in (2.5 cm) wide and one dc round is about 0.5 in (1.3 cm) tall.
Make one pocket first. It is a small, quick piece, and it tests your sc gauge and your mesh gauge.
Checkpoints:
– Pocket base after Row 20: 6 × 4 in (15.2 × 10.2 cm).
– Pocket after Rnd 1: 6.5 × 4 in (16.5 × 10.2 cm), which is a 21 in (53.3 cm) perimeter.
– Upper pocket wall, finished: 4 in (10.2 cm) tall, with the mesh section measuring 2 in (5.1 cm).
– Panel after Row 20: 7 in (17.8 cm) wide, 4 in (10.2 cm) tall.
If your piece is too big, go down half a hook size. If it is too small, go up half a size. If your stitch width matches but your mesh rounds are taller than 0.5 in, make your dc yarn-overs a little snugger. Don’t change the stitch counts.
Backing Panel
Ch 29.
Row 1: Sc in the 2nd ch from hook and in each ch across. (28 sc)
Rows 2–135: Ch 1, turn, sc in each st across. (28 sc)
Fasten off. The panel measures 7 × 27 in (17.8 × 68.6 cm).
Mark the pocket lines. Counting from Row 1 at the bottom, place markers at both ends of these rows:
– Row 8: lower pocket base, about 1.6 in (4.1 cm) up
– Row 23: lower pocket rim
– Row 53: middle pocket base, about 10.6 in (26.9 cm) up
– Row 73: middle pocket rim
– Row 98: top pocket base, about 19.6 in (49.8 cm) up
– Row 118: top pocket rim
That leaves 17 rows, or 3.4 in (8.6 cm), above the top pocket. There is a 6 in (15.2 cm) gap above the lower pocket and a 5 in (12.7 cm) gap above the middle pocket, so the rolls sticking out of each pocket don’t crowd the pocket above.
Mesh Pockets (Make 2)
Base: Ch 25.
Row 1: Sc in the 2nd ch from hook and in each ch across. (24 sc)
Rows 2–20: Ch 1, turn, sc in each st across. (24 sc)
The base measures 6 × 4 in (15.2 × 10.2 cm). Do not fasten off.
Rnd 1 (edging): Ch 1, do not turn. Work 2 sc in the first st, sc in the next 22 sts, 2 sc in the last st. That makes 26 sts on this long side. Work 16 sc evenly along the row ends of the short side, about 4 sc for every 5 rows. Working into the foundation loops, work 2 sc in the first st, sc in the next 22, 2 sc in the last (26 sts). Work 16 sc along the second short side. Sl st to the first sc. (84 sc: 26 + 16 + 26 + 16)
Each long-side count of 26 already includes that side’s corner increases. The short-side count of 16 does not include any corner stitches.
Rnd 2: Ch 1, sc in the BLO of each st around, sl st to the first sc. (84 sc) The unused front loops form a crisp fold where the walls turn upward.
Rnds 3–6: Ch 1, sc in each st around, sl st to the first sc. (84 sc) This completes the 1 in (2.5 cm) bottom band.
Rnd 7 (mesh set-up): Ch 3 (counts as dc), dc in the next st, ch 2, sk 2. *Dc in each of the next 2 sts, ch 2, sk 2; rep from * around. Sl st to the top of the ch-3. (21 repeats: 42 dc and 21 ch-2 sps, which is 84 sts including the chains)
Rnds 8–10: Sl st into the next dc, then sl st back into the top of the ch-3 so your hook is in place. Ch 3 (counts as dc), dc in the next dc, ch 2. *Dc in each of the next 2 dc, ch 2; rep from * around. Sl st to the top of the ch-3. (42 dc and 21 ch-2 sps)
Simpler option: just sl st to join and start each new round directly on top of the ch-3. Either way, every dc pair sits on the pair below and every ch-2 sits over a ch-2, so the holes stack into straight columns. The mesh measures 2 in (5.1 cm) tall.
Rnd 11 (conversion): Ch 1, sc in each dc (42 sc), work 2 sc in each ch-2 sp (42 sc). Sl st to the first sc. (84 sc = 42 worked 1-per-stitch + 42 worked into spaces)
Rnds 12–15: Ch 1, sc in each st around, sl st to the first sc. (84 sc) This completes the 1 in (2.5 cm) top band.
Fasten off, leaving a 40 in (101.6 cm) tail for sewing. Total wall height is 1 in + 2 in + 1 in = 4 in (10.2 cm).
Solid Lower Pocket (Make 1)
Work the Base and Rnds 1–2 exactly as for the mesh pockets. (84 sc)
Rnds 3–16: Ch 1, sc in each st around, sl st to the first sc. (84 sc)
Fasten off, leaving a 36 in (91.4 cm) tail. The walls are 15 rounds tall (Rnds 2–16), which is 3 in (7.6 cm).
Make All Pieces
- Backing panel: 1, sage
- Mesh pockets: 2, sage
- Solid pocket: 1, sage
Layout (front view, top to bottom):
[ tabs: sts 3–8 and 25–30 of top border ]
[ open panel: Rows 119–135 ]
[ MESH POCKET 1: Rows 98–118 ]
[ open panel: Rows 74–97 ]
[ MESH POCKET 2: Rows 53–73 ]
[ open panel: Rows 24–52 ]
[ SOLID POCKET: Rows 8–23 ]
[ open panel: Rows 1–7 ]
Joining
Method: Whipstitch with the yarn needle and the pocket’s tail, working through both layers. Sew only the pocket’s back wall to the panel. The front and side walls stay free so the pocket can curve out around a roll.
Stitch-to-stitch logic:
– Base edge: Line up the back long side of Rnd 1 (26 sts) with sts 2–27 of the marked base row. That leaves 1 panel stitch free at each edge, about 0.25 in (0.6 cm). Sew 1 pocket stitch to 1 panel stitch.
– Rim: Line up the 26 sts of the last round directly above the back long side with sts 2–27 of the marked rim row. Sew them 1 to 1.
– Back corners (mesh pockets): Sew the corner column of each pocket to column 2 or column 27 of the panel. Match 1 sc round to 1 row in the bands. Spread the 4 mesh rounds over 10 rows, which is 2½ rows per dc round. The 5 + 10 + 5 = 20 rows run exactly from the base row to the rim row.
– Back corners (solid pocket): Match 15 rounds to 15 rows, Row 8 to Row 23.
Tension: Keep your sewing stitches snug but not tight. The panel should lie flat behind each pocket with no rippling. Pin the rim and the base first, then sew the corners.
Size checkpoint: After joining, the panel should still measure 7 × 27 in (17.8 × 68.6 cm). If it has drawn in, loosen the seams.
Border
Border gauge: Same as the body, 4 sc per inch across stitches. Along row ends, work 4 sc for every 5 rows, which matches 4 sts per inch to 5 rows per inch.
Rnd 1: With the right side facing, join yarn in the top-right corner stitch. Work 3 sc in this corner st, sc in the next 26 sts, 3 sc in the last top st. Along the long side, work 108 sc evenly in the row ends (135 rows × 4/5 = 108). Work 3 sc in the first foundation st, sc in the next 26, 3 sc in the last foundation st. Work 108 sc along the second long side. Sl st to the first sc.
- Count: 26 + 26 + 108 + 108 + (4 corners × 3) = 280 sc
- Per side, counting both corner (middle) stitches: top and bottom 30, long sides 112. Check: 2 × 30 + 2 × 112 − 4 shared corners = 280.
Rnd 2: Ch 1. Sc in each st around, working 3 sc in each corner (middle) st. Sl st to the first sc.
- Count: 280 + 8 = 288 sc
- Per side: top and bottom 32, long sides 114. Check: 2 × 32 + 2 × 114 − 4 = 288.
Why the math works: 32 sts ÷ 4 per inch = 8 in (20.3 cm) wide. In length, 135 rows plus 2 border rounds at each end is 139 rows ÷ 5 = 27.8 in (70.6 cm). The pockets sit inside the border, so the border never passes over a seam.
Tabs (make 2): With the right side facing, join yarn in st 3 of the top edge, counting from the right corner st as st 1.
Row 1: Sc in sts 3–8. (6 sc)
Rows 2–25: Ch 1, turn, sc 6.
The tab is 1.5 × 5 in (3.8 × 12.7 cm). Fasten off with a long tail. Work the second tab over sts 25–30.
Fold each tab to the back and sew its last row to the back of the panel just below the border. Overlap about 1 in (2.5 cm), which leaves a loop about 2 in (5.1 cm) tall that fits rods up to 1 in (2.5 cm) in diameter.
Final Blocking
- Weave in all ends along seams or inside the solid bands.
- Lay the organizer face up on a towel or blocking mat.
- Pin the panel to 8 × 27.8 in (20.3 × 70.6 cm), keeping the edges straight.
- Mist the whole piece evenly with water until it is damp.
- Stuff each pocket with a toilet roll or a rolled hand towel so it dries rounded.
- Press the mesh holes square with your fingertips.
- Let it dry completely, 12–24 hours, before unpinning.
Final Quality-Control Checklist
- Panel is 8 × 27.8 in (20.3 × 70.6 cm) with straight sides.
- Border Rnd 2 has 288 sts, with 32 on the top and bottom and 114 on each long side.
- Each pocket has 84 sts per round and a 21 in (53.3 cm) perimeter.
- Mesh pockets show 4 rows of 21 square holes, lined up in straight columns.
- Upper pockets are 4 in (10.2 cm) tall and the lower pocket is 3 in (7.6 cm) tall.
- Each pocket is centered, with 1 free stitch on each side, inside the border.
- Tabs are evenly placed over sts 3–8 and 25–30 and securely sewn.
- The piece hangs straight without tilting.
Troubleshooting
- Mesh holes drift diagonally: You worked dc into chain spaces or skipped a dc. Each dc pair must go into the dc pair below it.
- Pocket walls flare out: Your Rnd 2 was not worked in BLO, or your gauge is loose. Redo Rnd 2, or go down a hook size.
- Panel ripples behind a pocket: The back wall is wider than 26 sts, or the seam is too tight. Recount Rnd 1 and resew more loosely.
- Border waves along the long sides: You have too many sc. Keep to exactly 108 per side in Rnd 1.
- Border pulls in: You have too few sc, or your tension is tight. Rework with a looser hand.
- Holder tilts: The tabs are off center. Move one tab so they mirror each other.
Care
Hand wash in cool water with mild soap, press out the water in a towel, and dry flat with the pockets stuffed. Avoid the dryer, which can shrink cotton unevenly.
Final Notes
The measurement chain is short. Gauge of 4 sts and 5 rows per inch gives a panel body of 7 × 27 in (17.8 × 68.6 cm) and pockets of 6.5 × 4 in (16.5 × 10.2 cm) with an 84-stitch perimeter. Each pocket’s 26-stitch back wall sews to 26 panel stitches. The two border rounds bring the panel to 8 × 27.8 in (20.3 × 70.6 cm), and the strap loops add about 2 in (5.1 cm) on top. Check each number as you reach it, and your organizer will hang straight and hold its rolls neatly.
Happy crocheting!