

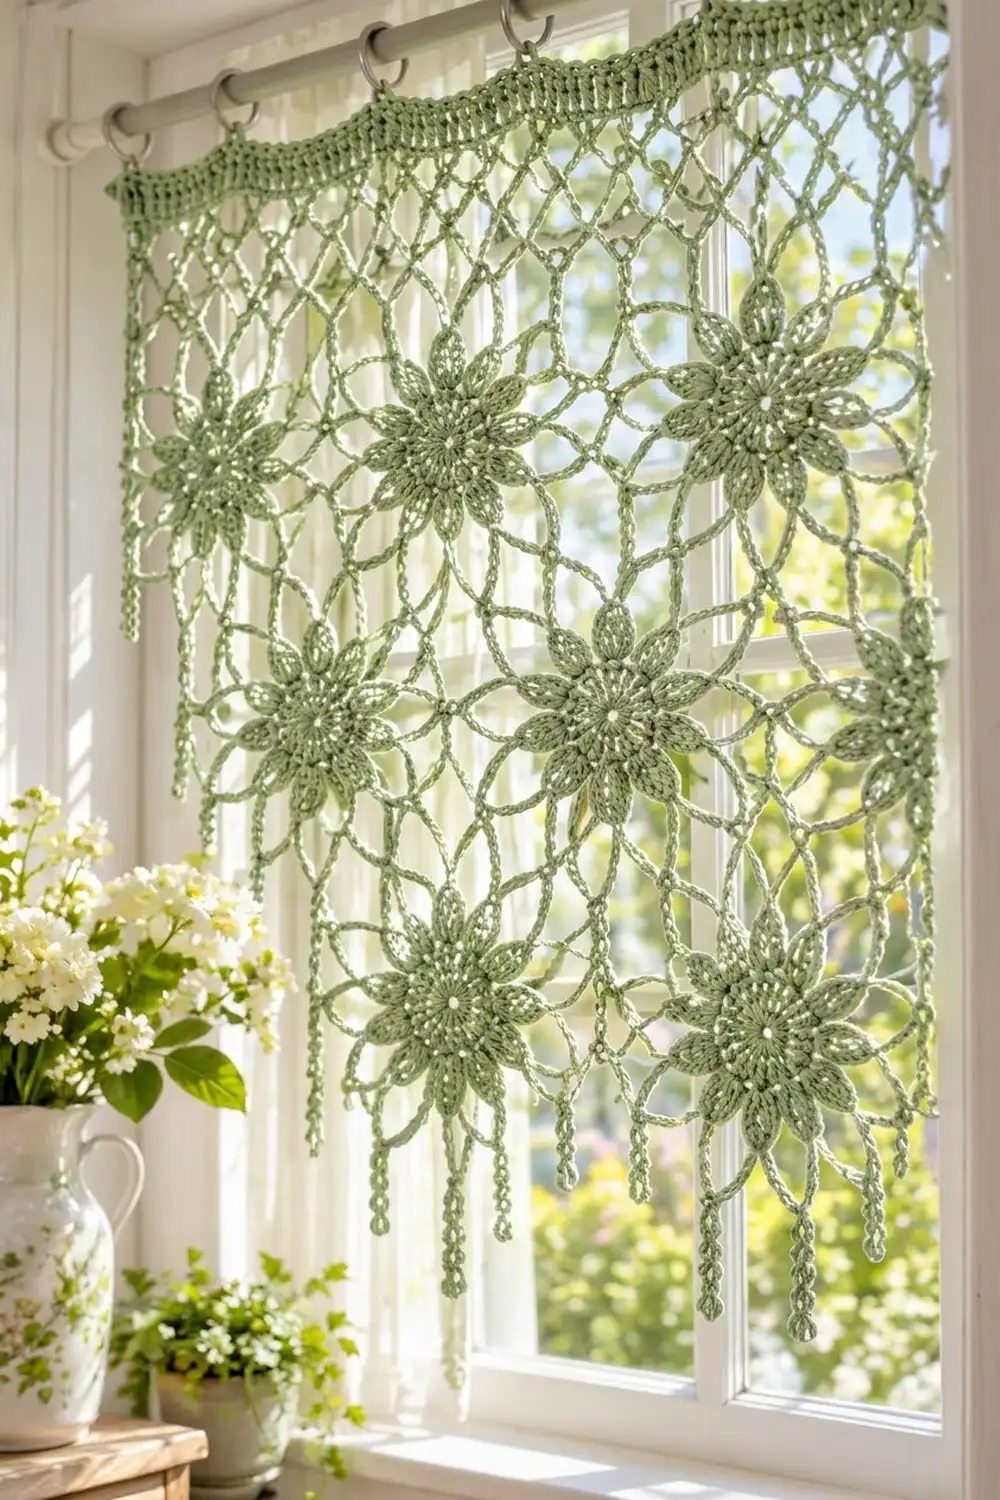
The Sage Blossom Lace Curtain is a light, airy café panel built from eight-petal flower motifs. The flowers float in an open web of chain loops, so plenty of sunlight comes through. A solid header band runs across the top, and a row of beaded chain drops swings along the bottom edge.
Everything is worked in one soft sage-green sport-weight cotton, which gives the panel a fresh, cottage-garden look. Mercerized cotton gives crisp stitch definition, and the petals show a clear ribbed outline that looks good with the light behind it.
The pattern uses US crochet terms. The finished panel measures 22 in (55.9 cm) wide and 23.25 in (59.1 cm) long without the fringe, or 29.75 in (75.6 cm) long to the tips of the longest drops.
You will make nine flower motifs, joining them as you go into a 3 × 3 grid. Then you work a two-round border all around, add a three-row header across the top, and finish with a fringe of chain drops along the bottom.
Finished Size and Construction
- Finished size: 22 in × 23.25 in (55.9 cm × 59.1 cm) without the fringe; 29.75 in (75.6 cm) long including the fringe
- Skill level: Intermediate
- Terminology: US crochet terms
- Yarn weight: Sport (#2), mercerized cotton
- Hook: 3.0 mm
- Number of pieces: 9 flower motifs
- Layout: 3 motifs across × 3 motifs down
- Motif size: 7 in (17.8 cm) from side to side after blocking
- Size before border: 21 in × 21 in (53.3 cm × 53.3 cm)
- Border depth: 0.5 in (1.3 cm) on the sides and bottom; 1.75 in (4.4 cm) on the top, including the header
Materials
Yarn: Use a smooth sport-weight mercerized cotton or cotton blend. Mercerized fibers hold the shape of the petals and the open loops much better than soft, matte cotton.
- Sage green: about 150 g / 465 m (508 yd)
The quantity includes a margin of roughly 25% for your gauge swatch, the joins, and personal tension differences.
Tools:
- 3.0 mm crochet hook
- Tapestry needle
- Scissors
- Blocking mats and rust-proof pins
- Spray bottle; light spray starch is optional
- Measuring tape
- Curtain clip rings, about 6 to 7 for a 22 in (55.9 cm) width
Abbreviations (US Terms)
- ch: chain
- sl st: slip stitch
- sc: single crochet
- hdc: half double crochet
- dc: double crochet
- tr: treble crochet
- sp: space
- st(s): stitch(es)
- rnd: round
Special stitch – Bead (dc4tog bobble): Yarn over, insert the hook in the indicated chain, and pull up a loop. Yarn over and draw through 2 loops. Repeat in the same chain 3 more times (5 loops on the hook). Yarn over and draw through all 5 loops.
Gauge and Checkpoints
Test one motif first. Crochet one complete motif, then wet-block it and pin it flat. It should measure 7 in (17.8 cm) from the middle of one side loop to the middle of the opposite side loop.
Motif checkpoints (relaxed, before blocking):
- After Rnd 2: 2 in (5.1 cm) across
- After Rnd 4: 5 in (12.7 cm) from petal tip to opposite petal tip
- After Rnd 5: 6 in (15.2 cm) across
- After Rnd 6 and blocking: 7 in (17.8 cm) from side to side
Border gauge: 20 sts = 4 in (10.2 cm) in sc or dc worked along the border.
If your motif is too large, go down to a 2.75 mm hook or pull your chains a little more firmly. If it’s too small, go up to a 3.25 mm hook. A difference of 0.25 in (0.6 cm) per motif adds up to 0.75 in (1.9 cm) across the panel, so correct it now.
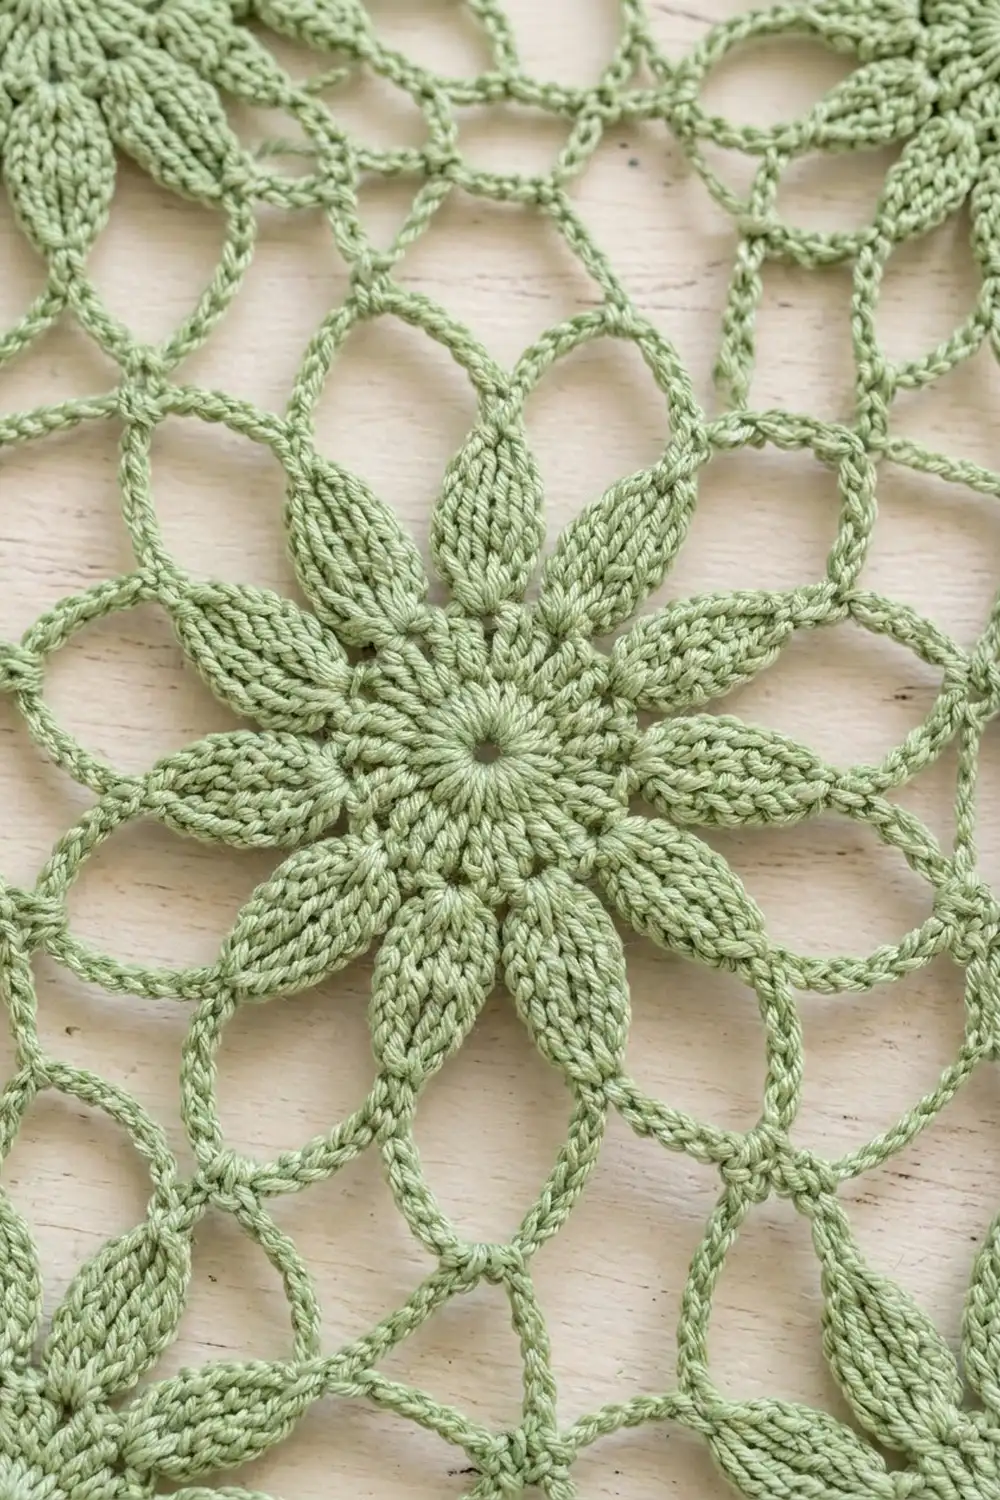
Flower Motif (Make 9)
The first motif is worked in full. The other eight follow the same instructions through Rnd 5 and are joined to their neighbors during Rnd 6 (see Joining).
Rnd 1: Make a magic ring. Ch 3 (counts as dc), work 15 dc in the ring, and sl st to the top of the beginning ch-3. Pull the ring snug, leaving a small open center. (16 dc)
Rnd 2: Ch 1. Sc in the next st, 2 sc in the next st; repeat from * 8 times. Sl st to the first sc. (24 sc)
Rnd 3 (petal bases): Sl st in the first sc. Ch 9. Working back down the chain, sc in the 2nd ch from the hook, hdc in the next ch, dc in the next ch, tr in each of the next 2 ch, dc in the next ch, hdc in the next ch, and sc in the last ch (8 sts). Skip the next sc of Rnd 2 and sl st in each of the next 2 sc. Repeat from * 8 times. The final sl st lands in the same sc as the first sl st. (8 half-petals; 3 sc of Rnd 2 used per petal)
The shaped half of each petal sits on one side of its chain. The free loops on the other side of the chain are worked in the next round.
Rnd 4 (petal outline): Working up the free loops on the unworked side of the petal chain, from base to tip: sc, hdc, dc, tr, tr, dc, hdc, sc (8 sts). In the turning ch at the tip, work (sc, ch 3, sc). Working down the shaped side, sc in each of the 8 sts. Sl st in the next sl st between petals. Repeat from * around and fasten off. (18 sts and 1 ch-3 tip per petal; 144 sts and 8 ch-3 tips total)
This round turns each half-petal into a full pointed lens shape with a ribbed outline and a center line along the base chain.
Rnd 5 (flower loops): Join the yarn in any ch-3 tip. Ch 1 and sc in the same tip. Ch 9, sc in the next ch-3 tip; repeat from * 7 more times, omitting the last sc. Sl st to the first sc. (8 sc, 8 ch-9 loops)
Rnd 6 (squaring round): Label the ch-9 loops alternately as corner loops and side loops, starting with a corner loop.
Sl st into the first corner loop. Ch 1. In the corner loop, work (sc, ch 11, sc). Ch 7. In the next side loop, work (sc, ch 7, sc). Ch 7. Repeat from * 3 more times and sl st to the first sc. Fasten off. (16 sc, 4 ch-11 corner loops, 12 ch-7 loops)
Loops per side: Corner loop, connector, middle loop, connector, corner loop = 5 loops per side, including both corner loops.
Make All Pieces
Make 9 motifs in sage green. Complete Motif 1 through Rnd 6. Work Motifs 2–9 through Rnd 5, then join each one on Rnd 6.
Layout (numbers show the joining order):
[1] [2] [3]
[4] [5] [6]
[7] [8] [9]
Joining
Method: Join as you go on Rnd 6. Each loop that faces a neighbor is split around a sl st into that neighbor’s matching loop.
- Joined corner loop: In the corner ch-9 loop, work (sc, ch 5, sl st in the neighbor’s ch-11 corner loop, ch 5, sc). This keeps the loop length at 11 ch.
- Joined connector loop: Ch 3, sl st in the neighbor’s matching ch-7 connector loop, ch 3. This keeps the loop length at 7 ch.
- Joined middle loop: In the side ch-9 loop, work (sc, ch 3, sl st in the neighbor’s ch-7 middle loop, ch 3, sc).
Stitch-to-stitch logic: Each joined side matches 5 loops to 5 loops: corner to corner, connector to connector, middle to middle, connector to connector, corner to corner. Nothing is added or skipped, so the grid stays square.
Four-way corners: Where 3 or 4 motifs meet, sl st into the existing join sl st instead of into a loop. All the corners then lock at a single point.
Tension: Work the ch-3 and ch-5 halves at the same tension as your free chains. If you pull them tight, the seams pucker; if they’re loose, the seams sag.
Size checkpoint: Pin the joined grid out. It should measure 21 in × 21 in (53.3 cm × 53.3 cm).
Border
Border gauge: 20 sts = 4 in (10.2 cm).
Starting count per side: Each side of the panel runs along 3 motifs, each with 5 loops per side: 3 × 5 = 15 loops. The corner loops at the seams belong to separate motifs and each one is worked separately. No stitches are added at the seams.
Rnd 1 (leveling): Join the yarn in the top-right panel corner loop. Ch 1 and work 5 sc in this loop (the first half of the corner).
Along each motif side, work: 5 sc in the corner loop, 8 hdc in the connector, 9 dc in the middle loop, 8 hdc in the connector, and 5 sc in the next corner loop. That is 35 sts per motif side.
At each of the 4 panel corners, work (5 sc, ch 2, 5 sc) in the single corner loop. Each group of 5 sc belongs to its own side. Sl st to the first sc.
Count: 3 × 35 = 105 sts per side; 420 sts plus 4 ch-2 corner sps in total.
The taller stitches fill the middle valleys and the sc sit on the higher corners, so the edge comes out straight.
Rnd 2: Ch 1. Sc in each st around, and work 3 sc in each corner ch-2 sp. Sl st to the first sc.
Count: 105 + 3 sc on each of 4 corners = 432 sts. Counted from one center corner sc to the next, including both, each side has 109 sts: 4 × 10⁹ − 4 shared corners = 432.
Fasten off.
Header (top edge only)
Row 3: With the right side facing, join the yarn in the center sc of the top-right corner. Ch 3 (counts as dc) and dc in each st across to the center sc of the top-left corner. Turn. (109 dc)
Row 4: Ch 3 (counts as dc), dc in each st across, turn. (109 dc)
Row 5 (wavy edge): Ch 1 and sc in the first st. Hdc in the next st, dc in the next st, hdc in the next st, sc in the next st; repeat from * 27 times. Fasten off. (1 + 27 × 4 = 109 sts)
The header adds 1.25 in (3.2 cm) above Rnd 2.
Fringe (bottom edge)
Join the yarn in the center sc of the bottom-left corner. This is stitch 1 of the 109 bottom stitches. You will make a drop in stitch 1 and in every 9th stitch after it (sts 1, 10, 19 … 109), for 13 drops in total. Alternate long and short drops, starting with a long one: 7 long and 6 short.
- Long drop: Ch 40, work a Bead in the 4th ch from the hook, then sl st in each of the remaining 36 ch back up to the edge. Length: about 6.5 in (16.5 cm).
- Short drop: Ch 28, work a Bead in the 4th ch from the hook, then sl st in each of the remaining 24 ch back up to the edge. Length: about 4.5 in (11.4 cm).
After each drop, sl st in each of the next 9 sts. The last sl st lands in the next drop’s stitch. Fasten off after the 13th drop.
Why the math works: Each motif side has 5 loops, which become 35 stitches, so 3 motifs give 105 stitches per side. That works out to 105 ÷ 5 = 21 in (53.3 cm), the same as the joined grid. Rnd 2 adds only the corner stitches, so each side counts 109. Both the header repeat (109 = 1 + 27 × 4) and the fringe spacing (109 = 1 + 12 × 9) divide that count evenly.
Final Blocking
- Weave in all ends along the petal outlines, where they won’t show against the light.
- Soak the panel in cool water for 10 minutes, then press out the water in a towel. Don’t wring it.
- Pin it on mats at 22 in (55.9 cm) wide and 23.25 in (59.1 cm) long, not counting the fringe.
- Pin out every corner loop and middle loop so the netting opens evenly.
- Pin each petal tip outward so the petals lie flat and pointed.
- Straighten the fringe drops so they hang vertically. Mist with light starch if you like.
- Let it dry completely before unpinning.
Final Quality-Control Checklist
- 9 motifs, each with 8 petals and 16 Rnd 6 loops
- Every joined side matches 5 loops to 5 loops
- Rnd 1 of the border: 105 sts per side
- Rnd 2 of the border: 109 sts per side, 432 in total
- Header: 109 sts in each row, 27 waves
- 13 fringe drops, alternating long and short and starting with a long one
- Panel measures 22 in × 23.25 in (55.9 cm × 59.1 cm)
Troubleshooting
- Petals curl: The tr stitches are too tight. Loosen your tension on Rnd 3, or go up a hook size for that round only.
- Motif cups: The Rnd 5 chains are too short or too tight. Check that you have 9 ch per loop.
- Motif ruffles: Your chains are too loose. Go down to a 2.75 mm hook for Rnds 5–6.
- Border waves: Your sts per in don’t match the border gauge. Change the hook size for the border only.
- Header pulls in: Your dc rows are too tight. Use a hook 0.25 mm larger for Rows 3–4.
- Drops twist: Wet them and hang the panel to dry with the fringe pointing down.
Care
Hand wash in cool water with mild soap, roll it in a towel, and dry it flat or pinned. Re-block lightly after washing so the netting stays open.
Final Notes
The measurements build in a chain. Each 7 in (17.8 cm) motif has 5 loops per side, and three motifs make a 21 in (53.3 cm) square of 15 loops per side. Border Rnd 1 turns those loops into 105 stitches per side, and Rnd 2 brings each side to 109 stitches and 22 in (55.9 cm). The header and the 13 beaded drops both divide that count evenly. Check your measurements at each stage and the panel will hang straight. Happy crocheting!