

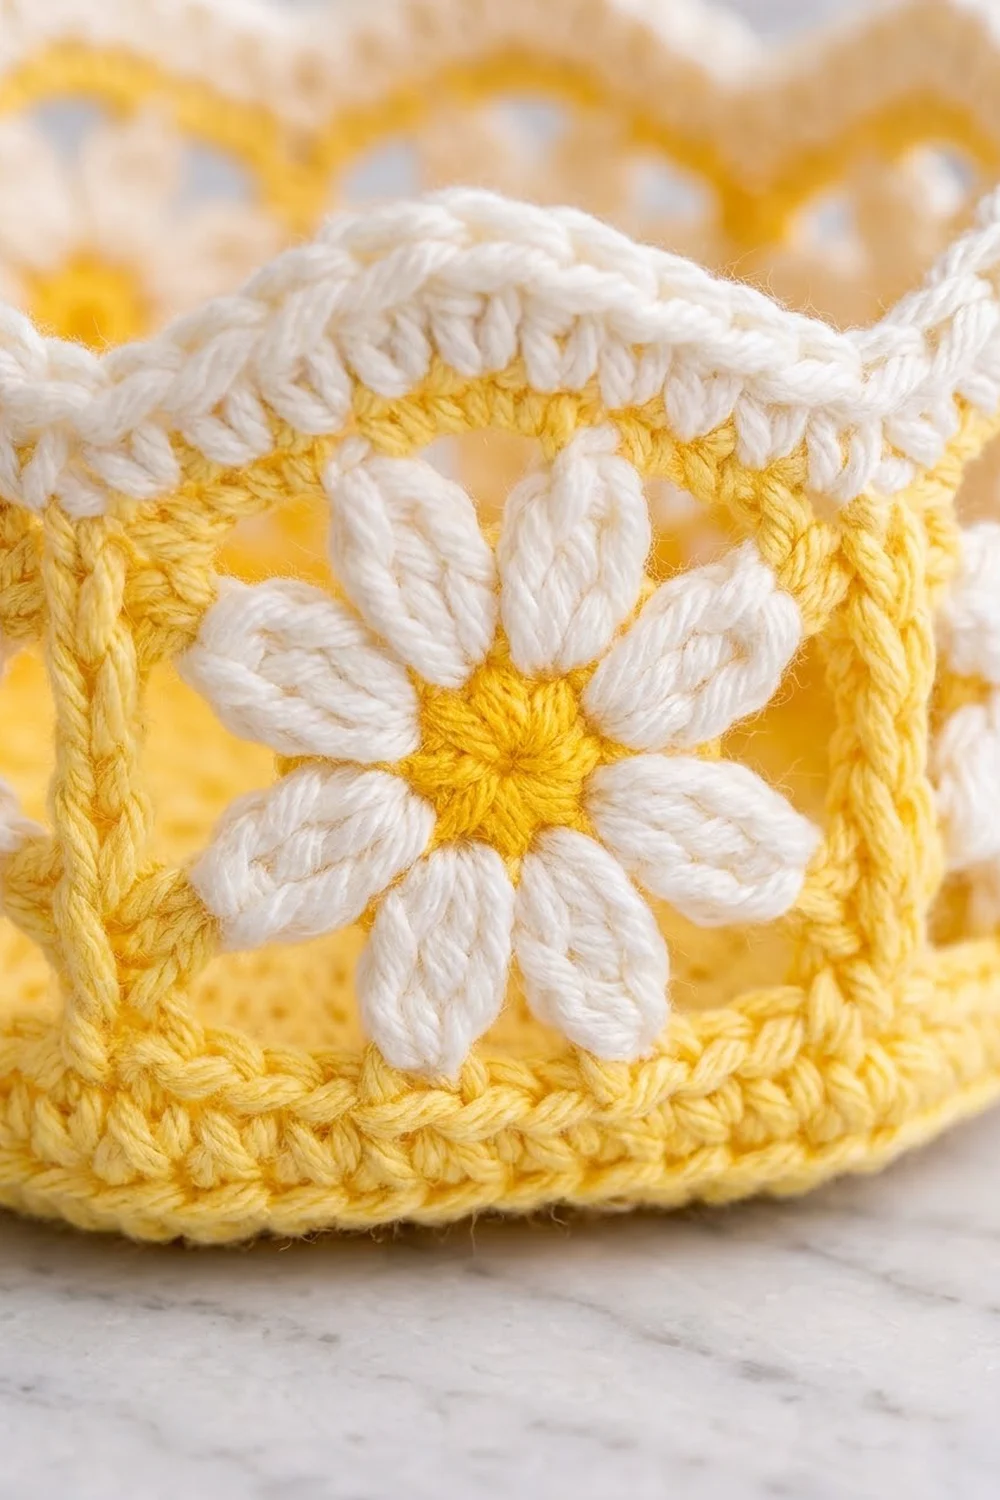
This hanging toilet paper holder has three tiers, each holding one roll. Each basket has a solid butter-yellow hexagonal base, a wall of six white daisy panels and a soft white scalloped rim. Two braided-look yellow straps run up the sides of all three baskets. They meet in a triangle that hangs from a single wall peg.
There are two colors, warm yellow and cream white. The look is bright and cottage-style, and the holder fits well in a small bathroom with little floor space. The pattern uses US crochet terms throughout.
Each finished basket measures about 6 in (15.2 cm) across corners, 5.2 in (13.2 cm) across flats and 4.25 in (10.8 cm) tall. The assembled holder hangs about 27 in (68.6 cm) from the top point of the triangle to the bottom. A standard roll about 4.3 in (10.9 cm) wide fits inside with room to spare.
You crochet three hexagon bases and eighteen square daisy panels. Six panels are seamed into a ring, the ring is crocheted onto a base, and a scalloped rim is worked around the top. Last, you make two straps and sew them to opposite seams of each basket.
Finished Size and Construction
- Finished basket size: 6 in (15.2 cm) across corners, 5.2 in (13.2 cm) across flats, 4.25 in (10.8 cm) tall
- Finished holder length: about 27 in (68.6 cm) including the hanging triangle
- Skill level: Intermediate
- Terminology: US
- Yarn weight: Worsted (#4) cotton
- Hook: 4.0 mm (G-6)
- Number of pieces: 23 (3 bases, 18 daisy panels, 2 straps)
- Layout: 6 panels in a ring per basket; 3 baskets stacked with 3 in (7.6 cm) gaps
- Daisy panel size: 3 in (7.6 cm) square
- Basket wall before border: 19.5 in (49.5 cm) around, 3 in (7.6 cm) tall
- Border (rim) depth: about 1 in (2.5 cm)
Materials
Use a smooth worsted-weight cotton or cotton blend. Cotton keeps the walls firm and holds up well to bathroom humidity. Acrylic also works, but the baskets will be softer.
- Yellow (main color): 200 g, about 340 m
- White (petals and rim): 100 g, about 170 m
These amounts include roughly 15 to 20 percent extra for your swatch and differences in tension.
Tools:
– 4.0 mm (G-6) crochet hook
– Tapestry needle
– Stitch markers (at least 6)
– Scissors and measuring tape
– Blocking mat, rust-proof pins and a spray bottle
– Wooden wall peg or hook for hanging
Abbreviations (US Terms)
- ch: chain
- sl st: slip stitch
- sc: single crochet
- dc: double crochet
- tr: treble crochet
- rev sc: reverse single crochet (crab stitch)
- sp(s): space(s)
- st(s): stitch(es)
- MR: magic ring
- WS: wrong side
Special stitch: 3-dc cluster (3dc-cl). *Yarn over, insert hook in st, yarn over and pull up a loop, yarn over and draw through 2 loops; repeat from * 2 more times in the same st (4 loops on hook), then yarn over and draw through all 4 loops.
Beginning cluster (beg-cl). Ch 2, then work the same steps only 2 times in the same st (3 loops on hook), and draw through all 3.
Gauge and Checkpoints
Gauge: 16 sc and 18 sc rows = 4 in (10.2 cm) with a 4.0 mm hook.
Make one daisy panel first and use it as your swatch. The whole basket depends on the panel being 3 in (7.6 cm) square with 12 sc per side.
Daisy panel checkpoints:
– After Round 1: about 0.75 in (1.9 cm) across
– After Round 2: about 1.75 in (4.4 cm) from petal tip to petal tip
– After Round 3: about 2.6 in (6.6 cm) square
– After Round 4: 3 in (7.6 cm) square
Hexagon base checkpoints (across flats):
– After Round 1: about 0.9 in (2.3 cm)
– After Round 3: about 2.8 in (7.1 cm)
– After Round 5: about 4.7 in (11.9 cm)
– After Round 6: 5.2 in (13.2 cm) across flats, 6 in (15.2 cm) across corners, each side 3 in (7.6 cm)
Too big? Go down to a 3.75 mm hook. Too small? Go up to a 4.5 mm hook. Never add or remove stitches, because every seam depends on the 12-stitch side.
Hexagon Base (Make 3)
Work in yellow, in joined rounds. Do not turn.
Round 1: MR, ch 3 (counts as dc), dc in ring, ch 1, 2 dc in ring, ch 1; rep from * 4 more times. Join with sl st to top of ch-3. (12 dc, 6 ch-1 sps; 2 dc per side)*
Round 2: Sl st in next dc, sl st in next ch-1 sp. Ch 3 (counts as dc), ch 1, dc in same sp. Dc in each dc to next ch-1 sp, (dc, ch 1, dc) in sp; rep from * 4 more times, dc in each remaining dc. Join to top of ch-3. (24 dc; 4 dc per side)*
Round 3: Sl st in next ch-1 sp. Ch 3, ch 1, dc in same sp. Dc in each dc to next ch-1 sp, (dc, ch 1, dc) in sp; rep from * 4 more times, dc in each remaining dc. Join. (36 dc; 6 dc per side)*
Round 4: Repeat Round 3. (48 dc; 8 dc per side)
Round 5: Repeat Round 3. (60 dc; 10 dc per side)
Round 6 (conversion round): Ch 1. Sc in each dc around, working (sc, ch 1, sc) in each corner ch-1 sp. Join. (60 sc worked 1 per dc + 12 sc added at corners = 72 sc, plus 6 corner ch-1 sps)
Each side now has 12 sc: 10 over the dc, plus 1 corner sc at each end. The corner ch-1 sps are not counted. Fasten off and weave in the ends.
Daisy Panel (Make 18)
Round 1 (yellow): MR, ch 1, 12 sc in ring. Join. Fasten off. (12 sc)
Round 2 (white): Join in any sc. Beg-cl in same st, ch 1. 3dc-cl in next sc, ch 1; rep from * 10 more times. Join to top of beg-cl. Fasten off. (12 clusters, 12 ch-1 sps)*
The clusters are the petals. Push each one outward so it puffs.
Round 3 (yellow): Join in any ch-1 sp. Ch 4 (counts as tr), tr, ch 2, 2 tr in same sp (corner). 3 dc in each of next 2 ch-1 sps. (2 tr, ch 2, 2 tr) in next ch-1 sp, 3 dc in each of next 2 ch-1 sps; rep from * 2 more times. Join to top of ch-4. (16 tr + 24 dc = 40 sts, plus 4 corner ch-2 sps; 10 sts per side)*
The 12 spaces split evenly into 4 corners and 8 side spaces.
Round 4 (yellow, conversion round): Ch 1. Sc in each st around, working (sc, ch 1, sc) in each corner ch-2 sp. Join. (40 sc worked 1 per st + 8 sc added at corners = 48 sc, plus 4 corner ch-1 sps; 12 sc per side)
As on the base, each side’s 12 sc includes 1 corner sc at each end. Fasten off.
Make All Pieces
- Yellow only: 3 hexagon bases and 2 straps
- Yellow and white: 18 daisy panels (Rounds 1, 3 and 4 in yellow; Round 2 in white)
Ring layout for one basket (walking around the wall):
P1 | P2 | P3 | P4 | P5 | P6 | back to P1
   S1   S2   S3   S4   S5   S6
S1 to S6 are the vertical seams. The straps attach at S1 and S4, which are directly opposite each other.
Stacking layout (front view):
   apex on peg
   [ Basket 1 ]   top
       |  |       3 in (7.6 cm) gap
   [ Basket 2 ]   middle
       |  |       3 in (7.6 cm) gap
   [ Basket 3 ]   bottom
Joining
Panels into a ring
Hold two panels with WS together so the seam forms a raised ridge on the outside. These ridges become the yellow bars between the daisies.
With yellow, work sc through both layers:
– 1 sc through both corner ch-1 sps at one end
– 1 sc through each of the 12 matching sc pairs
– 1 sc through both corner ch-1 sps at the other end
That gives 14 sc per seam.
Join P1 through P6 into a strip with 5 seams, then work seam S6 to close the ring. Keep your tension even. Tight seams pucker the wall, and loose seams let it lean.
Checkpoint: The ring is 3 in (7.6 cm) tall. The top edge has 6 × 12 = 72 panel sc plus 6 seam-end sc, for a total of 78 sts, about 19.5 in (49.5 cm) around.
Ring onto base
Place the base in the bottom of the ring with WS together. Line up each base side with a panel’s bottom edge, and each base corner with a seam.
With yellow, sc through both layers: 12 sc per side, and at each corner 1 sc through the base’s corner ch-1 sp and the seam-end sc together. (6 × 12 + 6 = 78 sc) Join and fasten off.
This makes the yellow ridge around the bottom. The base perimeter is 6 sides × 3 in = 18 in (45.7 cm), plus the corner stitches. That matches the 19.5 in (49.5 cm) ring.
Border (Scalloped Rim)
Border gauge: 4 sc per 1 in (2.5 cm), the same as the main gauge. Each 6-st scallop spans about 1.5 in (3.8 cm).
Each panel section of the top edge is 13 sts: 1 seam-end st plus that panel’s 12 sc.
Round B1 (yellow): Join at the top of seam S1. Ch 1, sc in the seam-end sc and in each of the next 12 sc. Sc in next seam-end sc, sc in each of next 12 sc; rep from * 4 more times. Join. Fasten off. (6 × 12 + 6 = 78 sc; 13 per section)*
Round B2 (white, scallop): Join in the sc above S1. Ch 1, sc in same st. [Sk 2, 5 dc in next st, sk 2, sc in next st] twice, sc in next st (the seam st); rep from * around. On the last repeat, leave out the final seam-st sc and join to the first sc. (3 sc + 10 dc = 13 sts per section; 78 sts total; 12 scallops)*
Each section works out as 1 sc + 2 × (sk 2, 5 dc, sk 2, sc) = 1 + 12 = 13 sts. That puts two scallops over each daisy and a pair of sc in the dip above each seam.
Round B3 (white, rolled edge): Ch 1, do not turn. Rev sc in each st around. Join. Fasten off. (78 rev sc)
Why the math works: Each panel gives 12 sts and each seam adds exactly 1, so every rim round has 78 sts. B2 changes the shape but not the count, so the rim lies flat on the 19.5 in (49.5 cm) wall without ruffling. The wall is 3 in (7.6 cm), the base ridge adds 0.25 in (0.6 cm) and the border adds 1 in (2.5 cm), for a total height of 4.25 in (10.8 cm).
Straps (Make 2)
Foundation: With yellow, ch 113.
Row 1: Sc in 2nd ch from hook and in each ch across. (112 sc)
Row 2: Ch 1, turn, sc in each sc across. (112 sc)
Row 3: Ch 1, turn, sl st loosely in each st across. This creates the braided surface. (112 sl st)
Fasten off, leaving a 24 in (61.0 cm) tail. Checkpoint: 28 in (71.1 cm) long and 0.6 in (1.5 cm) wide.
Attaching the straps: At 4 sts per inch, each basket (4.25 in / 10.8 cm tall) uses 17 strap sts and each 3 in (7.6 cm) gap uses 12 strap sts.
- Starting at the strap’s bottom end, whipstitch 17 sts to seam S1 of the bottom basket, from base to rim.
- Leave 12 sts free.
- Sew the next 17 sts to S1 of the middle basket.
- Leave 12 sts free.
- Sew the next 17 sts to S1 of the top basket.
That uses 17 × 3 + 12 × 2 = 75 sts and leaves 37 sts, or 9.25 in (23.5 cm). Repeat on S4 with the second strap.
Overlap the top 4 sts of the two straps and sew through all layers. That leaves 33 free sts, or 8.25 in (21.0 cm), on each side of the triangle. The triangle stands about 7.7 in (19.6 cm) tall.
Final Blocking
- Lightly mist each basket.
- Stuff it firmly with a rolled towel.
- Pat the base flat and sharpen the six corners.
- Straighten each seam ridge so it runs vertically.
- Pin each scallop into an even curve.
- Pin the straps flat without stretching them, then mist them.
- Let everything dry completely before hanging.
Final Quality-Control Checklist
- Each base is 5.2 in (13.2 cm) across flats, with 12 sc per side.
- Each panel is 3 in (7.6 cm) square, with 12 petals.
- All six seams sit on the outside and run straight.
- Rim rounds B1, B2 and B3 each have 78 sts.
- Each basket has 12 scallops, two over every daisy.
- Both straps are 28 in (71.1 cm) long before attaching.
- The baskets hang level, with equal 3 in (7.6 cm) gaps.
- All ends are woven in.
Troubleshooting
- Hexagon cups or ruffles: Confirm each round adds exactly 2 sts per side, then adjust your hook size.
- Flat petals: Pull the cluster loops up to full dc height.
- Rounded panel corners: Make sure each corner of Round 3 is (2 tr, ch 2, 2 tr).
- Ring and base don’t match: Recount for 12 sc per side on both pieces.
- Rim flares: Work B2 with a hook one size smaller.
- Baskets tilt: Re-sew so each strap covers exactly 17 sts per basket.
Care
Hand wash in cool water with mild soap and press out the water in a towel. Reshape the baskets and dry them over a stuffed towel.

Final Notes
Everything in this pattern comes from one number: 12 sc per side.
- A gauge of 4 sc per inch gives a 3 in (7.6 cm) panel.
- Six panels make a 78-st ring, 19.5 in (49.5 cm) around, which matches the 78-st base join.
- The 78-st rim adds 1 in (2.5 cm), for a 4.25 in (10.8 cm) basket.
- 28 in (71.1 cm) straps carry all three tiers with 3 in (7.6 cm) gaps.
Check each step in that chain as you go, and the holder will hang straight.
Happy crocheting!