

The Wisteria Trellis panel is an open lace curtain. Sage green chain lines form a tall diamond trellis with a small knot where they cross. Inside each diamond hangs a lavender wisteria cluster of puff petals, with two green leaves at the top. A lavender scalloped border with picots frames the panel.
The style is soft and cottage-like, and lots of light comes through. You only need two colors: sage green for the trellis and leaves, and lavender for the flowers and border. The pattern uses US crochet terms throughout.
One finished panel measures 20 in x 60.5 in (50.8 cm x 153.7 cm) after blocking. The photo shows two identical panels hung as a pair, so make two.
Each panel is one continuous piece. You work the green trellis in rows from the bottom up and make the leaves as you go. Then you work lavender clusters directly onto the trellis knots and finish with a three-round border. Nothing is sewn on.
Finished Size and Construction
- Finished size (one panel): 20 in x 60.5 in (50.8 cm x 153.7 cm)
- Skill level: Intermediate
- Terminology: US crochet terms
- Yarn weight: DK (#3) cotton or cotton blend
- Hook: 4.5 mm (US 7)
- Number of pieces: 2 separate, identical panels (not joined)
- Layout: each panel is 6 diamonds wide and 28 staggered diamond rows tall
- Diamond cell size: 3 in wide x 4 in tall (7.6 cm x 10.2 cm)
- Size before border: 18 in x 58.5 in (45.7 cm x 148.6 cm)
- Border depth: 1 in (2.5 cm) on every side
Materials
Choose a smooth DK cotton. It keeps the chains crisp, holds the puffs in shape and resists stretching while the panel hangs. Avoid fuzzy yarns, which blur the trellis lines. These amounts assume about 115 m per 50 g.
Per panel:
– Sage green (trellis and leaves): 150 g / 345 m
– Lavender (wisteria and border): 200 g / 460 m
For the pair:
– Sage green: 300 g / 690 m
– Lavender: 400 g / 920 m
All quantities include a margin of roughly 25-40%.
Tools:
– 4.5 mm (US 7) hook
– Tapestry needle
– Stitch markers
– Scissors
– Measuring tape
– Blocking mats, rust-proof pins and a spray bottle
– 14-16 clip curtain rings per panel
Abbreviations (US Terms)
- ch – chain
- sl st – slip stitch
- sc – single crochet
- hdc – half double crochet
- dc – double crochet
- sk – skip
- sp – space
- st(s) – stitch(es)
- rep – repeat
- kn – knot
- LP – leaf pair
- puff – puff stitch
Special stitches
- Knot (kn): Sc in the indicated st, ch 3, sl st in the top of that sc. This makes the bead at each trellis crossing.
- Leaf pair (LP): [Ch 6, sc in 2nd ch from hook, hdc in next ch, dc in next ch, hdc in next ch, sc in last ch, sl st in the base sc of the knot just made] twice. This makes two tapered leaves, each 1.25 in (3.2 cm) long.
- Puff: (Yo, insert hook in indicated ch, yo, pull up a loop) 3 times, yo, draw through all 7 loops, ch 1 to close.
- Picot-sc: Sc in indicated st, ch 3, sl st in the top of that sc.
Gauge and Checkpoints
Chain gauge: 4 ch = 1 in (2.5 cm), so one 12-ch foundation repeat = 3 in (7.6 cm).
Blocked diamond: 3 in wide x 4 in tall (7.6 cm x 10.2 cm).
Test first. Ch 38 and work Rows 1-5 with 3 repeats instead of 6, so Row 1 has 4 knots and 3 loops. Add one cluster, then pin the swatch and let it dry. It should measure 9 in (22.9 cm) wide and 8 in (20.3 cm) tall at the side edges.
Checkpoints (measure blocked or gently stretched):
– Row 1, first knot to last knot: 18 in (45.7 cm)
– After Row 9 (4 edge segments): 16 in (40.6 cm) tall
– After Row 19 (9 edge segments): 36 in (91.4 cm) tall
– After Row 29 (14 edge segments): 56 in (142.2 cm) tall
– After Row 31: 58.5 in (148.6 cm) tall
If the swatch is too big, use a 4 mm (US G-6) hook. If it’s too small, use a 5 mm (US H-8) hook. Keep all chain counts the same, because the border math depends on them.
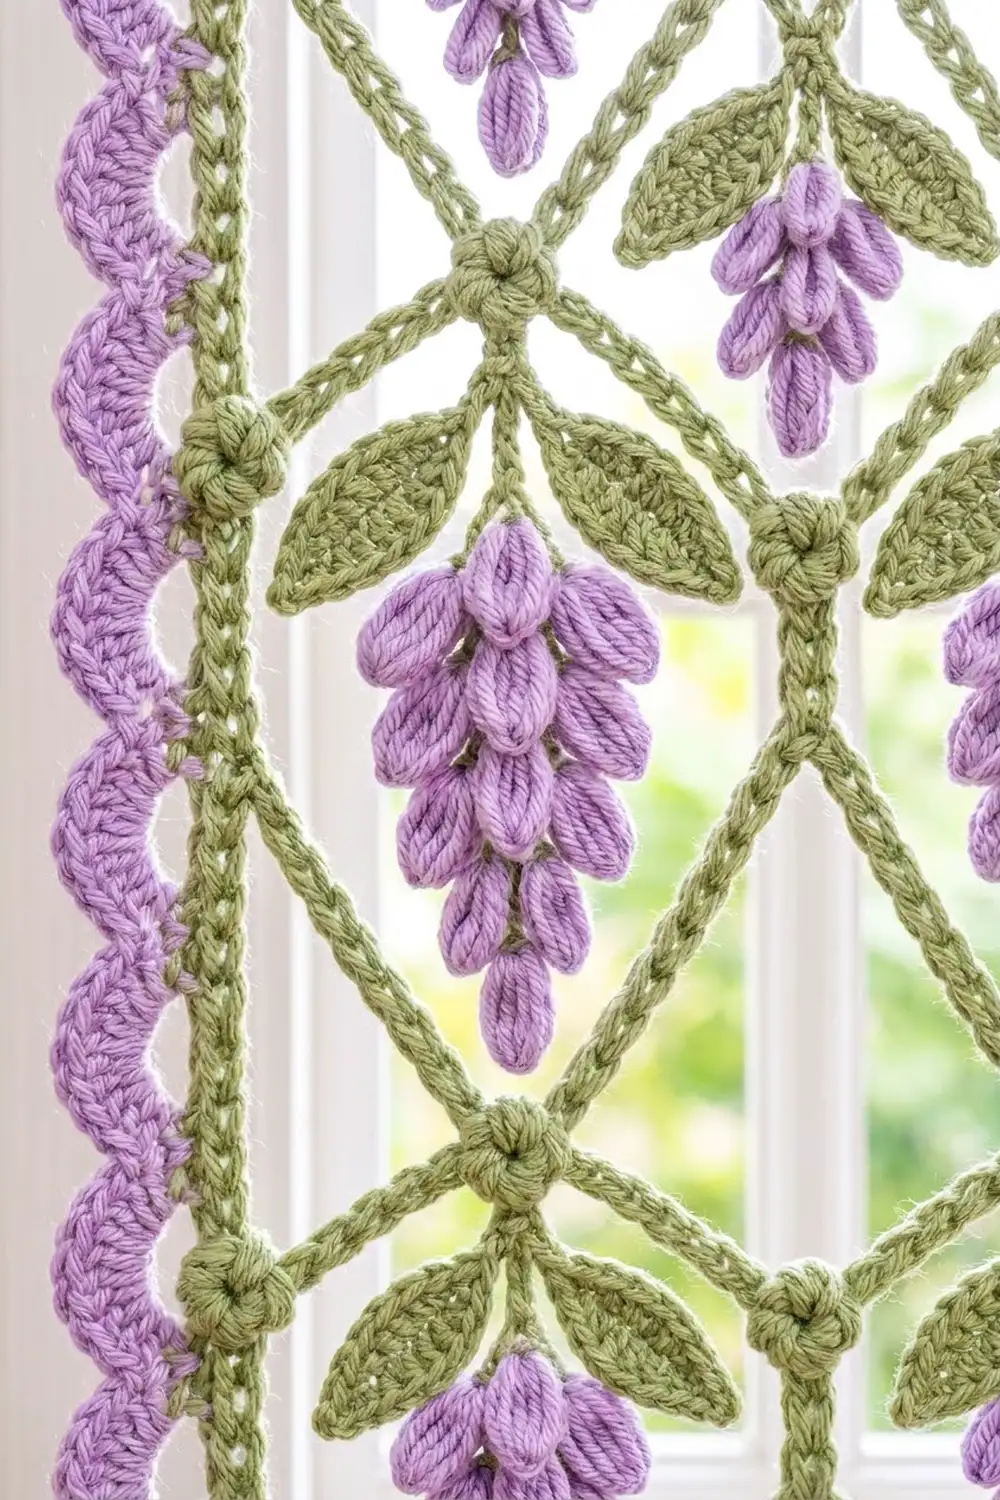
Trellis Mesh (Green)
The trellis is built from ch-21 loops. Each loop is anchored at its center (the 11th ch) by a knot in the next row.
- Odd rows: 7 knots and 6 loops.
- Even rows: 6 knots and 5 loops, plus a ch-26 at each end. Each ch-26 is 16 ch running straight up the side edge plus 10 ch running diagonally inward.
The top ch of each 16-ch edge segment is the corner ch. Every pair of rows adds one 4 in (10.2 cm) edge segment.
Foundation: With sage green, ch 74.
Row 1 (RS): Kn in 2nd ch from hook, *ch 21, sk 11 ch, kn in next ch; rep from * 5 more times. (7 kn, 6 ch-21 loops)
Each loop is longer than the 11 skipped ch, so it rises into a pointed arch above the straight foundation.
Row 2: Turn. Ch 26, kn in 11th ch of first ch-21 loop, *ch 21, kn in 11th ch of next ch-21 loop; rep from * 4 more times, ch 26, sl st in last kn of Row 1. Turn, sl st in each of next 16 ch, ending in the corner ch. (6 kn, 5 ch-21 loops, 2 ch-26)
The slip stitches climb back up the edge chain so the next row starts at the right height. This side edge ends up doubled.
Row 3: Ch 1, kn in same corner ch, *ch 21, kn in 11th ch of next ch-21 loop, LP; rep from * 4 more times, ch 21, kn in 16th ch (corner ch) of beginning ch-26. (7 kn, 6 ch-21 loops, 5 LP)
The first new loop passes over the diagonal 10 ch. Edge knots never get leaves.
Row 4: Turn. Ch 26, kn in 11th ch of first ch-21 loop, LP, *ch 21, kn in 11th ch of next ch-21 loop, LP; rep from * 4 more times, ch 26, sl st in last kn. Turn, sl st in each of next 16 ch. (6 kn, 6 LP, 5 ch-21 loops, 2 ch-26)
Rows 5-28: Rep Rows 3-4 twelve more times.
Row 29: Rep Row 3. (7 kn, 6 ch-21 loops, 5 LP)
Each leaf pair sits on the knot at the top point of one full diamond.
Top Edge (Green)
Row 30: Turn. Ch 15, sc in 11th ch of first ch-21 loop, LP, *ch 11, sc in 11th ch of next ch-21 loop, LP; rep from * 4 more times, ch 15, sl st in last kn. Turn, sl st in each of next 10 ch, ending in the corner ch. (6 sc, 6 LP)
Each ch-15 is 10 ch up the edge plus 5 ch across the top.
Row 31: Ch 1, sc in same corner ch, sc in next 5 ch, sc in next sc, *sc in next 11 ch, sc in next sc; rep from * 4 more times, sc in next 5 ch, sc in 10th ch (corner ch) of beginning ch-15. Fasten off. (73 sc)
Check: 1 + 5 + 1 + (5 x 12) + 5 + 1 = 73 sc. This matches the 73 working foundation ch. The panel now measures 18 in x 58.5 in (45.7 cm x 148.6 cm).
Leaf pairs: (14 odd rows x 5) + (13 even rows x 6) + 6 in Row 30 = 154.
Wisteria Clusters (Lavender)
Work one cluster at each of the 154 knots or sc that carry a leaf pair. Lay the panel flat with the leaves pointing down into their diamonds.
- Join lavender with a sl st around the base sc of the knot, behind the leaves.
- Ch 13.
- Puff in 2nd ch from hook. (1 puff; this is the tip)
- [Sk 1 ch, 2 puffs in next ch] twice. (4 puffs)
- [Sk 1 ch, 3 puffs in next ch] twice. (6 puffs)
- Sl st in each of the last 3 ch for the stem, then sl st in the base sc of the knot. Fasten off.
Per cluster: 11 puffs. The cluster is 2.75 in (7.0 cm) long and about 1.25 in (3.2 cm) wide at the top, tapering toward the bottom point of the diamond. The bare 3-ch stem sits under the leaves.
Crochet over the starting tail as you work the first puffs, so you only have one end to weave in per cluster.
Make All Pieces
Make 2 identical panels. Each panel takes:
– Sage green: 1 trellis with 154 leaf pairs (150 g / 345 m)
– Lavender: 154 clusters plus the border (200 g / 460 m)
The panels hang side by side and are not joined.
[ Panel 1 ]    window    [ Panel 2 ]
20 x 60.5 in             20 x 60.5 in
Each panel has 28 diamond rows. They alternate between 6 and 5 full diamonds, with half-diamonds at the edges of the 5-diamond rows.
Border (Lavender)
Border gauge: 4 sc = 1 in (2.5 cm), the same as the chain gauge, so the edges lie flat.
Edge counts before the border:
– Top: 73 sc in Row 31, including both corners
– Bottom: 73 foundation ch from the first knot to the last knot, including both corners
– Each side: 233 edge ch between the corners. That’s (14 x 16) + 10 = 234, minus the top corner ch, which already belongs to Row 31.
Rnd 1: With RS facing, join lavender in a top corner sc. Work around the panel as follows, then sl st to the first sc:
– Top: (Sc, ch 2, sc) in the corner sc, sc in each of next 71 sc, (sc, ch 2, sc) in the next corner sc.
– First side: Sc in each of 233 edge ch, (sc, ch 2, sc) in the corner foundation ch.
– Bottom: Working in the free loops of the foundation, sc in each of next 71 ch, (sc, ch 2, sc) in the corner ch.
– Second side: Sc in each of 233 edge ch.
On the doubled side, insert your hook under both the chain and its sl st.
Rnd 1 counts:
– Top and bottom: 73 sc each
– Each side: 1 + 233 + 1 = 235 sc
– Corners: 4 ch-2 sps
– Total: 616 sc
Rnd 2: Sl st in first sc of the top. Work each side and corner as follows, then sl st to the first sc:
– Each side: Sc in first sc, sk 2 sc, 5 dc in next sc, sk 2 sc, sc in next sc; rep from * across. The last sc lands in the last sc of the side.
– Each corner:* 7 dc in the ch-2 sp.
Rnd 2 counts:
– Top and bottom: 12 scallops each (13 sc + 60 dc = 73 sts)
– Each side: 39 scallops (40 sc + 195 dc = 235 sts)
– Corners: 4 seven-dc scallops
– Total: 106 scallops
Rnd 3: Work around as follows, then sl st to the first sl st and fasten off. (106 picots)
– Each sc between scallops: sl st in it.
– Each 5-dc scallop: sc in next 2 dc, picot-sc in next dc, sc in next 2 dc.
– Each corner scallop: sc in next 3 dc, picot-sc in next dc, sc in next 3 dc.
Why the math works: One scallop repeat uses 6 sts, and each side starts and ends with a sc. So a side needs (6 x scallops) + 1 sts:
– Top and bottom: 6 x 12 + 1 = 73
– Sides: 6 x 39 + 1 = 235
Both match the Rnd 1 counts, so every side ends on a sc right before its corner scallop.
The border adds 1 in (2.5 cm) on each side. Width: 18 + 2 = 20 in (50.8 cm). Length: 58.5 + 2 = 60.5 in (153.7 cm).
Final Blocking
- Weave in all ends, leaving 1 in (2.5 cm) tails to trim after blocking.
- Soak the panel in cool water for 15 minutes, then gently press out the water. Don’t wring it.
- Roll it in towels to remove more water.
- Lay it flat and pin the corners to 20 in x 60.5 in (50.8 cm x 153.7 cm).
- Pin the side edges straight at every edge knot. Pin the top and bottom every 3 in (7.6 cm).
- Ease the knots into place so each diamond is 3 in x 4 in (7.6 cm x 10.2 cm). Pin interior knots every few rows.
- Fan the leaves down and outward. Center each cluster in its diamond.
- Open each scallop and pin out its picot.
- Let the panel dry completely, usually 24-48 hours, then unpin.
Final Quality-Control Checklist
- Odd rows have 7 knots and even rows have 6.
- Every loop is anchored in its 11th ch.
- Each side edge has 14 segments of 16 ch plus 10 ch.
- Row 31 has 73 sc.
- There are 154 leaf pairs and 154 clusters, with no full diamond left empty.
- Every cluster has 11 puffs.
- Border Rnd 1 has 73 / 235 / 73 / 235 sc.
- There are 106 scallops and 106 picots.
- Each panel measures 20 in x 60.5 in (50.8 cm x 153.7 cm), and the two panels are within 0.5 in (1.3 cm) of each other.
Troubleshooting
- Diamonds look squat: your chains are too tight. Go up a hook size.
- Side edges wave: recount the 16-ch edge segments, then re-block with edge knots 4 in (10.2 cm) apart.
- Panel slants: a knot landed in the 10th or 12th ch. Count to the 11th ch every time.
- Border ruffles: recheck the Rnd 1 counts, or work Rnd 2 with a smaller hook.
- Border cups: you skipped some edge ch. Work 1 sc in every ch.
- Clusters twist: sl st firmly into the knot’s base sc and block the cluster straight.
Care
Hand wash in cool water with mild soap and dry flat, re-pinning the diamonds if needed. Don’t tumble dry, because it stretches the long chain loops.

Final Notes
The measurement chain runs like this:
– 4 ch = 1 in (2.5 cm), so 12 ch = 3 in (7.6 cm), one diamond’s width.
– Six diamonds give 18 in (45.7 cm).
– Each 16-ch edge segment is 4 in (10.2 cm). Fourteen segments plus the top edge give 58.5 in (148.6 cm).
– Edge counts of 73 and 235 sc carry 106 scallops, which bring each panel to 20 in x 60.5 in (50.8 cm x 153.7 cm).
Count your knots, check each checkpoint and the trellis will hang straight.
Happy crocheting!