

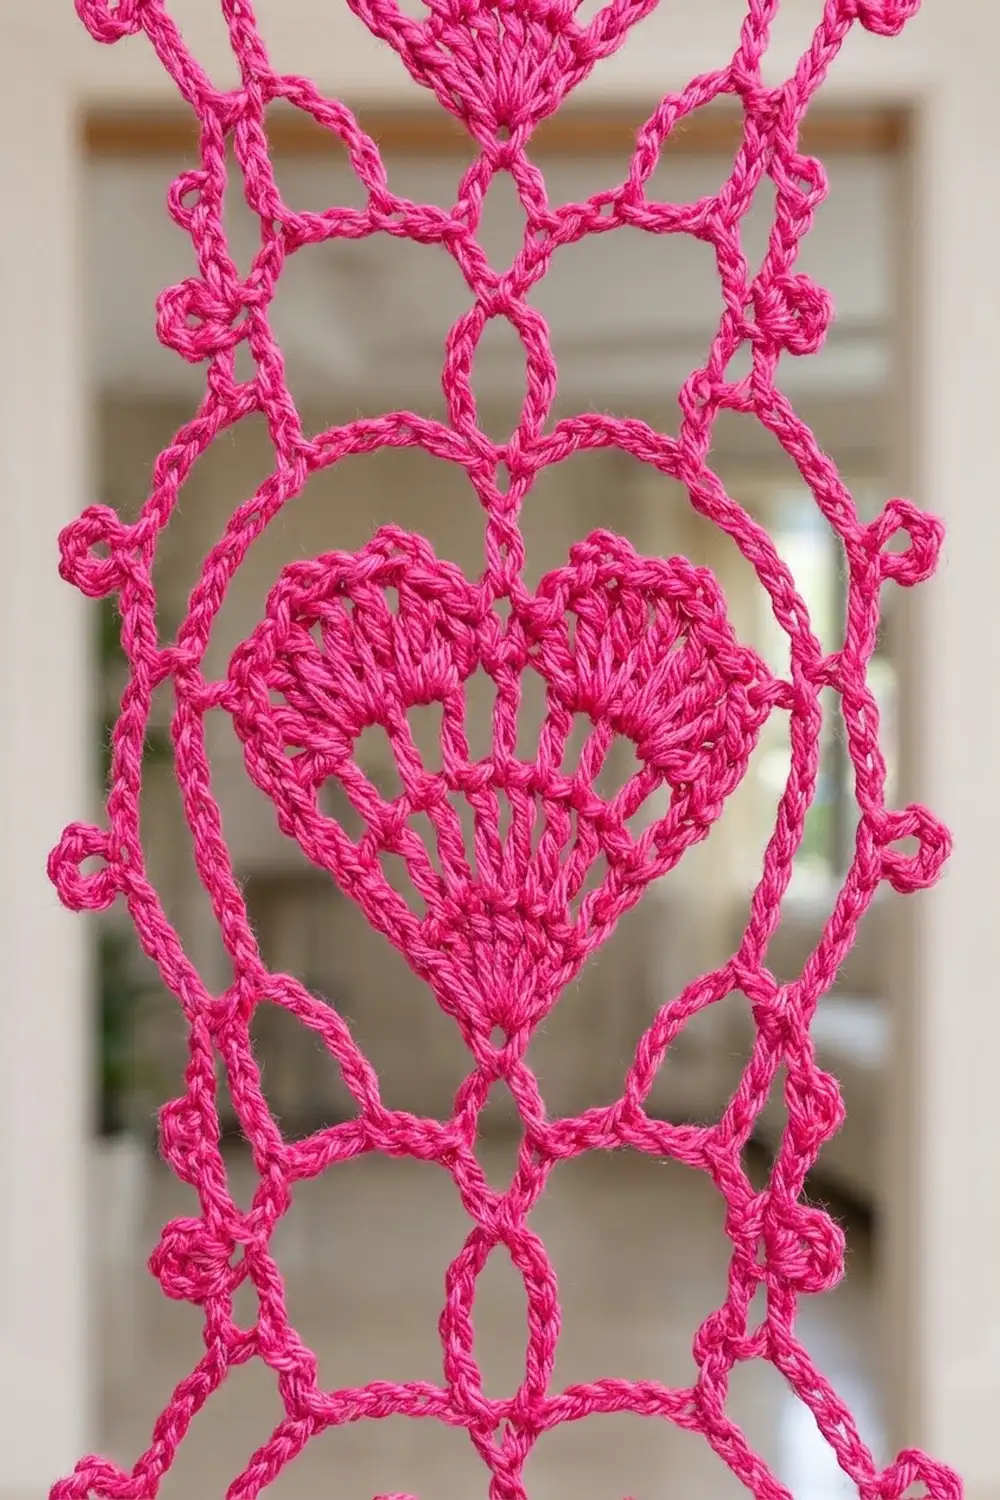
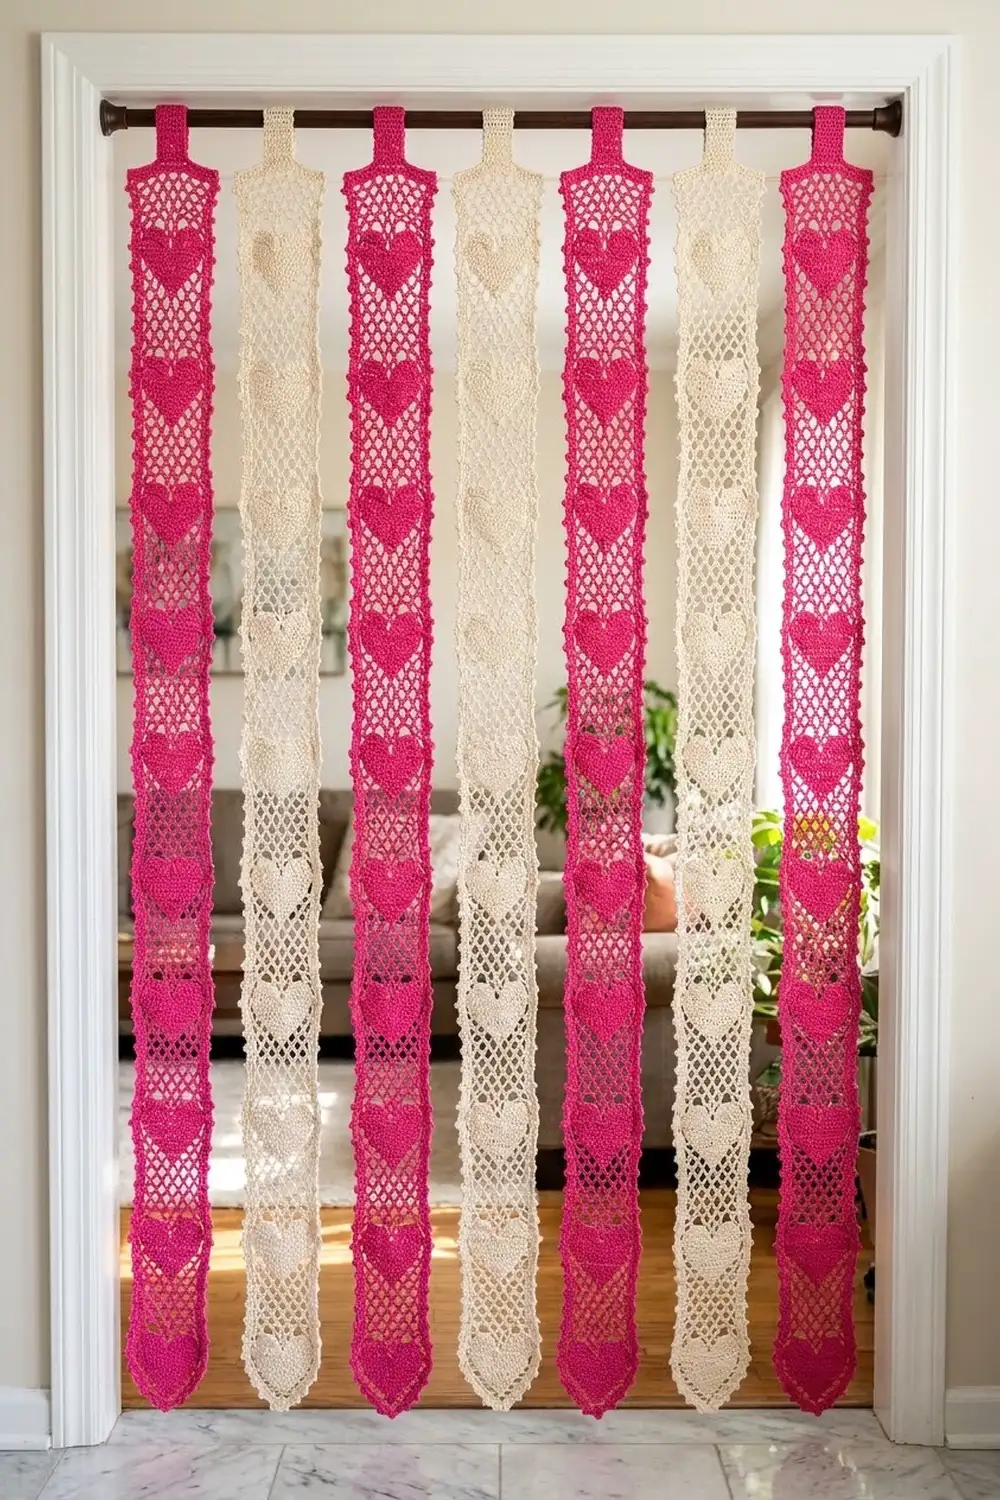
This door curtain is made of seven long lace strips that hang loose from a rod. Each strip is a column of point-down hearts. Every heart is a fan of double crochets that grows from a single stitch into two rounded lobes, with open chain loops on each side.
The strips alternate hot pink and cream: four pink and three cream. They are not sewn to each other, so you can walk through the curtain easily. Each strip has a picot border along both long edges and the bottom, plus a solid tab at the top that loops over the rod.
The pattern uses US crochet terms. Each finished strip is 5 in (12.7 cm) wide. The bordered body is 72.75 in (184.8 cm) long, and the strip hangs 75.75 in (192.4 cm) from the top of the rod. The full curtain covers about 38 in (96.5 cm) of rod.
Construction is simple. You work each strip from the bottom up in rows, repeating a 7-row heart sequence 18 times. Then you work a tab at the top and finish with a two-row picot border.
Finished Size and Construction
- Finished curtain width: about 38 in (96.5 cm) on the rod, with gaps of about 0.5 in (1.3 cm) between strips
- Skill level: Intermediate
- Terminology: US
- Yarn weight: #4 light worsted / medium cotton
- Hook: 4.5 mm
- Number of pieces: 7 strips (4 pink, 3 cream)
- Layout: 7 strips across, 1 strip high, hanging free
- Strip size before border: 4 in × 72.25 in (10.2 cm × 183.5 cm)
- Border depth: 0.5 in (1.3 cm) on each long edge and along the bottom
- Strip size after border: 5 in × 72.75 in (12.7 cm × 184.8 cm)
- Tab: about 2 in (5.1 cm) wide and 6 in (15.2 cm) long, folded into a 3 in (7.6 cm) loop
Materials
Use a smooth mercerized or combed cotton in light worsted weight, about 90 m per 50 g. Cotton holds the lace shape and hangs straight, and stitch definition matters here. Avoid fuzzy or very stretchy yarns because they blur the fans and let the strips sag.
- Hot pink: 500 g / 900 m (for 4 strips)
- Cream: 400 g / 720 m (for 3 strips)
One strip uses about 105 g / 190 m. The amounts above include a margin of roughly 20% for swatching, tension differences, and weaving in ends.
Tools:
– 4.5 mm crochet hook
– Tapestry needle
– Stitch markers
– Measuring tape
– Blocking mats or a towel-covered floor, plus rust-proof pins
– Spray bottle
– A curtain rod up to 1.25 in (3.2 cm) in diameter
Abbreviations (US Terms)
- ch – chain
- sl st – slip stitch
- sc – single crochet
- hdc – half double crochet
- dc – double crochet
- sp(s) – space(s)
- st(s) – stitch(es)
- tch – turning chain
- [ ] – repeat the instructions inside the brackets as directed
Special stitch: Picot – ch 3, then sl st in the 3rd ch from the hook.
Turning chains: A ch 3 at the start of a row counts as 1 dc. A ch 1 never counts as a stitch.
Gauge and Checkpoints
Gauge, measured after blocking:
– 19 sc = 4 in (10.2 cm) wide
– One 7-row heart repeat = 4 in (10.2 cm) tall
Make a test piece first. Work the Foundation Row and one repeat (Rows A–G), then wet-block it. It should measure 4 in (10.2 cm) wide × 4.25 in (10.8 cm) tall.
Checkpoints:
– After the Foundation Row: 4 in (10.2 cm) wide
– After 1 repeat: 4.25 in (10.8 cm) tall
– After 9 repeats: 36.25 in (92.1 cm) tall
– After 18 repeats: 72.25 in (183.5 cm) tall
If your piece is too big, go down a hook size (4.0 mm). If it is too small, go up a size (5.0 mm). Width matters most because the border math is based on 19 stitches per 4 in. Row height can be adjusted a little when you block.
Strip Pattern
Foundation
Foundation Row: Ch 20. Sc in the 2nd ch from the hook and in each ch across. Turn. (19 sc)
Number the stitches 1 to 19 in your head. Stitch 10 is the center, where the heart point will form.
Heart Repeat (Rows A–G)
Row A (heart point): Ch 3 (counts as dc in st 1), ch 3, skip sts 2–4, sc in st 5, ch 3, skip sts 6–9, 7 dc in st 10, ch 3, skip sts 11–14, sc in st 15, ch 3, skip sts 16–18, dc in st 19. Turn.
(2 edge dc, 2 sc, 7-dc fan, 4 ch-3 sps)
Row B (fan opens): Ch 3 (counts as dc), ch 4, skip the next ch-3 sp, sc in the next sc, ch 1, skip the next ch-3 sp, [dc in the next dc, ch 1] 7 times, skip the next ch-3 sp, sc in the next sc, ch 4, dc in the top of the tch. Turn.
(2 edge dc, 2 sc, 7 fan dc, 8 ch-1 sps, 2 ch-4 sps)
Row C (fan fills): Ch 3, ch 3, sc in the next ch-4 sp, ch 3, skip the next sc and ch-1 sp, dc in the next dc, [dc in the next ch-1 sp, dc in the next dc] 6 times, ch 3, skip the next ch-1 sp and sc, sc in the next ch-4 sp, ch 3, dc in the top of the tch. Turn.
(13-dc fan, 2 sc, 4 ch-3 sps, 2 edge dc)
Row D (widen): Ch 3, ch 3, sc in the next ch-3 sp (outer), ch 2, skip the next sc and inner ch-3 sp, 2 dc in the first fan dc, dc in each of the next 11 dc, 2 dc in the last fan dc, ch 2, skip the inner ch-3 sp and sc, sc in the outer ch-3 sp, ch 3, dc in the top of the tch. Turn.
(15-dc fan, 2 sc, 2 ch-3 sps, 2 ch-2 sps, 2 edge dc)
Row E (lobes): Ch 3, ch 3, sc in the next ch-3 sp, ch 1, skip the next sc and ch-2 sp. Work across the 15 fan stitches: 2 dc in st 1, dc in sts 2–6, hdc in st 7, sc in st 8 (the center dip), hdc in st 9, dc in sts 10–14, 2 dc in st 15. Ch 1, skip the next ch-2 sp and sc, sc in the next ch-3 sp, ch 3, dc in the top of the tch. Turn.
(17 heart sts: 14 dc, 2 hdc, 1 sc; plus 2 side sc, 2 ch-3 sps, 2 ch-1 sps, 2 edge dc)
The hdc–sc–hdc in the middle is lower than the dc on either side. That creates the dip between the two rounded lobes.
Row F (lattice closing): Ch 3, ch 3, sc in the next ch-3 sp, ch 3, skip the next sc and ch-1 sp, sc in heart st 1, [ch 3, skip 3 sts, sc in the next st] 4 times (sc lands in heart sts 5, 9, 13, and 17), ch 3, skip the next ch-1 sp and sc, sc in the next ch-3 sp, ch 3, dc in the top of the tch. Turn.
(2 edge dc, 7 sc, 8 ch-3 sps)
Row G (band): Ch 1, sc in the first dc, [2 sc in the next ch-3 sp] 4 times, sc in the center sc (the one on heart st 9), [2 sc in the next ch-3 sp] 4 times, sc in the top of the tch. Turn.
(1 + 8 + 1 + 8 + 1 = 19 sc)
Row G brings the count back to the 19 sc you started with, so Row A of the next repeat works exactly like the first one.
Body Length
Repeat Rows A–G 17 more times, for 18 repeats in total. Do not fasten off. The body should measure 72.25 in (183.5 cm).
Top Tab
Tab Row 1: Turn, ch 1, sl st in each of the first 6 sc. Ch 1, sc in the same st as the last sl st and in each of the next 8 sc. Leave the last 5 sc unworked. (9 sc, over sts 6–14)
Tab Rows 2–24: Ch 1, turn, sc in each sc across. (9 sc)
The tab should measure about 6 in (15.2 cm) long. Fasten off and leave a 12 in (30.5 cm) tail.
Make All Pieces
Make 7 strips in total:
– Hot pink (P): 4 strips
– Cream (C): 3 strips
Keep the tails long for now. You will finish them after the border.
Layout on the rod, from left to right:
| P | C | P | C | P | C | P |
Pink strips sit at both outer edges, so the curtain looks balanced.
Joining (Hanging the Strips)
The strips are never stitched to each other. Each strip joins the rod only through its own tab.
Method: Fold the tab toward the back of the strip so the last tab row lies against the back of the final Row G. Using the tab tail, whipstitch stitch to stitch: each of the 9 sc in Tab Row 24 goes to the matching back loop of Row G sts 6–14. That is 9 stitches to 9 stitches, so the tab doesn’t twist or pucker.
This makes a 3 in (7.6 cm) loop that fits a rod up to 1.25 in (3.2 cm) in diameter.
Tension: Keep the whipstitches snug but not tight. If you pull too hard, the top band puckers and the strip hangs crooked.
Sew the tabs now, but hang the strips only after the border and blocking are done.
Size checkpoint: 7 strips × 5 in (12.7 cm) + 6 gaps × 0.5 in (1.3 cm) = 38 in (96.5 cm) of rod.
Border
Work the border on each strip down the right long edge, across the bottom, and up the left long edge. The top edge and the tab are not bordered.
Border gauge: 19 sc per 4 in (10.2 cm), the same as the body gauge.
Border Row 1: With the right side facing, join yarn at the top right corner (the end of the last Row G). Ch 1. Work down the right edge as follows:
– Each repeat: 3 sc in each of the 6 dc row-ends (Rows A–F) and 1 sc in the Row G row-end, which is 19 sc per repeat.
– After 18 repeats, work 1 sc in the Foundation Row end.
– Right side total: 18 × 19 + 1 = 343 sc
Corner and bottom:
– 3 sc in the first foundation ch loop (corner)
– 1 sc in each of the next 17 loops (bottom)
– 3 sc in the last foundation ch loop (corner)
Up the left side, work 343 sc to match.
Row 1 total: 343 + 3 + 17 + 3 + 343 = 709 sc. The corner stitches are counted separately from the 343 sc on each long side. Turn.
Border Row 2 (picot row): This row adds stitches only at the 2 corners.
- Down the first long side: Ch 1, [sc in the next 9 sc, picot, sc in the next 10 sc, picot] 18 times, sc in the next sc. (343 sc, 36 picots)
- Corner: sc in the next sc, (sc, picot, sc) in the center corner sc, sc in the next sc. (4 sc, 1 picot)
- Bottom: sc in the next sc, [picot, sc in the next 3 sc] 5 times, picot, sc in the next sc. (17 sc, 6 picots)
- Corner: repeat the corner instructions. (4 sc, 1 picot)
- Up the second long side: sc in the next sc, [picot, sc in the next 10 sc, picot, sc in the next 9 sc] 18 times. (343 sc, 36 picots)
Row 2 total: 709 (1 per existing st) + 2 (1 extra per corner) = 711 sc, plus 80 picots.
Fasten off and weave in all ends.
Why the math works:
– A blocked dc row is about 0.62 in (1.6 cm) tall, so 3 sc per dc row-end and 1 per sc row-end gives 19 sc for every 4 in (10.2 cm) of length. That matches the body gauge, so the edge lies flat without rippling or pulling in.
– The 17 bottom sc plus the 2 corner groups use all 19 foundation loops.
– The picots land 2 per heart repeat, so they line up with the lattice on every strip.
Final Blocking
- Soak each strip in cool water for 10 minutes, then gently press out the water. Do not wring.
- Roll the strip in a towel to remove more moisture.
- Lay it flat on mats or a towel-covered floor.
- Pin the long edges straight at 5 in (12.7 cm) apart, placing a pin every 4 in (10.2 cm).
- Ease the length to 72.75 in (184.8 cm). Don’t stretch it more, because cotton lengthens further once it hangs.
- Open each heart fan, pin out the bottom picots, and press the lobes into round curves.
- Let the strip dry completely, then check that all 7 strips are within 0.5 in (1.3 cm) of each other in length.
Final Quality-Control Checklist
- [ ] Every strip has 18 hearts, all pointing down.
- [ ] Every Row G has exactly 19 sc.
- [ ] Each strip is 5 in (12.7 cm) wide after the border.
- [ ] Each long side has 343 sc and 36 picots.
- [ ] Tabs are centered over sts 6–14 and sewn 9 stitches to 9 stitches.
- [ ] Colors alternate P C P C P C P.
- [ ] All strips hang at the same length.
- [ ] Ends are woven in securely along solid stitches, not through the lace openings.
Troubleshooting
- The heart leans to one side: The 7-dc fan in Row A wasn’t in st 10. Count the skips again: 3, then 4, then the fan, then 4, then 3.
- There’s no dip between the lobes: Check that Row E has hdc–sc–hdc at its center, not three dc.
- Row G doesn’t come out to 19: Make sure you worked 1 sc into the center sc and 2 sc into each of the 8 ch-3 sps.
- The border ripples: Your dc rows are short. Work 2 sc in some of the dc row-ends, spreading the decreases evenly.
- The border pulls in: Your dc rows are tall. Go up a hook size for the border only.
- The strips have different lengths: Re-block the shorter ones and stretch them gently along their length.
- The tab twists: Unpick the seam and sew it again stitch for stitch.
Care
Hand wash in cool water with a mild detergent, then lay flat to dry and re-pin if needed. Don’t tumble dry, because the heat can shrink cotton unevenly between strips.
Final Notes
Here is the measurement chain:
– 19 sc gives a 4 in (10.2 cm) wide strip.
– Each 7-row repeat adds 4 in (10.2 cm), so 18 repeats bring the body to 72.25 in (183.5 cm).
– The border uses 19 sc per repeat, which matches the body gauge. It adds 0.5 in (1.3 cm) on each side, for a 5 in × 72.75 in (12.7 cm × 184.8 cm) strip.
– The 6 in (15.2 cm) tab folds into a 3 in (7.6 cm) loop, so the strip hangs 75.75 in (192.4 cm).
– Seven strips with small gaps fill 38 in (96.5 cm) of rod.
If you check your measurements at each step, the strips will match. Happy crocheting!