

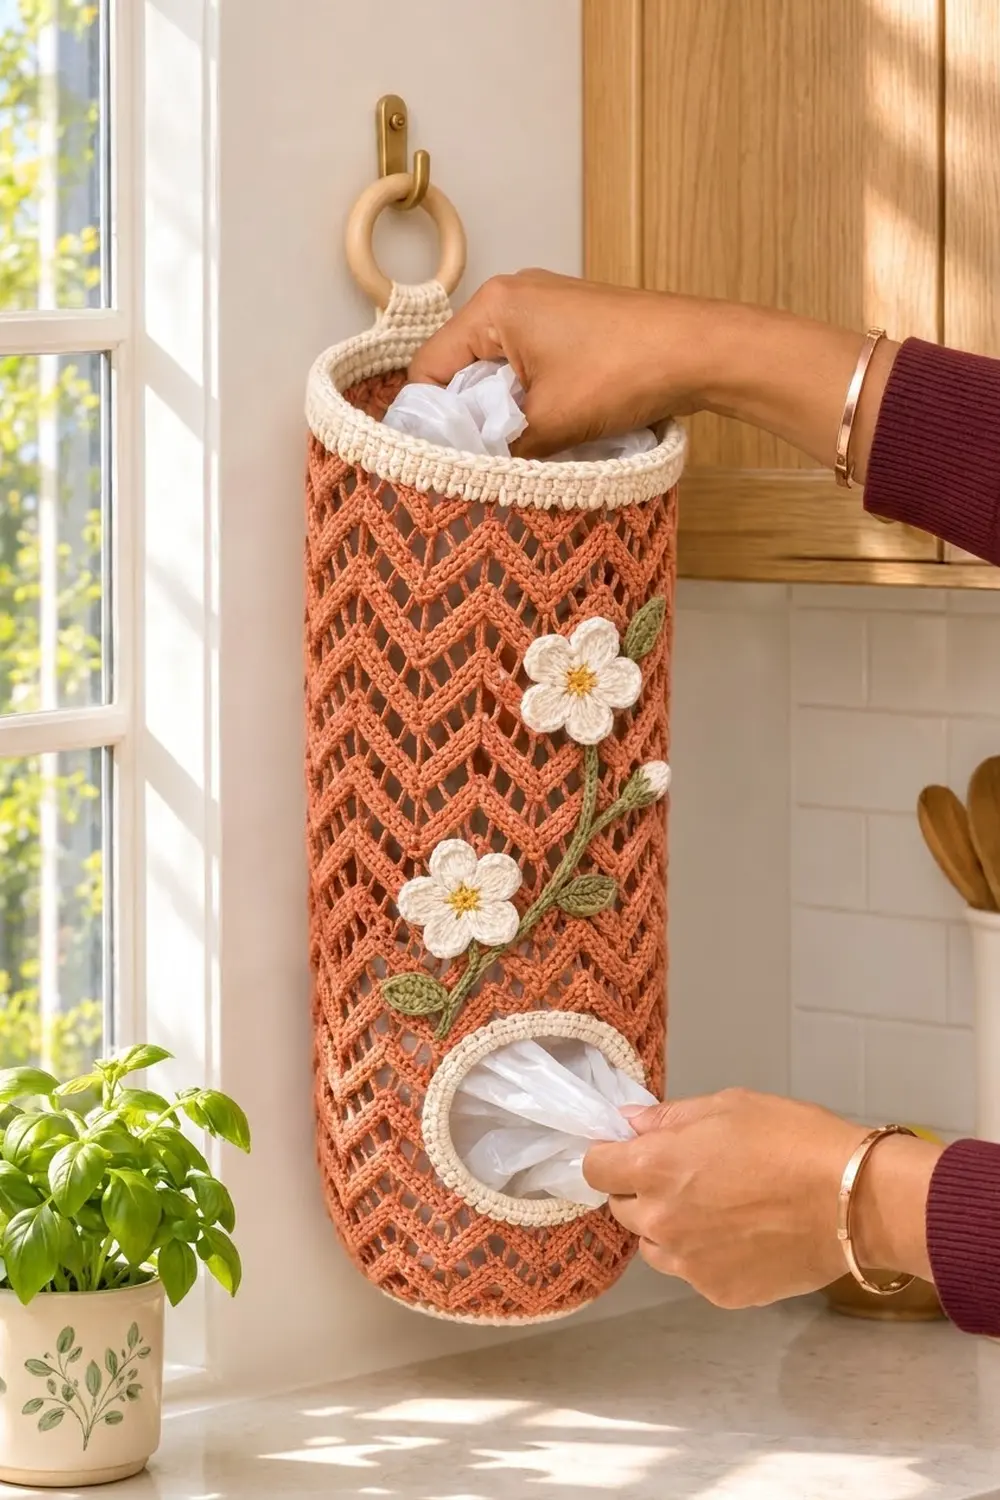
This hanging plastic-bag holder is a tall, soft cylinder in an openwork chevron mesh. Terracotta zigzags run all the way around it. Cream is used in three places: a solid rim at the top, a narrow band near the base, and an edging around the dispensing opening on the front. A cream tab at the back loops over a wooden ring so you can hang it on a hook.
On the front, an olive-green vine with leaves carries two cream five-petal flowers with golden-yellow centers and two small cream buds. The style is cottage kitchen: earthy, fresh and practical.
The pattern uses US terms. The finished holder is 17.75 in (45.1 cm) tall, 5.75 in (14.6 cm) across and 18 in (45.7 cm) around. Pressed flat, it is 9 in (22.9 cm) wide.
The body is made in one piece from the bottom up:
- A flat circular base
- A cream band
- Chevron mesh in joined rounds, with a few rows that leave a gap at the front for the opening
- A leveling round and the cream border
- The tab, the opening edging and the sewn-on appliqués
Finished Size and Construction
- Finished size: 17.75 in (45.1 cm) tall × 5.75 in (14.6 cm) diameter; 18 in (45.7 cm) circumference
- Skill level: Intermediate
- Terminology: US
- Yarn weight: Worsted (#4) cotton
- Hook: 4.5 mm (US 7)
- Number of pieces: 1 body crocheted in one piece, plus small appliqués (2 flowers, 2 buds, 4 leaves, 1 vine with 2 branches)
- Layout: Single piece, so there is no joining
- Mesh repeat: 12 sts = 2.25 in (5.7 cm), 8 repeats around
- Height before border: 16.75 in (42.5 cm)
- Border depth: 1 in (2.5 cm)
- Opening after edging: about 3.25 in (8.3 cm) wide × 2.75 in (7.0 cm) tall
Materials
Use a smooth, combed or mercerized worsted cotton. Cotton holds the chevron shape and doesn’t sag when the holder is full.
- Terracotta (main): 100 g / 170 m
- Cream: 50 g / 85 m
- Olive green: 10 g / 17 m
- Golden yellow: 5 g / 8 m
These amounts include a margin of about 20 percent.
Tools:
– 4.5 mm (US 7) hook
– Wooden ring, 2 in (5.1 cm) across
– Tapestry needle
– 4 locking stitch markers
– Tape measure and scissors
– Rustproof pins and a spray bottle
Abbreviations (US Terms)
- ch: chain
- sl st: slip stitch
- sc: single crochet
- hdc: half double crochet
- dc: double crochet
- tr: treble crochet
- sc2tog: single crochet 2 together
- sk: skip
- sp: space
- st(s): stitch(es)
- MR: magic ring
- beg: beginning
- RS / WS: right side / wrong side
Special stitch, dc3tog (the chevron valley): [Yarn over, insert hook in next st or sp, yarn over, pull up a loop, yarn over, pull through 2 loops] 3 times. You now have 4 loops on the hook. Yarn over and pull through all 4.
Counting rule: In the mesh, each ch-1 counts as 1 st. A full round has 96 sts.
Gauge and Checkpoints
- Sc gauge: 16 sc = 3 in (7.6 cm); 4 rounds = 1 in (2.5 cm)
- Mesh gauge: 1 repeat (12 sts) = 2.25 in (5.7 cm); 4 rounds = 2.5 in (6.4 cm), so 1 round = 0.625 in (1.6 cm)
The base is your test piece. After Rnd 12 it should measure 5.75 in (14.6 cm) across.
- Too big: Go down a hook size and start again.
- Too small: Go up a hook size.
Both gauges have to match, because 96 base sts and 96 mesh sts must both measure 18 in (45.7 cm) around.
Wall height checkpoints (measure up the side from the edge of the base):
| After | Wall height |
|---|---|
| Rnd 15 | 0.75 in (1.9 cm) |
| Rnd 16 | 1.25 in (3.2 cm) |
| Rnd 18 | 2.5 in (6.4 cm) |
| Row 24 | 6.25 in (15.9 cm) |
| Rnd 40 | 16.25 in (41.3 cm) |
| Rnd 41 | 16.75 in (42.5 cm) |
| Rnd 45 | 17.75 in (45.1 cm) |
Base
Use terracotta. Join each round with a sl st to the first st. The ch 1 at the start of a round does not count as a st.
- Rnd 1: MR, ch 1, 8 sc in ring. (8)
- Rnd 2: 2 sc in each st. (16)
- Rnd 3: *Sc in next st, 2 sc in next st; rep from * around. (24)
- Rnd 4: *Sc in next 2 sts, 2 sc in next st; rep from * around. (32)
- Rnds 5–12: In each round, work 1 more sc between increases than in the round before. Stagger the increases on even rounds by starting halfway through the first repeat. Counts: 40, 48, 56, 64, 72, 80, 88, 96.
Checkpoint: The base lies flat and measures 5.75 in (14.6 cm) across.
- Rnd 13: Sc in each st. (96) Work through both loops. This plain round gives the bottom a soft, rounded turn instead of a sharp edge.
Lower Cream Band
- Rnds 14–15: Change to cream. Sc in each st around. (96) Fasten off.
Chevron Mesh Body
Rnd 16 (setup): Join terracotta in any st. Ch 4 (counts as dc + ch 1), sk next st, *dc in next st, ch 1, sk next st; rep from * around. Join in 3rd ch of beg ch-4. (48 dc + 48 ch-1 = 96)
Pattern Round (Rnd 17):
- Sl st in next ch-1 sp. Ch 4 (counts as dc + ch 1), dc in same sp. This is the first peak.
- Repeat: (ch 1, sk next dc, dc in next ch-1 sp) twice, dc3tog over next 3 sts, (dc in next ch-1 sp, ch 1, sk next dc) twice, then (dc, ch 1, dc) in next ch-1 sp for the peak. Work this Repeat 7 times.
- Close: (ch 1, sk next dc, dc in next ch-1 sp) twice, dc3tog over next 3 sts, (dc in next ch-1 sp, ch 1, sk next dc) twice. Join in 3rd ch of beg ch-4.
Count: 8 peaks × 3 + 16 sides × 4 + 8 valleys × 1 = 96.
Each repeat uses 12 sts and makes 12 sts. The dc always go into ch-1 spaces and the chains always pass over dc, which staggers the holes. Peaks stack on peaks and valleys on valleys, so the zigzag forms by itself.
Rnd 18: Work the Pattern Round. (96) Mark the beg ch-4 as peak C. Then count 2 repeats backward from C and mark that peak as peak A. The 2 repeats between A and C become the front opening.
Opening Rows
Row 19 (RS): Sl st in next ch-1 sp (peak C). Ch 4, dc in same sp. Work the Repeat 6 times, ending with the peak at A. Turn.
Count: 7 peaks × 3 + 12 sides × 4 + 6 valleys = 75. This leaves 23 sts of Rnd 18 unworked; they form the bottom edge of the opening.
Rows 20–24: Sl st in first ch-1 sp (the peak sp). Ch 4, dc in same sp. Work the Repeat 6 times. (75 each) Turn at the end of Rows 20–23 only.
Close the round: Row 24 ends at peak C. Don’t turn. Ch 21 loosely, sl st in the peak sp at A, then turn so the RS faces you. The round is whole again: 75 + 21 = 96.
Rnd 25: Ch 4, dc in same sp (peak A). Ch 1, sk next dc. Now work into the chain, counting the chains from this side:
- dc in ch 1, ch 1, sk ch 2, dc in ch 3
- dc3tog over chs 4–6
- dc in ch 7, ch 1, sk ch 8, dc in ch 9, ch 1, sk ch 10
- (dc, ch 1, dc) in ch 11
- ch 1, sk ch 12, dc in ch 13, ch 1, sk ch 14, dc in ch 15
- dc3tog over chs 16–18
- dc in ch 19, ch 1, sk ch 20, dc in ch 21, ch 1, sk next dc
Then work (dc, ch 1, dc) in the peak sp at C, work the Repeat 5 times, and finish with the Close. (96)
The 21 chains take the place of 21 mesh sts, so the pattern carries on without a break.
Rnds 26–40: Work the Pattern Round. (96 each)
Checkpoint: The wall measures 16.25 in (41.3 cm). That is 1.25 in (3.2 cm) plus 24 mesh rounds at 0.625 in (1.6 cm) each.
Rnd 41 (leveling): Ch 1. Start each repeat at a peak and work:
- sc in next 3 sts (the peak)
- hdc in ch-1 sp, hdc in dc
- dc in ch-1 sp, dc in dc
- tr in dc3tog
- dc in dc, dc in ch-1 sp
- hdc in dc, hdc in ch-1 sp
That is 3 + 4 + 1 + 4 = 12 sts per repeat. Join. (96) The top edge is now straight. Fasten off.
Border
Border gauge: 16 sc = 3 in (7.6 cm); 4 rounds = 1 in (2.5 cm).
Rnds 42–45: Join cream. Ch 1, sc in each st around, join. (96 each)
Why the math works: The mesh has 96 sts at 12 sts per 2.25 in, which is 18 in (45.7 cm). The border has 96 sc at 16 sc per 3 in, which is also 18 in. Because the two match, the rim neither flares nor pulls in. Fasten off.
Hanging Tab
- Press the holder flat with the opening centered on the front.
- Mark the 6 center-back sts of Rnd 45 and join cream in the first one.
- Rows 1–14: Ch 1, sc in each of the 6 sts, turn. (6)
The tab is 1.125 in (2.9 cm) wide and 3.5 in (8.9 cm) long. Fold it through the wooden ring to the inside and whipstitch Row 14 to the inside of Rnd 42. The loop rises about 1.5 in (3.8 cm) above the rim.
Opening Edging
Join cream at the bottom right corner of the opening.
Rnd 1: Ch 1. Work sc around the opening as follows, then join. (23 + 12 + 21 + 12 = 68)
- Bottom edge: 1 sc in each of the 23 unworked sts
- First side: 2 sc in each of the 6 row-ends (12)
- Top edge: 1 sc in the free loop of each of the 21 chains
- Second side: 2 sc in each of the 6 row-ends (12)
Rnd 2: Ch 1, sc in each st. At each of the 4 corners, sc2tog the last st of one side with the first st of the next. Join. (21 + 10 + 19 + 10 + 4 corners = 64)
The raw gap measures 4.25 in (10.8 cm) × 3.75 in (9.5 cm). The 0.5 in (1.3 cm) band lies along every edge, and the corner decreases round it off. The result is a soft oval about 3.25 in (8.3 cm) × 2.75 in (7.0 cm).
Appliqués
Flower (make 2):
1. With golden yellow, MR, ch 1, 10 sc in ring, join. (10) Fasten off.
2. Join cream. *Sl st in next st, (hdc, 3 dc, hdc) in next st; rep from * 4 more times for 5 petals. Join.
Each flower is about 2 in (5.1 cm) across.
Bud (make 2):
1. With cream, ch 3. Work a 4-dc cluster in the 3rd ch from the hook. Fasten off.
2. Join olive green at the base and work (ch 2, sl st) twice around it to make the calyx.
Each bud is about 0.75 in (1.9 cm).
Leaf (make 4): With olive green, ch 6. Starting in the 2nd ch from the hook, work sc, hdc, dc, hdc, then (sc, ch 2, sc) in the last ch. Turn to the other side of the chain and work hdc, dc, hdc, sc. Join. Each leaf is 1.25 in (3.2 cm) long.
Vine: With olive green, ch 50 and sl st back along the chain. It measures about 10 in (25.4 cm). Make 2 branches the same way with ch 10 each, about 2 in (5.1 cm).
Placement:
– Start the vine 2 in (5.1 cm) below the border at the right front. Curve it down and to the left, ending 1 in (2.5 cm) above the opening edging.
– Sew one flower near the top of the vine and the other about 8 in (20.3 cm) below the border.
– Attach the branches with a bud at each tip.
– Sew the leaves on alternate sides of the vine.
Sew through the dc posts, not across the holes.
Final Blocking
- Weave in all ends through solid stitches.
- Mist the holder until it is damp but not soaked.
- Slide a rolled towel about 6 in (15.2 cm) thick into the tube.
- Line up the chevron peaks vertically and smooth the border.
- Pin the opening edging into an even oval.
- Let it dry completely, at least 12 hours.
Final Quality-Control Checklist
- Every mesh round has 96 sts and every opening row has 75.
- The peaks stack in 8 straight columns.
- The wall measures 17.75 in (45.1 cm).
- The circumference is 18 in (45.7 cm) at the base, the middle and the rim.
- The opening edging lies flat, with no ruffles.
- The tab is centered at the back and sewn on securely.
- The appliqués are sewn through posts and lie flat.
Troubleshooting
- Zigzag drifts sideways: You started in the wrong space. Always begin in the ch-1 sp right after the join.
- Stitch count is off: Check that each valley has one dc3tog and that you counted every ch-1.
- Base cups: Your increases are stacking. Stagger them.
- Base ruffles: Go down half a hook size.
- Opening edging ruffles: Work Rnd 1 more firmly.
- Rim flares: Tighten your tension or go down a hook size for the border.
Care
Hand wash in cool water. Reshape it over a rolled towel and let it air dry. Don’t tumble dry, because the mesh can stretch.

Final Notes
Here is the measurement chain. The base grows to 96 sts at 5.75 in (14.6 cm). Every round after that holds 96 sts at 18 in (45.7 cm) around. The wall grows from 0.75 in (1.9 cm) to 1.25 in (3.2 cm), 2.5 in (6.4 cm), 6.25 in (15.9 cm), 16.25 in (41.3 cm) and 16.75 in (42.5 cm), and finishes at 17.75 in (45.1 cm) with the border. If you check each stage against these numbers, the holder will come out the right size. Happy crocheting!