

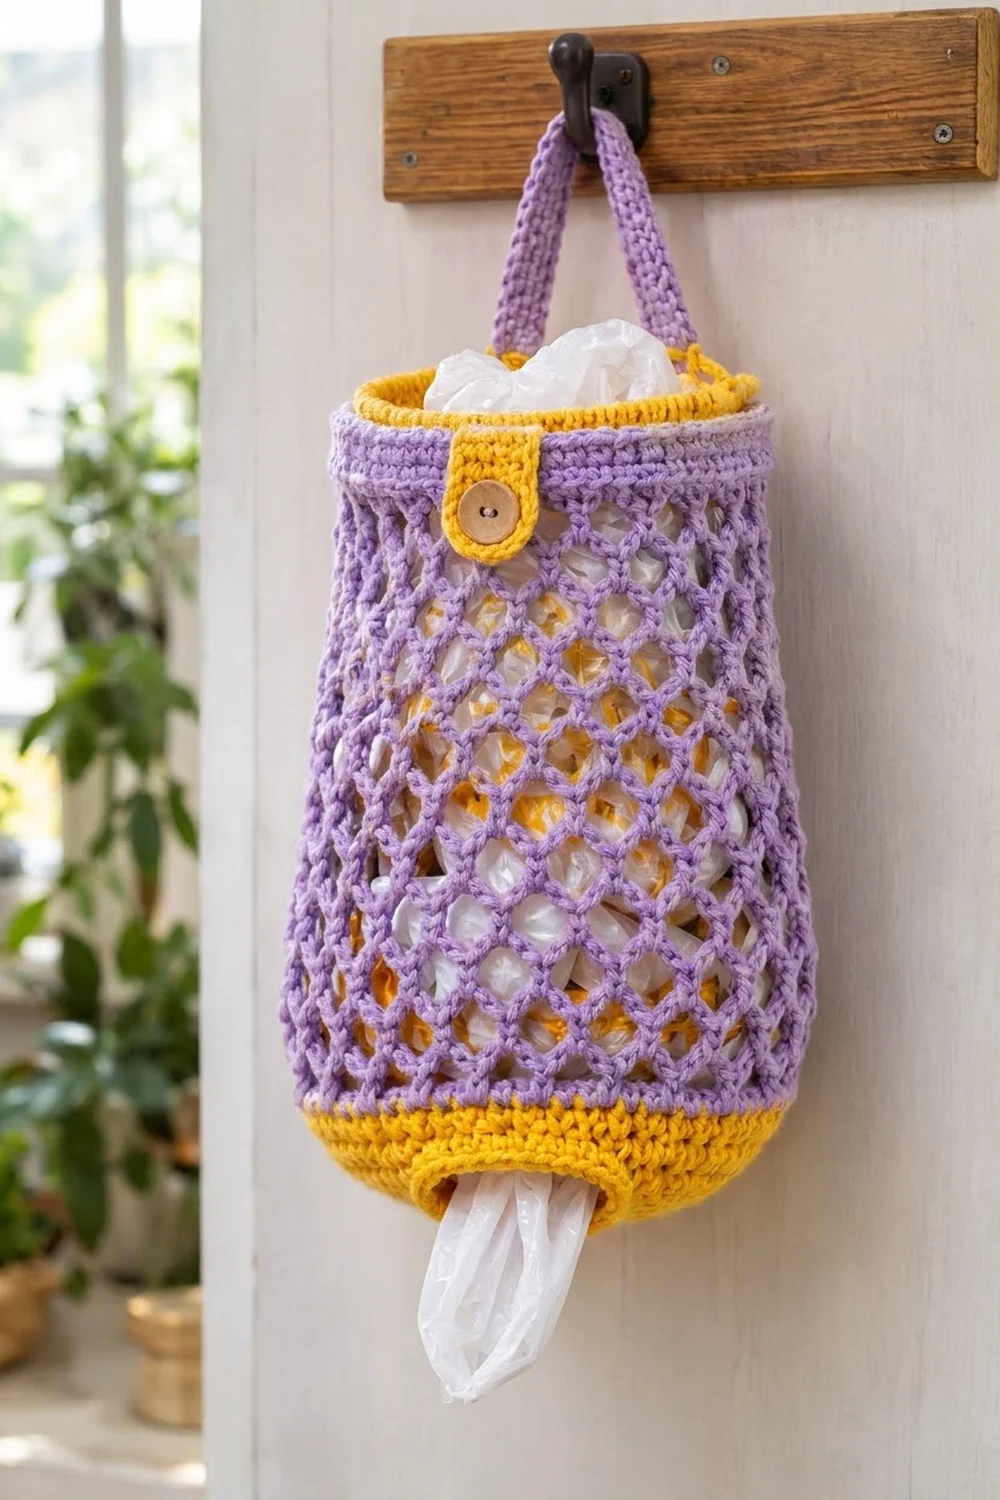
This hanging bag dispenser gives every kitchen a place for loose plastic shopping bags. You stuff bags in at the top and pull them out one at a time through a round opening at the bottom. The lavender diamond mesh lets you see how many bags are left, and the solid mustard-yellow base keeps the opening firm.
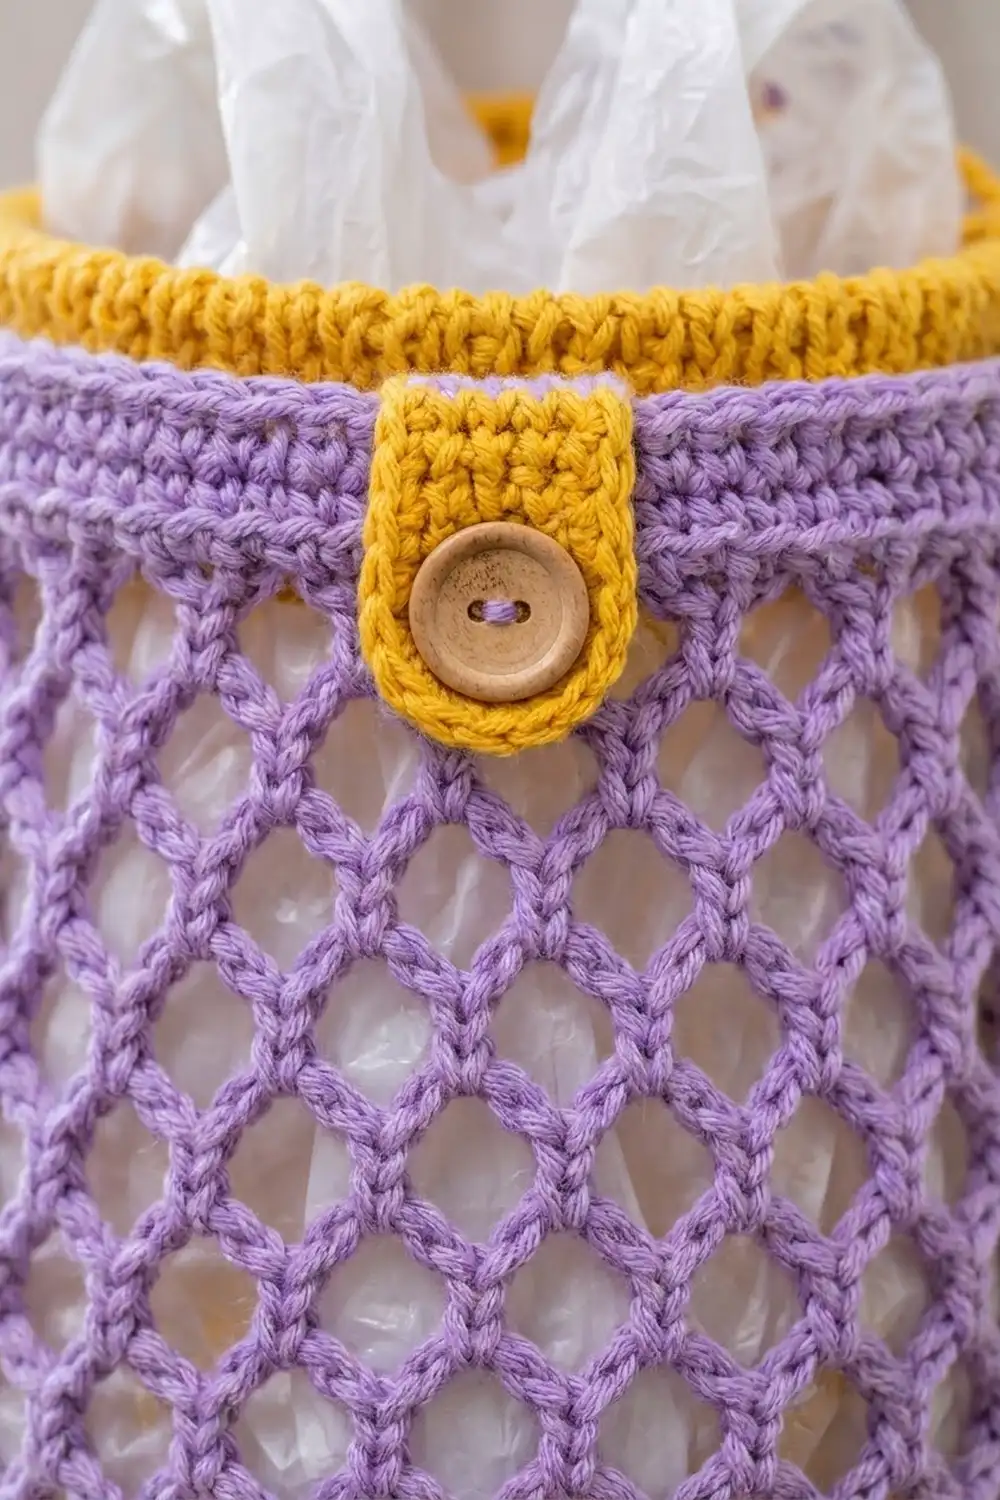
The colors are soft lavender and warm mustard yellow, with a natural wooden button for a cottage-kitchen look. A narrow strap handle hangs on any hook, and a small yellow button tab adds a finished detail to the front.
This pattern uses US crochet terms. The finished dispenser measures about 8.6 in (21.8 cm) wide when flat and 16.25 in (41.3 cm) tall, not counting the handle. The handle loop rises about 7 in (17.8 cm) above the rim.
Construction overview: You work the body in one piece from the bottom up. You start with a chain ring that becomes the dispensing hole, then work an increasing single-crochet cup in yellow. Next comes a lavender chain-loop mesh tube, followed by a solid lavender and yellow rim. The handle is worked in rows directly from the rim and sewn to the opposite side. A small tab is sewn onto the front, and the button is attached through it.
Finished Size and Construction
- Finished size: 8.6 in (21.8 cm) wide flat × 16.25 in (41.3 cm) tall
- Skill level: Easy / Advanced Beginner
- Terminology: US crochet terms
- Yarn weight: Worsted (#4), cotton or cotton blend
- Hook: 5.0 mm (H-8)
- Number of pieces: 1 body (handle worked on), plus 1 small sewn-on tab
- Layout: Single tube, worked in the round from bottom to top
- Base cup: 2.5 in (6.4 cm) tall, 60 sts around
- Size before rim: 8.6 in (21.8 cm) wide × 14.5 in (36.8 cm) tall
- Rim depth: 1.75 in (4.4 cm)
Materials
Choose a smooth worsted-weight cotton or cotton blend. Cotton holds the mesh shape, resists stretching under the weight of the bags, and washes well. Avoid very fuzzy yarns, because they hide the lattice.
- Lavender (Color A): 110 g / about 190 m
- Mustard yellow (Color B): 50 g / about 85 m
These quantities include a margin of about 15% for your gauge swatch and tension differences.
Tools:
– 5.0 mm (H-8) crochet hook
– 1 wooden button, 1 in (2.5 cm)
– Tapestry needle
– Sewing needle and matching thread
– Stitch marker
– Scissors
– Measuring tape
– Rustproof pins and a spray bottle for blocking
Abbreviations (US Terms)
- ch – chain
- sc – single crochet
- sl st – slip stitch
- st(s) – stitch(es)
- sk – skip
- rnd(s) – round(s)
- inc – 2 sc in the same st
- ch-4 loop – a loop of 4 chains in the mesh
Special stitch – Mesh loop: Work ch 4, then sc into the next ch-4 loop (or the stated st). Repeating this makes the open diamond lattice.
Gauge and Checkpoints
Solid sc gauge: 14 sc and 16 rnds = 4 in (10.2 cm)
Mesh gauge (relaxed): 5 ch-4 loops = 4.3 in (10.9 cm) wide; 5 mesh rnds = 3 in (7.6 cm) tall
Work the yellow base cup first, through Rnd 10, as your test. If the cup measures right, the rest of the bag will follow.
Checkpoints:
– Starting ring (Rnd 1): the opening measures about 2.75 in (7.0 cm) across.
– After Rnd 10: the cup measures 8.6 in (21.8 cm) wide flat (17.1 in / 43.4 cm around) and 2.5 in (6.4 cm) tall.
– After 10 mesh rnds: the mesh adds 6 in (15.2 cm).
– After Rnd 30: the body measures 14.5 in (36.8 cm) tall.
– After Rnd 37: the body measures 16.25 in (41.3 cm) tall.
If your piece is too big, go down a half or full hook size. If it is too small, go up a size. If only the opening is wrong, keep the hook and adjust the starting chain by 3 (for example, 27 or 33 ch). Then adjust the increases so you still reach 60 sts.
Base Cup (Color B, Yellow)
The cup starts at the dispensing hole and increases outward. That is why the bottom curves inward toward the opening.
Foundation: With B, ch 30. Join with sl st to the first ch to form a ring, without twisting.
Rnd 1: Ch 1, sc in each ch around. Join with sl st to the first sc. (30 sts)
Rnd 2: Ch 1, sc in next 4 sts, inc; repeat from * 6 times. Join. (36 sts)
Rnd 3: Ch 1, sc in next 5 sts, inc; repeat 6 times. Join. (42 sts)
Rnd 4: Ch 1, sc in next 6 sts, inc; repeat 6 times. Join. (48 sts)
Rnd 5: Ch 1, sc in next 7 sts, inc; repeat 6 times. Join. (54 sts)
Rnd 6: Ch 1, sc in next 8 sts, inc; repeat 6 times. Join. (60 sts)
Rnds 7–10: Ch 1, sc in each st around. Join. (60 sts each round)
Fasten off B. The cup is 2.5 in (6.4 cm) tall and 8.6 in (21.8 cm) wide flat.
Mesh Body (Color A, Lavender)
Rnd 11 (set-up): Join A in any st. Ch 1, sc in the same st, ch 4, sk 2 sts, sc in next st. Repeat from * around, ending with ch 4, sk 2. Join with sl st to the first sc. (20 sc, 20 ch-4 loops)
The math: each repeat uses 3 base sts (1 sc + 2 skipped), and 60 ÷ 3 = 20 loops exactly.
Rnd 12: Sl st in the next 2 ch to reach the center of the first loop. Ch 1, sc in the same loop, ch 4, sc in next loop. Repeat around, ending with ch 4. Join with sl st to the first sc. (20 ch-4 loops)
Rnds 13–30: Repeat Rnd 12. (20 ch-4 loops each round)
Each round shifts by half a loop, which forms the diamond lattice. You’ll have 20 mesh rounds in total (Rnds 11–30). They should measure 12 in (30.5 cm) relaxed, bringing the body to 14.5 in (36.8 cm).
Don’t fasten off.
Rim
The rim closes the mesh into a firm top edge. It holds the handle and tab and keeps the opening from sagging.
Rim gauge: 14 sc = 4 in (10.2 cm), the same as the base cup.
Rnd 31 (conversion): Sl st in the next 2 ch to reach the center of the first loop. Ch 1, sc in the same loop. Sc in the next sc, sc in next loop, sc in same loop. Repeat from * around, ending with sc in the last sc and sc in the first loop (beside the starting sc). Join. (20 sts worked 1-per-existing-sc + 40 sts worked into loops = 60 sts)
Rnds 32–35: Ch 1, sc in each st around. Join. (60 sts each round)
Fasten off A.
Rnd 36: Join B in the same st as the last join. Ch 1, sc in each st around. Join. (60 sts)
Rnd 37: Ch 1, sc in each st around. Join. (60 sts) Fasten off B.
Counts by section: Lay the body flat with the join at one side fold. Each flat side has 30 sts, and each quarter has 15 sts. Mark sts 1–6 (handle start), sts 16–21 (front tab), and sts 31–36 (handle end).
Why the math works: The base cup ends at 60 sts. The mesh uses those 60 sts in 20 three-stitch repeats. The rim puts 3 sts back into each of the 20 repeats (20 × 3 = 60). The top and bottom therefore match exactly, and the bag hangs straight without flaring or pulling in. The 7 rim rounds add 1.75 in (4.4 cm), for a total of 16.25 in (41.3 cm).
Handle (Color A)
Row 1: Join A in st 1 of Rnd 37. Ch 1, sc in sts 1–6. Turn. (6 sts)
Rows 2–60: Ch 1, sc in each st across. Turn. (6 sts each row)
The strap measures 1.7 in (4.3 cm) wide and 15 in (38.1 cm) long. Fasten off and leave a 12 in (30.5 cm) tail.
Without twisting the strap, sew the last row to sts 31–36 on the opposite side of the rim. Whipstitch through both loops along the top, then tack the strap to the lavender band for 0.75 in (1.9 cm) down on the inside so it carries the weight. The handle loop should rise about 7 in (17.8 cm) above the rim.
Button Tab (Color B)
Row 1: With B, ch 7. Sc in the 2nd ch from the hook and in each ch across. Turn. (6 sts)
Rows 2–10: Ch 1, sc in each st across. Turn. (6 sts each row)
The tab measures 1.7 in (4.3 cm) wide and 2.5 in (6.4 cm) tall. Fasten off and leave a 10 in (25.4 cm) tail.
Fold the top 0.75 in (1.9 cm) of the tab over the rim to the inside, with the tab centered over sts 16–21. Whipstitch all edges flat. Sew the wooden button to the center of the outside part of the tab, stitching through the tab and the lavender band.
Final Blocking
- Weave in all ends along solid sc sections, not through the mesh.
- Mist the whole piece evenly with water until it is damp but not dripping.
- Stuff the body loosely with a rolled towel to give it a round shape.
- Gently pull the mesh lengthwise until it measures 12 in (30.5 cm), so the diamonds open evenly.
- Shape the base cup into a smooth curve around the 2.75 in (7.0 cm) opening.
- Pin the handle flat and straight.
- Let it dry completely, then remove the towel.
Final Quality-Control Checklist
- [ ] The opening is about 2.75 in (7.0 cm) across and fits a bag through.
- [ ] The base cup has 60 sts and measures 8.6 in (21.8 cm) flat.
- [ ] Every mesh round has 20 loops.
- [ ] The rim has 60 sts in all 7 rounds.
- [ ] The total height is 16.25 in (41.3 cm).
- [ ] The handle has 60 rows, is untwisted, and is sewn securely.
- [ ] The tab is centered on the front, and the button is firmly attached.
- [ ] All ends are hidden in solid sections.
Troubleshooting
The mesh loops lean to one side: Make sure you work into the center of each loop, not the edge.
The bag flares at the top: You may have added extra sts in Rnd 31. Recount to 60.
The bag pulls in at the top: Your rim tension is tighter than the base. Go up a half size for Rnds 31–37.
The opening is too small for bags: Restart with 33 ch and work 5 inc rounds of +6, then add 1 extra plain round of 63 sts. Reduce Rnd 11 to ch 4, sk 2, sc across 63 sts for 21 loops.
The handle stretches: Use cotton, not acrylic, and tack the strap down further inside the band.
The mesh looks too long: Skip 1–2 mesh rounds. Each round is 0.6 in (1.5 cm).
Care
Machine wash cold on a gentle cycle in a mesh laundry bag. Reshape while damp and lay flat or hang to dry.
Final Notes
Each section of this pattern sets up the next one. The 30-st ring becomes a 2.75 in (7.0 cm) opening. The ring increases to a 60-st cup measuring 8.6 in (21.8 cm) flat and 2.5 in (6.4 cm) tall. The cup divides into 20 mesh loops, which you repeat for 12 in (30.5 cm). The loops convert back into 60 rim sts over 1.75 in (4.4 cm). The finished dispenser stands 16.25 in (41.3 cm) tall, with a 15 in (38.1 cm) handle strap and a button tab. Check each measurement as you go, and you’ll end with a firm, even dispenser.
Happy crocheting!