

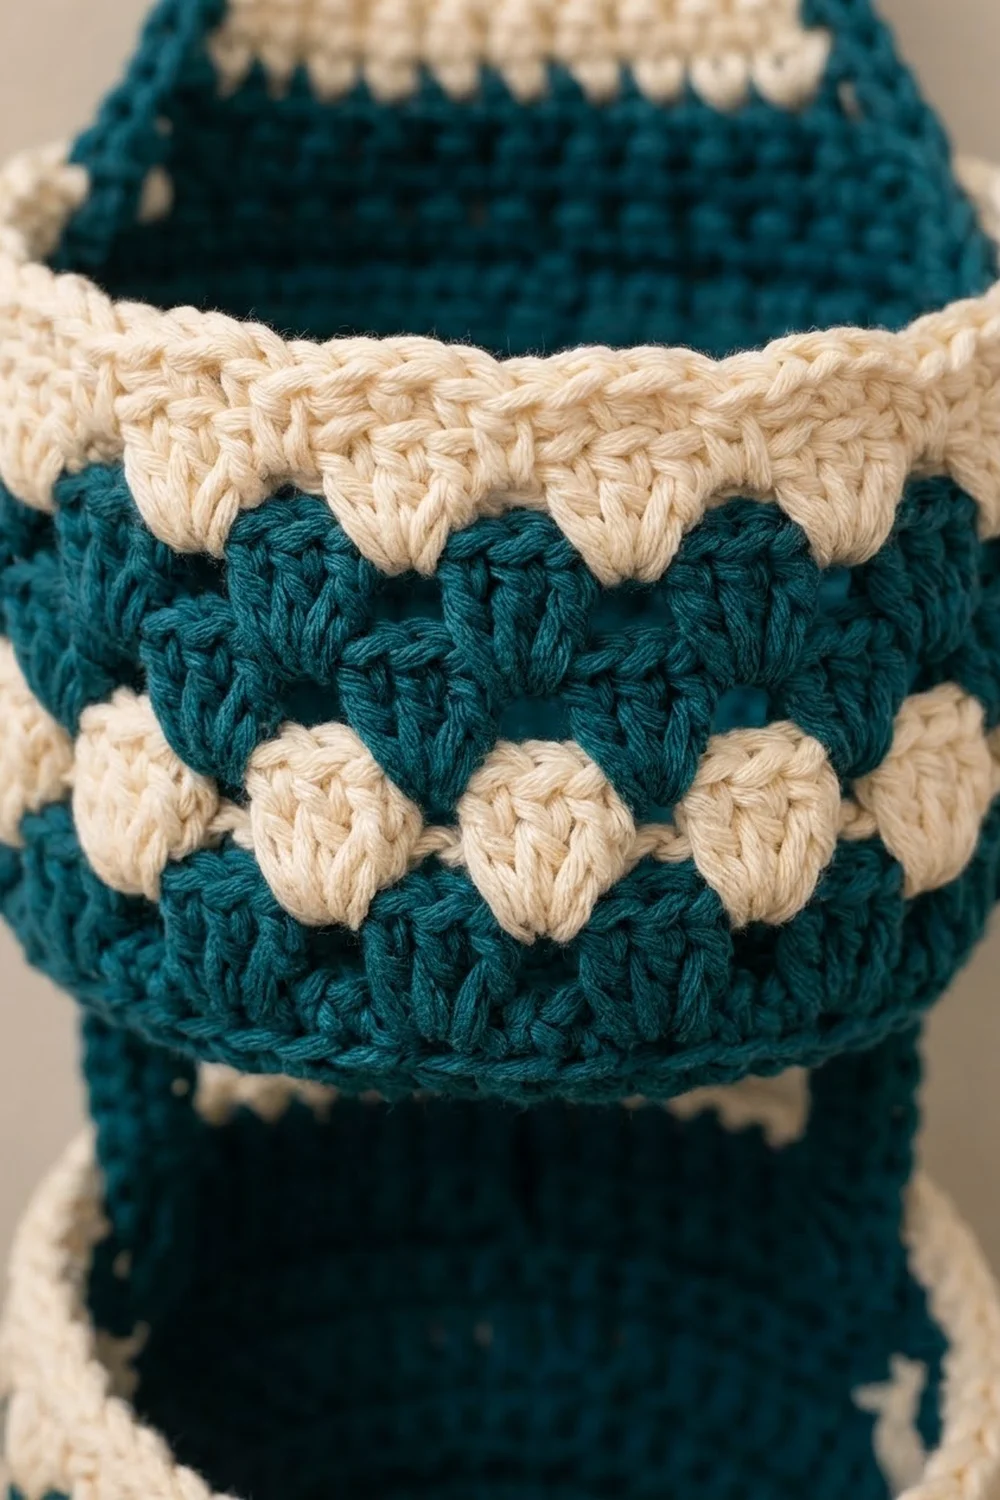
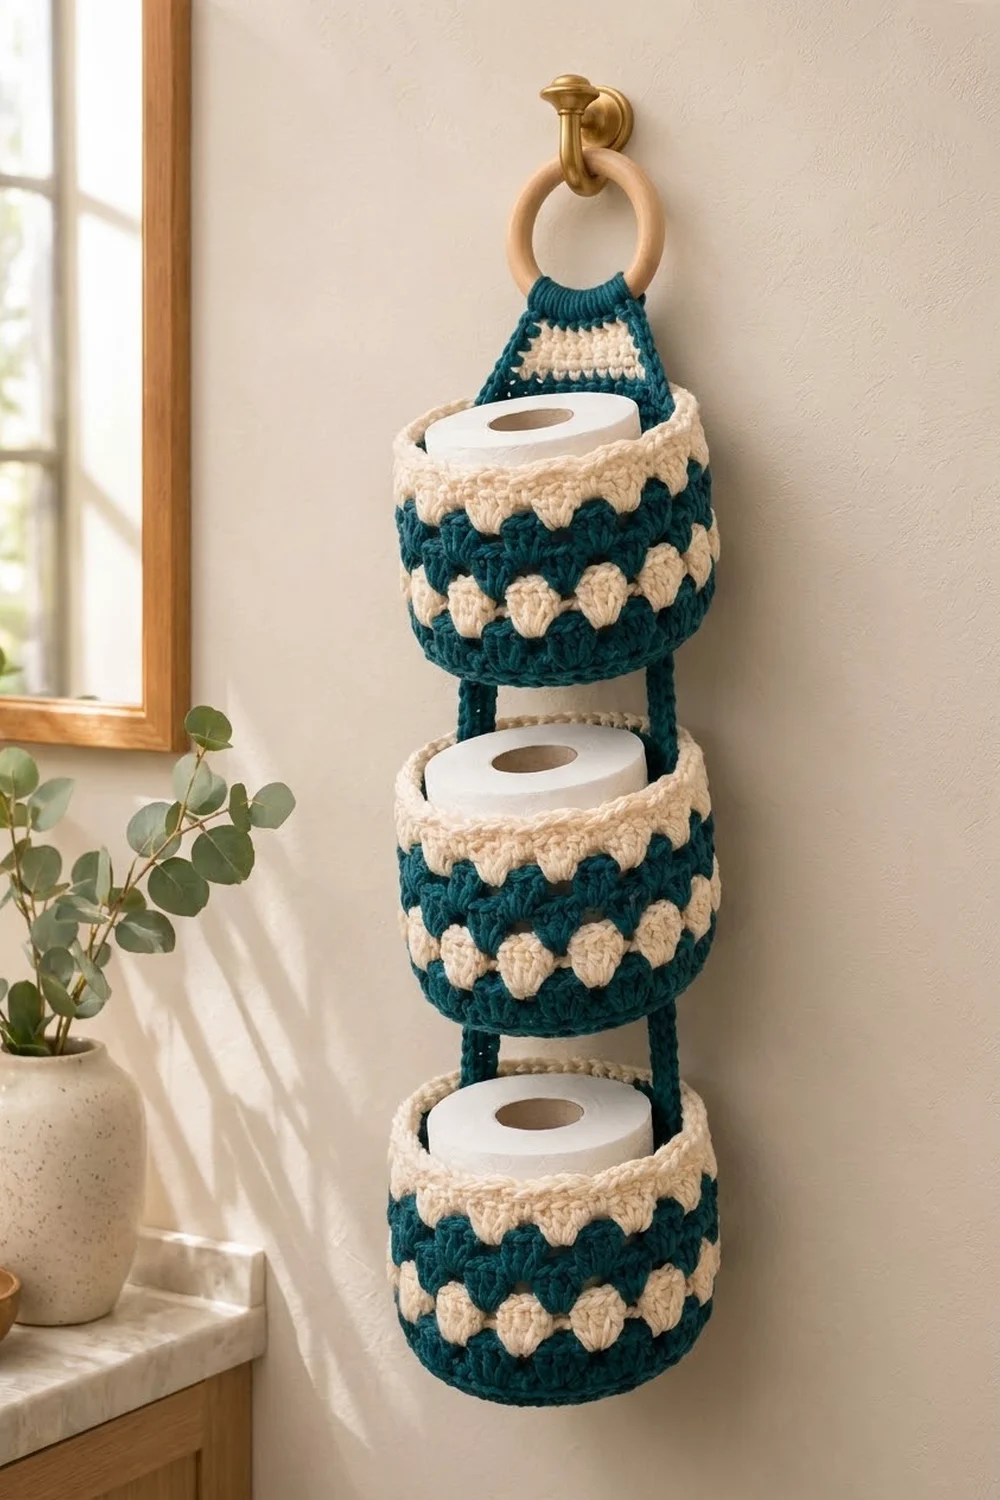
The Tidewater Tiers holder stacks three spare toilet rolls in a neat vertical column that hangs from one hook. Each roll sits in its own round basket. The basket sides are covered in staggered shell stitches that make a bold zigzag pattern.
The palette is deep teal and soft cream. The teal grounds the base and the straps, while the cream shells and rims brighten the piece. It fits a calm, natural bathroom with wood, brass and green plants.
This pattern uses US crochet terms. The finished hanger is about 5.75 in (14.6 cm) wide and about 16 in (40.6 cm) long, measured from the bottom of the ring to the bottom of the lowest basket. Each basket is 4 in (10.2 cm) tall.
The construction is simple. You crochet three baskets in joined rounds, then four short straps and one tapered tab, all worked flat. You sew the straps between the baskets, add the cream rims, and fold the tab over a wooden ring.
Finished Size and Construction
- Finished size: 5.75 in (14.6 cm) wide x 16 in (40.6 cm) long, not counting the ring
- Skill level: Easy-intermediate
- Terminology: US crochet terms
- Yarn weight: Worsted (#4) cotton
- Hook: 5.0 mm (H-8)
- Number of pieces: 8 (3 baskets, 4 straps, 1 tab) plus 1 wooden ring
- Layout: 3 baskets stacked in 1 vertical column
- Piece size: each basket is 5.75 in (14.6 cm) across x 4 in (10.2 cm) tall
- Size before border: each basket is 3.25 in (8.3 cm) tall through Rnd 19
- Border depth: the rim adds 0.75 in (1.9 cm)
Materials
Use a smooth, firm worsted-weight cotton or cotton blend. Cotton holds its shape when the baskets are loaded and stands up to bathroom humidity. Acrylic can sag, so if you use it, go down one hook size.
- Teal (Color A): 200 g, about 310 m (bases, shell rounds, leveling rounds, straps, tab)
- Cream (Color B): 100 g, about 155 m (shell rounds, rims, tab stripe)
Both quantities include a margin of about 15 percent.
Tools:
– 5.0 mm (H-8) crochet hook
– One wooden ring, 3 in (7.6 cm) across
– Tapestry needle
– Scissors
– Stitch markers (at least 6)
– Measuring tape
– Rustproof pins
Abbreviations (US Terms)
- ch – chain
- sl st – slip stitch
- sc – single crochet
- hdc – half double crochet
- dc – double crochet
- inc – 2 sc in the same stitch
- sc2tog – single crochet 2 together
- BLO – back loop only
- rev sc – reverse single crochet (crab stitch)
- st(s) – stitch(es)
- rep – repeat
Special stitches:
- Shell: 5 dc in the same stitch.
- Reverse single crochet: Work single crochet from left to right (right-handed). Insert the hook into the next stitch to the right, yarn over, pull up a loop, yarn over and pull through both loops.
Round notes: Work all rounds with the right side facing out. Join each round with a sl st to the first stitch. The beginning ch 1 does not count as a stitch. The ch 3 in Rnd 19 counts as a dc.
Gauge and Checkpoints
Gauge: 16 sc x 18 rounds = 4 in (10.2 cm). This is 4 sc per inch (2.5 cm).
Before making all three baskets, make one basket through Rnd 19 and check it against these measurements:
- After Rnd 4 (24 sts): about 1.9 in (4.8 cm) across
- After Rnd 8 (48 sts): about 3.8 in (9.7 cm) across
- After Rnd 12 (72 sts): about 5.75 in (14.6 cm) across
- After Rnd 14: the walls stand 0.5 in (1.3 cm) high
- After Rnd 18: the four shell rounds together measure about 2.25 in (5.7 cm)
- After Rnd 19: the basket is 3.25 in (8.3 cm) tall
If the base is too big, or a roll slides around loosely, go down 0.5 mm in hook size. If the base is too small, or a roll will not fit, go up 0.5 mm. A standard roll is about 4.5 in (11.4 cm) across, so the base needs at least 5.5 in (14.0 cm) to give a comfortable fit.
Basket (Make 3)
Base
With Teal:
Rnd 1: Make a magic ring, ch 1, 6 sc in the ring, join. (6)
Rnd 2: Inc in each st around, join. (12)
Rnd 3: Sc 1, inc; rep 6 times, join. (18)
Rnd 4: Sc 1, inc, sc 1; rep 6 times, join. (24)
Rnd 5: Sc 3, inc; rep 6 times, join. (30)
Rnd 6: Sc 2, inc, sc 2; rep 6 times, join. (36)
Rnd 7: Sc 5, inc; rep 6 times, join. (42)
Rnd 8: Sc 3, inc, sc 3; rep 6 times, join. (48)
Rnd 9: Sc 7, inc; rep 6 times, join. (54)
Rnd 10: Sc 4, inc, sc 4; rep 6 times, join. (60)
Rnd 11: Sc 9, inc; rep 6 times, join. (66)
Rnd 12: Sc 5, inc, sc 5; rep 6 times, join. (72)
Rounds 4 through 12 shift where the increases fall so the base stays round instead of turning into a hexagon.
Walls
Rnd 13 (Teal): Ch 1, sc in BLO of each st around, join. (72) This round makes the ridge where the walls turn up.
Rnd 14 (Teal): Ch 1, sc in each st around, join. (72) Fasten off Teal.
Rnd 15 (Cream): Join Cream in any st. Ch 1, sc in the same st, sk 2, shell in next st, sk 2, sc in next st. Rep from * around, leaving off the final sc on the last repeat, then join to the first sc. (12 shells + 12 sc = 72 sts) Fasten off.
Each repeat uses exactly 6 stitches (1 sc, 2 skipped, 1 shell stitch, 2 skipped), and 72 ÷ 6 = 12 repeats.
Rnd 16 (Teal): Join Teal in the center (3rd) dc of any shell. Ch 1, sc in the same st, shell in the next sc, sc in the center dc of the next shell. Rep from * around, leaving off the final sc, then join. (12 shells + 12 sc = 72 sts) Fasten off.
The new shells sit in the valleys between the old shells. This offset creates the staggered pattern.
Rnd 17 (Cream): Work as for Rnd 16. (72) Fasten off.
Rnd 18 (Teal): Work as for Rnd 16. (72) Do not fasten off.
Rnd 19 (Teal, leveling round): Ch 3 (counts as dc) in the same sc. Hdc in the next dc, sc in the next 3 dc, hdc in the next dc, dc in the next sc. Rep from * around, leaving off the final dc, then join to the top of the ch-3. (72) Fasten off.
Each repeat has 6 stitches (dc, hdc, sc, sc, sc, hdc), so the round still totals 72. The dc fills each valley and the sc sits on each shell peak, which gives the top a level edge. Leave the rims until after joining.
Checkpoint: 3.25 in (8.3 cm) tall and 5.75 in (14.6 cm) across.
Strap (Make 4)
With Teal, ch 25.
Row 1: Sc in the 2nd ch from the hook and in each ch across, turn. (24)
Rows 2–4: Ch 1, sc in each st across, turn. (24)
Fasten off, leaving a 20 in (50.8 cm) tail.
Checkpoint: 6 in (15.2 cm) long x 0.9 in (2.3 cm) wide.
Top Tab (Make 1)
The tab is worked from the bottom (wide end) up.
With Teal, ch 21.
Row 1: Sc in the 2nd ch from the hook and in each ch across, turn. (20)
Row 2: Ch 1, sc across, turn. (20)
Row 3: Ch 1, sc2tog, sc to the last 2 sts, sc2tog, turn. (18)
Row 4: Ch 1, sc across, turn. (18)
Row 5: Work as for Row 3. (16)
Row 6: Ch 1, sc across, turn. (16)
Row 7: Work as for Row 3. (14)
Row 8: Ch 1, sc across, turn. (14) Change to Cream.
Row 9 (Cream): Work as for Row 3. (12)
Row 10 (Cream): Ch 1, sc across, turn. (12)
Row 11 (Cream): Work as for Row 3. (10)
Row 12 (Cream): Ch 1, sc across, turn. (10) Change to Teal.
Row 13 (Teal): Work as for Row 3. (8)
Rows 14–24 (Teal): Ch 1, sc across, turn. (8)
Fasten off, leaving a 20 in (50.8 cm) tail.
Checkpoints:
– Row 1 is 5 in (12.7 cm) wide.
– Row 13 is 2 in (5.1 cm) wide.
– Rows 1–13 measure 2.9 in (7.4 cm) tall.
– The wrap strip (Rows 14–24) measures 2.4 in (6.1 cm).
Make All Pieces
| Piece | Qty | Colors |
|---|---|---|
| Basket | 3 | Teal base, Rnds 13–14, 16, 18–19; Cream Rnds 15, 17, rim |
| Strap | 4 | Teal |
| Tab | 1 | Teal with Cream Rows 9–12 |
Layout (back view):
            ( RING )
             [TAB]
     S1 [ BASKET 1 ] S2
     S1              S2
     S3 [ BASKET 2 ] S4
     S3              S4
        [ BASKET 3 ]
Straps S1 and S2 connect Basket 1 to Basket 2. Straps S3 and S4 connect Basket 2 to Basket 3.
Joining
Mark the placements. On Baskets 1 and 2, choose the side where your round joins line up and call it the back. Mark the back-center stitch of Rnd 19. Count 12 stitches to the left and 12 stitches to the right, and mark each one. The two strap centers are 24 stitches apart, which is 6 in (15.2 cm) around the curve. Mark the same three stitches on Basket 3.
Upper end of each strap. Pin S1 and S2 to the outside of Basket 1’s back wall, centered on the side markers. The strap’s top edge lines up with the top of Rnd 19, and the strap runs straight down to the Rnd 13 ridge. That covers 3.25 in (8.3 cm) of strap. Whipstitch both long edges, matching one strap row edge to about one wall stitch.
Gap. The next 1.25 in (3.2 cm) of strap hangs free.
Lower end of each strap. Slip the last 1.5 in (3.8 cm) of the strap inside Basket 2, centered on its side markers. Sew the bottom 0.75 in (1.9 cm) of the strap to the inside wall over Rnds 18–19. Leave the top 0.75 in (1.9 cm) loose for now, because the rim will be worked beside it. That gives 3.25 + 1.25 + 0.75 + 0.75 = 6 in (15.2 cm), which is the full strap length.
Repeat. Join S3 and S4 between Basket 2 and Basket 3 in the same way.
Tab. Center Row 1 of the tab on Basket 1’s back-center marker. Its 20 stitches cover 10 stitches on each side, so the edges of the tab just meet the inner edges of S1 and S2. Sew tab Rows 1–4 (0.9 in / 2.3 cm) to the outside of the wall, keeping the top of Row 4 level with the top of Rnd 19.
Tension. Keep your whipstitches snug but not tight. The wall should stay round without puckering. Pull each strap gently as you sew so all four straps end up the same length.
Size checkpoint. Lay the joined piece flat. Each gap should be 1.25 in (3.2 cm). Measured from the top of Basket 1’s Rnd 19 to the bottom of Basket 3, the piece should be about 13.25 in (33.7 cm).
Border: Basket Rim
Border gauge: 4 sc per inch (2.5 cm). The 4 rim rounds measure 0.75 in (1.9 cm).
Work these rounds on each basket. Join Cream in any stitch of Rnd 19, away from the straps. The strap ends lie below the top loops of Rnd 19, so every stitch is free to work into.
Rnd 20: Ch 1, sc in each st around, join. (72)
Rnds 21–22: Ch 1, sc in each st around, join. (72)
Rnd 23: Ch 1, rev sc in each st around, join. (72) Fasten off.
Why the math works: The rim is worked 1 stitch into each of the 72 stitches of Rnd 19, with no increases. This keeps the rim exactly as wide as the wall, so it stands straight instead of flaring. There are no corners on a round piece. Each quarter of the circle has 18 stitches, which is why the strap markers line up so easily. Adding 0.75 in (1.9 cm) to the 3.25 in (8.3 cm) wall gives the 4 in (10.2 cm) finished basket height.
Finish the strap ends. In Baskets 2 and 3, tack the loose top 0.75 in (1.9 cm) of each strap to the inside of the rim.
Finish the tab. Tack the sides of tab Rows 5–8 to the outside of Basket 1’s rim. Fold the wrap strip (Rows 14–24) over the bottom of the wooden ring toward the back. Sew Row 24 across the back of Rows 9–13 so the ring is held snugly in the fold.
Final Blocking
- Weave in all ends, running each one at least 2 in (5.1 cm) through stitches of the same color.
- Lightly spray each basket with water until it is damp but not soaked.
- Put a toilet roll, or a 4.5 in (11.4 cm) jar, in each basket to shape the walls.
- Lay the hanger flat. Straighten the straps and check that each gap is 1.25 in (3.2 cm).
- Pin each shell so its peak points straight up.
- Let it dry completely, which takes about 24 hours.
- Remove the forms and check that each basket is 5.75 in (14.6 cm) across.
Final Quality-Control Checklist
- [ ] Each basket has 72 stitches in every wall round.
- [ ] Each basket has 12 shells per shell round, and each round’s shells sit in the valleys of the round below.
- [ ] The base ridge (Rnd 13) is crisp on all three baskets.
- [ ] Each basket is 4 in (10.2 cm) tall and 5.75 in (14.6 cm) across.
- [ ] All four straps are 6 in (15.2 cm) long, and every gap is 1.25 in (3.2 cm).
- [ ] The tab is centered and the ring is held firmly.
- [ ] The hanger hangs straight and measures 16 in (40.6 cm) long.
- [ ] All ends are secure.
Troubleshooting
The base cups or ruffles. Cupping means the stitches are too tight, so go up a hook size. Ruffling means the stitches are too loose, so go down a hook size. Also recount the increases.
The walls flare outward. Check that Rnds 14–23 have no extra stitches. Every round should have exactly 72.
The shells don’t line up. Each new shell goes into an sc, and each new sc goes into the center dc of a shell. Recount the repeats: there should be 12.
The rim looks wavy. Your reverse sc is too loose, so work it with a smaller hook.
The basket tilts forward. Move the straps a few stitches closer to the back center and check that they are the same length.
The tab stretches. Add a second line of stitching across the back of the fold.
Care
Hand wash in cool water, press out the water in a towel, and lay flat to dry with the baskets reshaped around rolls. Do not tumble dry.
Final Notes
The measurements build on each other in this order:
- The gauge is 16 sc to 4 in (10.2 cm).
- That gauge gives a 72-stitch base 5.75 in (14.6 cm) across.
- The walls reach 3.25 in (8.3 cm) at Rnd 19.
- The rim adds 0.75 in (1.9 cm), so each basket is 4 in (10.2 cm) tall.
- The 6 in (15.2 cm) straps leave 1.25 in (3.2 cm) gaps between baskets.
- Together, the tab and the three tiers make a 16 in (40.6 cm) hanger.
If your gauge matches, every later measurement will match too. Check the first basket carefully, and the other two will go quickly.
Happy crocheting!