

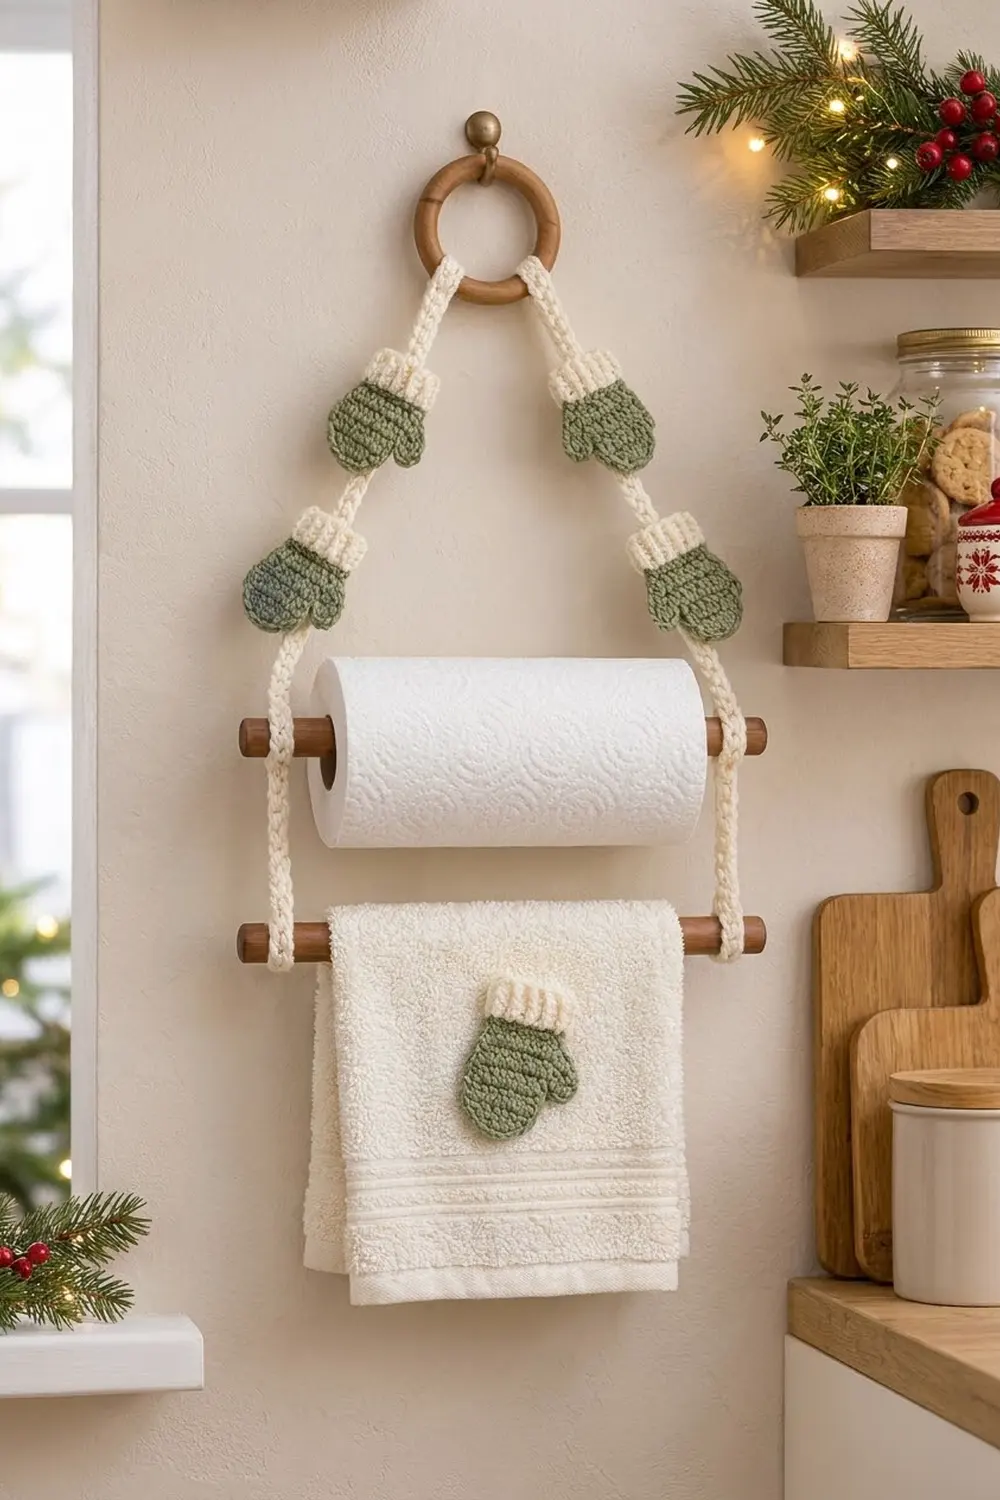
This hanging holder gives a winter kitchen some handmade warmth. Two cream crocheted cords hang from a wooden ring and hold two wooden dowels: the upper one carries a paper towel roll and the lower one carries a hand towel. Four little sage green mittens with cream ribbed cuffs sit along the diagonal cords, and a fifth mitten is sewn onto the hand towel so the set matches.
The colors are soft and calm: sage green hands, cream cuffs, cream cords and natural wood. Every crocheted part is simple. The mittens use single crochet and two rows of post-stitch ribbing, and the cords use a sturdy Romanian cord.
The pattern is written in US crochet terms. The finished hanger is about 14 in (35.6 cm) wide and 18 in (45.7 cm) tall from the top of the ring to the lower dowel. Each mitten is 2.75 in (7.0 cm) wide across the thumb and 3.25 in (8.3 cm) tall.
The construction goes in four steps. First you make five flat mittens in rows, working the hand and then the cuff. Next you work one outline round around each hand. Then you make two cords. Finally you assemble everything on the ring and dowels and sew the mittens in place.
Finished Size and Construction
- Finished hanger: 14 in (35.6 cm) wide × about 18 in (45.7 cm) tall
- Skill level: Easy (single crochet, post stitches, Romanian cord)
- Terminology: US
- Yarn weight: Worsted (#4)
- Hook: 4.0 mm (G-6)
- Number of pieces: 5 mittens + 2 cords
- Layout: 2 mittens on each diagonal cord, 1 mitten on the towel
- Mitten size: 2.75 in (7.0 cm) wide × 3.25 in (8.3 cm) tall
- Size before border: hand body 1.75 in (4.4 cm) wide × 2 in (5.1 cm) tall
- Border depth: 1 sc outline, about 0.25 in (0.6 cm) per edge
Materials
Use a smooth worsted yarn in acrylic or cotton. Cotton looks crisper near a sink. Acrylic is softer and lighter on the cords. Avoid fuzzy yarn, because it hides the ribbing on the cuffs.
- Sage green: 20 g, about 40 m (mitten hands and outlines)
- Cream: 30 g, about 60 m (cuffs and cords)
These quantities include a safety margin of about 25 percent.
Tools and hardware:
– 4.0 mm (G-6) crochet hook
– Tapestry needle
– Scissors and stitch markers
– 1 wooden ring, 2.5 in (6.4 cm) across
– 2 wooden dowels, 14 in (35.6 cm) long and 0.5 in (1.3 cm) thick
– 1 cream hand towel
– Sewing thread in cream and sage (optional, for the towel appliqué)
– Pins and a blocking mat
Abbreviations (US Terms)
- ch: chain
- sc: single crochet
- hdc: half double crochet
- sl st: slip stitch
- st(s): stitch(es)
- RS / WS: right side / wrong side
- fphdc: front post half double crochet. Yarn over, insert the hook from front to back to front around the post of the stitch, then complete an hdc.
- bphdc: back post half double crochet. Yarn over, insert the hook from back to front to back around the post, then complete an hdc.
Special stitch: Romanian cord. Ch 2 and sc in the 2nd ch from the hook. Turn the work clockwise and sc into the single vertical loop on the left side. Turn clockwise again and sc under the 2 loops now on the left side. Repeat the last step. Each sc counts as 1 cord stitch.
Gauge and Checkpoints
Gauge: 16 sc × 18 rows = 4 in (10.2 cm) in sage.
Make one complete mitten before you make the rest. Measure it at each stage:
- After Row 9: the body is 1.75 in (4.4 cm) wide (not counting the thumb) and 2 in (5.1 cm) tall.
- After the cuff: the cuff is 2.25 in (5.7 cm) wide and about 1 in (2.5 cm) tall.
- After the border: the mitten is 2.75 in (7.0 cm) wide across the thumb and 3.25 in (8.3 cm) tall.
- Cord: 5 cord stitches = 1 in (2.5 cm), and the cord is about 0.375 in (1.0 cm) thick.
If your mitten is too big, go down 0.5 mm in hook size. If it is too small, go up 0.5 mm. Don’t add or remove stitches, because the border and cuff counts depend on the 7-stitch body.
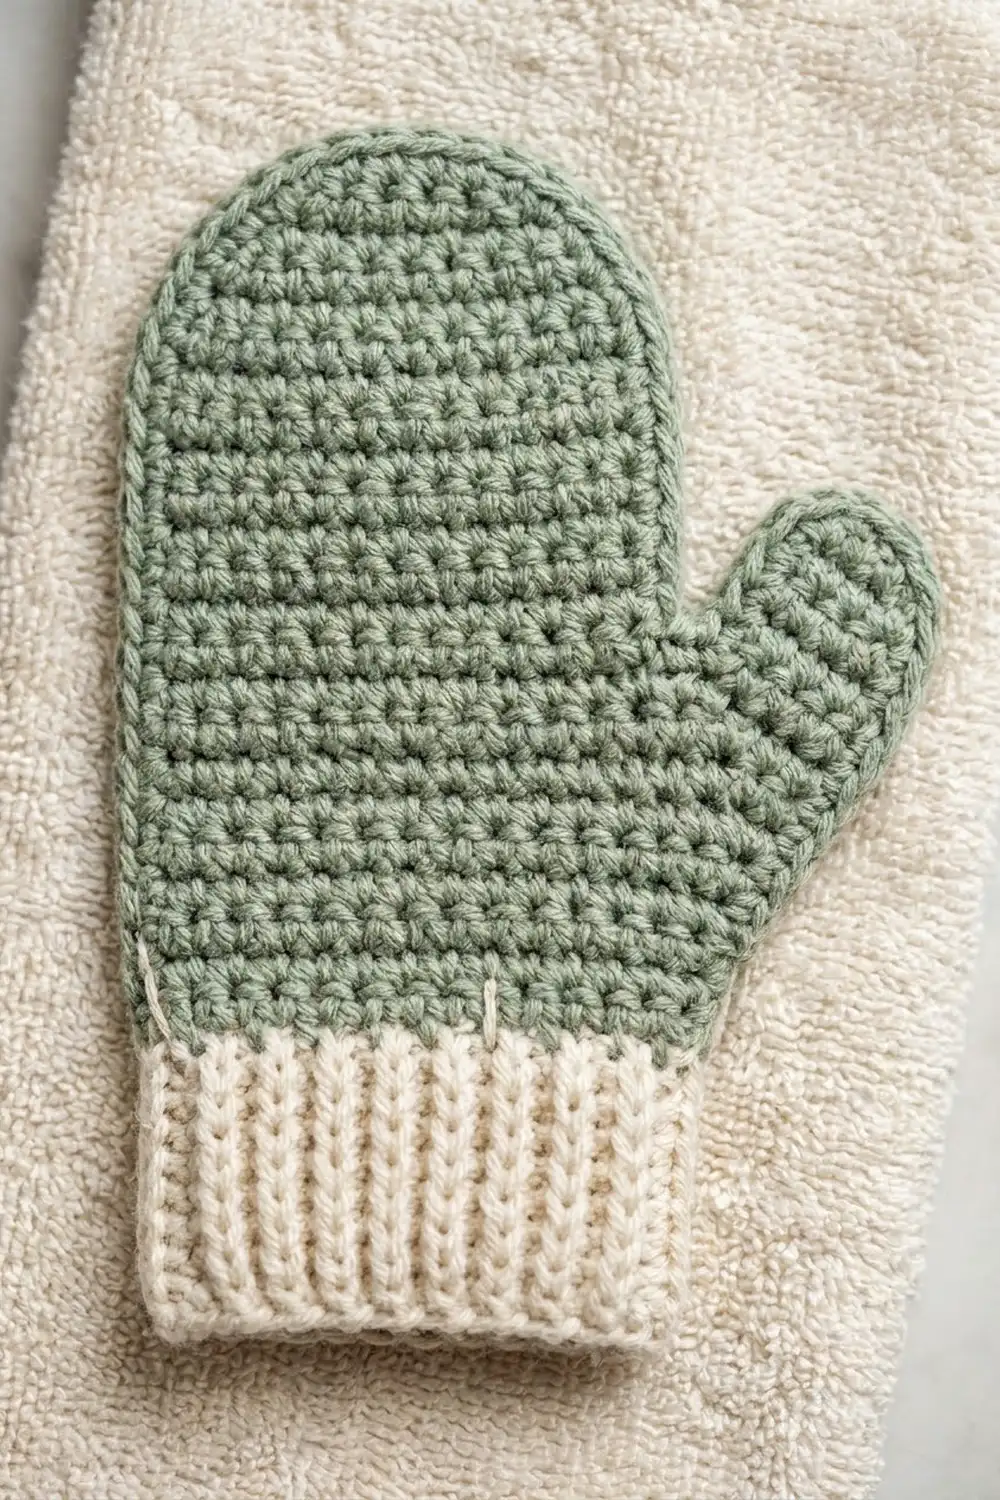
Mitten Pattern (Make 5)
Hand (Sage)
Ch 4.
Row 1: Work 2 sc in the 2nd ch from the hook, sc in the next ch, then 2 sc in the last ch. Turn. (5 sc)
Row 2: Ch 1. Work 2 sc in the first st, sc in the next 3 sts, then 2 sc in the last st. Turn. (7 sc)
Rows 3–4: Ch 1, sc in each st across. Turn. (7 sc)
Row 5: Ch 1, sc in each st across. Don’t fasten off. Ch 3 for the thumb, then turn. (7 sc + 3 ch)
Row 6: Sc in the 2nd ch from the hook and in the next ch, then sc in each of the 7 sts. Turn. (9 sc)
Row 7: Ch 1, sc in each st across. Turn. (9 sc) This row ends at the thumb tip.
Row 8: Sl st in each of the first 2 sts (the thumb). Ch 1, then sc in the next 7 sts. Turn. (7 sc; the sl sts don’t count)
Row 9: Ch 1, sc in each st across. (7 sc) Fasten off sage.
The thumb is 2 sts wide and 2 rows tall, and it sticks out from one side. To make a left and right pair, just flip the mitten over. Both faces look nearly the same.
Cuff (Cream)
Row 10 is a conversion row. It turns the 7 hand stitches into 9 cuff stitches so the cuff matches the bordered hand.
Row 10: Join cream in the first st of Row 9. Ch 1. Work 2 sc in the first st, sc in the next 5 sts, then 2 sc in the last st. Turn. (7 sts worked + 2 added = 9 sc)
Row 11: Ch 2 (does not count as a stitch). Hdc in the first st, then work (fphdc, bphdc) 3 times. Fphdc in the next st and hdc in the last st. Turn. (1 + 7 + 1 = 9 sts)
Row 12: Ch 2. Hdc in the first st. Across the next 7 sts, work bphdc around each fphdc and fphdc around each bphdc. Hdc in the last st. (9 sts) Fasten off.
The raised ribs from Row 11 stay on the RS, so the cuff shows 4 vertical cream ribs.
Cord Pattern (Make 2)
With cream, work Romanian cord until it measures 26 in (66.0 cm). That is about 130 cord stitches. Fasten off, leaving a 12 in (30.5 cm) tail for sewing.
Measure the cord while it hangs freely, not while it is stretched. Both cords must be the same length to within 0.25 in (0.6 cm).
Make All Pieces
Before you assemble anything, finish all 5 mittens, including the border round in the Border section below.
- Sage: 5 hands (Rows 1–9) and 5 borders
- Cream: 5 cuffs (Rows 10–12) and 2 cords
Layout grid:
              (  RING  )
             /          \
          [M1]          [M3]      3 in down each cord
           /              \
        [M2]              [M4]    7 in down each cord
         /                  \
  ==|=========================|==  upper dowel: paper towel
    |                         |    6 in drop
  ==|=========================|==  lower dowel: hand towel
              [M5 on towel]
Make M1 and M2 with the thumb pointing outward to the left. Flip M3 and M4 so their thumbs point outward to the right.
Joining and Assembly
Cord budget, 26 in (66.0 cm) per cord:
– Ring loop and overlap: 3.5 in (8.9 cm)
– Diagonal: 10.5 in (26.7 cm)
– Upper dowel wrap: 2.5 in (6.4 cm)
– Drop between dowels: 6 in (15.2 cm)
– Lower dowel wrap: 2.5 in (6.4 cm)
– Tail end: 1 in (2.5 cm)
Together these add up to exactly 26 in (66.0 cm).
Steps:
- Fold the top 3.5 in (8.9 cm) of one cord over the ring. Whipstitch the end flat to the cord, one stitch into each cord stitch, so you have a firm loop.
- Measure 10.5 in (26.7 cm) down the cord. Wrap it once around the upper dowel, 0.75 in (1.9 cm) in from the end, and sew it to itself.
- Measure 6 in (15.2 cm) down. Wrap the cord around the lower dowel, also 0.75 in (1.9 cm) in from the end, and sew it down. Hide the 1 in (2.5 cm) tail against the back of the cord.
- Repeat Steps 1–3 with the second cord on the other ends of the dowels.
The cords are 12.5 in (31.8 cm) apart on the dowels, so each diagonal spans 6.25 in (15.9 cm) sideways. That gives a vertical rise of about 8.5 in (21.6 cm) from the ring loop to the upper dowel.
Sewing the mittens on the cords: Lay each cuff over the front of a cord so the cord runs behind the cuff. Whipstitch through the 9 sts of Row 12, catching only the back loops so the stitches don’t show on the front. Place M1/M3 3 in (7.6 cm) below the ring loop and M2/M4 7 in (17.8 cm) below it.
Tension: Pull each stitch just snug. If you pull too tight, the cuff will pucker and tilt the mitten.
Towel appliqué: Center M5 about 3 in (7.6 cm) below the fold of the hanging towel. Pin it, then whipstitch through all 27 border sts and the 3 row-ends on each side of the cuff, using matching thread.
Size checkpoint: Both dowels must hang level. Each diagonal measures 10.5 in (26.7 cm), and the hanger is about 18 in (45.7 cm) tall.
Border (Hand Outline)
Border gauge: 1 sc worked into row-ends adds about 0.25 in (0.6 cm) to each edge.
Hold the mitten RS up with the cuff at the top. Join sage in the end of Row 9 on the straight side, just below the cuff. Ch 1, then work the round as follows:
- Straight side: 1 sc in the end of each row from 9 down to 1 (9 sc)
- Fingertip: working in the foundation ch, sc in the first ch, 2 sc in the next ch, sc in the last ch (4 sc)
- Lower thumb side: 1 sc in the end of each row from 1 up to 5 (5 sc)
- Thumb: 2 sc in the free loops of the thumb chains, 3 sc across the thumb tip (1 in the end of Row 6 and 2 in the end of Row 7), then 1 sc in each of the 2 sl sts (7 sc)
- Upper thumb side: 1 sc in the end of Row 8 and 1 sc in the end of Row 9 (2 sc)
Sl st into the side of Row 10 and fasten off. Total: 9 + 4 + 5 + 7 + 2 = 27 sc.
Why the math works: The hand body is 7 sts, or 1.75 in (4.4 cm). The border adds 1 sc on each side, so the body becomes the width of 9 sts, or 2.25 in (5.7 cm). The cuff has exactly 9 sts at 2.25 in (5.7 cm), so the cuff and hand line up with no step. The thumb adds 0.5 in (1.3 cm), which gives the full width of 2.75 in (7.0 cm). On the height, 9 rows give 2 in (5.1 cm), the border adds 0.25 in (0.6 cm) at the fingertip and the cuff adds 1 in (2.5 cm), for 3.25 in (8.3 cm) in total.
Final Blocking
- Lightly mist all 5 mittens with water.
- Pin each one RS up to 2.75 in (7.0 cm) × 3.25 in (8.3 cm).
- Shape the fingertip into a smooth curve and square off the thumb.
- Keep the cuff ribs straight and vertical. Don’t stretch the cuff wider than 2.25 in (5.7 cm).
- Let the mittens dry completely before sewing them on.
- Hang the cords with a light weight on the end for an hour so they hang straight. Don’t steam acrylic cord.
Final Quality-Control Checklist
- [ ] All 5 mittens measure 2.75 in (7.0 cm) × 3.25 in (8.3 cm).
- [ ] Each border has 27 sc, and each cuff has 9 sts with 4 raised ribs.
- [ ] The thumbs on each diagonal point outward.
- [ ] Both cords are 26 in (66.0 cm) before assembly.
- [ ] Both diagonals are 10.5 in (26.7 cm), and the dowels hang level.
- [ ] The mittens sit 3 in (7.6 cm) and 7 in (17.8 cm) below the ring.
- [ ] All tails are woven in on the back.
Troubleshooting
- The cuff is wider than the hand: your Row 10 tension is loose. Redo Row 10 with a hook 0.5 mm smaller.
- The thumb curls: block it flat and check that the border has 7 sc around the thumb.
- The fingertip is pointed instead of round: make sure you worked 2 sc in the middle foundation ch.
- The ribs lean or blur: you worked post stitches into the wrong posts on Row 12. Work fp around bp and bp around fp.
- The dowels tilt: compare the two diagonal lengths and re-sew the upper wrap to fix the difference.
- The cord twists: always turn clockwise, and block the cord with a light weight on the end.
Care
Spot clean the hanger with mild soap and lay it flat to dry. You can hand wash the towel with its appliqué in cool water and reshape the mitten while it’s damp.
Final Notes
The measurement chain is short. Get the gauge of 16 sc = 4 in (10.2 cm), and the 7-stitch hand comes out at 1.75 in (4.4 cm). The border brings the hand to 2.25 in (5.7 cm), which matches the 9-stitch cuff. The finished mitten is 2.75 in (7.0 cm) × 3.25 in (8.3 cm). Two 26 in (66.0 cm) cords then build a 14 in (35.6 cm) × 18 in (45.7 cm) hanger with level dowels. Check each link in that chain and the holder will come together cleanly.
Happy crocheting!