

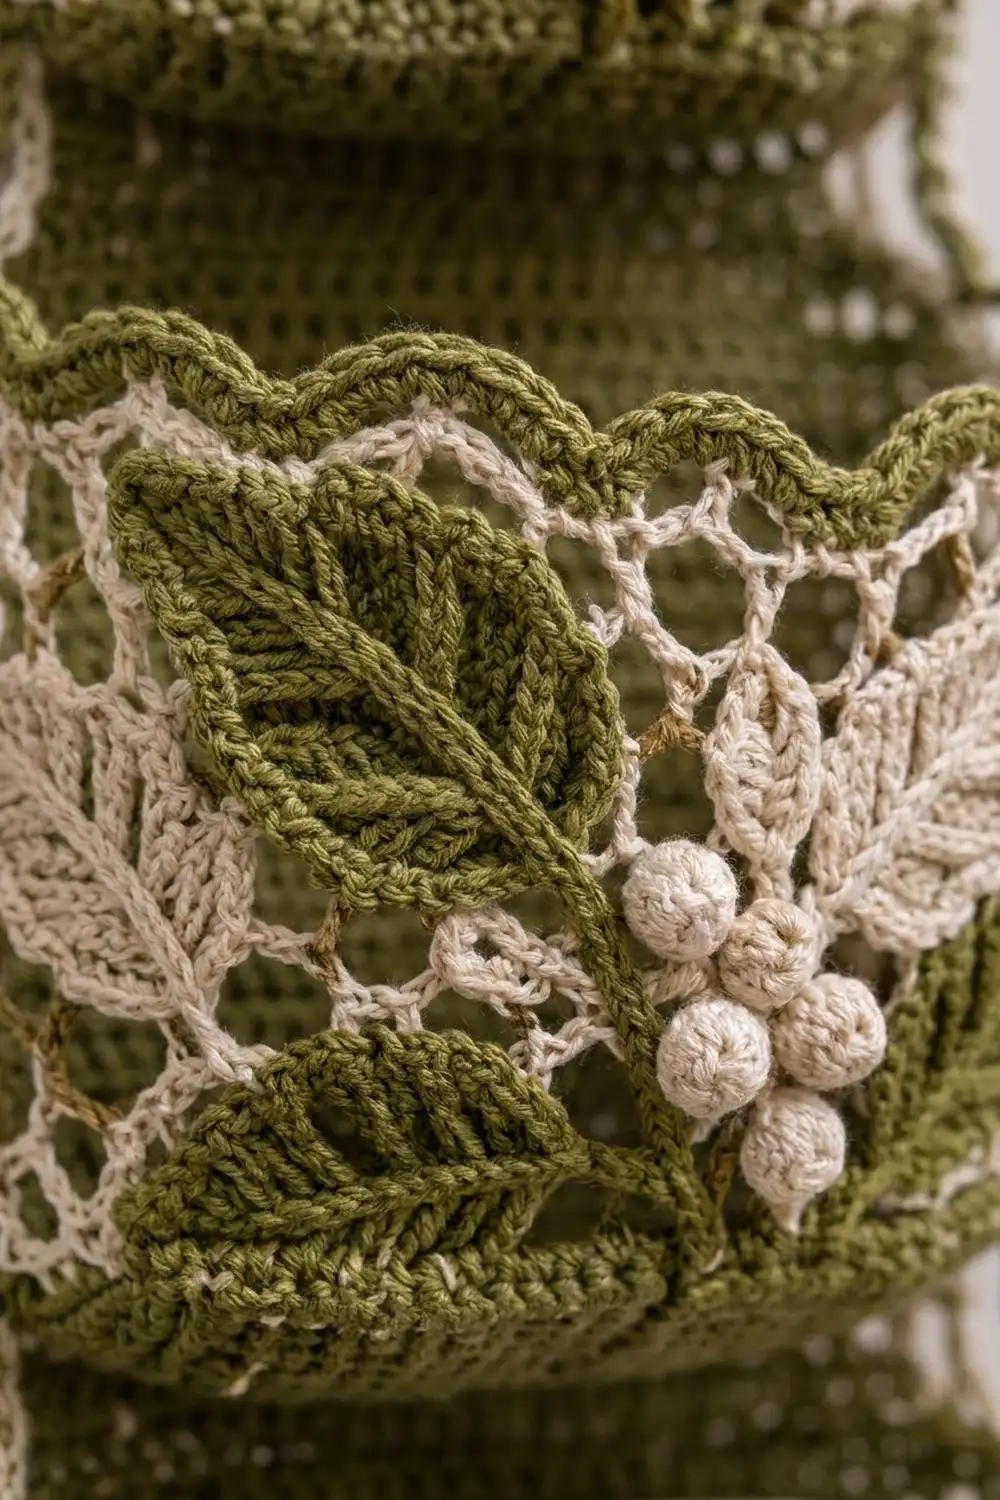
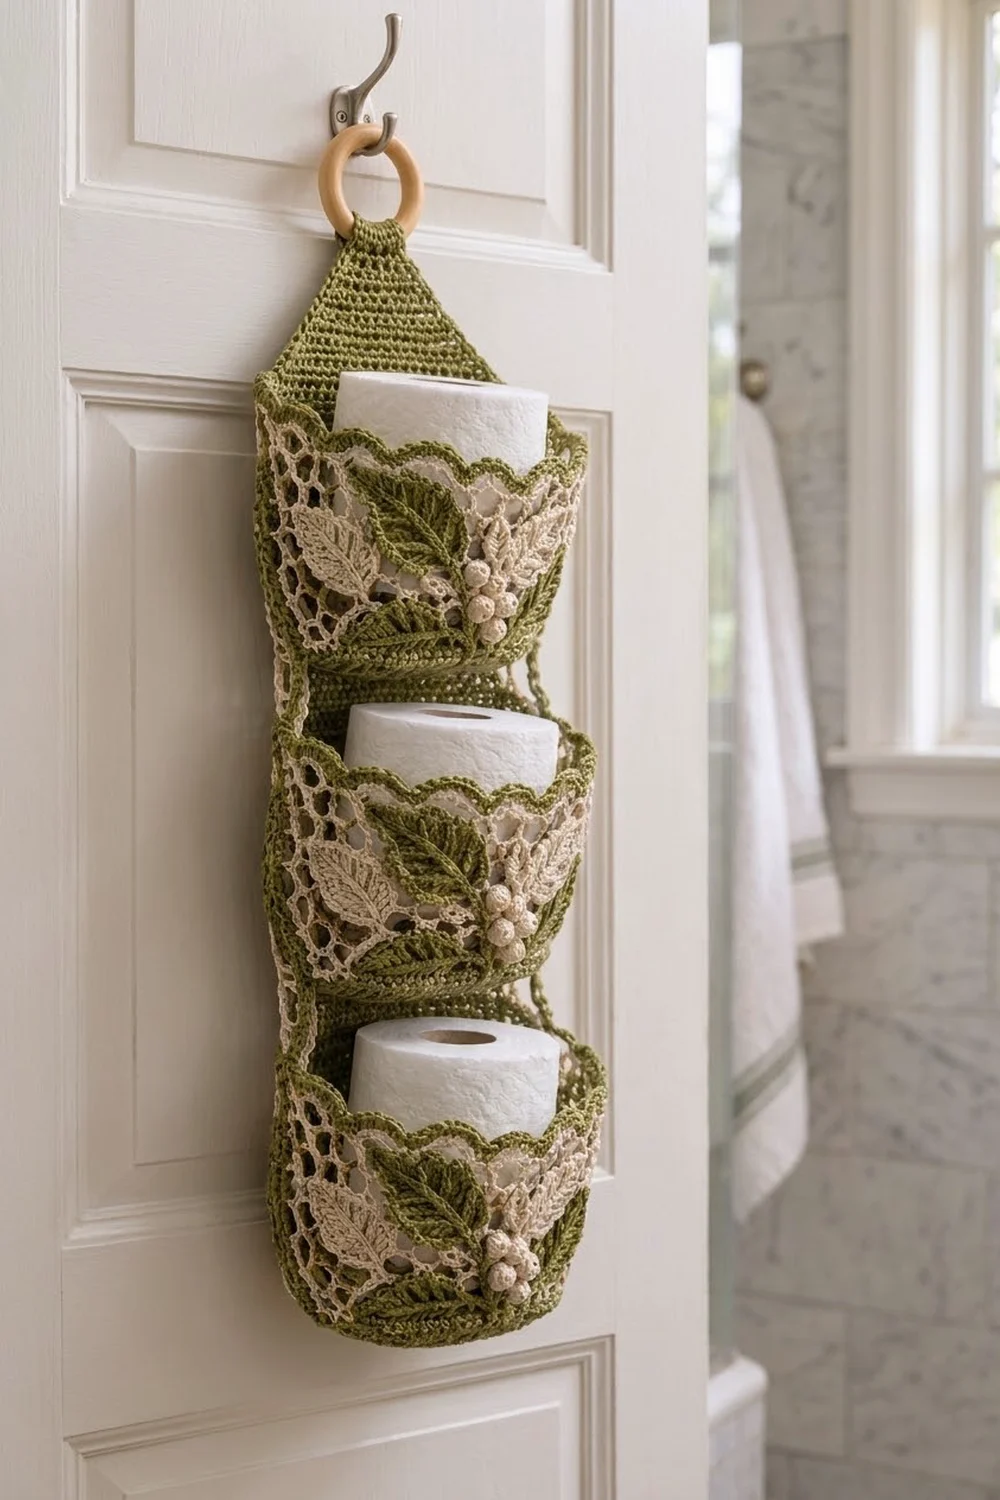
This hanging holder stores three spare rolls in a narrow strip of wall or door space. Each pocket has a solid olive base, open cream mesh walls, and a scalloped olive rim. Olive and cream leaves sit on the front with a small cluster of cream berries.
The colors are soft olive green and natural cream. The look is cottage style with a touch of Irish lace, and the mesh lets the white rolls show through. All instructions use US crochet terms.
The finished holder is 7.4 in (18.8 cm) wide. It measures about 11.4 in (29.0 cm) from the bottom of the lowest pocket to the top of the folded tab, and the 2 in (5.1 cm) wooden ring hangs above that.
Each pocket is worked in the round from an oval base, so it needs no seams. You make three pockets, a triangular hanger, and the appliqués. Then you sew the leaves and berries on, stack the pockets, attach the hanger, and fold the tab around the ring.
Finished Size and Construction
- Finished size: 7.4 in (18.8 cm) wide x about 11.4 in (29.0 cm) tall, plus the ring
- Skill level: Intermediate
- Terminology: US
- Yarn weight: DK / light worsted (3) cotton
- Hook: 4.0 mm (G-6)
- Number of pieces: 3 pockets, 1 hanger, 6 large leaves, 6 small leaves, 15 berries
- Layout: 1 column of 3 pockets, with the hanger on top
- Pocket size: 7.4 in (18.8 cm) long x 4.8 in (12.2 cm) deep x 4 in (10.2 cm) tall
- Pocket height before the scalloped rim: 3.5 in (8.9 cm)
- Rim (border) depth: 0.5 in (1.3 cm)
Materials
Use a smooth mercerized or matte cotton. Cotton keeps the mesh crisp and holds the pocket’s shape under the weight of a roll. Avoid acrylic, which stretches over time.
- Olive green: 175 g / about 400 m (437 yd)
- Cream: 100 g / about 230 m (252 yd)
These amounts assume about 115 m per 50 g and include a margin of roughly 15%.
Tools:
– 4.0 mm (G-6) crochet hook
– One 2 in (5.1 cm) wooden ring
– Tapestry needle
– 8 stitch markers
– Scissors
– Rust-proof pins and a blocking mat
– Spray bottle
Abbreviations (US Terms)
- ch – chain
- sl st – slip stitch
- sc – single crochet
- hdc – half double crochet
- dc – double crochet
- tr – treble crochet
- sc2tog – single crochet 2 together
- BLO – back loop only
- sk – skip
- sp – space
- st(s) – stitch(es)
Special stitch – Scallop: Work 5 dc in the same stitch.
Gauge and Checkpoints
Gauge: 18 sc and 20 rnds = 4 in (10.2 cm). One mesh round is about 0.5 in (1.3 cm) tall.
Make one complete pocket before you start the others. Then check these measurements:
- After Rnd 6: the base is about 5.1 x 2.4 in (13.0 x 6.1 cm)
- After Rnd 12: the base is 7.4 x 4.8 in (18.8 x 12.2 cm)
- After Rnd 20: the wall is 3.1 in (7.9 cm) tall, measured from the base edge
- After Rnd 22: the wall is 3.5 in (8.9 cm) tall
- After Rnd 23: the wall is 4 in (10.2 cm) tall
If the piece is too big, go down 0.5 mm in hook size. If it’s too small, go up 0.5 mm. If only the mesh is too tall, chain 3 instead of 4 in Rnds 17–20.
Pocket (make 3)
Each round starts at one narrow end of the oval. That means sts 1–46 of Rnds 12–22 make up the back half of the pocket. Join each round with a sl st to the first st, and don’t turn.
Base (olive)
Ch 13.
Rnd 1: Sc in 2nd ch from hook, sc in next 10 ch, 3 sc in last ch. Working along the opposite side of the chain, sc in next 10 ch, 2 sc in the same ch as the first sc. Join. (26 sts)
Rnd 2: Ch 1, 2 sc in first st, sc in next 10, 2 sc in each of next 3, sc in next 10, 2 sc in each of last 2. (32 sts)
Rnds 3–12: Ch 1. Sc around, adding 3 evenly spaced increases at each curved end of the oval and keeping the increases stacked above those from the round below. Each round has 6 more sts than the last:
- Rnd 3: 38
- Rnd 4: 44
- Rnd 5: 50
- Rnd 6: 56
- Rnd 7: 62
- Rnd 8: 68
- Rnd 9: 74
- Rnd 10: 80
- Rnd 11: 86
- Rnd 12: 92
The base should lie flat. If it ruffles, offset each round’s increases by one stitch.
Lower Band (olive)
Rnd 13: Ch 1, sc in BLO of each st around. This turns the edge up into the wall. (92 sts)
Rnds 14–15: Ch 1, sc in each st around. (92 sts) Fasten off.
Mesh Wall (cream)
Rnd 16: Join cream in any st. Ch 1, sc in the same st, ch 3, sk 1, sc in next st, and repeat around. End with ch 3, sk 1, and join to the first sc. (46 ch-3 sps)
Rnds 17–20: Sl st into the first sp. Ch 1, sc in the same sp, ch 4, sc in next sp, and repeat around. End with ch 4 and join. (46 ch-4 loops) Fasten off after Rnd 20.
Because each sc sits in the center of a loop from the round below, the mesh forms open diamonds that look like honeycomb.
Upper Band (olive)
Rnd 21 (conversion): Join olive in any loop. Ch 1, work 2 sc in each ch-4 loop around. (46 loops x 2 sc = 92 sts) Join.
Rnd 22: Ch 1, sc in each st around. (92 sts) Join, but don’t fasten off. The scalloped rim is worked from here in the Border section.
Leaves and Berries
Large Leaf (olive, make 6)
Ch 13.
Rnd 1: Sc in 2nd ch from hook, hdc in next ch, dc in next 2, tr in next 4, dc in next 2, hdc in next. In the last ch, work (sc, ch 2, sc). Working along the other side of the chain, hdc in next ch, dc in next 2, tr in next 4, dc in next 2, hdc in next, sc in the last ch. Join. (24 sts + 1 ch-2 tip)
Rnd 2: Ch 1, sc in BLO of each st around. At the tip, work (sc, ch 2, sc) in the ch-2 sp. (24 sts + 2 extra sc = 26 sc, plus the ch-2 tip)
The leftover front loops make a ridged outline, and the tall center stitches form a raised vein. The leaf is about 3 in (7.6 cm) long.
Small Leaf (cream, make 6)
Ch 9.
Rnd 1: Sc in 2nd ch from hook, hdc in next ch, dc in next 4, hdc in next. In the last ch, work (sc, ch 2, sc). Working along the other side, hdc in next ch, dc in next 4, hdc in next, sc in the last ch. Join. (16 sts + 1 ch-2 tip)
The small leaf is about 2 in (5.1 cm) long.
Berry (cream, make 15)
Rnd 1: Start with a magic ring and work 6 sc into it. (6 sts)
Rnd 2: 2 sc in each st. (12 sts)
Rnd 3: Sc in each st. (12 sts)
Rnd 4: Sc2tog 6 times. (6 sts)
Push the yarn tail inside as stuffing and close the ring. Each berry is about 0.6 in (1.5 cm) across.
Make All Pieces
- Olive: 3 pockets (base and bands), 1 hanger, 6 large leaves
- Cream: 3 pocket mesh walls, 6 small leaves, 15 berries
Per pocket, sew on 2 large leaves, 2 small leaves, and 5 berries.
        [ HANGER + RING ]
     [ POCKET 1 – 2L 2S 5B ]
     [ POCKET 2 – 2L 2S 5B ]
     [ POCKET 3 – 2L 2S 5B ]
Hanger (olive, make 1)
Ch 34.
Row 1: Sc in 2nd ch from hook and in each ch across. Turn. (33 sts)
Row 2 (decrease): Ch 1, sc2tog, sc to the last 2 sts, sc2tog. Turn. (31 sts)
Row 3: Ch 1, sc across. Turn. (31 sts)
Rows 4–9: Repeat Rows 2–3 three times.
- Row 4: 29
- Row 5: 29
- Row 6: 27
- Row 7: 27
- Row 8: 25
- Row 9: 25
Rows 10–20: Repeat Row 2 on every row.
- Row 10: 23
- Row 11: 21
- Row 12: 19
- Row 13: 17
- Row 14: 15
- Row 15: 13
- Row 16: 11
- Row 17: 9
- Row 18: 7
- Row 19: 5
- Row 20: 3
The triangle should be 7.3 in (18.5 cm) wide at the base and 4 in (10.2 cm) tall.
Rows 21–30 (tab): Ch 1, sc in each of 3 sts. Turn. (3 sts)
The tab is 2 in (5.1 cm) long and about 0.7 in (1.8 cm) wide. Fasten off, leaving a long tail.
Joining
Appliqué first. Pin 2 large leaves in a V shape on the front of each pocket, centered over sts 47–92. Tuck 2 small cream leaves behind them so their tips show. Pin 5 berries in a cluster where the leaf bases meet.
Sew each piece to the mesh along its outer edge with matching yarn. Catch the cross-points of the mesh, not the open holes.
Mark the back. On every pocket, place markers in sts 7 and 39 of Rnds 15 and 22. The 33 sts between and including the markers form the flat center of the back.
Pocket to pocket. Put Pocket 2 behind Pocket 1 so that the back of Pocket 2’s Rnd 22 lines up with the back of Pocket 1’s Rnd 15. Whipstitch with olive, matching stitches one to one: sts 7–39 to sts 7–39, which is 33 stitches to 33. Join Pocket 3 to Pocket 2 the same way.
Hanger to pocket. Line up the 33 sts of hanger Row 1 behind sts 7–39 of Pocket 1’s Rnd 15. Whipstitch them one to one.
Tension. Pull each stitch snug, but don’t pinch the fabric. The seam has to carry a roll without puckering the wall.
Size checkpoint. The bottom of each pocket should sit 2.9 in (7.4 cm) below the bottom of the pocket above it. The stack of three pockets should measure 9.8 in (24.9 cm) tall.
Border
Border gauge: One scallop takes up 4 sts, or about 0.9 in (2.3 cm), and stands 0.5 in (1.3 cm) tall.
Pocket rim, Rnd 23 (olive): This round continues from Rnd 22 on each pocket. Ch 1, sc in the first st, sk 1, Scallop in next st, sk 1, sc in next st. Repeat around, ending with sk 1, Scallop, sk 1, and join to the first sc. (23 scallops; 23 sc + 115 dc = 138 sts)
Fasten off and weave in the ends.
Why the math works: Rnd 22 has 92 sts, and each repeat uses 4 sts, so 92 ÷ 4 = 23 repeats with nothing left over. The 33-st back seam sits in Rnd 22 below the rim, so the scallops stay free.
Hanger edging (olive): With the right side facing, join olive at the bottom right corner. Work 1 sc in each row-end up the slanted side, for 20 sc. Skip the tab, then work 20 sc down the other side. (40 sc)
Fasten off. Wrap the tab around the wooden ring to the back and sew it down to Row 20.
Final Blocking
- Lightly mist the whole holder until it is damp, but not wet.
- Stuff each pocket with a toilet roll wrapped in a plastic bag.
- Pin the scallops so they stand up evenly.
- Lay the hanger flat and pin it to a 7.3 x 4 in (18.5 x 10.2 cm) triangle.
- Shape the leaves with your fingers so the tips curl slightly outward.
- Let everything dry completely, then remove the rolls and bags.
Final Quality-Control Checklist
- Each pocket base has 92 sts and lies flat
- Each mesh wall has 46 loops in every round
- Each rim has 23 scallops
- All three pockets are 7.4 in (18.8 cm) wide
- Every back seam joins exactly 33 sts to 33
- Appliqués are centered on the front, and all ends are woven in
- The holder hangs straight from the ring
Troubleshooting
- The base ruffles: You have too many increases. Check each round against the counts above.
- The base cups: You have too few increases, or your tension is tight. Go up a hook size for the base.
- The mesh slants: Make sure you work into the center of each loop, not into a stitch.
- A pocket sags under the roll: Re-sew the back seam with tighter stitches, or use a smaller hook for Rnds 21–22.
- The scallops come out uneven: Rnd 22 isn’t 92 sts. Recount and fix it before you start the rim.
Care
Hand wash the holder in cool water and lay it flat to dry, reshaping the pockets around a roll. Don’t put it in the dryer.
Final Notes
Every measurement in this pattern follows from the first: a gauge of 18 sc per 4 in (10.2 cm) gives a 92-st base that is 7.4 in (18.8 cm) long. That base supports 46 mesh loops, which convert back to 92 sts, which divide into exactly 23 scallops. The 33-st back seams match the hanger’s 33-st base, so the whole holder hangs straight.
Happy crocheting!