

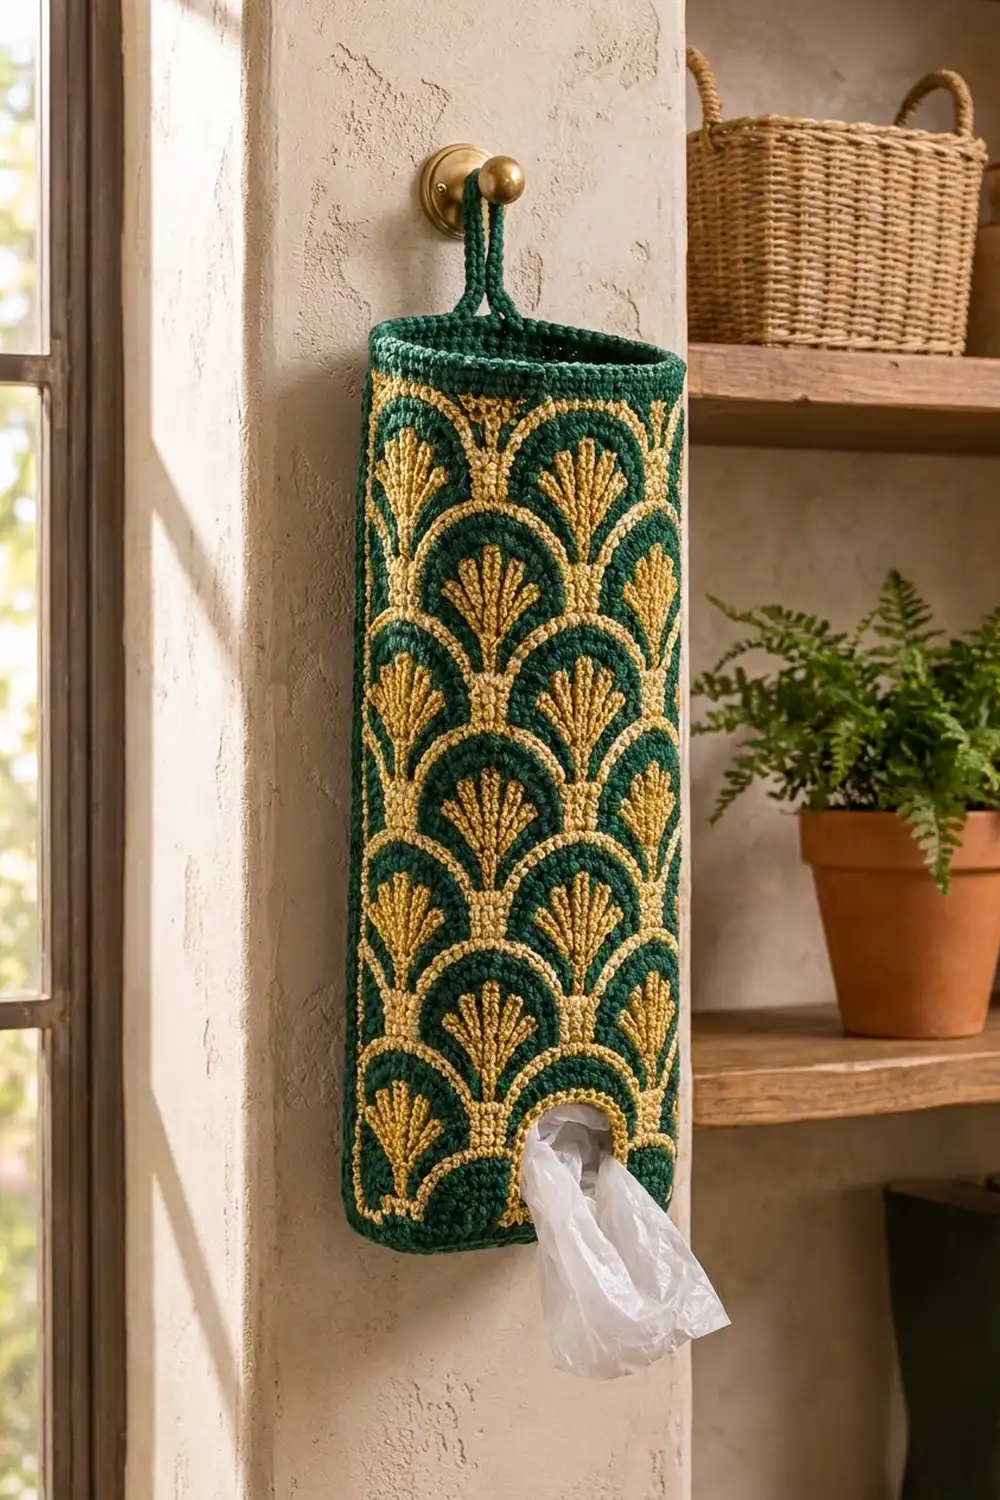
This hanging bag holder brings a bit of Art Deco glamour to a kitchen or utility room. Staggered green arches, each filled with a gold fan and topped with a gold outline, run the full length of a slim tube. You pull bags out through a small arched opening near the bottom and stuff new ones in through the open top.
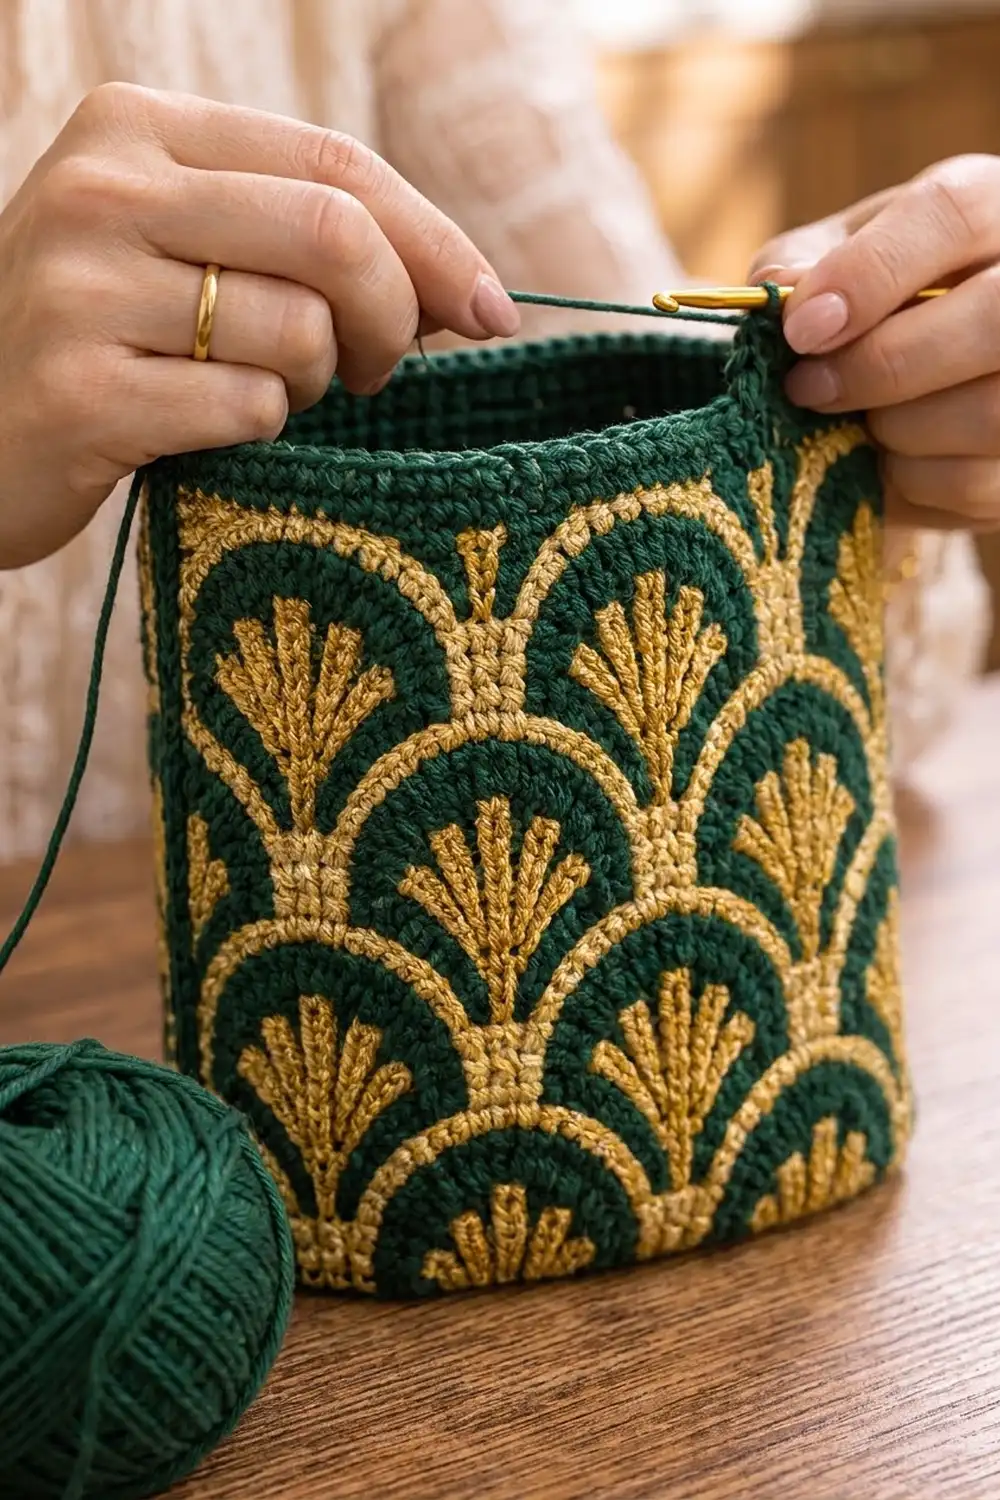
The sample is emerald green and golden yellow, and the design looks just as good in navy and cream. It is worked entirely in tapestry single crochet, so the fabric is dense and firm. It holds its shape on a hook with no lining.
The pattern uses US crochet terms. The finished holder is about 7 in (17.8 cm) wide laid flat and 14 in (35.6 cm) tall. The loop adds about 3 in (7.6 cm), for a total hanging length of about 17 in (43.2 cm).
It is made in one piece. You crochet an oval base, then a back-loop round turns the work up into the wall, and the fan pattern is worked in rounds. For a short stretch you work back and forth in rows to leave the opening, then close it with a chain. To finish, you add a gold edging around the opening, a striped top rim and the loop.
Finished Size and Construction
- Finished size: about 7 in (17.8 cm) wide flat × 14 in (35.6 cm) tall, plus a 3 in (7.6 cm) loop
- Skill level: Intermediate (tapestry colorwork)
- Terminology: US crochet terms
- Yarn weight: Worsted (#4) cotton or cotton blend
- Hook: 4.0 mm (G-6)
- Number of pieces: 1
- Layout: one tube with an oval base; eight fan columns around; opening at front center; loop at back center
- Piece size: 64 sts around, about 14.25 in (36.2 cm) circumference
- Size before border: about 13.25 in (33.7 cm) tall after Rnd 69
- Border depth: about 0.85 in (2.2 cm) top rim, plus a 1-round gold edging around the opening
Materials
Choose a smooth, firm worsted cotton or cotton blend. Cotton keeps the fan rays crisp and stops the tube from sagging when it’s full. Avoid fuzzy or stretchy yarns.
- Green (G): 120 g, about 204 m
- Gold (Y): 90 g, about 153 m
These amounts assume yarn of about 170 m per 100 g. In tapestry crochet both colors run through every stitch, so each one uses more yarn than its share of the design suggests. The quantities include a margin of roughly 15%.
Tools:
– 4.0 mm (G-6) crochet hook
– 3 stitch markers
– Tapestry needle
– Scissors
– Tape measure
– Optional: a 2-liter bottle or a rolled towel for blocking
Abbreviations (US Terms)
- ch – chain
- sc – single crochet
- sc2tog – single crochet 2 together
- sl st – slip stitch
- st(s) – stitch(es)
- rnd(s) – round(s)
- tbl – through the back loop only
- G / Y – green / gold
- RS / WS – right side / wrong side
- col – column of an 8-st repeat
Special stitch – tapestry sc: Work a normal sc, laying the unused color along the tops of the stitches below so it is wrapped inside the new stitch. To change color, work the last yarn-over of the stitch before the change with the new color. Always carry the unused strand, and never leave floats.
Reading color rows: “3G, 2Y, 3G” means 3 sc in green, 2 in gold and 3 in green, for 8 sts in total. Every repeat row reads the same forward and backward, so the opening rows are worked the same way on RS and WS rows.
Gauge and Checkpoints
Gauge: 18 sts and 19 rnds = 4 in (10.2 cm) in tapestry sc.
Use the base as your test piece. Work Rnds 1–6, lay it flat and measure. Tapestry sc often comes out tighter than plain sc, so measure again once the pattern is established.
Checkpoints:
– After Rnd 6 (base): about 5.5 × 2.5 in (14.0 × 6.4 cm), 64 sts
– After Rnd 20: wall about 3 in (7.6 cm) tall; opening about 1.75 in (4.4 cm) wide × 2.1 in (5.3 cm) tall
– Width at any round: about 7 in (17.8 cm) flat
– After Rnd 45: wall about 8.25 in (21.0 cm) tall
– After Rnd 69: wall about 13.25 in (33.7 cm) tall
– Finished: about 14 in (35.6 cm) tall
Too big? Go down 0.5 mm in hook size. Too small? Go up 0.5 mm. Never change the stitch count, because 64 sts is exactly eight 8-st repeats.
Pattern
Oval Base (G only)
Join each round with a sl st to the first sc. The ch 1 at the start of a round never counts as a stitch.
Rnd 1: Ch 17. 2 sc in 2nd ch from hook, sc in next 14 ch, 3 sc in last ch. Working along the opposite side of the chain, sc in next 14 ch, 1 sc in the same ch as the first 2 sc. Join. (34 sts)
Rnd 2: Ch 1, 2 sc in each of next 2 sts, sc in next 14, 2 sc in each of next 3, sc in next 14, 2 sc in last st. Join. (40 sts)
Rnd 3: Ch 1, [sc in next, 2 sc in next] 2 times, sc in next 14, [sc in next, 2 sc in next] 3 times, sc in next 14, sc in next, 2 sc in last. Join. (46 sts)
Rnd 4: Ch 1, [sc in next 2, 2 sc in next] 2 times, sc in next 14, [sc in next 2, 2 sc in next] 3 times, sc in next 14, sc in next 2, 2 sc in last. Join. (52 sts)
Rnd 5: Ch 1, [sc in next 3, 2 sc in next] 2 times, sc in next 14, [sc in next 3, 2 sc in next] 3 times, sc in next 14, sc in next 3, 2 sc in last. Join. (58 sts)
Rnd 6: Ch 1, [sc in next 4, 2 sc in next] 2 times, sc in next 14, [sc in next 4, 2 sc in next] 3 times, sc in next 14, sc in next 4, 2 sc in last. Join. (64 sts)
Each curved end gains 3 sts per round, about the rate of a flat circle, so the base lies flat. Rnd 6 has two straight sides of 14 sts and two curved ends of 18 sts (14 + 14 + 18 + 18 = 64).
Wall Base
Rnd 7: Ch 1, sc tbl in each st with G. Join. (64 sts) This round makes the fold where the wall turns up.
Rnd 8: Ch 1, sc in each st with G, carrying Y from now on. Join. (64 sts)
Rnd 9: Ch 1, sc in each st with Y, carrying G. Join. (64 sts) This is the gold stripe along the bottom.
Fasten off both colors. Place markers in sts 16 and 23 of Rnd 9. Sts 16–23 are the center 8 of the first straight side (sts 13–26), which makes this side the front. They form the bottom of the opening.
Fan Repeat (8 sts × 12 rnds)
Tier A (fan centered on cols 4–5)
– A1: 3G, 2Y, 3G (stem)
– A2: 2G, 4Y, 2G (fan base)
– A3: 1G, 1Y, 1G, 2Y, 1G, 1Y, 1G (rays)
– A4: 1Y, 1G, 1Y, 2G, 1Y, 1G, 1Y (ray tips)
– A5: 8G (arch crown)
– A6: 1G, 6Y, 1G (gold outline)
Tier B (Tier A shifted 4 sts)
– B1: 1Y, 6G, 1Y
– B2: 2Y, 4G, 2Y
– B3: 1Y, 1G, 1Y, 2G, 1Y, 1G, 1Y
– B4: 1G, 1Y, 1G, 2Y, 1G, 1Y, 1G
– B5: 8G
– B6: 3Y, 2G, 3Y
Each new stem grows out of the small green gap in the outline below it, so the tiers stack in an offset fish-scale layout.
Opening Rows (Rnds 10–19)
Sts 16–23 stay unworked. The rows cover the other 56 sts, which is exactly 7 repeats.
Rnd 10 (Row 1, RS): Join G and Y in st 24 of Rnd 9. Ch 1, work A1 7 times, ending in st 15. (56 sts)
Rnds 11–19 (Rows 2–10): Ch 1, turn, and work A2, A3, A4, A5, A6, B1, B2, B3 and B4 in order, each one 7 times across. (56 sts each)
Row 10 is a WS row, so it ends at the edge where Row 1 began.
Close the Opening
Rnd 20 (B5): Ch 1, turn so the RS faces you. Sc in G across the 56 sts, then ch 8 in G across the top of the opening. Do not join. (56 sc + 8 ch = 64 sts)
From this point, work in a continuous spiral and move your marker up each round.
Rnd 21 (B6): Work B6 7 times across the sc, then work B6 once into the 8 ch. (64 sts)
Main Body
Rnds 22–69: Work A1 through B6 (8 times around in each round) 4 more times. (64 sts each round)
Rnds 10–69 add up to five full 12-round repeats (60 rnds), ending on a B6 round.
Border
The border has two parts: the top rim and the opening edging. Use the same gauge as the body, 18 sts and 19 rnds = 4 in (10.2 cm).
Top Rim
Rnd 70: Sc in each st with G. (64 sts)
Rnd 71: Sc in each st with Y. (64 sts)
Rnds 72–73: Sc in each st with G. Cut Y after Rnd 72. (64 sts each)
Rnd 74: Sl st loosely in each st with G. (64 sl sts) Sl st in 2 more sts to smooth out the spiral step, then fasten off.
Laid flat, the rim has 32 sts along the front and 32 along the back (64 ÷ 2). Since it keeps all 64 sts, it stays exactly as wide as the body without flaring or pulling in. The four sc rounds measure about 0.85 in (2.2 cm).
Opening Edging
With the RS facing, join Y at the bottom right corner of the opening.
Edging Rnd: Sc in each of the 8 unworked sts of Rnd 9. Work 9 sc up the side, 1 in each row end for Rows 1–9. Sc2tog over the Row 10 end and the first ch. Sc in each of the next 6 ch. Sc2tog over the last ch and the Row 10 end on the other side. Work 9 sc down the side. Join. (34 sts)
Here’s why the count works: 8 bottom + 10 + 10 side row ends + 8 top ch gives 36 positions. The two corner sc2tog each combine 2 positions, so 36 − 2 = 34. Those corner decreases round the top into an arch.
Hanging Loop
Count the sts of Rnd 74 starting from the first st past the opening. Back center falls between sts 28 and 29.
Join G with a sl st in st 26. Ch 30, then sl st in st 31. Turn, work 42 sc into the ch-30 loop, and sl st in st 26. Fasten off. The loop is anchored over 6 centered sts, so the holder hangs straight.
Final Blocking
- Weave in all ends on the WS, through stitches of the matching color.
- Spray the holder evenly until it is damp.
- Slide a 2-liter bottle or a rolled towel inside.
- Shape the base into an oval about 5.5 × 2.5 in (14.0 × 6.4 cm).
- Smooth the wall to about 14 in (35.6 cm) tall.
- Ease the opening into an arch about 1.75 in (4.4 cm) wide.
- Let it dry completely, then take out the form.
- Hang it for a day so the wall settles.
Final Quality-Control Checklist
- Base is flat and oval
- Every round has 64 sts, and the fans line up in 8 columns
- Each fan has a stem, a fan base, rays and a gold outline
- Alternate tiers sit between the fans below
- Opening is centered on the front and arched at the top
- Edging has 34 sts and lies flat
- Rim is level, with a single gold stripe
- Loop is centered at the back and secure
Troubleshooting
- Fans lean: sc in a spiral naturally leans. Keep your tension even and block over a form.
- Carried yarn shows on the RS: keep the carried strand snug along the stitch tops.
- Opening is off center: check that sts 16–23 were left unworked and that every row has 56 sts.
- Base cups: use a larger hook for Rnds 1–6.
- Base ruffles: use a smaller hook for Rnds 1–6.
- Rim flares: work Rnd 74 more firmly.
- Loop stretches: work a second round of sc around it.
Care
Hand wash in cool water with mild soap. Press out the water in a towel and dry the holder over a form, without wringing or tumble drying.
Final Notes
Everything depends on one measurement chain. At 18 sts per 4 in (10.2 cm), the 64-st base turns into a 14.25 in (36.2 cm) tube that lies 7 in (17.8 cm) wide when flat and holds eight 8-st fan columns. At 19 rnds per 4 in (10.2 cm), each 12-round repeat adds about 2.5 in (6.4 cm). Five repeats plus the base rounds give a 13.25 in (33.7 cm) wall, and the 0.85 in (2.2 cm) rim brings it to 14 in (35.6 cm). If you check gauge at the base and again after Rnd 20, the rest of the measurements will follow.
Happy crocheting!