

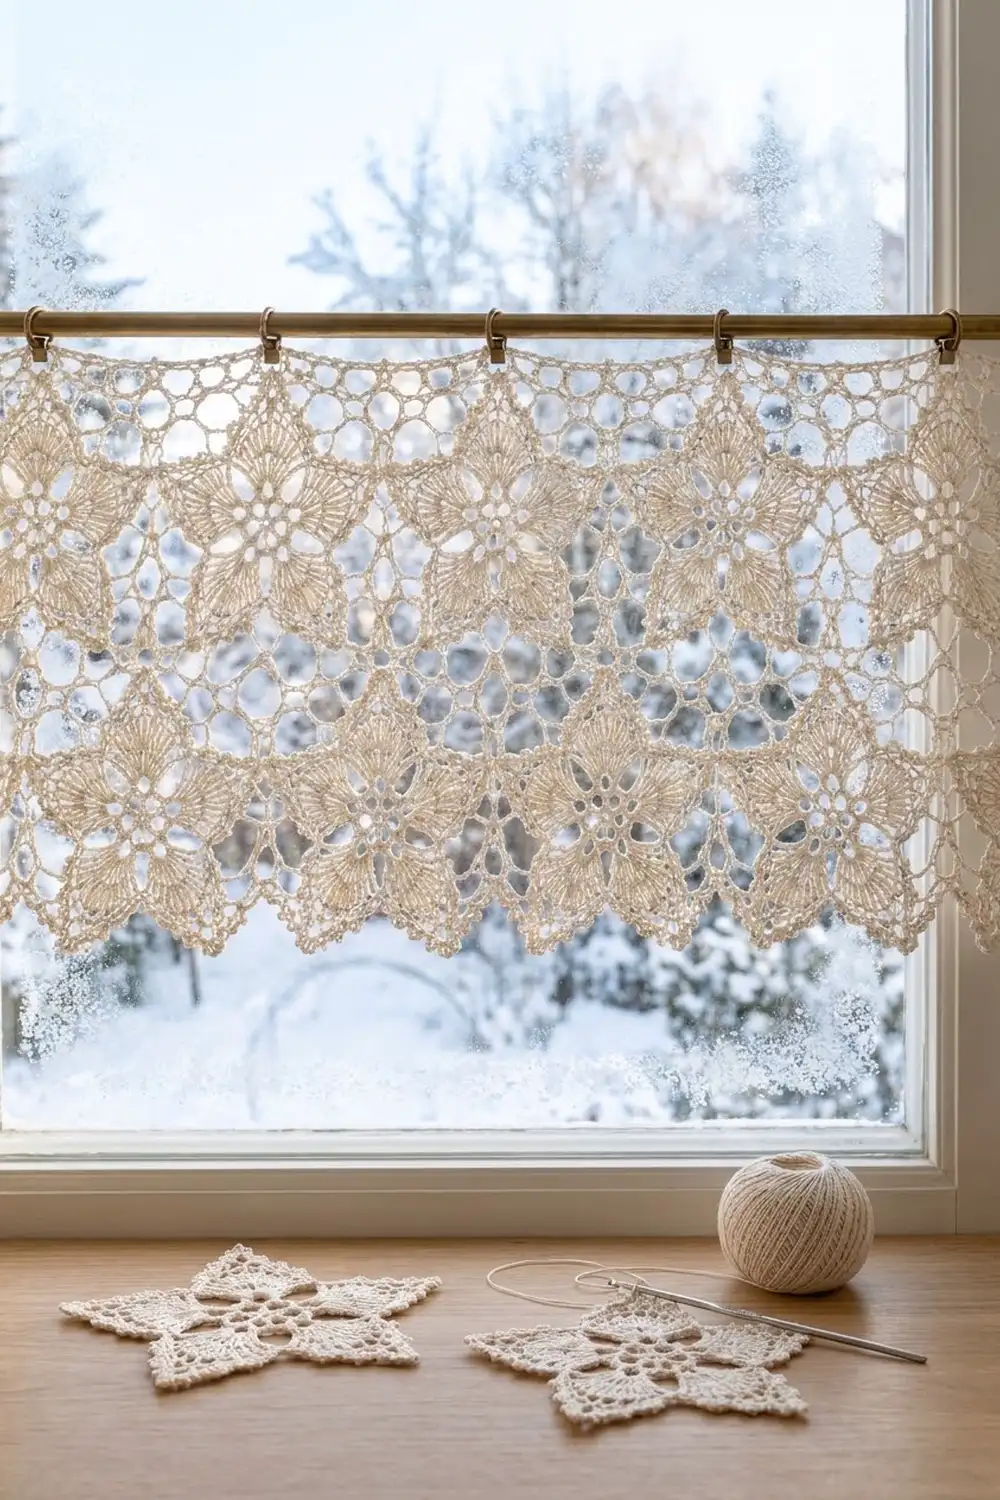
This café curtain is made from ten lace stars joined in two rows. The lace lets winter light through. Each star has a small eyelet center, five rounded petals, open fans in the arms and a beaded picot edge that sharpens every point. Chain mesh fills the spaces between the stars and turns into a neat straight header at the top.
The whole curtain uses one color: cream size 10 cotton thread. It looks soft and old-fashioned, works well with wood, brass and greenery, and fits a kitchen window from late autumn through the end of winter.
This pattern uses US crochet terms. After blocking, the curtain measures 31.25 in (79.4 cm) wide and 11.25 in (28.6 cm) tall. It hangs from clip rings, so you don’t need a rod pocket.
You make the first star, then join the other nine as you go in their last round. Next you add short chain bars between the rows and fill the top gaps with mesh. Finally you work a 4-row header straight across the top.
Finished Size and Construction
- Finished size: 31.25 in (79.4 cm) wide × 11.25 in (28.6 cm) tall
- Skill level: Intermediate
- Terminology: US
- Yarn weight: Lace (0), size 10 crochet cotton thread
- Hook: 1.75 mm (US steel 6)
- Number of pieces: 10 star motifs
- Layout: 2 rows × 5 stars
- Piece size: 6.25 in (15.9 cm) wide from side tip to side tip × 6 in (15.2 cm) tall
- Size before border: 31.25 in (79.4 cm) wide × 10.5 in (26.7 cm) tall
- Border depth: 0.75 in (1.9 cm) header band above the leveled top edge
Materials
Yarn: Use mercerized size 10 cotton thread. It blocks crisply and holds its points. Thread at about 400 m per 100 g works well. Avoid fuzzy or very soft thread, because the picots and mesh will blur.
- Cream/ivory: 110 g (about 440 m)
This amount includes a margin of about 20% for gauge swatches, joins and weaving in ends.
Tools:
- 1.75 mm (US steel 6) crochet hook
- Fine tapestry needle
- Small sharp scissors
- Rust-proof pins and a blocking board
- Spray starch or diluted fabric stiffener (optional)
- 9 clip curtain rings
- Measuring tape
Abbreviations (US Terms)
- ch – chain
- sl st – slip stitch
- sc – single crochet
- hdc – half double crochet
- dc – double crochet
- tr – treble crochet (yarn over twice)
- sp – space
- st(s) – stitch(es)
- RS / WS – right side / wrong side
- JAYGO – join-as-you-go
Special stitches
- Picot: Ch 3, sl st in the 3rd ch from the hook.
- Tip join: Where the pattern says ch 5 at a tip, work ch 2, sl st in the named loop or stitch of the neighboring star, then ch 2.
Gauge and Checkpoints
Gauge: 16 sc = 2 in (5.1 cm), which means 8 sc and about 8 ch per 1 in (2.5 cm).
Make one complete star before anything else and block it. That star is your real gauge swatch. Check it at these points:
- After Rnd 3 (petals): 1.75 in (4.4 cm) across
- After Rnd 6 (fans): 4 in (10.2 cm) across
- After Rnd 9, blocked: 6.25 in (15.9 cm) from side tip to side tip, 6 in (15.2 cm) tall
If the star is more than 0.25 in (0.6 cm) too big, change to a 1.5 mm hook. If it is more than 0.25 in (0.6 cm) too small, change to a 2 mm hook. Don’t change the stitch counts. The header depends on each star being exactly 6.25 in (15.9 cm) wide.
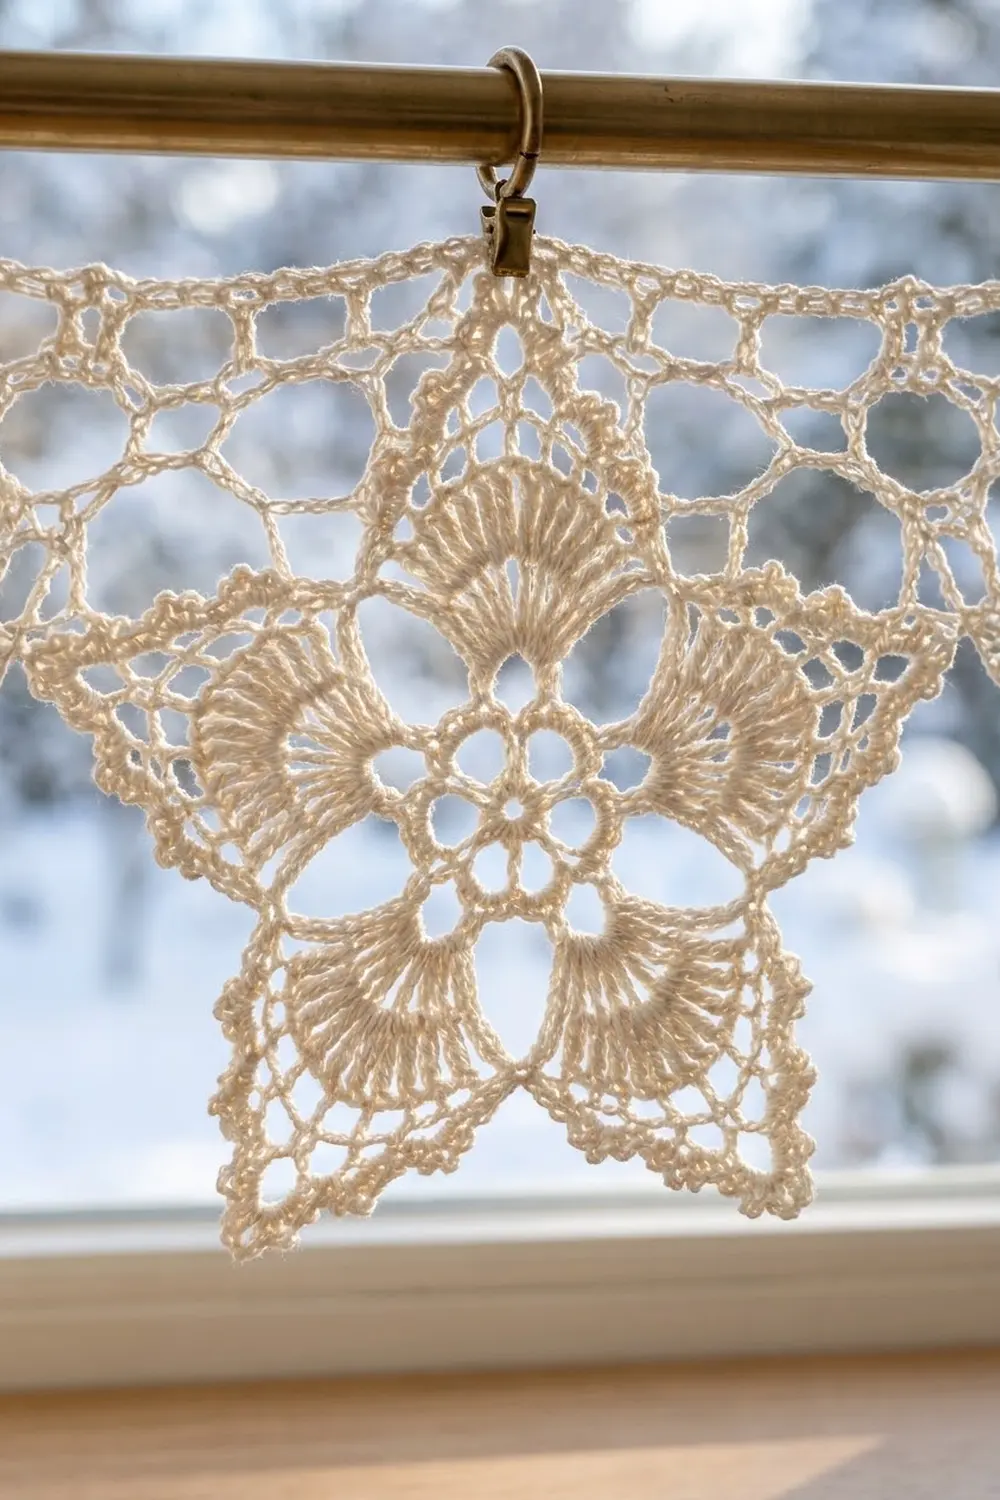
Star Motif
Ch 6 and sl st to the first ch to form a ring.
Rnd 1: Ch 5 (counts as dc + ch 2). [Dc in ring, ch 2] 9 times. Sl st in 3rd ch of the beginning ch-5.
(10 dc, 10 ch-2 sps: the eyelet ring.)
Rnd 2: Sl st into the first ch-2 sp. Ch 1, sc in same sp. [Ch 7, skip next ch-2 sp, sc in next ch-2 sp] 4 times. Ch 7, skip last ch-2 sp, sl st to first sc.
(5 sc, 5 ch-7 loops.)
Rnd 3 (petals): Sl st into the first loop. In each ch-7 loop work (sc, hdc, 7 dc, hdc, sc). Sl st to first sc.
(5 petals of 11 sts each = 55 sts.)
Rnd 4: Sl st in the next 5 sts to reach the center (4th) dc of the petal. Ch 1, sc in same st. [Ch 9, sc in center dc of next petal] 4 times. Ch 9, sl st to first sc.
(5 sc, 5 ch-9 loops.) Each loop sits between two petals and becomes the base of one arm.
Rnd 5 (fans): Ch 1, sc in first sc. [12 dc in next ch-9 loop, sc in next sc] 4 times. 12 dc in last loop, sl st to first sc.
(5 sc + 60 dc = 65 sts.) Each sc is a valley between arms.
Rnd 6 (open ribs): Ch 1. Sc in valley sc, ch 2, [tr in next dc, ch 1] 11 times, tr in next dc, ch 2. Repeat from * to * 4 more times. Sl st to first sc.
(Per arm: 1 sc, 12 tr, 11 ch-1 sps, 2 ch-2 sps. Total: 5 sc, 60 tr, 55 ch-1 sps, 10 ch-2 sps.)
Rnd 7 (start points): Ch 1. Sc in valley sc. Ch 4, skip the ch-2 sp and ch-1 sp 1, sc in ch-1 sp 2. Ch 4, sc in sp 4. Ch 4, (sc, ch 5, sc) in sp 6. Ch 4, sc in sp 8. Ch 4, sc in sp 10. Ch 4, skip sp 11 and the ch-2 sp. Repeat from * to * 4 more times. Sl st to first sc.
(Per arm: 7 sc, 6 ch-4 loops, 1 ch-5 tip loop. Total: 35 sc, 30 ch-4 loops, 5 ch-5 loops.)
Rnd 8 (lengthen points): Ch 1. Sc in valley sc. Ch 3, sc in next ch-4 loop. [Ch 4, sc in next ch-4 loop] 2 times. Ch 4, (sc, ch 7, sc) in ch-5 tip loop. [Ch 4, sc in next ch-4 loop] 3 times. Ch 3. Repeat from * to * 4 more times. Sl st to first sc.
(Per arm: 9 sc, 2 ch-3, 6 ch-4, 1 ch-7. Total: 45 sc, 10 ch-3, 30 ch-4, 5 ch-7.)
Rnd 9 (picot edge): Ch 1. Sc in valley sc. 3 sc in ch-3 sp. In each of the next 3 ch-4 loops work (2 sc, picot, 2 sc). In the ch-7 tip work (4 sc, ch 5, 4 sc). In each of the next 3 ch-4 loops work (2 sc, picot, 2 sc). 3 sc in ch-3 sp. Repeat from * to * 4 more times. Sl st to first sc and fasten off.
(Per arm: 39 sc, 6 picots, 1 ch-5 tip loop. Total: 195 sc, 30 picots, 5 tip loops.)
Picot names used later: on each edge of an arm, the picot nearest the valley is 3, the middle one is 2, and the one nearest the tip is 1.
Make All Pieces
Make 10 stars in cream. Make Star 1 complete, as written above. For Stars 2–10, work Rnds 1–8 as written and join them in Rnd 9 (see Joining).
Top row:     S1   S2   S3   S4   S5     (one point up)
Bottom row:  S6   S7   S8   S9   S10    (one point up, directly below)
Joining
Method: Use JAYGO tip joins in Rnd 9 only. Each join replaces the ch-5 of a tip loop with ch 2, sl st, ch 2.
Top row: Lay each star with one point up. The two side points face left and right.
- Stars 2–5: Join the left side tip to the right side tip loop of the star before it.
Bottom row: Each bottom star sits directly under a top star.
- Star 6: Join its top tip to the bottom valley sc of Star 1. That valley is the sc between Star 1’s two lower points.
- Stars 7–10: Join the top tip to the bottom valley sc of the star above it. Join the left side tip to the right side tip loop of the star to its left.
Tension: Keep the ch-2s loose and pull the sl st snug but not tight. A tight join makes the tip dimple.
Chain bars: Each lower point of a top-row star needs a bar to the nearest bottom-row side tip.
- Join the thread with a sl st in the tip loop of the lower point.
- Ch 12, then sl st in that bottom-row side tip. Where two bottom stars meet, work through the joined tip loops.
- Fasten off.
That gives 10 bars, each about 1.5 in (3.8 cm) long when stretched.
Size checkpoint: Pin the curtain flat. It should be 31.25 in (79.4 cm) wide (5 × 6.25 in) and 10.5 in (26.7 cm) tall from the top-row tips to the bottom-row tips.
Border (Top Header)
The border is only at the top. The bottom stays as free points.
Border gauge: 8 sc = 1 in (2.5 cm).
Step 1: Level the gaps. Between neighboring top-row tips, the edge drops about 2.25 in (5.7 cm) to the flat upper edges of the side arms. Fill each gap with 4 short rows of mesh.
Full gaps (4 gaps, between S1–S2, S2–S3, S3–S4 and S4–S5)
In each gap, A is the star on the left and B is the star on the right.
- Row 1: Sl st in picot 3 on the right edge of A’s top arm. [Ch 6, sc in next picot] across the arm edges: A’s picots 3, 2 and 1, then the joined side tip loops, then B’s picots 1, 2 and 3. Ch 6, sl st in picot 3 on the left edge of B’s top arm.
(7 sc, 8 ch-6 loops.) Ch 3, sl st in B’s picot 2. - Row 2: [Ch 6, sc in next loop] 8 times. Ch 6, sl st in A’s picot 2.
(8 sc, 9 loops.) Ch 3, sl st in A’s picot 1. - Row 3: [Ch 6, sc in next loop] 9 times. Ch 6, sl st in B’s picot 1.
(9 sc, 10 loops.) Ch 3, sl st in B’s top tip loop. - Row 4: [Ch 6, sc in next loop] 10 times. Ch 6, sl st in A’s top tip loop.
(10 sc, 11 loops.) Fasten off.
Half gaps (2, at the outer edges of S1 and S5)
- Row 1: Sl st in the outer side tip loop. [Ch 6, sc in next picot] working through picots 1, 2 and 3 on the arm edge. Ch 6, sl st in picot 3 of the top arm.
(3 sc, 4 loops.) Ch 3, sl st in picot 2. - Row 2: [Ch 6, sc in next loop] 4 times. Ch 3, tr in the side tip loop.
(4 sc, 4 loops + 1 ch-3 sp = 4½ loops.) - Row 3: Ch 1, sc in the tr. [Ch 6, sc in next ch-6 loop] 4 times. Ch 6, sl st in picot 1.
(5 sc, 5 loops.) Ch 3, sl st in the top tip loop. - Row 4: [Ch 6, sc in next loop] 5 times. Ch 3, tr in the last sc.
(5 loops + 1 ch-3 sp = 5½ loops.) Fasten off.
Work the S5 half gap as a mirror image with the same counts.
Step 2: Header band
- Row 1 (RS): Join at the left edge. Work 2 sc in the ch-3 sp and 4 sc in each of the 5 ch-6 loops (22 sc for the half gap). Then for each of S1–S5, work 6 sc in the top tip loop. Between neighboring tips, work 4 sc in each of the 11 loops of each full gap (44 sc). At the S5 half gap, work 4 sc in each of the 5 loops and 2 sc in the ch-3 sp (22 sc). (250 sc)
- Row 2: Ch 3 (counts as dc), turn. Dc in each st across. (250 dc)
- Row 3: Ch 3, turn. Dc in each st across. (250 dc)
- Row 4: Ch 1, turn. Sc in each st across. (250 sc) Fasten off.
Why the math works: Each star owns half the gap on each side of it plus its own tip: 22 + 6 + 22 = 50 sc. With five stars, 5 × 50 = 250 sc. At 8 sc per inch, 250 ÷ 8 = 31.25 in (79.4 cm), which is exactly the width of the joined stars. No stitches are added at the seams, so the header lies flat without ruffling or pulling in.
The header adds 0.75 in (1.9 cm). The finished height is 10.5 + 0.75 = 11.25 in (28.6 cm).
Final Blocking
- Weave in all ends along solid stitches, never through the chain loops.
- Soak the curtain in cool water for 10 minutes and press out the water in a towel.
- Pin the header straight first, at 31.25 in (79.4 cm).
- Pin every star tip and every bottom point to a sharp point.
- Pin out each picot on the bottom edges.
- Stretch the mesh and bars gently until the loops are open.
- Check that the height is 11.25 in (28.6 cm).
- Spray with starch if you like and let it dry completely before unpinning.
Final Quality-Control Checklist
- [ ] All 10 stars are 6.25 in (15.9 cm) wide
- [ ] Every Rnd 9 arm has 6 picots and a tip loop
- [ ] 8 side-tip joins, 5 top-tip-to-valley joins and 10 chain bars
- [ ] Full gaps end with 11 loops and half gaps with 5½
- [ ] Header Rows 1–4 each have 250 sts
- [ ] Width is 31.25 in (79.4 cm) and height is 11.25 in (28.6 cm)
- [ ] All ends are woven in invisibly
Troubleshooting
- The star cups: Your Rnd 4 or Rnd 7 chains are too tight. Loosen them or go up a hook size.
- The star ruffles: Your Rnd 6 trebles are too long. Tighten your yarn-overs.
- Points look blunt: Check that the ch-7 at the tip in Rnd 8 is there, and pin the points hard when blocking.
- The header waves: You have more than 250 sts. Count 50 per star.
- The header pulls in: Your sc are too tight. Work Row 1 with a 2 mm hook.
- The fillers sag: Pull the sl sts into the picots firmly.
Care
Hand wash in cool water with mild soap, roll it in a towel and block it flat to dry. Starch again after washing if you want crisp points.
Final Notes
Everything depends on one measurement chain. Each star is 6.25 in (15.9 cm) wide, so five stars make 31.25 in (79.4 cm). The stars in each column overlap tip to valley, so two rows are 10.5 in (26.7 cm) tall. Each star owns 50 header stitches, so the header has 250 stitches that match the width exactly. The header adds 0.75 in (1.9 cm), for a finished height of 11.25 in (28.6 cm). If the first star is right, the rest of the curtain will be right too.
Happy crocheting!