

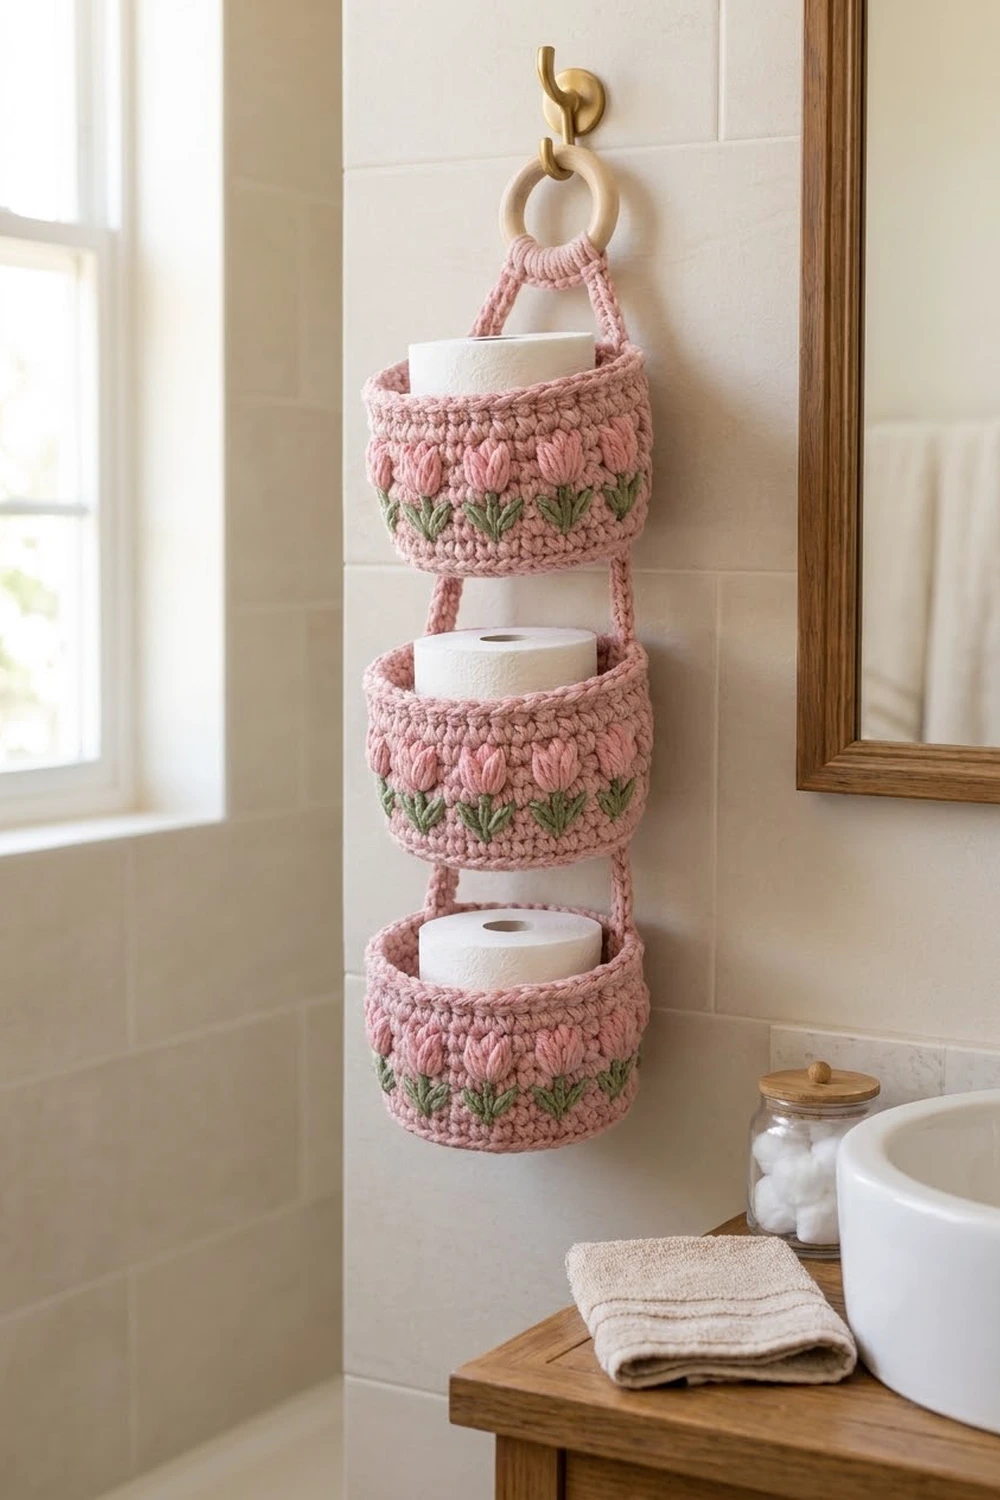
This hanging organizer has three oval baskets, one above the other, linked by short straps and hung from a natural wooden ring. Each basket holds one standard toilet roll, so spare rolls stay close at hand but off the floor.
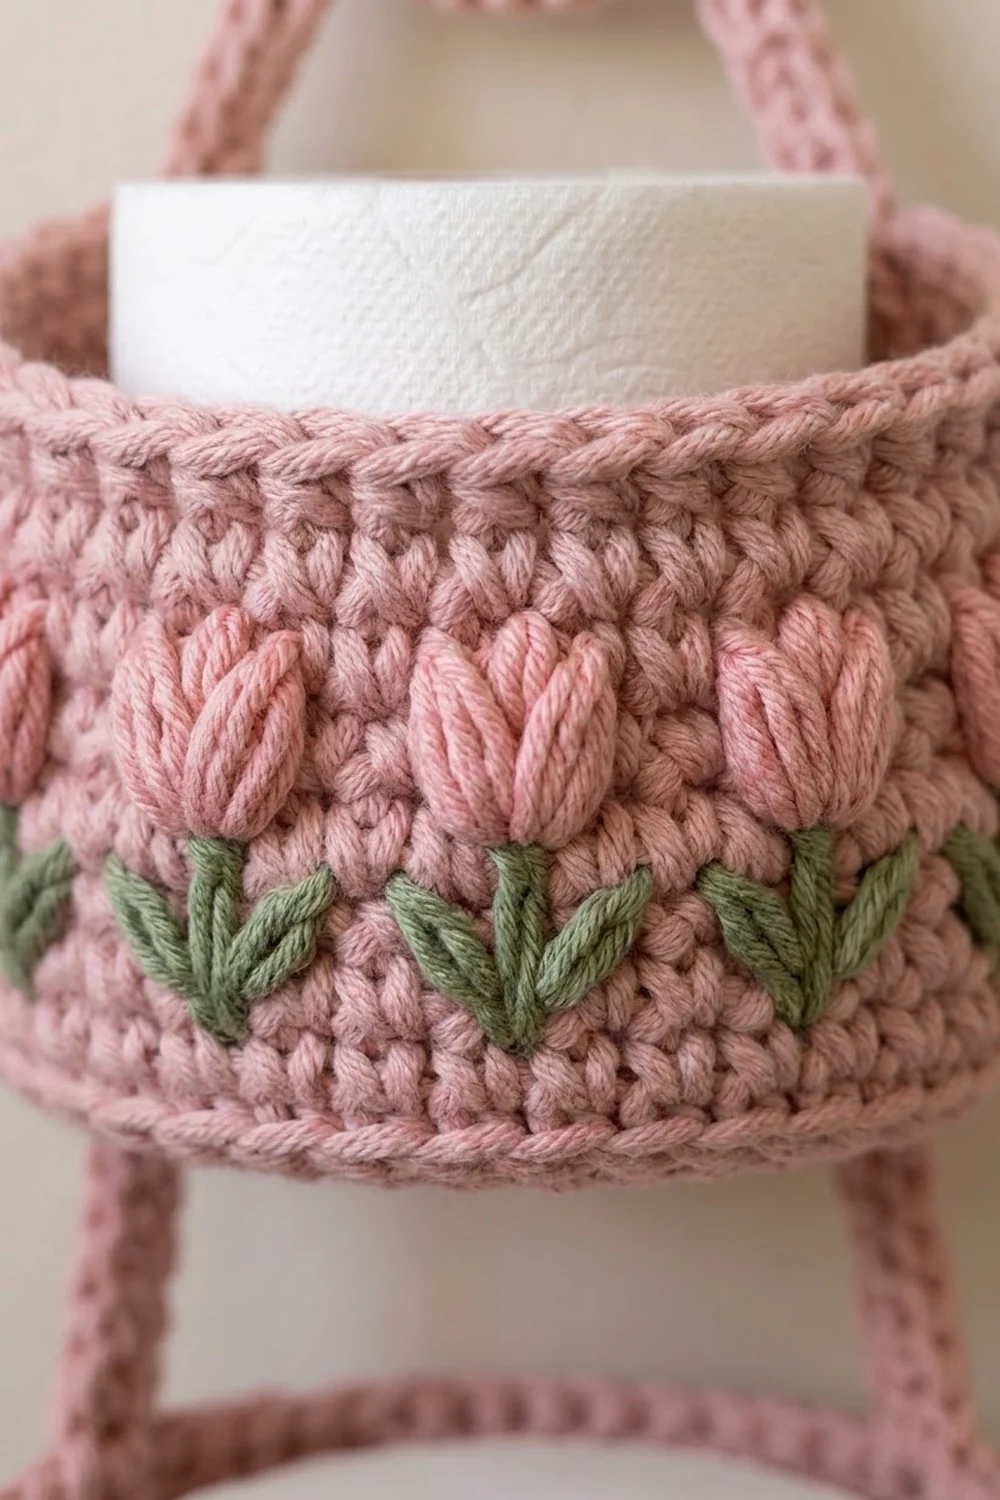
The main color is dusty rose. A band of raised tulip bobbles in lighter blush pink runs around each basket, and each tulip has a sage-green embroidered stem and two leaves. The look is soft and cottage-style. The rounded top edge gives every basket a neat, firm finish.
The pattern uses US crochet terms. The finished hanger is about 21.5 in (54.6 cm) long. Each basket is 6.25 in (15.9 cm) wide, 5 in (12.7 cm) deep and 3.5 in (8.9 cm) tall.
Each basket begins with an oval base in single crochet. Next comes a back-loop ridge, then straight sides with one turned bobble round that forms the tulips. You make six flat straps, sew them to the ends of the baskets, and cover the strap tops with a reverse single crochet rim. The stems and leaves are embroidered last.
Finished Size and Construction
- Finished size: about 21.5 in (54.6 cm) long, hanging
- Skill level: Intermediate
- Terminology: US crochet terms
- Yarn weight: Bulky (#5)
- Hook: 6.0 mm (J-10)
- Number of pieces: 9 (3 baskets, 4 connector straps, 2 hanger straps)
- Layout: 3 baskets in one column, joined by 2 straps between each pair, with 2 straps up to 1 ring
- Basket size: 6.25 in x 5 in (15.9 cm x 12.7 cm) base, 3.5 in (8.9 cm) tall
- Basket height before border: 3.25 in (8.3 cm)
- Border (rim) depth: 0.25 in (0.6 cm)
- Gap between baskets: 2 in (5.1 cm)
Materials
Pick a firm bulky yarn so the baskets hold their shape. A cotton-acrylic blend works well. It doesn’t split much, stands up to bathroom humidity and keeps the stitches crisp. These amounts are based on a yarn with about 120 m per 100 g.
- Main color (dusty rose): 200 g, about 240 m. Used for the baskets, straps and ring wrap.
- Tulip color (light blush pink): 25 g, about 30 m. Used for the bobbles.
- Leaf color (sage green): 15 g, about 18 m. Used for the stem and leaf embroidery.
All amounts include a margin of roughly 15–20 percent for gauge differences and swatching.
Tools:
- 6.0 mm (J-10) crochet hook
- 1 wooden ring, 3 in (7.6 cm) outside diameter
- Tapestry needle
- At least 4 locking stitch markers
- Measuring tape
- Sewing pins
- Scissors
Abbreviations (US Terms)
- ch – chain
- sl st – slip stitch
- sc – single crochet
- inc – 2 sc in the same stitch
- BLO – back loop only
- rev sc – reverse single crochet (crab stitch)
- st(s) – stitch(es)
- Rnd – round
- yo – yarn over
- RS / WS – right side / wrong side
Special stitch – bobble (tulip head): [Yo, insert hook in st, yo and pull up a loop, yo and draw through 2 loops] 5 times in the same st, then yo and draw through all 6 loops on the hook. Bobbles push out toward the side facing away from you. That is why the tulip round is worked with the WS facing you.
Reverse single crochet: Work from left to right. Insert the hook in the next st to the right, yo and pull up a loop, yo and draw through both loops.
Gauge and Checkpoints
Gauge: 12 sc and 13 rounds = 4 in (10.2 cm) in sc worked in the round.
Make one basket base first (Rnds 1–8) as your test piece before buying all your yarn.
- After Rnd 5: the oval measures about 4.5 in x 3 in (11.4 cm x 7.6 cm).
- After Rnd 8: the base measures 6.25 in x 5 in (15.9 cm x 12.7 cm). It should lie flat, without cupping or ruffling.
- After Rnd 12: the side measures 1.25 in (3.2 cm) from the ridge.
- After Rnd 18: the side measures 3.25 in (8.3 cm) from the ridge.
If the base is too small: change to a 6.5 mm hook. The base must be at least 4.75 in (12.1 cm) across the short side or the roll won’t fit.
If the base is too big or ruffled: change to a 5.5 mm hook.
Basket (Make 3)
Use the main color. Join each round with a sl st to the first sc. Ch 1 at the start of each round does not count as a stitch.
Rnd 1: Ch 7. Sc in the 2nd ch from the hook, sc in the next 4 ch, 3 sc in the last ch. Rotate and work along the other side of the foundation: sc in the next 4 ch, 2 sc in the last ch. Join. (14 sts)
Rnd 2: Ch 1. Inc in the first st, sc in the next 4 sts, [inc] 3 times, sc in the next 4 sts, [inc] 2 times. Join. (20 sts)
Rnd 3: Ch 1. Sc 1, inc, sc 4, [sc 1, inc] 3 times, sc 4, [sc 1, inc] 2 times. Join. (26 sts)
Rnd 4: Ch 1. Sc 2, inc, sc 4, [sc 2, inc] 3 times, sc 4, [sc 2, inc] 2 times. Join. (32 sts)
Rnd 5: Ch 1. Sc 3, inc, sc 4, [sc 3, inc] 3 times, sc 4, [sc 3, inc] 2 times. Join. (38 sts)
Rnd 6: Ch 1. Sc 4, inc, sc 4, [sc 4, inc] 3 times, sc 4, [sc 4, inc] 2 times. Join. (44 sts)
Rnd 7: Ch 1. Sc 5, inc, sc 4, [sc 5, inc] 3 times, sc 4, [sc 5, inc] 2 times. Join. (50 sts)
Rnd 8: Ch 1. Sc 6, inc, sc 4, [sc 6, inc] 3 times, sc 4, [sc 6, inc] 2 times. Join. (56 sts)
Each curved end now has 24 sts and each straight section has 4 sts: 24 + 24 + 4 + 4 = 56. Place marker A in st 24 and marker B in st 52. These are the centers of the two curved ends, and they split the round into two halves of 28 sts. Move both markers up as you go.
Rnd 9 (ridge): Ch 1. Sc in the BLO of each st around. Join. (56 sts) The unused front loops form the ridge between base and side.
Rnds 10–11: Ch 1. Sc in each st around. Join. (56 sts)
Join the tulip color at the end of Rnd 11 and carry it along.
Rnd 12 (WS, tulip round): Ch 1 and turn. You are now working with the WS facing you, in the opposite direction. Work over the unused color as you go so it stays hidden inside the stitches.
[Sc 2, bobble in tulip color, sc 1] 14 times. Join. (56 sts, 14 bobbles)
Change to the tulip color on the last yo of the st before each bobble, and back to the main color on the last yo of the bobble.
Check your markers: marker B should be the 5th st of this round and marker A the 33rd. Each one sits exactly halfway between two bobbles, so each half of the basket has 7 tulips. Cut the tulip color.
Rnd 13: Ch 1 and turn so the RS faces you again. Sc in each st around. Join. (56 sts) The bobbles now stand out on the outside.
Rnds 14–18: Ch 1. Sc in each st around. Join. (56 sts)
Fasten off and leave a 12 in (30.5 cm) tail. Keep markers A and B in place.
Straps
Use the main color.
Connector strap (make 4):
- Row 1: Ch 13. Sc in the 2nd ch from the hook and in each ch across. (12 sts)
- Row 2: Ch 1, turn. Sc in each st across. (12 sts)
Fasten off and leave a 10 in (25.4 cm) tail. Each strap measures 4 in x 0.6 in (10.2 cm x 1.5 cm).
Hanger strap (make 2):
- Row 1: Ch 19. Sc in the 2nd ch from the hook and in each ch across. (18 sts)
- Row 2: Ch 1, turn. Sc in each st across. (18 sts)
Fasten off and leave a 10 in (25.4 cm) tail. Each strap measures 6 in x 0.6 in (15.2 cm x 1.5 cm).
Make All Pieces
Main color: 3 baskets, 4 connector straps (C1–C4) and 2 hanger straps (H1, H2)
Tulip color: 42 bobbles in total (14 per basket)
Leaf color: 42 stems and 84 leaves, embroidered after blocking
Layout:
            [ RING ]
          H1        H2
   [ A ]  BASKET 1 (top)    [ B ]
          C1        C2
   [ A ]  BASKET 2 (middle) [ B ]
          C3        C4
   [ A ]  BASKET 3 (bottom) [ B ]
The left-hand straps attach at marker A and the right-hand straps attach at marker B.
Joining
Sew the straps with the main color in a tapestry needle. All straps go on the outside of the baskets, centered over marker A or marker B.
Stitch-to-stitch logic: A strap is 0.6 in (1.5 cm) wide, which is about 2 stitch columns. Center it over the marker stitch so it covers that stitch and half a stitch on each side. The nearest bobbles are 2 sts away, so the tulips stay uncovered. One inch (2.5 cm) of strap covers 3 sc rounds.
Upper end of each connector strap: Lay the last 1 in (2.5 cm) of the strap over Rnds 9–11 of the basket above. The strap’s end should sit on top of the ridge. The rest of the strap hangs down below the base.
Lower end of each connector strap: Lay the last 1 in (2.5 cm) over Rnds 16–18 of the basket below. The strap’s end should line up with the top of Rnd 18.
Sew all around the edges of each overlap with whipstitch. Then backstitch an X across the overlap for strength. Pull each stitch until it’s snug but doesn’t pucker. If the overlap ripples, your stitches are too tight. Each overlap carries weight, so go around it twice.
Hanger straps: Sew the lower 1 in (2.5 cm) of H1 and H2 over Rnds 16–18 of Basket 1 at markers A and B. Thread the upper ends through the wooden ring from front to back. Fold 1 in (2.5 cm) back on itself and sew it down. Bring the two straps together at the bottom of the ring. Wrap the main color tightly around both straps 12 times just below the ring, then secure it with the needle.
Size checkpoint: Hang the piece. The visible gap between baskets should be 2 in (5.1 cm), and the hanger straps should show about 4 in (10.2 cm). The total length is 21.5 in (54.6 cm).
Border
The border is the rim round on each basket. Work it now, after joining, so it covers the strap ends that finish at the top of Rnd 18.
Border gauge: 1 rev sc per sc, 3 sts per 1 in (2.5 cm), adding 0.25 in (0.6 cm) of height.
Rnd 19: With the RS facing, join the main color at marker B. Ch 1. Rev sc in each st around, working through both the basket and the strap where they overlap. Join.
- Front half (from marker B to marker A): 28 rev sc
- Back half (from marker A back to marker B): 28 rev sc
- Total: 56 rev sc
Fasten off and weave in the ends.
Why the math works: The rim has exactly as many stitches as Rnd 18, worked 1-to-1, so it neither flares nor pulls in. The markers split 56 into two equal halves of 28, which keeps the rim level and the straps directly opposite each other. Nothing is added at the straps because they sit on top of existing stitches.
Final Blocking
- Mist each basket lightly with water, or steam it gently from 1 in (2.5 cm) away. Don’t press the bobbles.
- Put a toilet roll inside each basket, or a rolled towel 4.5 in (11.4 cm) across.
- Smooth the base flat and straighten the sides so the ridge runs level all the way around.
- Push each bobble outward from the inside so the tulips stand up.
- Lay the straps flat. Hang the piece, or lay it down at full length, and let it dry completely.
- Embroidery: With the leaf color, make one straight stitch for each stem, running from the bottom of Rnd 10 to the base of the bobble. Then add one lazy-daisy leaf on each side of the stem’s base, angled up and out, each about 0.3 in (0.8 cm) long.
Final Quality-Control Checklist
- Each base measures 6.25 in x 5 in (15.9 cm x 12.7 cm) and sits flat.
- Every round has 56 sts from Rnd 8 to Rnd 19.
- There are 14 tulips per basket, 7 in each half, with even spacing.
- All bobbles stand out on the outside.
- Each strap is centered on its marker, with 1 in (2.5 cm) overlaps.
- The gaps between baskets are an even 2 in (5.1 cm).
- The rim covers all strap ends.
- The baskets hang level, without tilting forward.
- All ends are woven in at least 2 in (5.1 cm).
Troubleshooting
- The base cups upward: Your tension is too tight. Go up a hook size, or check that each increase is really 2 sc in one stitch.
- The base ruffles: Your tension is too loose. Go down a hook size and count the stitches after every round.
- The bobbles pop inside: Rnd 12 was worked with the RS facing. Rip back and remember to turn before the round.
- Carried yarn shows between bobbles: Work over the strand more snugly, and keep the strand loose enough that it doesn’t pull.
- A basket tilts: One strap sits off its marker. Recount the 28-stitch halves and sew it again.
- The rim waves: You worked more than 1 rev sc into a stitch. Work exactly 56.
- The straps stretch: Sew a second X through each overlap, or use a cotton-rich yarn.
Care
Hand wash in cool water, press out the water in a towel, and reshape the baskets around a roll to dry flat. Don’t tumble dry.
Final Notes
Everything depends on a few measurements, so check them as you go. Gauge is 12 sc per 4 in (10.2 cm). The 56-stitch base comes out at 6.25 in x 5 in (15.9 cm x 12.7 cm). The sides reach 3.25 in (8.3 cm) before the rim, and the 0.25 in (0.6 cm) rim brings each basket to 3.5 in (8.9 cm). With 2 in (5.1 cm) gaps between baskets, a 4 in (10.2 cm) hanger section and the 3 in (7.6 cm) ring, the finished length is 21.5 in (54.6 cm). If you check each of these, the tulips stay evenly spaced, the straps line up and the baskets hang straight.
Happy crocheting!