

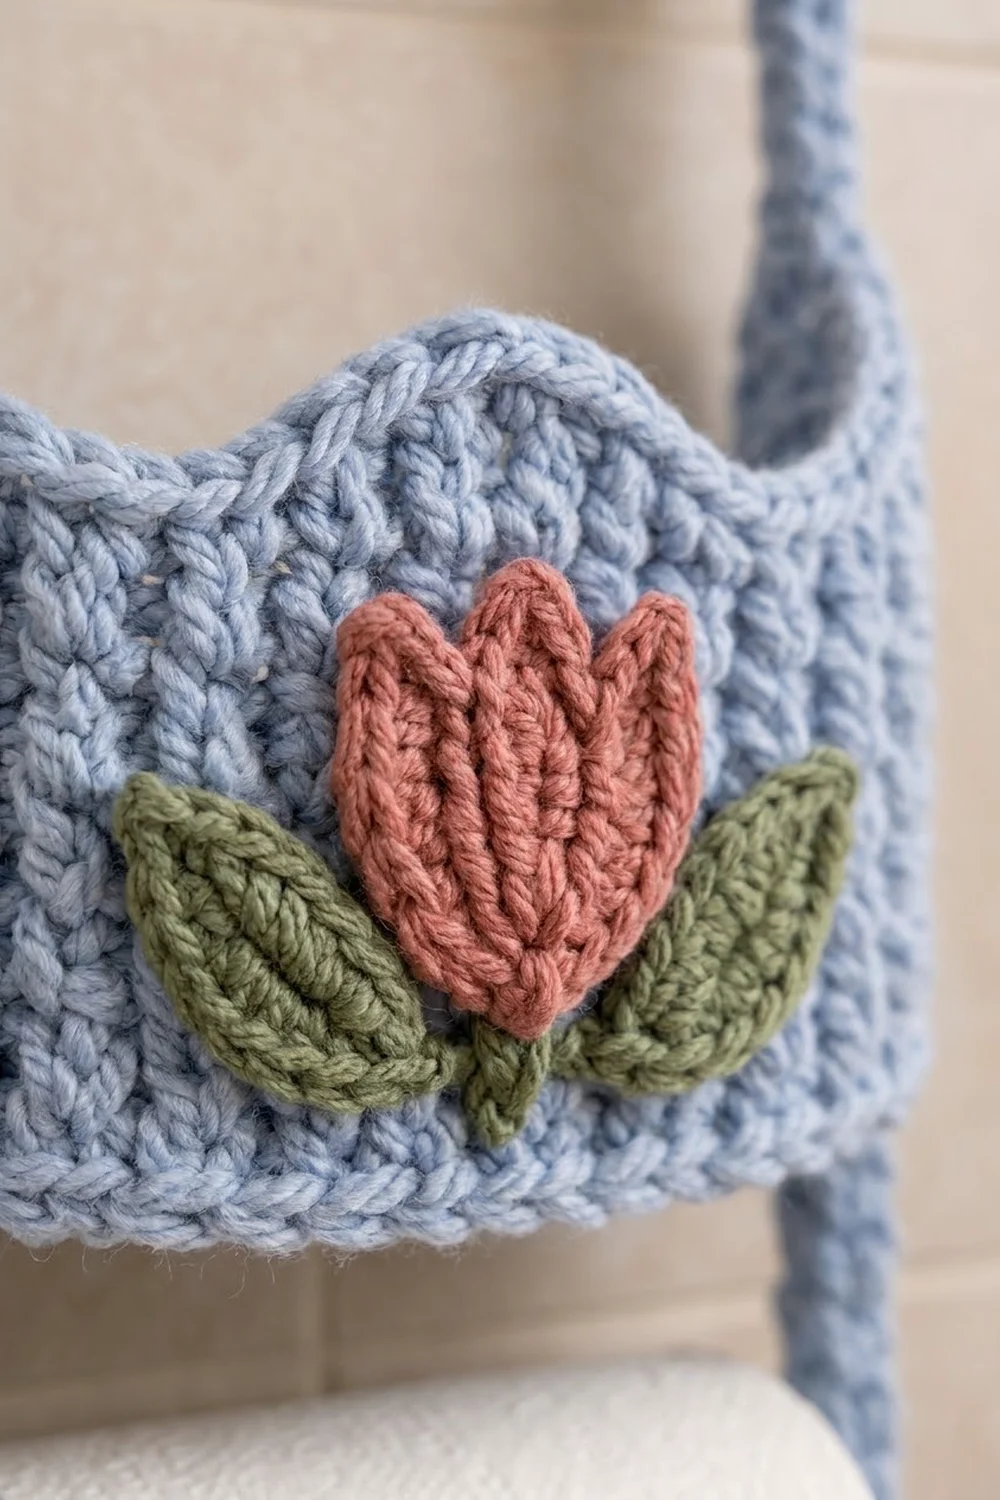
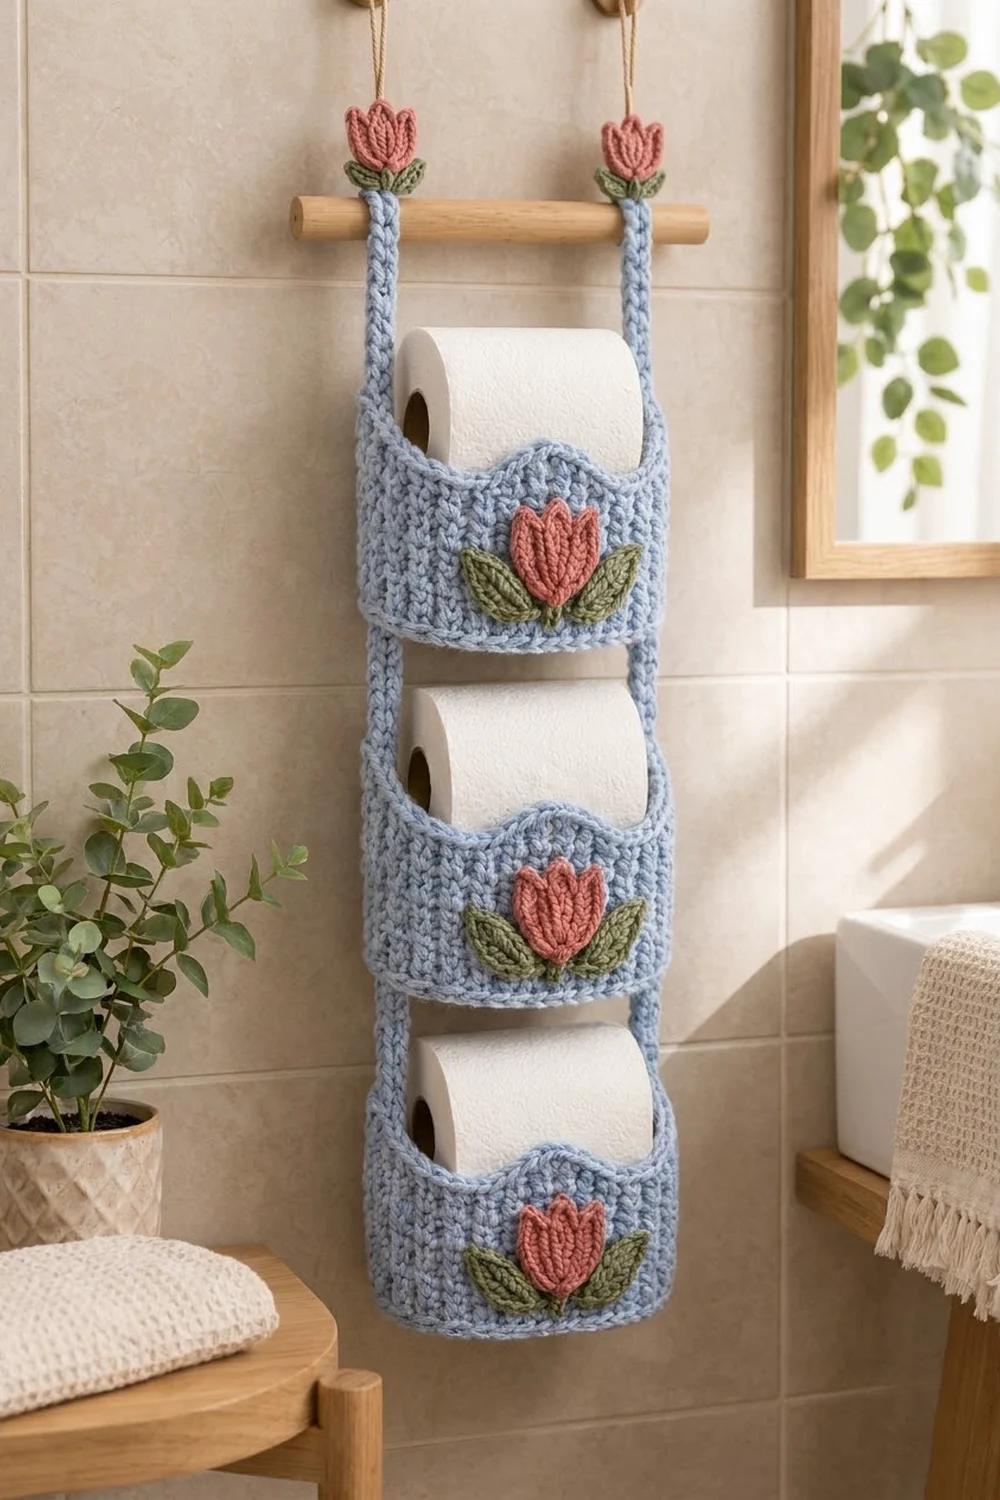
This hanging toilet paper holder stacks three soft pockets on a pair of slim straps, all hung from a short wooden dowel. Each pocket holds one standard roll on its side, and a dusty-rose tulip with sage leaves sits on the front of each one.
The colors are soft and cottage-style: periwinkle blue for the pockets and straps, dusty rose for the tulips, and sage green for the leaves. The pockets are worked in waistcoat stitch. It looks knitted, but it is just single crochet worked through the center of each stitch. Each front rim rises into a gentle arch, and a corded reverse single crochet edge finishes it.
The pattern uses US crochet terms. The finished holder is about 7 in (17.8 cm) wide and about 16 in (40.6 cm) long from the top of the dowel to the bottom of the lowest pocket, not counting the tulip toppers.
Each pocket starts as an oval base. You work the sides in the round and shape a short arch on the front. Then you sew on the appliqués, stitch the pockets to two flat straps, add the rim border, and hang the straps over the dowel.
Finished Size and Construction
- Finished size: about 7 in (17.8 cm) wide × 16 in (40.6 cm) long below the dowel
- Skill level: Easy to intermediate
- Terminology: US crochet terms
- Yarn weight: Bulky (#5)
- Hook: 6.0 mm (US J-10) for pockets and straps; 5.5 mm (US I-9) for appliqués
- Number of pieces: 3 pockets, 2 straps, 3 tulips, 6 leaves, 2 mini tulips, 4 mini leaves
- Layout: 1 column of 3 pockets, connected by 2 straps
- Pocket size: base 7 in × 4.75 in (17.8 × 12.1 cm); 3.5 in (8.9 cm) tall at the sides, 4.5 in (11.4 cm) at the arch peak
- Pocket size before border: 3 in (7.6 cm) tall at the sides, 4 in (10.2 cm) at the peak
- Border depth: 0.5 in (1.3 cm), 2 rounds
Materials
Choose a smooth bulky yarn in cotton, a cotton blend, or soft acrylic. Cotton holds the pocket shape best in a humid bathroom. The quantities below assume about 120 m per 100 g.
- Periwinkle blue: 180 g (about 216 m) for pockets and straps
- Dusty rose: 25 g (about 30 m) for tulips and mini tulips
- Sage green: 25 g (about 30 m) for leaves and mini leaves
All quantities include a margin of about 15–20% for your gauge check and sewing tails.
Tools:
- 6.0 mm (US J-10) and 5.5 mm (US I-9) crochet hooks
- Wooden dowel, 0.75 in (1.9 cm) diameter, 12 in (30.5 cm) long
- Optional hanging cord, 20 in (50.8 cm)
- Tapestry needle
- Locking stitch markers (at least 4)
- Scissors and measuring tape
- Rust-proof pins for blocking
Abbreviations (US Terms)
- ch – chain
- sl st – slip stitch
- sc – single crochet
- hdc – half double crochet
- dc – double crochet
- tr – treble crochet
- sc2tog – single crochet 2 together
- inc – 2 sc in the same stitch
- BLO – back loop only
- rev sc – reverse single crochet (crab stitch), worked left to right
- st(s) – stitch(es)
- RS / WS – right side / wrong side
Waistcoat stitch (wsc): Insert the hook through the center of the “V” of the stitch below, between its two vertical legs, not under the top loops. Yarn over, pull up a loop, yarn over, pull through both loops. Each wsc counts as 1 sc.
Picot (p): Ch 2, sl st in 2nd ch from hook. This makes the pointed petal tips.
Gauge and Checkpoints
Gauge: 11 sts and 12 rounds = 4 in (10.2 cm) in waistcoat stitch worked in the round with the 6.0 mm hook. Plain sc base rounds work to the same gauge.
Make one complete pocket before starting the others. That pocket is your real gauge swatch.
Checkpoints:
- After Rnd 7 (base): about 7 in × 4.75 in (17.8 × 12.1 cm), lying flat
- After Rnd 16: sides 3 in (7.6 cm) tall from the base fold
- After arch Row 3: 4 in (10.2 cm) tall at the center front
- After the border: 3.5 in (8.9 cm) at the sides, 4.5 in (11.4 cm) at the peak
If the base is longer than 7 in (17.8 cm), go down a hook size. If it is shorter, or a roll won’t slide in easily, go up a hook size.
Pocket (Make 3)
Use blue and the 6.0 mm hook. Work in a continuous spiral. Mark the first stitch of each round and move the marker up as you go.
Base
Ch 9.
Rnd 1: 3 sc in 2nd ch from hook, sc in next 6 ch, 3 sc in last ch; working along the opposite side of the chain, sc in next 6 ch. (18 sts: 3 per end, 6 per side)
Rnd 2: [Inc in each of next 3 sts, sc in next 6] twice. (24 sts)
Rnd 3: [(Sc in next st, inc) 3 times, sc in next 6] twice. (30 sts)
Rnd 4: [(Sc in next 2, inc) 3 times, sc in next 6] twice. (36 sts)
Rnd 5: [(Sc in next 3, inc) 3 times, sc in next 6] twice. (42 sts)
Rnd 6: [(Sc in next 4, inc) 3 times, sc in next 6] twice. (48 sts)
Rnd 7: [(Sc in next 5, inc) 3 times, sc in next 6] twice. (54 sts: 21 per curved end, 6 per straight side)
Checkpoint: the base lies flat and measures about 7 in × 4.75 in (17.8 × 12.1 cm).
Sides
Rnd 8 (turning round): Sc BLO in each st around. (54 sts = 54 worked 1-per-stitch + 0 added)
This round makes a crisp fold line at the base.
Rnds 9–16: Wsc in each st around. (54 sts each round)
Sl st in the next st to smooth the step, then fasten off. Checkpoint: the sides measure 3 in (7.6 cm) from the fold.
Front Arch
Flatten the pocket so one long side faces you. This is the front. The two side folds are where the straps will go. Place marker A and marker B on the top round so that 22 sts, counting both marked sts, sit centered on the front (11 sts on each side of the center point).
Work the arch in plain sc rows.
Row 1 (RS): Join blue with a standing sc in the st at marker A, sc in next 21 sts, ending at marker B. Turn. (22 sts)
Row 2 (WS): Ch 1, sc2tog, sc in next 18 sts, sc2tog. Turn. (20 sts)
Row 3 (RS): Ch 1, sc2tog, sc in next 16 sts, sc2tog. (18 sts)
Fasten off. The arch adds 1 in (2.5 cm) at the center, so the peak measures 4 in (10.2 cm). The 32 sts outside the arch stay as the lower rim.
Tulip Appliqué (Make 3)
Use rose and the 5.5 mm hook. Work in rows from the base up.
Row 1: Ch 2, 3 sc in 2nd ch from hook. Turn. (3 sts)
Row 2: Ch 1, inc, sc in next st, inc. Turn. (5 sts)
Row 3: Ch 1, inc, sc in next 3 sts, inc. Turn. (7 sts)
Row 4: Ch 1, sc in each st across. Turn. (7 sts)
Row 5 (petals): Ch 1, sc in first st, (dc, p, dc) in next st, sl st in next st, (dc, tr, p, tr, dc) in next st, sl st in next st, (dc, p, dc) in next st, sc in last st.
This row uses all 7 sts of Row 4. The two sl sts form the dips between the petals, and the tr group makes the taller center petal. Fasten off and leave a 12 in (30.5 cm) tail.
Petal lines: With rose yarn, surface sl st from the center of Row 1 straight up to each of the two dips. These lines separate the three petals.
The tulip measures about 2.5 in (6.4 cm) wide and 2.25 in (5.7 cm) tall.
Leaf (Make 6)
Use green and the 5.5 mm hook.
Ch 8. Sl st in 2nd ch from hook, sc in next ch, hdc in next ch, dc in next 2 ch, hdc in next ch, sc in last ch, then 2 more sc in that same last ch (leaf base). Working along the opposite side of the chain: hdc in next ch, dc in next 2 ch, hdc in next ch, sc in next ch, sl st in next ch. Ch 2 and sl st in the same ch to form the tip. (15 sts plus tip)
Fasten off and leave a tail. Surface sl st a vein from base to tip in green. Each leaf is about 2.5 in × 1 in (6.4 × 2.5 cm).
Mini Tulip (Make 2) and Mini Leaf (Make 4)
Mini tulip: Work Tulip Rows 1–2. (5 sts) Then work this petal row: ch 1, (dc, p, dc) in first st, sl st in next st, (dc, tr, p, tr, dc) in next st, sl st in next st, (dc, p, dc) in last st. Fasten off and leave a tail. Size: about 1.75 in × 1.5 in (4.4 × 3.8 cm).
Mini leaf: Ch 5. Sl st in 2nd ch from hook, sc in next ch, hdc in next ch, sc in last ch, then 2 more sc in that same ch. Working along the opposite side of the chain: hdc in next ch, sc in next ch, sl st in next ch. Ch 2 and sl st in the same ch. (9 sts plus tip) Size: about 1.5 in × 0.75 in (3.8 × 1.9 cm).
Strap (Make 2)
Use blue and the 6.0 mm hook.
Ch 55.
Row 1: Sc in 2nd ch from hook and in each ch across. Turn. (54 sts)
Row 2: Ch 1, sc in each st across. (54 sts)
Fasten off. The strap measures about 19.6 in (49.8 cm) long and 0.7 in (1.8 cm) wide. Mark the stitch at one end as stitch 1. That end is the top.
Attach the Appliqués
Do this on each pocket before joining.
- Place a tulip on the center front, with its Row 1 point 0.75 in (1.9 cm) above the base fold.
- Tuck the base ends of 2 leaves under the tulip so they angle up and outward at about 45 degrees.
- Pin the pieces. Whipstitch around the leaves and the tulip through the front layer only, keeping one hand inside the pocket.
- Sew each mini tulip over the base ends of 2 mini leaves the same way. This makes 2 toppers.
Make All Pieces
Blue: 3 pockets, 2 straps
Rose: 3 tulips, 2 mini tulips
Green: 6 leaves, 4 mini leaves
Layout (front view):
[mini tulip]                 [mini tulip]
=========== dowel 12 in ==============
   strap |                     | strap
         |  drop: sts 12-16    |
         [   Pocket 1 + tulip  ]  sts 17-26
         |  gap:  sts 27-30    |
         [   Pocket 2 + tulip  ]  sts 31-40
         |  gap:  sts 41-44    |
         [   Pocket 3 + tulip  ]  sts 45-54
Strap stitch map (54 sts): dowel loop 11 + drop 5 + pocket 10 + gap 4 + pocket 10 + gap 4 + pocket 10 = 54.
The loop takes 4 in (10.2 cm), the drop is about 1.8 in (4.6 cm), and each gap is about 1.5 in (3.8 cm).
Joining
Sew each strap to a pocket’s side fold, centered on the curved end, from the base fold up to the rim.
Stitch-to-stitch logic: Each pocket uses 10 strap sts. The lowest 9 match the 9 side rounds (Rnds 8–16) one to one. The top strap st of each block gets tacked to the border later.
- Lay a strap vertically against the outside of one side fold of Pocket 3.
- Whipstitch strap sts 46–54 to Rnds 16 down to 8, one strap st per round, so st 54 sits at the base fold.
- Repeat on the other side with the second strap.
- Sew Pocket 2 to sts 32–40 and Pocket 1 to sts 18–26 the same way. Leave sts 45, 31, and 17 free for now.
- Leave the gap sts (27–30 and 41–44) and the drop sts (12–16) unsewn.
- Wrap strap sts 1–11 over the dowel from front to back. Sew sts 1–3 to the back of the strap just below the dowel. Sew a topper to the front of each loop so its petals stand above the dowel.
Tension: Sew firmly but don’t pull. The strap should lie flat and the pocket side shouldn’t pucker. If the strap gathers, take slightly wider bites into the pocket.
Size checkpoint: From the top of strap st 17 down to the base of Pocket 3, the column should measure about 14 in (35.6 cm). Each gap should measure about 1.5 in (3.8 cm).
Border
Work the border on each pocket rim after the straps are attached. The straps lie on the outside and don’t get in the way.
Border gauge: 11 sc = 4 in (10.2 cm) along the rim with the 6.0 mm hook. Work 1 sc in each stitch and 1 sc in each row-end of the arch.
Rnd 1: With RS facing, join blue with a standing sc in the first st of arch Row 3. Sc in each of the remaining 17 sts of Row 3 (18 sts on the arch top). Sc in each of the 3 row-ends down the left side of the arch (3). Sc in each of the 32 lower rim sts around the back (32). Sc in each of the 3 row-ends up the right side of the arch (3). Sl st to the first sc. (56 sts = 18 + 3 + 32 + 3)
This is a trim round: 50 sts are worked 1-per-existing-stitch (18 + 32), and 6 sts are added into row-ends.
Rnd 2: Ch 1, rev sc in each st around. Sl st to the first st and fasten off. (56 sts)
Why the math works: An sc row-end is about as tall as one sc is wide, so 1 sc per row-end keeps the sides of the arch flat. The 32 rim sts and 18 arch sts each get exactly 1 sc, so the rim doesn’t ruffle or pull in. The border adds 0.5 in (1.3 cm), which brings the sides to 3.5 in (8.9 cm) and the peak to 4.5 in (11.4 cm).
Last, tack strap sts 17, 31, and 45 to the outside of each pocket’s border.
Final Blocking
- Lightly mist each pocket, or hold a steam iron 1 in (2.5 cm) above it without touching the yarn.
- Slide a roll or a rolled towel into each pocket to set the oval shape.
- Smooth each arch so the peak is centered and both step-downs match.
- Pin the tulip petals and leaf tips so they lie flat and come to a point.
- Let everything dry completely before hanging.
Final Quality-Control Checklist
- Each base measures about 7 in × 4.75 in (17.8 × 12.1 cm).
- Each pocket has 54 sts in every side round and 56 sts in each border round.
- The sides measure 3.5 in (8.9 cm) and the peaks measure 4.5 in (11.4 cm).
- Each tulip is centered, 0.75 in (1.9 cm) above the base fold.
- Each 10-st strap block is attached: 9 sts to the sides and 1 st to the border.
- All three pockets hang level.
Troubleshooting
Base cups up: Your sc is too tight. Go up a hook size for Rnds 1–7.
Base ruffles: Check that each round has exactly 6 increases. If it does, go down a hook size.
Roll won’t fit: The sides are too tight. Work Rnds 9–16 with a 6.5 mm hook.
Arch looks lopsided: Recount so the 22 arch sts, including both markers, are centered on the front.
Rim flares: Your rev sc is loose. Work Rnd 2 with the 5.5 mm hook.
Pockets tilt: One strap is sewn higher than the other. Realign it stitch by stitch using the strap stitch map.
Care
Remove the dowel, hand wash in cool water, and lay flat to dry. Reshape each pocket around a roll while it dries.
Final Notes
Here is the measurement chain. A 7 in × 4.75 in (17.8 × 12.1 cm) base grows into 3 in (7.6 cm) sides. The arch raises the center to 4 in (10.2 cm). The 2-round border brings the sides to 3.5 in (8.9 cm) and the peak to 4.5 in (11.4 cm). Two 54-stitch straps, each 19.6 in (49.8 cm) long, link the three pockets into a 16 in (40.6 cm) column below the dowel. If your first pocket matches these numbers, the other two will too.
Happy crocheting!